Here is the first of many, many recipes included with the brand spankin’ new Business in a Box Kit, exclusively from Bramble Berry. With the kit, you get this Ombre Soap advanced technique recipe along with another (soon to be revealed) technique option and a Business in a Box quick start guide all in a handy PDF. Read even more about all of the contents in the Business in a Box Kit here. Note that this recipe below uses the Quick Mix oils but this technique will work for any slow-moving recipe.
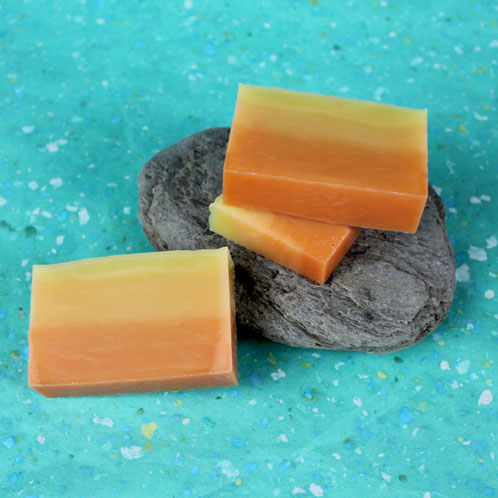
This soapmaking technique is for a super on-trend ombre look. Try out different color schemes with other LabColors from your Business in a Box kit for varied styles. Match colors to fragrance or essential oils, or create multiple colored soaps for a rainbow-esque display. Simply colored soap, when strategically layered, creates a light to dark fade that is sure to impress your customers. A seamless transition between colors will show off your expert sense of color and design.

RECIPE:
33 oz Lots of Lather Quick Mix
11 oz Distilled Water
4.7 oz Sodium Hydroxide
Diluted Canary LabColor
Diluted Orange Labcolor
2 oz Energy Fragrance Oil
If you’d love to try out this tutorial but aren’t ready for the full Business in a Box kit, click here to add ingredients for just this recipe to your Bramble Berry shopping cart!
If you have never made cold process soap before, I highly recommend you get a couple of basic recipes under your belt. Check out this (free!) 4-part series on cold process soap making, especially the episode on lye safety. Bramble Berry carries quite a few books on the topic as well, including this downloadable book on making cold process soap. The Business in a Box kit comes with four videos on soapmaking and a grand total of seven books and e-books, including four books on soapmaking and three on business, for your reading pleasure.
SAFETY FIRST: Suit up for safe handling practices! Long sleeves, gloves, and eye protection are necessary when making cold process soap. Eye glasses are not sufficient protection. Be sure that kids, pets, and other tripping/distraction hazards are out of the house or don’t have access to your soaping space. Always soap in a well-ventilated area.
ONE: Slowly and carefully add the lye to the water and stir until clear. Set aside to cool.
TWO: Heat the entire container of Lots of Lather Quick Mix and give it a good stir. Measure the appropriate amount of oil into a heat-safe container.
NOTE: Reheat the entire container of Lots of Later Quick Mix before each use. Like with Palm Oil, separation can occur with the different ingredients, causing unequal amounts to measure out if the oils aren’t reheated and mixed properly.
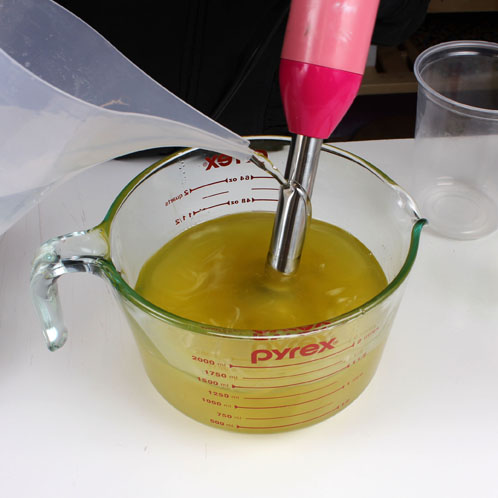
THREE: When the lye water has cooled to 130 degrees or below (and is within 10 degrees of the oils), add the lye water to the oils and mix with a stick blender until a light trace is achieved. To eliminate air bubbles from being mixed into the soap batter, pour the lye down the shaft of the stick blender and burp the stick blender by tapping it on the bottom of your container before turning it on.
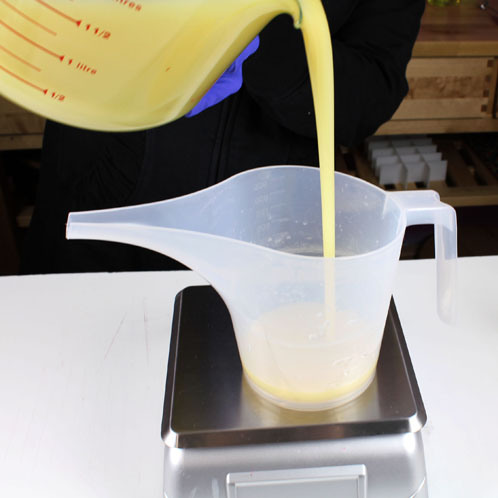
FOUR: Divide the soap batter into 4 separate containers (one for each layer) by weighing out 12.2 oz of soap batter into each container. You’ll want to weigh out the soap for precision’s sake to make sure the soap batter is equally distributed between each layer to achieve a gradual and seamless gradient of color through your finished soap.
FIVE: Color to each portion of soap batter as follows: 1 teaspoon of diluted Orange LabColor to portion one; 3/4 teaspoon of diluted Orange LabColor and 1/2 teaspoon diluted Canary LabColor to portion two; 1/4 teaspoon diluted Orange LabColor and 3/4 teaspoon diluted Canary LabColor to portion three; 1 teaspoon diluted Canary LabColor to portion four. Stir in the LabColors using a spoon or whisk. Keep the soap lined up in this order from now until you pour it into the mold.
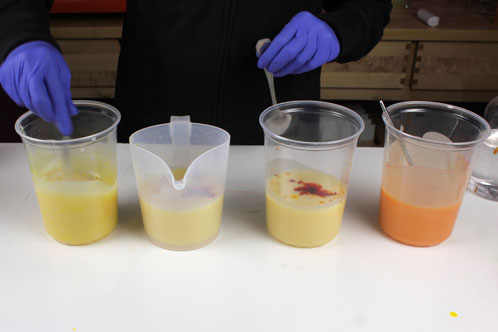
SIX: Add 0.5 oz of Energy Fragrance Oil to each portion. Mix well using a spoon or whisk.
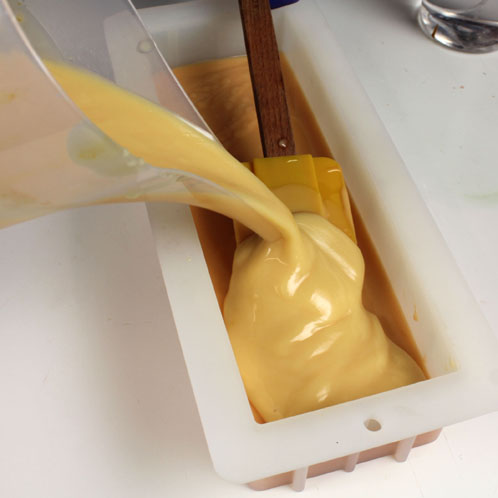
SEVEN: To create the ombre layers, start with the darkest orange color (portion one). Bring the first layer of soap to a thick trace with the stick blender and pour into the mold. Using a spatula, distribute the soap to create a smooth, level surface for the next layer. Bring the next lightest color (portion two) to a thick trace, and pour into the mold over a spatula to maintain straight, even layers. Repeat with portions three and four, always bringing to a thick trace before pouring and pouring over a spatula to maintain the integrity of the previous layer.
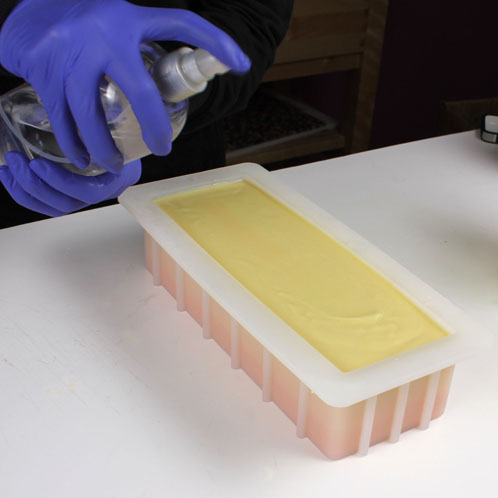
EIGHT: Spray the entire top with 91% Isopropyl Alcohol to help prevent soda ash. Cover and insulate for 24 hours and unmold after 3-4 days. Allow to cure for 4-6 weeks.



I love this design! I want to make this for my mother, but she wants a violet fragrance (and yours accelerates trace). If I use a slow-moving recipe and wait until the last second to add the fragrance, do you think I could use acceleration to my advantage (since this requires a thick trace anyway)?
Good morning, Nick!
Your mom is just going to love this soap! While the Violet Fragrance Oil does move quite fast, if you waited until the last possible moment to add it to each layer right before you pour, you can probably make it work. I would also suggest trying it out in a small test batch first so that you know exactly how it moves, and that will give you an even better idea of how much time you’ll have. I hope this helps! Be sure to keep us updated on how it turns out. =)
Happy Soaping!
-Becky with Bramble Berry
I just finished insulating my Violet Ombre! I used a recipe high in Olive & Coconut Oil, with some Avocado Oil, Castor Oil, Rice Bran Oil, and Shea Butter (and a little Silk Powder), kept the temps around 90 degrees, and mixed the colors in (I used Purple Passion LC and Easter Purple LC, for a subtle gradient) at incredibly light trace. It worked amazingly! The top layer got a little thick on me, but nothing I couldn’t handle. Since it was really thick but workable, I textured the top a little and sprinkled some Iridescent Glitter on top. I have a small cardboard box that I use for insulation, and I covered that with a couple towels to force it to gel (it helps that my kitchen is around 75 normally). It looks and smells amazing, and I know my mom is going to love it!
Hi Nick!
OMG! That sounds absolutely amazing. If you were able to get any pictures of this gorgeous soap, we would love for you to share them with us on Bramble Berry’s Facebook page. =)
-Becky with Bramble Berry
https://www.facebook.com/BrambleBerry
I love this idea! I may try it with BB’s Cranberry Pomegranate fragrance, and do a red to pink fade. Do natural colorants, like madder, work for this, or do I need the LabColor to make it work?
Hi Carly,
That’s a great idea! I can’t wait to see how it turns out. I’d suggest splitting your batch into three or four different layers (depending on how many you’d want) and coloring each one with a different amount of Madder Root. Typically, we suggest infusing your botanical powders in an oil beforehand, for a speckle-free look, but you can also add in right into your soap.
If you more natural colorant ideas, check out the Make it Monday: #Natural Colorants album on Facebook:
https://www.facebook.com/media/set/?set=a.10152063260035504.897237.100412115503&type=1
Madder Root: https://www.brambleberry.com/Madder-Root-P4940.aspx
If you have any other questions, let me know!
-Kirsten with Bramble Berry
I haven’t used lab colors yet. What do you mean diluted lab colors? Do I not use them full strength?
They are great for melt and pour, lotions and cold process and do need to be diluted prior to using them. If you are making cold process pick LabColors that are specifically for Cold Process. Next, check out the Quick Start Guide then read through our three fabulous blog posts on how to successfully use the LabColors: Diluting LabColors, LabColor Usage Rates, LabColors and Gel Phase
https://www.brambleberry.com/Labcolor-Quickstart-Guide-W29.aspx
http://www.soapqueen.com/bath-and-body-tutorials/tips-and-tricks/diluting-bramble-berry-labcolors/
http://www.soapqueen.com/bath-and-body-tutorials/cold-process-soap/labcolor-usage-rates/
http://www.soapqueen.com/bath-and-body-tutorials/tips-and-tricks/labcolors-and-gel-phase-are-friends/
What beautiful ombre layers! It does look like a sunset. And I love the Energy FO – I made an M&P soap with that FO a few years ago, but I called it “Sunrise.” It seems to be the perfect scent for a sunrise/sunset theme!
I’m so glad you like it, Jenny! Ombre layers are so much fun to do, have you seen these blog posts on ombre-type layers?
Dipped Ombre Candles: http://www.soapqueen.com/bath-and-body-tutorials/home-crafts/dipped-homebre-candles/
Ombre Rebatch Layers: http://www.soapqueen.com/bath-and-body-tutorials/cold-process-soap/ombre-rebatch-layers/
Green Machine (Melt and Pour Tutorial): http://www.soapqueen.com/bath-and-body-tutorials/melt-and-pour-soap/green-machine-melt-and-pour-tutorial/
Ombre Heart Soaps: http://www.soapqueen.com/bath-and-body-tutorials/melt-and-pour-soap/soapylove-tutorial-ombre-heart-soaps-2/
-Becky with Bramble Berry