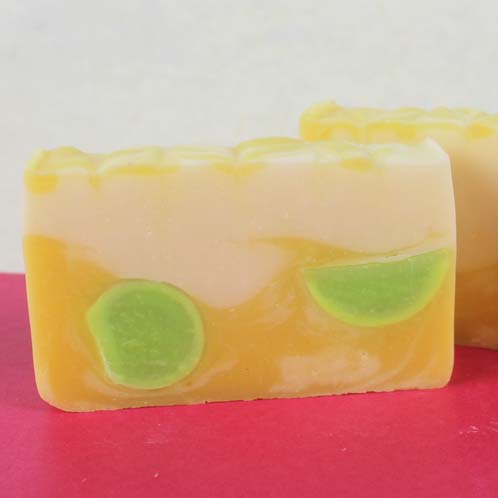
Summer is in full swing, and I’m loving anything bright and refreshing right now! Bramble Berry’s brand spankin’ new Crisp Anjou Pear Fragrance Oil really awakens the senses and the colors of this soap are perfect for that summery vibe. Done in two parts, I’m hopeful this project brings a smile to your face! PSST: I know something that will bring a smile to your face – our NEW silicone 5 pound log liner specially designed for the 5 pound Soap Queen log mold. It has saved us hours of lining molds in just the last month.

Buy everything you need for both parts of this project at the click of a button!
Part One/Day One: The Embeds
3.3 oz Canola Oil
0.1 oz Castor Oil
3.3 oz Coconut Oil
3.3 oz Palm Oil
1.4 oz Sodium Hydroxide (lye)
3.3 oz Distilled Water
5 ml Diluted Citrus Green LabColor
.7 ounces Crisp Anjou Pear Fragrance Oil
9 Ball Silicone Mold
Ice Sphere Mold
Other embeddable molds of your choice
If you have never made cold process soap before, I strongly suggest getting a couple of basic recipes under your belt before diving in. Check out Soap Queen TV on Cold Process if you want to get started with cold process. It’s a 4 part series that will take you through the basics (and be sure to watch the episode on Lye Safety). You need gloves, goggles, and long sleeves. Safety is the most important part of any soap recipe. If you’re a book worm, Bramble Berry also has some helpful reading on the cold process technique.
ONE: In a well ventilated area, slowly and carefully add the lye to the water (never the other way around!) and stir until the mixture is clear. Don’t breathe in any lye fumes. Set aside to cool.
TWO: Melt and combine Coconut and Palm oils. Mix in Canola and Castor Oils.
THREE: Once your lye and oils have cooled to under 120 degrees (not essential, but ideally within 10 degrees of each other), slowly and carefully add the lye water to the oils.
TIP: To prevent air bubbles when adding the lye water, pour over a spatula or down the shaft of your stick blender.
FOUR: Pulse the mixture with your stick blender until you reach trace. Add 5 ml diluted Citrus Green LabColor and stick blend until incorporated.

FIVE: Add .7 ounces of Crisp Anjou Pear Fragrance Oil and mix in well. You may have to use a whisk to keep trace from accelerating too much.
SIX: Pour the soap into your 9 Ball Silicone mold and the Ice Sphere mold. I kept the Ice Sphere mold open to create 1/2 circles.
Note: There is plenty of soap in this recipe to fill two 9 Ball Silicone molds and both halves of an Ice Sphere mold, so be sure to have some other embed molds on hand to try out!
SEVEN: Insulate the molds for 24 hours. Unmold as soon as possible, and move on to Part Two!
Part Two/Day Two: The Main Soap Overpour
18.2 oz Canola Oil
0.6 oz Castor Oil
18.2 oz Coconut Oil
18.2 oz Palm Oil
7.9 oz Sodium Hydroxide (lye)
18.2 oz Distilled Water
21 ml diluted Canary LabColor
Dispersed Titanium Dioxide (see below)
3.6 oz Crisp Anjou Pear Fragrance Oil
5# Soapqueen Log Mold
Silicone Mold Liner
Color Prep: Pre-mix the Titanium Dioxide into any light-weight oil (I used Sunflower Oil) at a rate of one teaspoon of colorant to one tablespoon oil. Use a mini-mixer. Make sure to saturate the powder in the oil before you turn on the mixer, or you’ll get a messy poof of powder! Push the Titanium Dioxide into the oil with the tip of the mixer.
Optional Prep: I laid out my embeds next to the mold to get an idea of how I want them to go into the soap.
ONE: In a well ventilated area, slowly and carefully add the lye to the water (never the other way around!) and stir until mixture is clear. Don’t breathe any of those fumes in. Set aside to cool.
TWO: Melt and combine Coconut and Palm oils. Add Canola and Castor Oils.
THREE: Once your lye and oils have cooled to under 120 degrees (but ideally within 10 degrees of each other), slowly and carefully add the lye water to the oils.
FOUR: Pulse the stick blender until a light trace is achieved. Split the batch into two uneven parts, one being about two thirds of the batch.

FIVE: To the larger of the two batches, add the pre-mixed Titanium Dioxide. Stir in with a whisk until well incorporated. Add 2.3 ounces of the Crisp Anjou Pear fragrance oil and mix (stay with the whisk!) until fully mixed in.

SIX: To the smaller batch, add 21 ml of Canary LabColor and 1.2 ounces of Crisp Anjou Pear fragrance oil and mix well, using a whisk.
SEVEN (Optional): For added interest, I decided to do a quick in-the-pot swirl! Pour about 1/3-1/2 of the white colored soap into the yellow at 4-5 different entry points (I like to hit 12:00, 3:00, 6:00 9:00 and the very center). Be sure to pour from high up so that the white soap penetrates the full volume of the yellow soap. Then, drag a spatula through the entry points to lightly swirl them – but only once! You don’t want to over swirl, causing the colors to mix and lose contrast.
EIGHT: Pour the yellow and white swirled soap into the 5# wood log mold. To help the swirl along, pour the soap starting in the center of the mold, then go back and forth across the length of the mold. Reserve a little bit of the yellow soap for later.
NINE: Add your embeds. Pushing some into the soap deeper than others will give the soap a fun, interesting look! Once all of the embeds are in the yellow soap, pour the rest of the white soap into the mold. You can either pour over a spatula to get a nice linear layer, or you can do what I did and pour without a spatula, allowing the white soap to cause wavy layers. Tap the mold on the table to eliminate air bubbles.
TEN: Pour the rest of the yellow soap on top, in thin lines going the length of the mold. Swirl the soap by dragging a chopstick or dowel (inserted into only the first 1/4” or so of soap) perpendicularly to the lines created by the yellow soap.
ELEVEN: Allow the soap to sit in the mold for 24-48 hours. Remove from mold, cut and allow to cure for 4-6 weeks. Enjoy!


What size of 9 ball mold did you use for this project? Small, medium or large. Love the soap and can’t wait to make it.
Good morning, Nancy!
For this particular project, you would using the Small 9 Ball Silicone Mold
(https://www.brambleberry.com/Small-9-Ball-Silicone-Mold-P5472.aspx). You care going to have so much making this soap and we can’t wait to here how it turns out. If you get any pictures we’d love for you to share them with us on Bramble Berry’s Facebook page. Happy Soaping!
https://www.facebook.com/BrambleBerry
-Becky with Bramble Berry
Is there any danger of the canary labcolor bleeding into the titanium oxide?
Hi Allison! We made this soap back in June and the Canary Yellow Labcolor hasn’t really bled at all! If you are worried about the yellow bleeding, you could substitute the Canary Yellow out for our Fizzy Lemonade colorant which doesn’t bleed at all. 🙂
Fizzy Lemonade Colorant: https://www.brambleberry.com/Fizzy-Lemonade-Colorant-P4965.aspx
-Becky with Bramble Berry
Hi. I wanna thank you for all your kindness and warmth. It amazes me all the time….I did make this very recipe for trying some simple swirling and it turned out really good. I have been looking for a nice slow trace recipe and think it is it! However I’ve been reading about canola oil going rancid in a few weeks and I fear about my lovely soap! Do you think canola at this ratio is safe? Thanks again. I’m a huge fan! Please forgive my english mistakes. Kisses from Brazil!
Good morning, Ane!
We are so happy to hear that this recipe turned out so well for you, if you have any pictures we’d love to see them. You can share them with us on Bramble Berry’s Facebook page:
https://www.facebook.com/BrambleBerry
With the Canola Oil, we didn’t have any problems using it in our soap, but make sure you are using freshly bought Canola Oil and not something that has been sitting around for months. The fresher your oil is the longer it will last in your soap without going rancid or causing DOS (Dreaded Orange Spots).
-Becky with Bramble Berry
Thank you very much!
Beautiful soap! Thanks so much for another great tutorial! 🙂
a great project. Wonderful instructions. Start right today
Can’t wait to see how it turns out for you!
-Becky with Bramble Berry