Ever wondered what the difference is between CPOP, HPOP, and CPHP? I’m hoping to set the record straight when it comes to various methods of using heat to aid in the soapmaking process. Or, at the very least, I’ve set out to tell my own accounts of what happens when I attempt these different methods. First, let’s take a look at CPOP.
CPOP: Cold Process Oven Process. Basically, CPOP is forcing a hot, extended gel phase with the help of an oven. Gel phase is temperature phase. After soap is in the mold, the process of saponification can cause the soap to heat up. Gel phase is beneficial to soap because it can intensify colors in the soap. Professor Kevin M. Dunn, author of Caveman Chemistry and Scientific Soapmaking, mentions that heat and gel phases also speeds along the saponification process. However, not going through gel phase doesn’t detract from soap in any way. In fact, some soapers prefer the matte look of soap that has NOT gelled, or gone through gel phase, and take special steps to prevent gel phase. The warmest part is in the center of the soap (the most insulated section), which is where gel phase starts. Insulating soap after molding will also promote gel phase, although CPOP will pretty much guarantee a full gel (as opposed to a partial gel, which can appear as a dark ring in the center of your soap). Cooling the soap as quickly as possible will deter gel phase from happening, which is why some soapers put their soap into the fridge or freezer directly after molding. To gel or not to gel is a matter of personal preference, but CPOP is all about the gel phase, baby! There’s a Q & A at the end of the tutorial for commonly asked questions.
Click here to tweet this tutorial!

Recipe:
7.5 oz Coconut Oil
7.5 oz Olive Oil
7.5 oz Palm Oil
2.5 oz Sweet Almond Oil
3.4 oz Sodium Hydroxide (Lye)
8.25 oz Distilled Water
1.5 oz Fresh Mango Fragrance Oil
1/2 teaspoon Electric Bubble Gum Pigment
1 teaspoon Hydrated Green Chrome Oxide
1 teaspoon Titanium Dioxide
2.5 oz Sunflower Oil (or any liquid oil)
1/2 teaspoon Merlot Mica
Click here to add everything you need for this project to your Bramble Berry shopping cart!
If you have never made cold process soap before, I strongly suggest getting a couple of basic recipes under your belt before starting on this advanced recipe. Check out Soap Queen TV on Cold Process if you want to get started with cold process soap making. It’s a series of FREE videos that will take you through the basics! Be sure to watch the episode on Lye Safety. Safety is the most important part of any soap recipe! If you’re a book worm, Bramble Berry also has some helpful reading on the cold process technique. There’s a downloadable book on making CP soap right here.
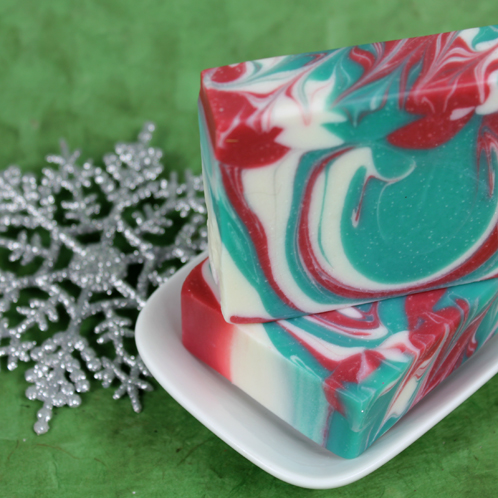
MOLD PREP: Line the 2 Pound Wood Loaf Mold with Freezer Paper, shiny side up.
COLOR PREP: Disperse the pigments as follows: 1/2 teaspoon Electric Bubble Gum in 1/2 Tablespoon liquid oil, and 1 teaspoon Hydrated Chrome Green Oxide and 1 teaspoon Titanium Dioxide in 1 Tablespoon of liquid oil each. Use a mini mixer to make quick work of the dispersing, but be sure to saturate the powdered pigments in the oil with the tip of the mixer before turning it on (or you’ll wind up with a bit of a mess!).
OVEN PREP: Adjust the racks in the oven so that there is one rack on the lowest notch, and one rack toward the center. Be sure that the central rack isn’t too close to any heating elements. Line the bottom of the oven with foil, or place an old cookie sheet on the bottom rack. Preheat the oven to 170 degrees Fahrenheit (or the lowest setting your oven allows).
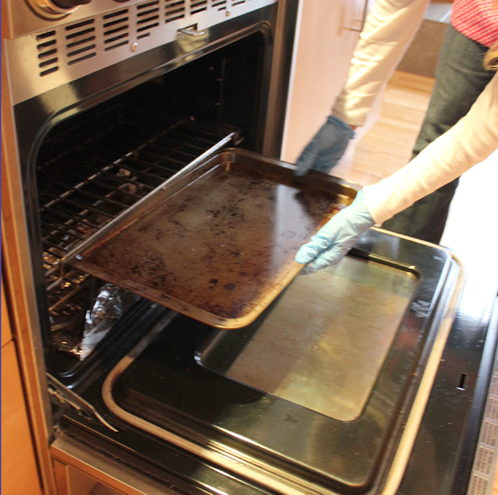
SUIT UP: Before starting this recipe, gear up in gloves, safety goggles (regular eye glasses don’t count!) and long sleeves. Make sure kids and pets are in another part of the house so there are no distractions or tripping hazards. Ensure that there is adequate ventilation in your soaping space to take any fumes away.
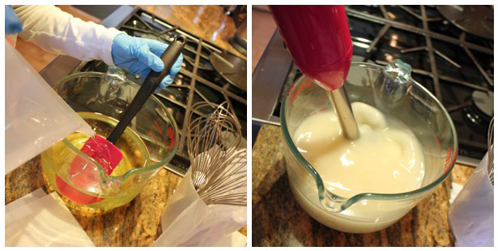
ONE: Slowly and carefully add the lye to the water. Stir until clear and set aside to cool.
TWO: Melt and combine the Coconut and Palm Oils. Add the Olive and Sweet Almond oils and mix well.
THREE: Add the lye water to the oils and stick blend until a light trace is achieved.
FOUR: Split the batch into three equal parts, about 1.5 cups each. Color one of the batches with 1/2 teaspoon Merlot Mica and 1 teaspoon of dispersed Electric Bubblegum pigment, the second batch with 2 teaspoons dispersed Hydrated Chrome Green oxide, and the third with 3 teaspoons dispersed Titanium Dioxde pigment. Mix each of the colorants in well using a whisk.
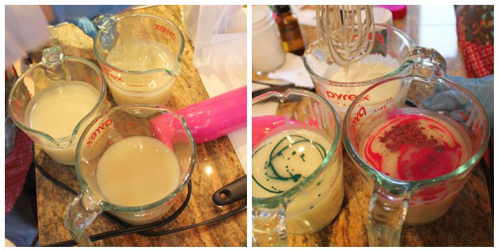
FIVE: Add 0.5 oz Fresh Mango Fragrance Oil to each batch and mix well. Ensure that the soap is at a medium trace before proceeding to the next step; if necessary, use the stick blender.
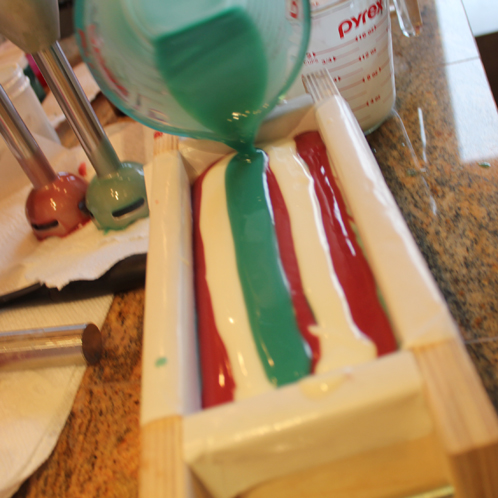
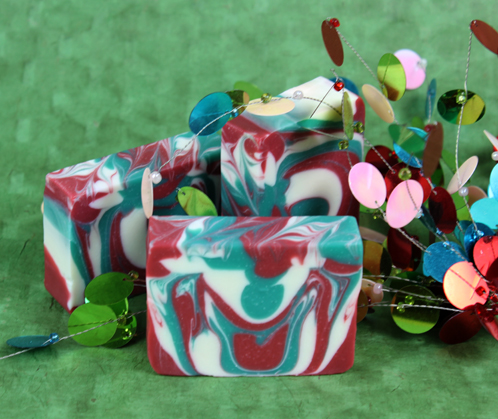
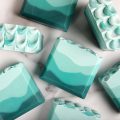
SIX: Decide on a color order – I went with Red, White, then Green. Slowly pour a bit of the Red soap down the middle of the mold with one back and forth pass. Follow up with the White soap, right down the middle with a back and forth pass. Do the same with a bit of the Green soap. Repeat with all three colors until there is just a little bit left of each. TIP: As the mold gets fuller and fuller, pour from further and further away, so the soap that’s being poured penetrates all the layers to create the swirl.
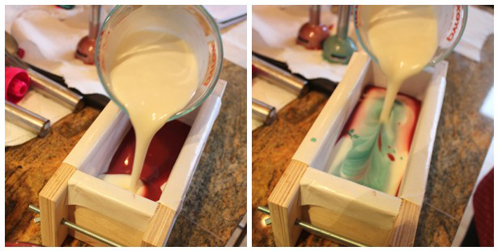
SEVEN: With the last bit of Red, pour a slow and deliberate “U” curve down the length of the mold. Pour close to the mold so the color does not break through layers underneath. Repeat with White, pouring the second “S” shape right next to the Red. Follow with Green, right next to the White.
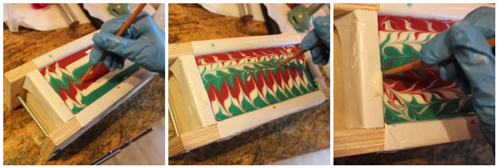
EIGHT: Using a chopstick or dowel stuck into just the first 1/4″ or so of soap, create a swirl by first dragging the chopstick perpendicular to the “U” curves, then horizontally, and finally, diagonally.
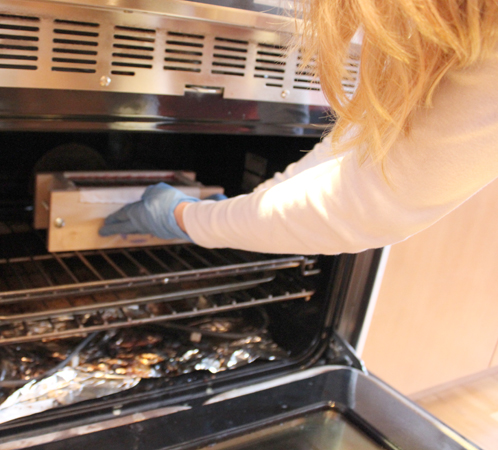
NINE: Stick the soap into an oven, preheated to 170 degrees Fahrenheit, and set the timer for 1 hour. After one hour, turn the oven off, leaving the soap to sit overnight.
TEN: Pull the soap out of the oven. Allow to sit for another day or two, unmold and cut. In chapter 21 of Scientific Soapmaking, Prof. Dunn notes that the total alkali of raw soap batter is about 10%, and that the total will fall to below 0.1% within an hour if the soap is held at 160 degrees. After unmolding, check the pH of the soap using either pH test strips or the zap test (Prof. Dunn recommends the tongue over the test strip); if it’s all clear, the soap is fine to use! It’s the final bit of pH lowering that happens in the rest of the 4-6 weeks of curing, and the main benefit of the cure time is the evaporation of excess water, which makes for a harder bar and a more true net weight for labeling purposes if you’re selling your soap. So if you’d like a harder bar, allow your soap to go through the usual 4-6 week cure. Enjoy!
Q: I’ve heard I can use CPOP soap right away, the next day! Is it safe to sell?
A: While technically, the soap is fairly mild within 24 hours, that final 4 weeks of waiting time allows your soap to really hit it’s maximum hardness and long lasting nature. According to Kevin Dunn, “At any realistic temperature, saponification will be complete within 24 hrs.” Using CPOP soap fresh is doing you and your customer a disservice. It is softer and will ‘melt’ in the shower. Give it a 4 week drying period before selling.
Q: I have a plastic mold that I want to use. Can I?
A: No. No you cannot. Traditionally plastic will melt. While technically, you can use silicone that’s rated for baking, like the rad Bramble Berry liners and awesome silicone loaf mold, there’s an interesting thing that happens with silicone and a super hot gel phase. The soap sort of ‘boils’ on the inside and something about the lack of breathing in silicone makes little air bubble/water bubble pock marks on the entire outside of the loaf. It is more than frustrating to go through the extra work of CPOP, only to find your soap loaf pitted and pocked. The freezer paper gives it breathability that silicone liners or molds don’t give you.
Q: I have your Birchwood molds. Can I use them with CPOP?/ I have a mold that is glued together. Can I use that with CPOP?
A: No. Glue melts in the oven and your mold will fall apart. The Birchwood molds use glue to help keep them together so they are not suitable for CPOP soap.
Q: Can I use any fragrance oil with CPOP? Will they burst into flame if they’re too low of a flashpoint?
A: Yes. No. While you technically can use any soap-safe fragrance oil and essential oil, some of them are quite fleeting and waft or evaporate out when exposed to extremely tough conditions (high pH with cold process soap coupled with a hot, lengthy gel phase). It’s important that you do a small 1 or 2 pound batch and ensure you’re happy with the scent at the 4 week mark after making the soap. Flashpoint is the temperature at which a pure, not mixed or diluted fragrance oil will combust or burst into flames when given an open flame. With CPOP soap, there is no open flame and the fragrance oil has been diluted by over 95% by your soap mixture.
Q: If CPOP is so great, why don’t you do it all the time?
A: I love CPOP because the colors are brighter (thanks to a super hot gel phase) and the soap comes out absolutely rock hard after a normal drying time. And, I’d do it more but I don’t currently have a oven in the Soap Queen Lab (which is where I do the majority of my soaping).
Q: Do I have to do anything special with my recipe to do CPOP?
A: No. You can use your normal cold process recipe. I don’t discount my water with CPOP because so much water evaporates out during the extra hot gel phase process and I worry about the soap cracking but other than that, use your regular cold process soap.
I hope you enjoy CPOP soapmaking after you try it.
Click here for a printable PDF of this tutorial.


I just used this tutorial to make a great looking batch of lemon myrtle soap. It smells wonderful and has hardened well over the last day. I couldn’t wait to try a bar in the shower, but found it to be very tingly, a bit of a surprise as I thought it was supposed to have mostly saponified in the cooking. Could there be something I did wrong in the process?
Hi Melanie!
I would recommend tapping that bar lightly against your tongue. If it “zaps” you, it may be lye heavy. If it is, you can fix it! I’ll include a tutorial on how to do that.
However, it may just need a couple more days. While most of the saponification has already happened, there may be just a tiny bit still happening. If that’s the case, the tingling should go away. 🙂
-Kelsey with Bramble Berry
Hot Process Hero: http://www.soapqueen.com/bath-and-body-tutorials/tips-and-tricks/hot-process-hero-2/
Dear BB Team,
I mostly do HP soaping because currently I am living in Peru where we are close to an almost 100% humidity during winter and about 80-90% during spring/summer. So HP is my best friend because it helps to evaporate the excess water from my soaps and even with HP and always have to wait a couple of weeks of curing time to allow my soaps to harden..
so that is why I was very excited about CPOP process.
For the very first batch I used a silicone mold. No fragrance added, just a hint of mineral cosmetic pigment and I followed the instructions about the time and temperature in the owen (1 hr on 170 F and allowing it to sit in the oven by itself till the next day). Even about 4-5 hrs after I switched off the owen, I noticed my soap was very hard already. By the next day it unmolded very easily and when we wanted to cut it, it crackled / broke so we were not able to cut it to bars. The inside texture was interesting – not soft, but softer and had like little air-bubbles or lets say mini airpockets, and smelled like fresh paint / lye. I did the zap test and it clearly zapped so even if I knew already I was probably not going to be able to use this soap, I waited for several days and zap tested again, it still was weird and clearly not ready. I am wondering what caused that the soap was very hard almost immediately and had a weird texture? I used just my usual olive, coconut, cocoa butter recipe, and this time I added a little bit of flaxseed oil. Intesting that today I made a second batch with a similar recipe and it looks like gelling right now and definetely looks better than the first one, it is still a bit soft after about 5-6 hrs and looks solid but the top still a bit transparent, I think this one will be fine! I forgot to say the first batch I did a 30% water and this one was with 32%. I am thinking maybe the first could be lye heavy? Many thanks for all your and inspiration!
Hi Darla!
It sounds like that batch may be lye heavy. I would recommend running it through the Lye Calculator again to double check those amounts.
The good news is you can fix this soap using the Hot Process Hero method! You are basically cooking your soap to a proper pH level. I’ll include a link below. 🙂
-Kelsey with Bramble Berry
Hot Process Hero: http://www.soapqueen.com/bath-and-body-tutorials/tips-and-tricks/hot-process-hero-2/
Hi Kelsey, thank you very much for your advice!
Also, my second batch in CPOP turned out very well! I agree, the first one that I made last week was really probably lye heavy. I noticed that my digital balance is not measuring well, I am almost sure it is not sitting on a stable base and therefore not measuring well.. I will make sure to measure really accurately, I think the original recipe turned out a disaster because of the incorrect measurements.
I have to say I enjoyed a lot being able to do swirls just like in CP, and also having the soap ready the next day is great – I tested it for PH and it really worked, my soap was ready to use and I got a nice hard bar, harder than with HP which is great news with the humid climate we have here in Peru! I still leave my soaps to rest for a couple of weeks. Anyway, this article was really useful, and I appreciate your time on responding as well! take care >)
Hi Darla!
I’m glad I was able to help out!
Also, I’m so glad you liked this recipe! I’m a fan of it as well – I love the bright colors and that it’s ready so much faster. 🙂
-Kelsey with Bramble Berry
I just used these instructions for my first batch of CPOP… and it, ah, was a disaster LOL. It foamed right up out of the mold and spilled over after 25 minutes. I used a 30/30/30/10 recipe of olive, coconut, palm and castor, and a blend of grapefruit, lavender, peppermint, and ginger essential oils for scent. French green clay for color. I scraped the top off and now it looks and ahs the texture of rebatch soap… I think it will be fine to use after cutting, just maybe not that pretty. Any thoughts on what I did wrong? Was it too hot? I had the oven onto 170 and used a silicone loaf mold (I don’t mind the bubbles on the edges. I live at a high altitude. Any thoughts? I’m stumped! Thanks.
Hi Lauren!
Oh no! You had the temperature just right and your recipe is one we use often, so I’m wondering if it’s the essential oils.
How much essential oil did you add? Also, did you get them from Bramble Berry?
Let me know and we’ll figure this out. 🙂
-Kelsey with Bramble Berry
Thanks for the speedy reply! Nope, it was a blend from my local natural grocery… that’s what I get for not getting everything here! I wonder if maybe the ginger in the blend caused it to overheat? Because I only used, hmm, I think it was 20-30 mL. I’ll have to try another batch next week, with some peppermint that I got from BB :)It really did seem hotter than it should have been when I pulled out the bubbling monstrosity (which, incidentally, I was able to cut into very cool looking little bars after I scraped the top off and let the rest harden!)
Hi Lauren!
That ginger essential oil may be the culprit. The spice content in there could’ve caused your soap to overheat. I’m glad those bars turned out well though!
Please let me know how that second batch goes. 🙂
-Kelsey with Bramble Berry
the electric blue pigmant is no longer available.. can you recomend a replacement?
Hi Tui!
You may like our Fired Up Fuchsia Colorant. It’s a nice bright pink. It is out of stock, but the Fuchsia and Electric Bubblegum Colorant will be available in three weeks. 🙂
-Kelsey with Bramble Berry
Fired Up Fuchsia: https://www.brambleberry.com/Fired-Up-Fuchsia-Colorant-P4967.aspx
If this soap still needs 4 weeks to cure after sitting in the oven for 1 hour, what the point of the oven method? Only for vibrant colors reason? Just trying to figure out 🙂
Also, I was wondering if I will leave the soap for 3-4 hours in the oven, can the soap cure faster?
Hi Veronika!
Using this method has a couple advantages, including making the soap go through gel phase so you get vibrant colors. It’s also ready to use after 24 hours!
The reason we recommend letting it cure for four weeks is so water in the soap will evaporate off and you’ll have a harder bar of soap. 🙂
-Kelsey with Bramble Berry
This looks amazing! I’ve been looking all through your blog for Christmas soap recipes and love this one! Can you recommend a more “Christmasy” fragrance that will work well in this specific project? (no discoloration, acceleration of trace, etc..)
Hi Kara!
I’m so glad you liked this recipe!
I think a great fragrance would be our Cranberry Fig Fragrance Oil. It has a holiday feel, and no discoloration or acceleration!
Cranberry Fig Fragrance Oil: https://www.brambleberry.com/Cranberry-Fig-Fragrance-Oil-P3933.aspx
-Kelsey with Bramble Berry
hi, My soap is going through a gel phase. I am wondering if my soap will resume it’s natural color after this phase or stay gel like?
Hi Francine!
When soap goes through gel phase, it can result in more vibrant colors that remain after the gel phase is done. This can be great depending on your design!In particular, Lab Colors become especially bright when soap goes through gel phase. You may find the blog posts below helpful! 🙂
Jazzed about Gel Phase:
http://www.soapqueen.com/bath-and-body-tutorials/tips-and-tricks/gel-phase/
Lab Colors and Gel Phase are Friends:
http://www.soapqueen.com/bath-and-body-tutorials/tips-and-tricks/labcolors-and-gel-phase-are-friends/
-Amanda with Bramble Berry
I was wondering, does CPOP have any affect on how quickly I can unmold my soap versus just plain CP? does the added heat set it up faster?
Hi Rachel!
The extra heat helps the color of your soap to become brighter (thanks to a really hot gel phase), and it does also help speed up the saponification process. The soap may come out of the mold a little faster, but nothing too drastic. We still recommend giving it 1-2 days in the mold, and a full curing time 🙂
-Amanda with Bramble Berry
New to soap making and finding it so interesting. I have an excalibur dehydrator with a thermostat. I want to try a cpop in it as the temperature goes up 165. How long is it ideal to hold that temperture. It has the added benefit of a fan so the drying process while it is still in the mold. Your thoughts would be appreciated.
Thank you.
Hi Georgia!
Interesting idea! I have heard of people using a dehydrator to cure their soap, but never to do CPOP. From what I have heard from other soapers, people have cured their soap with dehydrators with mixed results. While we have never tried CPOP with a dehydrator, I would recommend keeping the temperature similar to what we used in this recipe. We used a temperature of 170, so the 165 should work fine. We held this temperature for one hour. I’m curious to hear how this works for you Georgia 🙂
-Amanda with Bramble Berry
Could I use parchment paper in the mold?
Austin,
You could use parchment paper but we have found that lining with freezer paper works great.
Thanks for your question.
~Kevin with Bramble Berry
Hello?
I’ve found a recipe and plugged in the %’s in the soap calculator. The amounts given did not match what was given on the calculator. Or am I reading it wrong. It just gives you the water:lye ratio to use? If so, then how do you know how much weight wise to use of different oils?
Hi Helen!
When using the lye calculator, you can either choose the percentages of your individual oils and what the total weight will be, or you can choose the weight of each oil individually. Then, based on this information, the calculator will provide you with the amount of water and lye needed for your recipe.
When working with the percentages option, you need to provide the calculator with the total weight of your oils. Then based on the total weight and the percentages for each oil, it will provide you with a measurement for each oil. I hope that makes sense! 🙂
If you have more questions, don’t hesitate to ask! 🙂
-Amanda with Bramble Berry
What can I use instead of palm oil? Can I use food coloring? I live in a really small town and I only have a walmart to buy the ingredients. How do you make a recipe? For example I want to make soap with coconut oil, and olive oil. How do I determine what butters, oils, or such I add?
Hi Fred!
Replacing Palm Oil with food coloring would not work because food coloring is not a soapmaking oil, but instead a color additive. If you are looking to formulate a cold process recipe, you may find this blog post extremely helpful!
Formulating Cold Process Recipes:
http://www.soapqueen.com/bath-and-body-tutorials/tips-and-tricks/formulating-cold-process-recipes/
There are countless amounts of oil/butter combinations that you can use to make soap. The ingredients depend on personal preference, and what properties you would like your final product to have. Some oils help contribute to the hardness of your bar, others help with lather, and some add moisture. We have found the best bar is one that includes a combination of hard, and soft oils.
For more information regarding different soapmaking oils, this post has lots of great info regarding each!
Common Soapmaking Oils:
http://www.soapqueen.com/bath-and-body-tutorials/tips-and-tricks/free-beginners-guide-to-soapmaking-common-soapmaking-oils/
Once you have a recipe that you like, you can run it through the Lye Calculator to find out how much oil and water you will need to saponify your soap!
Lye Calculator:
https://www.brambleberry.com/Pages/Lye-Calculator.aspx
Using the Lye Calculator: http://www.soapqueen.com/bath-and-body-tutorials/cold-process-soap/using-the-bramble-berry-lye-calculator-2/
For more information regarding what saponification (the process of turning oils, water and lye into soap) you may find this video helpful 🙂
Saponification Explained: http://www.soapqueen.com/bath-and-body-tutorials/cold-process-soap/how-to-make-cold-process-soap-episode-2-2/
Another great place to get more information regarding cold process soapmaking is Soap Queen TV! We have a whole series explaining cold process soapmaking, including lye safety, different types of oils, and many more tips and tricks!
Soap Queen TV Cold Process Series:
http://www.youtube.com/playlist?list=PLAADF6209996265D2
If oils are unavailable to you in your town, you could order online at Brambleberry(dot)com. We have all the supplies you need to get started making your own soap!
I hope this helps Fred! I’m excited for you to start soaping!
-Amanda with Bramble Berry
What can I use instead of palm oil? Can I use food coloring? I live in a really small town and I only have a walmart to buy the ingredients.
Joist love all the soaping tips,my question is when doing CPOP can you use the family oven or do you need to have a seperate oven for this ..I don’t want to poison my family
Hi Debbie!
You can use your regular oven for CPOP. Just make sure that no soap spills out 🙂
-Amanda with Bramble Berry
Hello my friend,
we tried to make the CPOP process, and all went fine,
but today morning i had a odd result:
-big loaf silicon mold, the oils were on top and the hard part bellow
-smaller silicon molds, spill out of the mold.
Can i recover from this situation, can i just melt it over again and put it on the molds?
Thank you so much for the amazing good site!!
Hi Pedro!
It’s possible that you could simply wipe off the oils on top. For the smaller molds, it could be an issue of too much soap, or it may have got too hot and created a “volcano” effect. The link below shows that effect, and gives some info about it.
http://www.soapqueen.com/bath-and-body-tutorials/cold-process-soap/coconut-milk-soap-volcano-2/
The oils on top of your soap could be because your soap was not fully emulsified. It could be that your lye/water and oils were not fully incorporated and the oil on top are the oils that were not fully mixed into your lye/water.
Unfortunately, you cannot remelt your soap and place it back in the molds.
I hope this helps!
-Amanda with Bramble Berry
My friend and I tried this beautiful soap today. Our first batch of swirls will be a bit strange but the second batch should be better. We’ll be trying this again soon I’m sure. We are both fascinated with soaping!
Hi Patty!
So glad you gave this recipe a try! Soaping is definitely a skill that improves with practice! We would love to see your soapy creations on our Facebook page! 🙂
https://www.facebook.com/BrambleBerry
-Amanda with Bramble Berry
Hi, I am a little confused. I want to make a 5 pound batch of this soap. So do I just need to multiply this recipe by 2.5? I only have 16 ounces of Palm Oil ordered so I was going to use that 16 ounces and then up the olive oil 2.75 to 21.5 ounces.
So according to your recipe I need to use:
21.5 oz Olive Oil
16 oz Palm Oil
6.25 oz Sweet Almond Oil
6.25 oz Sunflower Oil
8.5 oz lye
20.625 oz water
My confusion is when I ran it through the lye calculator on Brambleberry, I got this:
Olive Oil 21.50oz
Palm Oil 16.00oz
Sunflower Seed Oil 6.25oz
Sweet Almond Oil 6.25oz
5% Lye (Sodium Hydroxide) Amount 6.517oz
Ounces of liquid recommended 16.50oz
Yields 73.02oz
So which is the correct amount of lye to use (I did calculated it with a 5% super fat because I couldn’t find any reference to that in the recipe). Thank you for your help, I really hope to work on this recipe soon (I am making 5 pounds so I have enough for everyone for Christmas!).
Good morning, Manda!
There is actually a very easy way to resize any cold process soap recipe. To do so, you would enter the recipe as is in the Bramble Berry’s Lye Calculator.
Bramble Berry’s Lye Calculator: https://www.brambleberry.com/Pages/Lye-Calculator.aspx
After you have done that, select your superfat and click the calculate button. This will lead you to the results screen and the area where you can resize your batch to a larger (or smaller size).
Find the section that says ‘Resize Batch’ and enter in a higher oil amount and hit resize batch until your yield reaches the amount of soap you are looking to make.
In your case, you are trying to make 5 lbs (80 oz) of soap. I adjusted the oil weight until I reached exactly 80 ounces of final yield. The new recipe (at a 5 lb size) reads:
6.85 oz Sweet Almond Oil
23.55 oz Olive Oil
17.53 oz Palm Oil
6.85 oz Sunflower Oil
7.2 oz Lye (5% Superfat)
18.07 oz Distilled Water
Which will yield 80 oz (5 lbs.) soap. You will never want to just double the recipe because the amount of lye really is dependent on the amount of oils and butters in your recipe. We always suggest using the lye calculator for your lye calculations.
I hope this helps clear up any confusion. If you have any other questions, feel free to ask! =)
-Becky with Bramble Berry
Thank you so much! I shared a photo on Bramble Berry’s Facebook page!
Hi Manda!
Thank you so much — we appreciate you being a part of our amazing soapmaking community and can’t wait to see more from you! =)
-Becky with Bramble Berry
I just tried this process yesterday but with a different recipe and when I took the soap out today the top has a blistered appearance. I had used a silicone mold lined with wax paper and my FO was bitter almond. Thoughts?
Hey 🙂 This soap is really pretty. i was wondering if I could use a Pringles can for this?
Hi Amber!
A pringles can might be a bit harder to get your soap out of, but we always encourage our readers to experiment and have fun with their recipes. If you are looking for a circular mold, you can check out our silicone column mold.
Silicone Column Mold: https://www.brambleberry.com/Silicone-Column-Mold-P5619.aspx
Happy Soaping!
-Becky with Bramble Berry
Great explanation and instructions. I have been making soap for about 8 years, just as a hobby, and this method is the only one I have ever used! Now, though I will experiment with the different colors. You make it look so simple. Thank you!
Hi Sue!
We are so glad that this tutorial worked for you. This is actually one of my favorites recipes because how much fun it is. If you are able to get any fun pictures of your soap, we’d love to see how it turned out. You can share photos on Bramble Berry’s Facebook page. =)
Happy Soaping!
-Becky with Bramble Berry
https://www.facebook.com/BrambleBerry
Can I still spray the top with 91% alcohol to prevent ash or is it necessary to do so with CPOP?
Hi Jessica!
You can absolutely still spray your soap with the 91% rubbing alcohol to prevent soda ash. Even if you get soda ash, you can use cold water and wash it off using a paper towel or old nylon! =)
-Becky with Bramble Berry
Hi!
I have mostly seen Freezer paper with a plastic coating in the stores. This doesn’t seem like it would work for CPOP… Does this matter? What kind of freezer paper is ideal?
Thanks!
Molly
Hi Molly!
As strange as it sounds, freezer paper actually works really well for CPOP and Anne-Marie uses it every single time she does a CPOP project. As long as you get a freezer paper brand that has one shiny side and one dull side, you should be just fine. 🙂
-Becky with Bramble Berry
Ive made a cp soap with no colours or scents as its my first time at making cp soaps, i made my soap and poured it into my loaf mould 12 hours later i checked and the surface felt hard all over so i covered again and check 12 more hours later. When i touched the suface the outside was hard but in the middle the surface was hard but under was still gel can you tell me did my soaf over gel? Thanks
Good morning, Stuart!
We are so excited to hear that you have start cold process soaping! Typically, a loaf of soap is going to take about 24-48 hours to harden. Which recipe were you working with? If you want to know if your soap went through gel phase, you can actually check it once you unmold your soap.
Once your soap has harden and you are able to unmold it, go ahead and cut a couple of bars. If you look on the inside of the bar, and it is ‘darker’, then your soap has gone through gel phase. Once you start using colors, gel phase versus non-gel phase will be much more evident.
Here are a few blog posts that go over gel phase that I think could really help you out!
LabColors and Gel Phase are Friends: http://www.soapqueen.com/bath-and-body-tutorials/tips-and-tricks/labcolors-and-gel-phase-are-friends/
Soaping Notes: http://www.soapqueen.com/bath-and-body-tutorials/cold-process-soap/soaping-notes/
Free Beginner’s Guide To Soapmaking: Cold Process: http://www.soapqueen.com/bath-and-body-tutorials/cold-process-soap/free-beginners-guide-to-soapmaking-cold-process/
I hope this helps out! Let me know if you have any other questions. =)
-Becky with Bramble Berry
I have seen cp soap makers make beautiful piping designs on their soaps. Can you do this on CPOP also?
Will the designs hold?
Hi Bann,
It should work just fine as long as you’re piping soap and it is traced thick enough to hold. The heat shouldn’t collapse the texture or anything! But we’ve never tried doing this before so try a small test batch. If you are doing a soap frosting recipe made of different ingredients, they might not hold as well. Another good reason for a test batch! 🙂
We’d love to see photos of your results:
https://www.facebook.com/BrambleBerry
-Kirsten with Bramble Berry
I wonder if you could help me out with some information around minimum mold sizes for cp soap. I am wanting to make small guest soaps and I am able to find small, round, fancy silicone molds here in South Africa (rose, sunflower, dahlia etc) which I think might work. The volume of each indent varies between 23 mls and 35 mls each depending on the design of the mold. Will cp soap neutralise properly if I use these little molds? If you could let me know, I would be very grateful. What I have been doing up to now is to make the cp soap in a log, then grating the soap after unmolding and then making little round soaps of about 40gm by scrunching up the grated soap, forming round balls and then flattening them (a bit like making cookies from a dough). I have developed, as a result of this method, severe wrist and elbow problems and need to find another way to make the little soaps which are so popular at the craft markets where I sell them.
Good morning, Margaretha!
The molds that you are wanting to use are smaller then we typically tend to work with, but we suggest making a small test batch of soap to see if it works for you! =)
Something that might benefit you with grating up your soap is using an industrial or meat grinder for your soaps. It sounds like they might work the best for you. I hope this helps! Let me know if you have any other questions.
-Becky with Bramble Berry
I don’t use any artificial colourants in the cp soap but really like the swirl effect. Can I use Morrocon Red Clay and French Green Clay instead – how much of each would I need to use for a 1.9 kg batch (about 4 lbs). I also use acrylic moulds and wondered if they would cope with the oven process.
Good morning, Margaretha!
You could totally use the Morrocon Red Clay and French Green Clay in your recipe instead of the colorants we listed and it would still make a fabulous bar of soap. With the amount, you can double what you find in this recipe (but make sure to disperse the clay in water beforehand), or you can add it a little bit at a time until you get the color you are going for. It’s always so much fun to try different amounts and we definitely encourage experimentation. =)
On your molds, you would need to contact the vendor that you purchased them from to see if they are oven-rated and would last in the heat. I hope this helps! Let me know if you have any other questions.
-Becky with Bramble Berry
Well, I made this recipe as a treat to myself for something to do on my vacation from being a nurse. I ordered all the supplies from Brambleberry….and was uber excited to make this. So, made it today AND I FORGOT TO DILUTE THE COLORS IN THE SUNFLOWER OIL!!! ahhhhhhh I didn’t realize it until I had them all mixed in. Is this why my batches thickened up too quick on me? I figured so. I was still able to get it all in the mold but, I’m afraid that due to the thickness, I was unable to make the wonderful top. The batch is in the oven as we speak and I’m hoping it still yields some great soap when I pull it out. (Live and learn…lol) Thank you for these wonderful recipes!
Oops, I have totally forgotten to dilute colors before too. The Lab Colors shouldn’t thicken up the soap though, could you tell me a little more about what happened?
I’m glad you figured it out though. If you have any photos of these soaps, we’d love to see them on our Facebook page:
https://www.facebook.com/BrambleBerry?fref=ts
-Kirsten with Bramble Berry
I tried CPOP last night and this morning the soap smelled horrible when I cut it. Also, was very soft and light pockets of softer oil. throughout loaf. I used Soapcalc so I cannot figure out why that batch would be bad. My oils and butters are new. I used blue pigment and black oxide powder…any suggestions why this would happen?
Hi Evette!
I’m so sorry to hear about your soap not turning out how you would expect. What kind of fragrance oil did you use? If you are willing to share your recipe with us we are more than happy to help you troubleshoot. You can actually save this batch by using the Hot Process Hero method and the soap should turn to a more even consistency.
Hot Process Hero: http://www.soapqueen.com/bath-and-body-tutorials/tips-and-tricks/hot-process-hero-2/
-Becky with Bramble Berry
Good recommendation on trying maybe 160F. My oven’s 170F lead to some foam-over during the on-cycle. *sigh*
I like this CPOP, because I like the benefits of HP soap (harder, faster drying, already reacted) but HP on the stove doesn’t allow delicate swirls.
Splitting the light trace and coloring those out of the pot is an awesome idea. Much easier than trying to swirl in EO sludge between light and medium trace.
Good morning, Josh!
I’m sorry that you had a bit of foam-over with your soap batch, that can be frustrating. I’d definitely try the 160F as well as not filling the mold to the top and see if that helps you out. Keep us updated! 🙂
-Becky with Bramble Berry
Hi Anne-Marie,
I have a question regarding citrus essential oils in CPOP.
In my experience, orange, lemon and tangerine essential oils tend to fade quicker in comparison to others like lavender, tea tree, etc. in CP soaps.
Would using them in CPOP method, as (although low) extra heat is applied, make them lose scent quicker than CP soaps or not?
Thanks,
Pelin
Good morning, Pelin!
It is true the the citrus essential oils don’t tend to stay very well in any kind of cold process recipes, and if you are using the CPOP method, you are going to ‘bake’ them out of your batch. If you are looking for a citrus that will last through that process, I’d try using the 10x Orange Essential Oil. We’ve found that is really tends to last longer than any other citrus essential oils.
10x Orange Essential Oil: https://www.brambleberry.com/10x-Orange-Essential-Oil-P4441.aspx
I hope this helps!
-Becky with Bramble Berry
So glad I saw this post. Every time I’ve made CPOP I’ve had those tiny bubbles all over the top and it looks awful. I usually do the oven at 170 for two hours then take it off and let it sit in the oven. Now I know I should only leave it on for one hour and take it off. I haven’t been able to pinpoint this problem until now. Thank you for this great explanation.
Does it matter if I do the oven at 170 for one hour then take it off to rest overnight versus setting it for 170 then taking it off and popping soap in there overnight?
Good afternoon, Fuchia!
We have found that sticking it into an already preheated (at 170F) oven and setting the timer for 1 hour and then turning the oven off and leaving over night has been the best for the soap. It allows it to harden and in the morning, you can pull it out and start cutting! I hope this helps. 🙂
-Becky with Bramble Berry
SoapQueen – this is a beautiful soap! I tried to make it right after I saw the post. I’m still very new to soaping and found my techniques are still a work in progress! My swirls turned out more like valleys – though I did pour high to force the soap through… So, I tried again – did a little better second time, however not by much… I’ve decided at this point that my soap was too thick. I guess i’m not a good judge of what medium trace looks like. I have no problems with light and full trace… Should I try pouring at what I see as light trace?
Oh BTW, the electric bubble gum and merlot make the most gorgeous crimson red! I will use it a LOT in the future! I love seeing it after gel phase! CPOP is the bomb!
Good morning, Cathy!
I am just so glad to hear that you are having so much fun with CPOP, it really is such a fun way of soaping. We do suggest pouring at what you see as light trace. Sometimes trace can be a little hard to tell,and light and medium trace are subjective terms. What may be medium to us could be light to you. I hope this helps! 🙂
-Becky with Bramble Berry
P.S. For more on trace (with pictures) you can check out our new Free Beginner’s Guide To Soapmaking: Cold Process.
http://www.soapqueen.com/bath-and-body-tutorials/cold-process-soap/free-beginners-guide-to-soapmaking-cold-process/
I have made multiple hot process batches using my crock pot, and when I saw how lovely these bars turned out I wanted to try the oven method. It did not work so well for me however. Not sure what happened, but my color totally left the soap…it went from a beautiful fuscia to an ugly flesh color…the fragrance-Lovespell Type-did ok. When I pulled the logs out after they sat overnight, they were very oily. I cut into the logs and the soap had went through a separation at some point. I save the two batches by putting them in my crockpot. I added back the color, and a tad more fragrance, and it turned out fine.
Trying to determine what went wrong. I use goat milk in my soaps, and I have a gas range.
Hi Becky!
That sounds like such a bummer, I’m sorry that your batch didn’t turnout how you were expecting the first time. I’d love to help you troubleshoot what happened!
Which colorant did you use in your batch? There are a few colorants that just don’t stick very well in cold process, no matter what we do. How long did you keep your soap in the oven? We only like to keep it in for about an hour at 170F, and no longer. If you have your recipe, I’d love to see it so we can get to the bottom of this issue for you! 🙂
-Becky with Bramble Berry
I’ve been using a Room Temperature Process/Oven Hot Process since the beginning of my soaping career (guilty as charged here…instant gratification girl here :D). I absolutely love it and I’ve tried all the different processes. I actually keep mine in the oven for a bit longer and it ends up giving my soaps this cool looking “dip” in the middle of the soap. I think it happens because the soap swells when it’s hot and the middle drops back down after it’s cool…but not the sides of the soap. It’s kinda became my trademark shape so to speak. I like it also b/c makes it easier to hold onto the bar of soap in the shower. 🙂 I do lots of different swirls…and they are pretty, but not as complex as the ones you have on this tutorial. I really want to learn how to do this better. Do you have a video demonstrating it? I feel like I could grasp it better if I could watch it maybe. 🙂 Thank you for this great tutorial. I learn SO much from you guys. And FYI…the funnel pouring technique is one of my favorites thanks to you guys. 🙂
Your technique sounds so neat! I’d love to see some pictures of your finished soap if you have any. You can share it with us on Bramble Berry’s Facebook page.
https://www.facebook.com/BrambleBerry
If you are looking for tutorials on how to swirl, here are a few tutorials (and videos) that I think might really help you out:
A Palm Free In-The-Pot Swirl: http://www.soapqueen.com/bath-and-body-tutorials/cold-process-soap/a-palm-free-in-the-pot-swirl/
Circle Swirled Soap: http://www.soapqueen.com/bath-and-body-tutorials/cold-process-soap/circle-swirled-soap-in-column-mold/
Three Color Mantra Swirl: http://www.soapqueen.com/bath-and-body-tutorials/cold-process-soap/three-color-mantra-swirl/
Peacock Swirl in Cold Process Soap (Video): http://www.soapqueen.com/bath-and-body-tutorials/cold-process-soap/peacock-swirl-in-cold-process-soap-video/
How to Make Funnel Pour Soap on Soap Queen TV: http://www.soapqueen.com/bath-and-body-tutorials/cold-process-soap/how-to-make-funnel-pour-soap-on-soap-queen-tv/
Linear Swirling (Cold Process): http://www.soapqueen.com/bath-and-body-tutorials/cold-process-soap/linear-swirling-cold-process/
In-the-Pot Swirling (Cold Process): http://www.soapqueen.com/bath-and-body-tutorials/cold-process-soap/in-the-pot-swirling/
Faux Funnel Pour: Advanced Cold Process: http://www.soapqueen.com/bath-and-body-tutorials/cold-process-soap/faux-funnel-pour-advanced-cold-process/
And you can also check out our premium Advanced Swirl CP video on Bramble Berry here:
https://www.brambleberry.com/Advanced-CP-Swirl-Online-Video-P4727.aspx
I hope this helps! 🙂
-Becky with Bramble Berry
Awesome. Thanks Becky! I’ve posted some of my stuff before. I’ll post another picture for you to see. 🙂
Thanks, Kim! I can’t wait to see it. 🙂
-Becky with Bramble Berry
Could I use your silicone mold for the CPOP ?
You can absolutely use your silicone mold for CPOP soaps! All of Bramble Berry’s silicone molds can handle heat up to 500 degrees Fahrenheit. But, using a silicone mold can leave little pockmarks (air bubbles) in your soap with this type of soaping.
-Becky with Bramble Berry
Hi, I just wanted to chime in and say yes, you can use a silicone mold for this method, but it can boil over in a heart beat. (I think she said this in the tutorial). I’ve been using this method ever since I started soapmaking and I primarily use wooden molds, but I make these luffa soaps with BB’s square silicone mold. I slice natural luffa, place slices in the mold, make up my soap recipe using Room Temperature Process, making sure to only get it to a light trace. I pour into the mold making sure to leave just the tiniest bit of space at the top of the mold to leave room for swelling. I place in the oven at 170F and watch very closely for about an hour (It can boil over…ask me how I know. lol). Now, it can leave little bubble marks on the soap, however, I find that there are less for some reason when I put a bit of kaolin clay in my recipe (not sure why it helps…I use it as a fixative for my EO). Even if they do have a few of these bubble marks, it really does make a very pretty, rustic bar regardless…or so my customers tell me. So, yes…you can use this process with a silicone mold, but it takes a very watchful eye to pull it off and being OK with a rustic bar of soap. 🙂
Hi Kim!
Thanks for the tip about using Kaolin Clay when using a silicone mold, that’s so helpful. Glad to hear that you customers loved that rustic-look, it’s so in right now and I know that I just can’t get enough of it. 🙂
-Becky with Bramble Berry
I just tried this for the first time and it was great! I used a bottle of my husband’s home brewed pumpkin ale as my liquid and used cinnamon to color my swirl. It smells and looks amazing! There are photos on my blog.
Such a fun method!
So glad it turned out so well for you, I bet the Pumpkin Ale smells divine! I took a look at the pictures on your blog and they look fabulous. Thanks for giving us some great feedback on this recipe. 🙂
-Becky with Bramble
Hi fellow soarers, I tried the s next to the u – well it didn’t look right… but too late now. The top still turned out very interesting…
Cathy Catey
That does not appear to be a S curve by the looks of it, appears to be U or oblong circle? I cannot see an S in the pour pictures.
Thanks for the catching that, you have some sharp eyes. It is supposed to be a “U” curve and we are editing the post to reflect that. Thanks again! 🙂
-Becky with Bramble Berry
Will this work with goat milk soap?
Good morning, Ginny!
Thanks for the great question. It’s possible to do but the milk will scorch turn brown or orange in the soap – and it will always smell for 7-10 days after making it. You can also ask this question at
the Teach Soap forums as there are many soapers there that do CPOP and could offer you some great advice on goat’s milk in CPOP-type soaps. 🙂
Teach Soap Forums: http://www.teachsoap.com/forum/
I hope this helps!
-Becky with Bramble Berry
Is that 170 Farenheit?
Yes, Fahrenheit. Great clarification.
Hi –
Living here in Florida, I always get full gel phase. I just put the loaf mold in a shoebox, set another box over it, leave in my garage, perfect full-gel! Anyways, can I use this recipe that way, without hot-processing it?
Is it hard enough for a silicone mold?
Thanks!!
You’re doing a traditional cold process recipe with a great gel phase – but it’s not the CPOP with the extended, super hot gel phase. You can definitely use the soap but you’ll want to ensure it’s dried and cured for that full 4-6 weeks. =)
Wonderfull Christmas soap Anne.
Thank you! The colors are definitely traditional Christmas.
Now understand why the bright & beautiful colors 🙂
The heat really makes those colors pop!
Great post! Just made soap yesterday an have never done CPOP, would love to try it. I wonder if I could place my batch from yesterday in the oven? or it needs to be done right after you reach trace.
Hi Blanca!
You would actually need to place your batch in the oven right after trace.
-Becky with Bramble Berry
What’s the difference between a curtsy and a genuflect? Either way, I am bowing the knee to the Soap Queen for this clarification! I’ve heard a few different variations on the process, and I have yet to make it to Chapter 21 of Dunn’s excellent book, so this is great info. Thank you muchly, Anne-Marie!
We love using Caveman Chemistry here at Bramble Berry for those scientific answers we are searching for, it really is a great resource, along with Scientific Soapmaking. I often find myself referring back to it for those harder questions. 🙂
-Becky with Bramble Berry
I’m so glad you wrote this post! Such a perfect explanation, as always. Scientific Soapmaking is such a great book, I think all soapmakers should read it.
I’m so glad you solved the mystery of the air bubbles from the silicone molds! I’m currently working on a solution to that problem, because I always CPOP and I love the silicone loaf mold. I have done a couple batches without bubbles, so I will let you know when I figure out the secret!
It’s only cosmetic but it is really irritating, isn’t it? It has something to do with the heat and the ‘breathability’ factor but that’s as far as I’ve gotten. Let me know if you figure out the mystery =)
I love to CPOP! I put my soap in a pre-heated turned off 170 degree oven overnight with the oven light on. Maybe that’s not technically CPOP. What I’ve had problems with is any portion of my batter that I’ve whitened with Titanium Dioxide gets a crackled/crazed look with this method. Any thoughts or suggestions to help with the TD crackling? Can’t wait to mix up the Electric Bubblegum/Merlot Mica combo for the perfect Christmas Red. Yay!
Thank you!
Good morning, Jill!
As you’ve found, Titanium Dioxide can be a little tricky to work with in cold process sometimes. And when you add heat, extra fun! It sounds like you are getting little rivers in your soap because of the TD (which happen with EVERY batch of soap but the titanium dioxide really showcases it). Heat 100% exacerbates this issue. You can either switch to Super Pearly White Mica which hides those rivers a bit better or try the oven at a lower setting. You might also try mixing slightly more; premix the TD with an oil (or glycerin) and full mix it up before you add it to your soap. Here is a Soap Queen short where that type of process is demonstrated:
How to Use Neon Pigments: http://www.soapqueen.com/bath-and-body-tutorials/tips-and-tricks/soap-queen-short-how-to-use-neon-pigments/
I hope this helps! Keep us updated on how your soap turns out. 🙂
-Becky with Bramble Berry
Becky, thanks for the tips!
Excellent explaination! I’ve been doing CPOP with BBs cube mold and wondering why I was getting all those little bubbles…now I know why! Thanks!
Thankfully the pesky bubbles are only cosmetic but still, they can be irritating, can’t they? =)
I keep reading the question and answers and I read a Mariah and she says thanks now she knows why she was getting all the tiny bubbles. If you had explained it I can not find it and I am needing to know what to do about the tiny bubbles.. So far I used silicone loafs pans to make my cpop soap..
Can you please advise me regarding the bubble and I will apologize in advance for just not finding a post on it.
Thank you,
Carolyn Sluka
GREAT explaination, if only every soap maker would read it! Thank you.
Thank you =) I’m so glad you like it.
Whaou a christmas soap !!
Thank you! The red really makes it pop, doesn’t it?
Thanks so much for this post. I have done a few batches lately that I wanted to gel, but I couldn’t seem to keep the heat in them. They are still fine but are taking a bit longer to harden than I would like. I have been trying to keep the water content up due to some hard shattering soap batches. Will be trying CPOP next time.
Let us know how they turn out, Louisa! We definitely want to help you out so your soap turns out perfectly. 🙂
-Becky with Bramble Berry