The ocean is a constant source of inspiration, from the icy blue colors to the fresh ozone scents. Inspired by the textures of the sea, this Shimmering Sea Glass Cold Process uses clear melt and pour pieces to mimic the look of translucent glass found on the shore. Melt and pour pieces are embedded within the soap, and placed on top with plenty of glitter for a crystal-like effect. A simple In-the-Pot Swirl creates a fluid swirl of teal, purple and white.
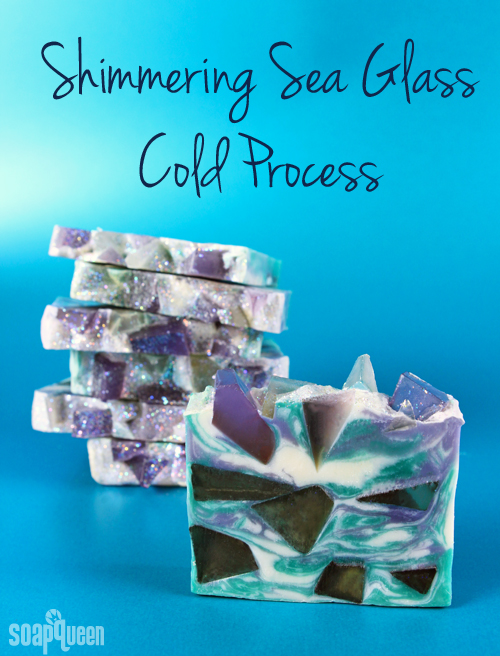
Over time, the embedded melt and pour pieces may begin to shrink slightly due to the loss of moisture. Using LCP (Like Cold Process) melt and pour bases helps avoid this, because of the lower glycerin content. Embedding melt and pour soap is a great way to recycle leftover bits from previous projects.
What You’ll Need:
9.9 oz. Coconut Oil
3.3 oz. Mango Butter
9.9 oz. Olive Oil
9.9 oz. Palm Oil
4.7 oz. Sodium Hydroxide
10.9 oz. distilled water
Approximately 15 oz. melt & pour soap chunks (preferably LCP)
Lavender Forest Fragrance Oil
Titanium Dioxide
Ultramarine Violet
Ultramarine Blue
Hydrated Chrome Green
Iridescent Glitter
10″ Silicone Loaf Mold
Click here to add everything you need for this project to your Bramble Berry shopping cart!

If you’ve never made Cold Process soap before, stop here! I highly recommend checking out our FREE four part SoapQueen.tv series on Cold Process Soapmaking, especially the episode on lye safety. And if you’d rather do some reading, Bramble Berry carries a wide range of books on the topic, including my newest book, Soap Crafting. You can also checkout the digital downloads for that instant gratification factor.
SAFETY FIRST: Suit up for safe handling practices! That means goggles, gloves and long sleeves. Make sure kids, pets, and other distractions and tripping hazards are out of the house or don’t have access to your soaping space. Always soap in a well-ventilated area.
COLOR PREP: To ensure that the Titanium Dioxide blends smoothly into the soap batter, we recommend micronizing it before dispersing it in oil. To micronize colorant, simply use a coffee grinder to blend the colorant to break up any clumps of color and prevent streaks of white from showing in the final soap. We like to use a coffee grinder that has a removable, stainless steel mixing area for easy cleaning. Then, disperse 1 teaspoon of the colorant into 1 tablespoon of sunflower or sweet almond oil (or any other liquid oil). Finally, disperse 1 teaspoon of the other colorants into 1 tablespoon of light liquid oil. Use a mini mixer to get the clumps of color worked out smoothly.
EMBED PREP: We used 15 oz. of leftover melt and pour chunks. We chose uncolored chunks made from our LCP Clear Melt and Pour, as well as chunks colored with Liquid Violet. Cut the scrap melt and pour into jagged shapes to give the appearance of jewels or crystals. If you need a melt & pour refresher, check out our Free Beginner’s Guide to Melt and Pour.
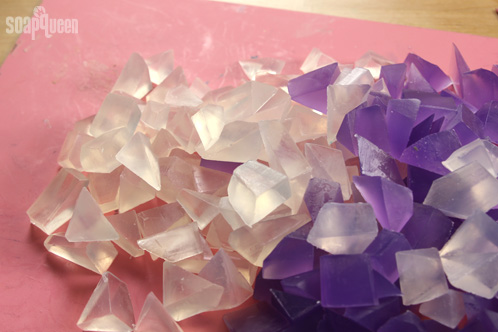
After you’ve cut up the melt & pour, coat roughly half (about 7.5 oz.) in a mixture of 1/2 tsp. Aqua Pearl Mica and 1/4 tsp. Luster Black mica. We recommend mixing the micas together first and then coating the chunks. When the chunks are fully coated in mica, set them aside.
 ONE: Slowly and carefully add the lye to the water and gently stir until the lye has fully dissolved and the liquid is clear. Set aside to cool.
TWO: Combine the coconut, olive, mango and palm oils (remember to fully melt then mix your entire container of palm oil before portioning). Once the lye water and the oils have cooled to 130 degrees or below (and are ideally within 10 degrees of each other), add the lye water to the oils and stick blend until thin trace. If you’d like a harder bar of soap that releases faster from the mold, you can add Sodium Lactate to the cooled lye water. Use 1 teaspoon of Sodium Lactate per pound of oils in the recipe. For this recipe, you’d add about 2 tsp. Sodium Lactate.

 THREE: Equally split the batter into two more containers. Each container should hold about 2 cups of soap. Use one color per container at the following rates:
- 3 tsp. dispersed Titanium Dioxide
- 3 tsp. dispersed Ultramarine Violet + 1.5 tsp. Ultramarine Blue
- 3 tsp. Hydrated Chrome Green
 FOUR: Split the Lavender Forest Fragrance Oil equally between the 3 containers. Stir in with a wire whisk.
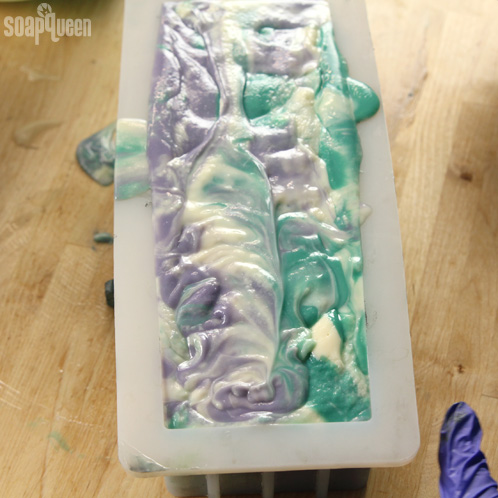
 FIVE: Now for a modified In-The-Pot Swirl. We call it ‘modified’ because instead of pouring the colored soap methodically at 12:00, 3:00, 6:00 and 9:00, pour wherever you’d like! Alternate between pouring the purple soap and green soap until you’ve emptied both containers.
 SIX: When you’ve emptied both containers of colored soap into the white soap, use a chopstick or dowel to swirl the soap in the pot. We swirled in a figure 8 pattern. Be careful to swirl only once because you do not want to muddle the colors.
 SEVEN: Pour roughly half the swirled soap into the mold. Keep the bowl in the same place as you pour, and allow the soap to flow into the mold. Tamp the mold on the table several times to disperse bubbles.
 EIGHT: Press the mica-covered embeds into the soap. Pack them in tightly to add interest, and don’t be afraid to push a few far down into the soap. It will enhance your final product!
 NINE: Once all the embeds have been placed, pour the remaining swirled soap.
 TEN: At this point the soap my be quite thick. That’s okay! The top texture won’t matter so much because you’re going to cover it in more embeds anyway. Tamp the mold on the table to disperse any bubbles.
 ELEVEN: Use the remaining melt and pour chunks to cover the top of the soap. Have fun with this part! Sticking them haphazardly into the soap results in an authentic gemstone look.
 TWELVE: Finish the soap with sprinkles of Iridescent Glitter.

Unmold the soap after 3-4 days. When you’re ready to cut this soap, turn it on its side to avoid pulling glitter through the soap and accidentally creating tiny drag marks. Allow to cure for 4-6 weeks. Enjoy!
- 9.9 oz. Coconut Oil
- 3.3 oz. Mango Butter
- 9.9 oz. Olive Oil
- 9.9 oz. Palm Oil
- 4.7 oz. Sodium Hydroxide
- 10.9 oz. distilled water
- 15 oz. melt & pour soap chunks
- Lavender Forest Fragrance Oil
- Titanium Dioxide
- Ultramarine Violet
- Ultramarine Blue
- Hydrated Chrome Green
- Iridescent Glitter
- 10″ Silicone Loaf Mold
- SAFETY FIRST: Suit up for safe handling practices! That means goggles, gloves and long sleeves. Make sure kids, pets, and other distractions and tripping hazards are out of the house or don’t have access to your soaping space. Always soap in a well-ventilated area.
- COLOR PREP: To ensure that the Titanium Dioxide blends smoothly into the soap batter, we recommend micronizing it before dispersing it in oil. To micronize colorant, simply use a coffee grinder to blend the colorant to break up any clumps of color and prevent streaks of white from showing in the final soap. We like to use a coffee grinder that has a removable, stainless steel mixing area for easy cleaning. Then, disperse 1 teaspoon of the colorant into 1 tablespoon of Sunflower or Sweet Almond Oil (or any other liquid oil). Finally, disperse 1 teaspoon of the other colorants into 1 tablespoon of light liquid oil. Use a mini mixer to get the clumps of color worked out smoothly.
- EMBED PREP: We used 15 oz. of leftover melt and pour chunks. We chose uncolored chunks made from our Clear Melt & Pour Base, as well as chunks colored with Liquid Violet. Cut the scrap melt and pour into jagged shapes to give the appearance of jewels or crystals. If you need a melt & pour refresher, check out our Free Beginner’s Guide to Melt and Pour.
- After you’ve cut up the melt & pour, coat roughly half (about 7.5 oz.) in a mixture of ½ tsp. Aqua Pearl Mica and ¼ tsp. Luster Black mica. We recommend mixing the micas together first and then coating the chunks. When the chunks are fully coated in mica, set them aside.
- Slowly and carefully add the lye to the water and gently stir until the lye has fully dissolved and the liquid is clear. Set aside to cool.
- Combine the Coconut, Olive Oil, Mango and Palm oils (remember to fully melt then mix your entire container of Palm Oil before portioning). Once the lye water and the oils have cooled to 130 degrees or below (and are ideally within 10 degrees of each other), add the lye water to the oils and stick blend until thin trace. If you’d like a harder bar of soap that releases faster from the mold, you can add Sodium Lactate to the cooled lye water. Use 1 teaspoon of Sodium Lactate per pound of oils in the recipe. For this recipe, you’d add about 2 tsp. Sodium Lactate.
- Equally split the batter into two more containers. Each container should hold about 2 cups of soap. Use one color per container at the following rates: 3 tsp. dispersed Titanium Dioxide, 3 tsp. dispersed Ultramarine Violet + 1.5 tsp. Ultramarine Blue, 3 tsp. Hydrated Chrome Green.
- Split the Lavender Forest Fragrance Oil equally between the 3 containers. Stir in with a wire whisk.
- Now for a modified In-The-Pot Swirl. We call it ‘modified’ because instead of pouring the colored soap methodically at 12:00, 3:00, 6:00 and 9:00, pour wherever you’d like! Alternate between pouring the purple soap and green soap until you’ve emptied both containers.
- When you’ve emptied both containers of colored soap into the white soap, use a chopstick or dowel to swirl the soap in the pot. We swirled in a figure 8 pattern. Be careful to swirl only once Pour roughly half the swirled soap into the mold. Keep the bowl in the same place as you pour, and allow the soap to flow into the mold. Tamp the mold on the table several times to disperse bubbles.
- Press the mica-covered embeds into the soap. Pack them in tightly to add interest, and don’t be afraid to push a few far down into the soap. It will enhance your final product!
- Once all the embeds have been placed, pour the remaining swirled soap.
- At this point the soap my be quite thick. That’s okay! The top texture won’t matter so much because you’re going to cover it in more embeds anyway. Tamp the mold on the table to disperse any bubbles.
- Use the remaining melt and pour chunks to cover the top of the soap. Have fun with this part! Sticking them haphazardly into the soap results in an authentic gemstone look.
- Finish the soap with sprinkles of Iridescent Glitter.
- Unmold the soap after 3-4 days and allow to cure for 4-6 weeks. When you’re ready to cut this soap, turn it on its side to avoid pulling glitter through the soap and accidentally creating tiny drag marks. Enjoy!


Hello!
How do you recommend storing CP soap with MP embeds? Plastic wrapping won’t be good for the CP soap, but leaving it all open to the air might result in the MP embeds shrinking and falling out….I don’t have access to a melt/pour base that is similar to CP soap here, and shipping to Canada from Brambleberry is sadly, cost prohibitive.
Thanks!
Hi Leanne!
I would recommend storing the bars in a cool, dry place with lots of good air flow. If you have a dehumidifer, definitely have that on in the curing room. If not, you can run a fan over the soaps as they’re curing. That should help prevent some of the sweating and shrinking. 🙂
Read more about storing your soap here: http://www.soapqueen.com/bath-and-body-tutorials/tips-and-tricks/how-to-store-handmade-bath-products/
-Kelsey with Bramble Berry
It says, “Unmold the soap after 3-4 days and allow to cure for 4-6 weeks. When you’re ready to cut this soap, turn it on its side …” Does this mean that you have to wait the 4-6 weeks before cutting it or do you cut it after you unmold it and then let it cure?
Hi Jeanne!
You can cut the soap after it’s unmolded! Then, cure the cut bars for 4-6 weeks. We recommend curing the bars after they’re cut so each one is exposed to the air. That way the excess water evaporates, giving you a firmer bar that lasts longer in the shower. Also, if you wait 6 weeks, the soap is more difficult to cut.
Learn more in the How to Store Handmade Bath Products post: http://www.soapqueen.com/bath-and-body-tutorials/tips-and-tricks/how-to-store-handmade-bath-products/
Sorry for any confusion! We updated the post to be more clear. 🙂
-Kelsey with Bramble Berry
Hello..
Would it be possible to use left over CP soap chunks in this recipe instead- or is the M&P used because it has translucent properties?
Thanks 🙂
Hi Bella!
Absolutely you could use cold process chunks! We love the look of the translucent melt and pour, but cold process would look great as well. 🙂
-Kelsey with Bramble Berry