This advanced cold process recipe is for the patient soapmakers our there. But I promise your patience will be rewarded with a beautiful and detailed bar of handmade soap. This recipe is divided into 3 stages and is actually a combination of 3 separate recipes. So take a deep breath, grab your ingredients and let’s make some Valentine’s Day Soap!

7.8 oz. Olive Oil
7 oz. Coconut Oil
6.5 oz. Palm Oil
1.2 oz. Beeswax
3.18 oz Lye
7.43 oz. Water
1-2 teaspoons Burgundy oxide
Flexible Brownie Pan Mold
18 oz. Olive Oil (16 + 2 oz.)
2 oz. Coconut Oil
2 oz. Palm oil
2.9 oz. Lye
7.22 oz. water
2 oz. Olive Oil
1.8 oz. Baby Rose fragrance
2 teaspoons Pink Oxide
2 teaspoons Fuchsia LabColor (diluted)
18 oz. Olive Oil (16 +2 oz.)
2 oz. Coconut Oil
2 oz. Palm oil
2.9 oz. Lye
7.22 oz. water
2 oz. Olive Oil
1.8 oz. Baby Rose Fragrance
1 Tablespoon Pearly White mica

The entire recipe fits two 2 lb. molds or one 4lb mold. You may have some extra soap left over too so have another little mold on hand (check out some of our heart molds).
Baby Rose fragrance oil tends to accelerate trace, so this recipe is specifically formulated to reach trace slowly. For this reason it’s important to prepare layers one and two in separate batches rather than making one big batch and splitting it (which is what you’ve see me do in the past).
Safety First! If you’ve never made cold process we highly recommend reading this blog post and watching this DVD or reading this book. Please do not make Cold Process Soap for the first time with just this blog post.
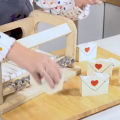
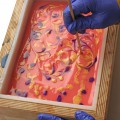
STEP ONE:Make the recipe for the cut-out hearts by combining and heating your oils, mixing in your lye water followed by the Burgundy Oxide. After reaching trace, pour 1/4″-1/2″ of soap into the Flexible Brownie Tray. Let sit for 24-48 hours or until the soap is firm enough to remove from the mold. Use a cookie cutter or craft knife to cut 9-10 heart shapes and smooth the edges with your finger if needed.Set hearts aside.

STEP TWO:Line your wooden mold(s) and have an extra mold or storage container on hand. We used freezer paper with the shiny side up (towards the soap) so it peels off easily. Learn to line your mold here.
STEP THREE: To start the second recipe, sprinkle the lye over the water in a heat safe container. Stir well taking care not to inhale any fumes. Set aside and allow to cool until the water is clear with no bits of lye in the bottom.

STEP FOUR:Measure out 2 ounces of olive oil in a head safe container. Measure out 1.8 ounces of Baby Rose Fragrance Oil.Set aside but keep with in arms reach. We’re going to add these both at the very end.

STEP FIVE: In a microwave safe container that will hold at least 2 pounds, melt the Coconut Oil and Palm Oil (making sure to mix the palm oil well). Add the remaining 16 oz. Olive Oil and mix well.
STEP SIX: Mix the Pink Oxide with a tiny bit of Olive Oil to work out any clumps and set aside. Keep your diluted Fuchsia LabColor close at hand too.

STEP SEVEN: (Are your goggles and gloves on? Keep ’em on!) Slowly add the lye water to the oil mixture. Gently mix using a stick blender in short bursts. Add the Pink Oxide mixture and Fuscia Labcolor and blend until fully incorporated. What you see for color is what you will get so if the color is not dark enough, add more Fuscia Labcolor until it is your idea of a perfect pink color.
STEP EIGHT: Heat up the 2 oz. of Olive Oil for 45 seconds in the microwave. Add your fragrance oil to this warmed up olive oil. Add the fragrance and oil mixture and stir with a spoon. Then gently use your stick blender to give it one or two bursts. Baby Rose accelerates trace even with the extra gentle addition method and careful stick blending so be prepared to pour quickly.

STEP NINE: Once trace is reached (which will happens fast), spoon the soap into the mold filling it only half way and tamping it down on the table to get rid of any air bubbles.
STEP TEN: For the third recipe, repeat steps 3-9 using the Super Pearly White Mica as your colorant.
STEP ELEVEN: Place the heart cut-outs at even intervals through out the soap, leaving the tips of the hearts peeking out of the top. The spacing depends on how wide you want your soap slices to be.

STEP TWELVE: Insulate and allow to set-up for a few days before cutting.
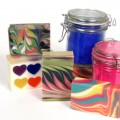
Cutting the Soap: Remove the soap log(s) from the mold. Using a sharp non-serrated knife slice the soap so there is one heart on the front of each slice. You may need to trim the bars a little to clean up the hearts.


I just made this soap last night and something didn’t work right, and I am a pretty experienced CP soap maker.
My first clue was this morning when I touched some extra pink soap that I had poured into a mold and it had a crust but was still gel underneath. Not a good sign.
So after 24 hours I decided to check this out and un-did one side of my mold, and sure enough, the bottom layer is a clear-ish gel that has the constistency of slime. What the heck? The top layer is very similar, but not quite as runny.
So I ran the recipe through a lye calculator (should have done it first, I broke the cardinal rule) and the amount of lye (2.9 oz)in the recipe is not even on the chart. 0% excess fat is 2.82 grams.
Am I missing something here? I always check my recipes, but this time…
I will say that the baby rose fragrance is wonderful, I am just sorry that I wasted so much of it in the failed batch.
I will try again tomorrow with the correct amount of lye.
Interesting. Excess lye would usually just make your soap trace super fast as opposed to separation that you got. It definitely sounds like something else – more like separation?
That said, I need to double check my notes and see why the lye isn’t working out. I’m betting we used 16 oz. of Olive Oil + the 2 oz. at the end and typo’ed it because it’s correct in the second layer and not the first.
Good eye – I’ll get it fixed asap. =)
And if it were me? I’d rebatch using the Hot Process Hero: http://www.soapqueen.com/bath-and-body-tutorials/tips-and-tricks/hot-process-hero-2/ with an extra 4-6 ounces of oil so you at least have usable soap in the end.
Rebatching is a good idea as it smells awesome. I’ll try that.
I have had soap separate before and this was more like soap that was just stuck in gel state. Interesting experiment to be sure.
Some time ago, you posted a beautiful melt and pour soap that looked just like this one. Layers were orange and lime with the hot pink hearts set in just like this CP tutorial. Only problem was that I didn’t get to watch how and when the hearts were set in the melt and pour ( how long did it set up before you were able to have them stand up?) The fragrances you used were Kumquat in orange layer and Champayne in the lime layer. Thanks!
Yes! That was a great tutorial. Look for it to be posted in the next few weeks on the blog (since it was just a newsletter project so a lot of people didn’t see it). I need to review my notes to remember how long I had to wait. =)
The heart isn't being cut. It just hangs out in the soap. The layers tend to separate if poured too far apart in time. 🙂 The downward pressure of the knife is what does it in my experience. 🙂
I'm curious as to why soap layers won't stick together if they are poured more than a few hours apart, and yet the heart in this project is 24-48 hours old and it is supposed to stick to the two layers of soap it's inserted into. I don't get it . . .
Hooray – you said the magic words, "new, lower price". I placed another BB order before I saw your reply but I'll be ordering this in my next BB order.
Hi Linda,
Here's the link to that mold: https://www.brambleberry.com/Glossy-Silicone-Square-Tray-Mold-P4752.aspx and I've updated the blog post. New, lower price =)
Yes, use any fragrance you want so long as it does not accelerate trace. I would follow the measurements exactly if it were just another good-performing fragrance.
Pinkberry will work just fine. The color will be just a tinch different but nothing major =)
Have fun with the project!
Hi Ann Marie:
I know this is a project from Valentine's Day LAST year, but I was thinking of trying this project now.
I don't care much for rose fragrance, so can I use another fragrance as long as the fragrance does not state that it accelerates trace? And if I use another fragrance, can I still follow the rest of your instructions and measurements exactly? Or do I need to change my water amounts?
Also, I tried to click on the link above to purchase the flexible brownie pan but I got an error message saying the link was no good. I tried to search on BB for the pan but couldn't seem to find it. Do you still carry that pan?
Lastly, can I substitute Pinkberry color for the Fuchsia color?
Thanks!
Hi Salome,
I know I'm too late to help you on this but for others reading this later, I find that layers won't stick together if they're more than a few hours old with cold process soap.
Sorry to be the bearer of good news.
Thanks for replying Anne-Marie !
I can't wait to start embedding soap this way!
xoxo
Marie
So, here's a question, I made soap yesterday and want to add a layer to it today. What do I have to do to make sure that they stick together?
Brilliant question Marie. Awesome job putting the puzzle pieces together about aluminum reacting TERRIBLY with fresh soap.
In this case, since the soap is hardened and the lye is neutralized, you can use any cookie cutter you want =) But, if the soap was fresh fresh, you would never want to use aluminum products at all.
HI, I have a question 🙂
Can we use any cookie cutter? I mean my soapmaking teacher stressed on the fact that lye reacts with metals, so I was wondering if that mattered when making the embedable shape?
xoxo
Marie
Ann Marie
Absolutely beautiful! I can't wait to try this out myself in the coming months!!
Melissa
Hi Doreen,
While I can't promise you'll be able to get your recipe to work, whenever I do layers, they stick together great. The few times that they haven't, it's been because I waited too long between layers.
I would defnitely give it a try again but maybe with the oils I suggested and not the subsitutions just to be on the safe side.
My layers are still sticking together relaly nicely.
Let me know how it goes when you give it another try =)
Wow! Very ambitious and very very cool! Thank you AM for sharing this fun cp soap project 🙂
I just made this recipe and this is what happened…can someone tell me what I did wrong as I make layered soap and this has never happened although I have recently stopped using palm oil and substituted it with canola shortening.My bottom layer separated from my top layer. The heart worked just fine and they look pretty in the soap.
The cream layer I used wine instead of water and I used the shortening in place of the palm and adjusted my lye and liquids with a lye calculator.
Thanks…i will remake this if I am sure I can get it to work.
Doreen
Hi Anon – CPOP would be fine – just make sure to make the inserts way ahead of time so they don't loosen up and lose their shape right along with everything else in the oven =)
I planned on using a smaller heart and want to move it to where the two colors meet in the middle of the bar and pour my second color. Can this recipe then be CPOP? or will it screw up the appearance?
Oh wow. This is very cute and easy to do. Its really a unique idea to give a gift to our loved ones. Thanks for this nice stepped post.
I followed your recipe exactly. But no discounts, no fragrance. My soap did gel. But in my brownie pan it was more like 1/2" thick and definately did not cut like butter. I had to lean on the cookie cutter. It was like cutting a bar of commercial 'soap'. I have never used beeswax in a soap formula before. I used natural pasteles. I can see my pan was too small…shoud have used 2, but it was also very hard and shiny. Not what I am used to in CP…hard yes, but that normally takes a few days to weeks. I sure appreciate the help. I think this is such a cute design, I want to make it for the grands for Valentine's day gifts.
Loretta
Hi FittingTips,
Oh no! Splintery soap is no good.
Couple questions:
1. Did you use fragrance?
2. Did you discount the water at all?
3. Did the soap go through a hot gel phases?
I didn't use any fragrance for the inserts, didn't discount the water and the soap studio was so very cold that the soap did not go through gel phase.
When I made the recipe, I had a good 10 minutes to work with the soap. I poured it into one of our 'normal' brownie pans and then a thin layer into 4 MW Rectangle Molds so I'd have extra just in case. The layer was about 1/4" of an inch thick I'd say?
Keep me posted; I'd love to see if we can figure out why yours got so hard on you and mine cut like butta'. =)
A-M
I tried this today. I think something went wrong. My first soap…the one in the brownie pan set up hard and fast. At 5 hours I figured I'd better cut now or never. It splintered with the cookie cutters (good sharp strong ones) and even bent one of my cutters. What size pan did you use? Mine was 9×9 is that too small? I am an experienced CP maker but this is my first soap with beeswax.
Thanks!
Hi Mariana,
I'm helping out on the Blog while Anne-Marie is in Saudi Arabia.
Our next Soap Queen TV video is scheduled for Thursday, Jan. 28th. It's a special Valentine edition – but I don't want to give it away so that's all I'm saying for now. 🙂
Hi Soapwoman,
We did not spray our pieces with alcohol and they are sticking just fine! I guess that's one advantage over MP soapmaking. I think it's important that the soap is pretty fresh – so that it shrinks at the same rate as it cures.
So pretty AM! I've been entertaining the idea of making 'cut out' soaps, just lack that patience! Lol
They ARE darling! Just one question. I am an experience CP soaper, but haven't done much with embedding. Thought you had to spray with alcohol to get the cured soap to "stick." Not necessary?
LOVE it! Thanks! I have been tinkering with the idea of cutting shapes out of CP soap, now you have given me the inspriation I needed to move on it! Thanks, as always Anne Marie!
🙂
S.
What an adorable soap! Thanks for all the info and projects you do!
Michelle in NV
Mar D. Jabones said….
Super cute cold process soap!!! Delightful!!! All my family follow your videos in youtube, we can not stop learning new tips and tricks every time. Thank you very much!!!
Our question is when are the new episodes coming out in youtube, we live in Spain so it is the only way to watch your classes.
Your ideas and designs are wonderful and we have a lot of fun at the same time!!!!
Waiting to watch you soon on your new shows!!!
Mariana
Very cute project!
Oh it is just so pretty! I love the technique – thanks for sharing!
So cute! I like your idea of using three different colors. It looks great all together.
that is so so adorable and cannot wait to try!
Anne-Marie, I made your shea recipe this morning. It is WAAY better than the recipe I had.
It is so fluffy I positively wanted to EAT it!
I am so excited because this product sells.
If we don't get to "talk" to you again before you leave, we all LOVE you and are praying for a safe trip!
Anne Marie…
You Rock!
I get so many ideas from you.
Thank you.
I like the idea of doing a larger object and cutting it in half (Charity) because then there wouldn't be as much clean up.
Helen, You are correct. I ended up making 2 "2 lb" loaf sizes with that recipe. Here are the dimensions for that mold:
7" x 2.25" x 3.25"
I'm glad everyone is enjoying the project. It's complicated but worth it! =)
This is awesome! Thanks for sharing.
Thank you Anne Marie, those are just darling. Your patience is truly amazing.
Best of wishes for your trip east.
Beautiful!
I did something similar for Christmas, but instead of cutting out the embedded trees, I made them in a silicone tree-shaped muffin pan. When I cut the bars, I sliced through the middle of the tree, so one half was on each bar. I spaced the trees such that every other cut had a tree and the odd cuts were plain, so one side was plain and one side had the shape, like yours.
I like the cookie cutter idea because there are more shape options.
This looks great! Is that the whole recipe we see in that mold or just half? Could you post the inner dimensions of the mold this fits into? My molds are oriented with the wide side of the soap at the top and they hold a batch using 60 oz of oils.
This is great! Thanks for sharing this. I'm planning to make soap this weekend, so I'm going to start gathering supplies and equipment for this special project.
This looks awesome and just the thing I was looking for. Thanks so much for sharing!
This is a great tutorial. Thank you!
I can't wait to try this once I've accomplished a few plain CP soaps! 🙂 (Therefore, this will be filed away for next year.)