Bramble Berry was recently mentioned in the 2011 Martha Stewart Holiday Handbook. Yippy! (And yes, we all did the Happy Soaping dance in the office when we saw our name in print in the Divine Ms. M’s magazine). If you don’t have that issue already, you should definitely get it. There are lots of yummy cookie recipes included. Martha did a wonderful red and white striped soap project using melt and pour soap. Even though Bramble Berry was just noted as a supplier (and not the author of the recipe), we received a ton of calls in customer service asking how to make the “Martha Soap” which we were so happy to help with (and so proud to be associated with! Thanks Martha and team!). The calls inspired me to create my own “Martha Inspired” peppermint layer loaf. This is obviously an iteration of the soap by the Martha but it also takes inspiration from last year’s uber popular Peppermint Bark soap.
 See the snowflake ornaments in the background? These beautifully crocheted ornaments for the tree were a gift from a customer. Thanks Eleanor, that was so sweet of you!
Ingredients
28 oz White MP Soap Base
40 oz Clear MP Soap Base
Merlot Sparkle Mica Or Bordeaux Mica
Peppermint Essential Oil, 2nd Distillation
Tools
Heat safe containers
Knife
Buy all of the ingredients you need in the click of a button!![]() update: The buy it now button contains Opalescent Bordeaux Mica instead of Merlot Mica since we’re currently out of stock. It’s a great substitute for this project.
update: The buy it now button contains Opalescent Bordeaux Mica instead of Merlot Mica since we’re currently out of stock. It’s a great substitute for this project.
This recipe combines two intermediate melt and pour soapmaking techiques: Embedding and Layering. If you have never soaped using these methods, brush up on your melt and pour skills by watching the Soap Queen TV episodes on Embedding and Layering.
PREP: The first step is to prepare our embedding pieces for the center of the soap loaf.
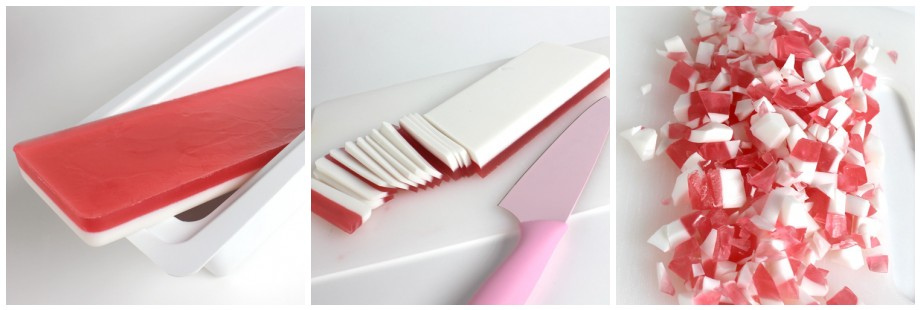
- One: Melt 8 ounces of white soap base in a heat safe container (30 second bursts in the microwave). Mix in .1 oz (that’s POINT one) of Peppermint 2nd Essential Oil. Pour the soap into the 9″ Loaf Mold. Let cool.
- Two: Melt 8 ounces of clear soap base in a heat safe container (30 second bursts in the microwave). Mix in .1 oz (that’s POINT one) of Peppermint 2nd Essential Oil, 25 drops of Non-bleeding Red and 1/2 mini scoop of Merlot Mica (this is the perfect combo for a non-bleeding red in my opinion). Let the soap cool down to 125-130 degrees the spritz the white layer with rubbing alcohol and pour the red layer over the white. Let cool.
- Three: Once the soap has cooled, unmold the soap and cut into small, irregular pieces.
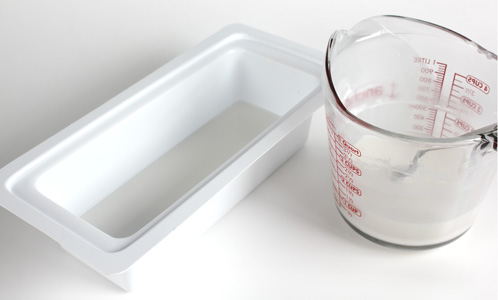
ONE: Melt 20 ounces of white soap base in a heat safe container (30 second bursts in the microwave) and mix in .3 ounces of Peppermint 2nd Essential Oil. Pour half of the white soap into the loaf mold. Weigh it if you want to be precise but I’m sure that you can all guess that I eyeballed it. Spritz the soap with rubbing alcohol to get rid of any air bubbles and let the soap cool.
Tip: Cover the remaining white soap with plastic wrap to keep it warm. You’ll probably have to reheat by the time we use it again but this may shave off a minute in the microwave depending on how fast you work.
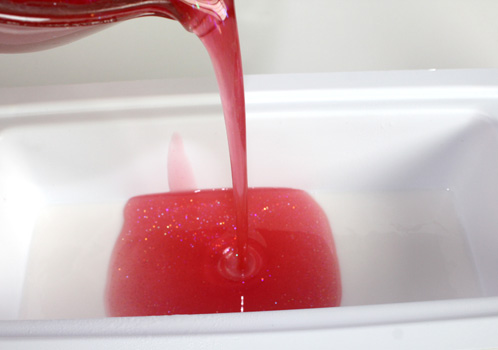
TWO: While the white soap is cooling, melt 20 ounces of clear soap base in a heat safe container (30 second bursts in the microwave). Mix in .3 ounces of Peppermint 2nd Essential Oil, 45 drops Non-bleeding Red, 2 mini scoops Merlot Mica and 1/2 Teaspoon of Iridescent Glitter. Mix well and let the soap cool down to 125- 130 degrees. Once the white soap is completely cool and ready to support another layer, spritz it with rubbing alcohol and pour half of the sparkly red soap over the white. Let the soap cool.
Tip: Cover the remaining red soap with plastic wrap to keep it warm.
THREE: Now for the fun part- embedding! Melt 12 ounces of clear soap base in a heat safe container (30 second bursts in the microwave). Mix in .2 ounces of Peppermint 2nd Essential Oil and let the soap cool down to 130 degrees.
Hint: Have you heard of the “blueing technique”? Add just the teeniest, tiniest amount of Liquid Blue Colorant to the soap to get a “clear” effect in the soap. See the trick in action on the Embedding Episode of Soap Queen TV.
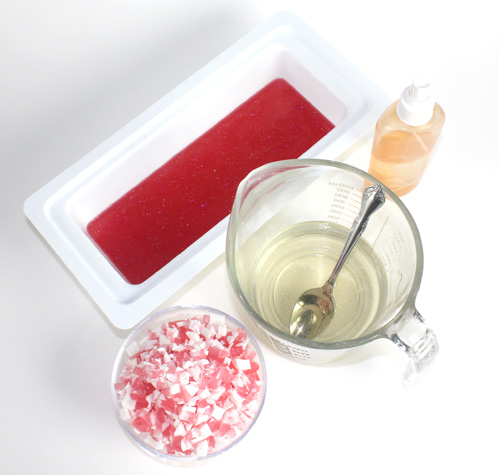
FOUR: This next step will involve a lot of rubbing alcohol and a fast paced tempo. Liberally spritz the embedding pieces ahead of time. Next, spritz the red layer of soap with rubbing alcohol and pour half of the clear soap on top. Add a big handful of the peppermint pieces. Then repeat. Spritz. Pour the rest of the clear. Add peppermint pieces. Let cool.
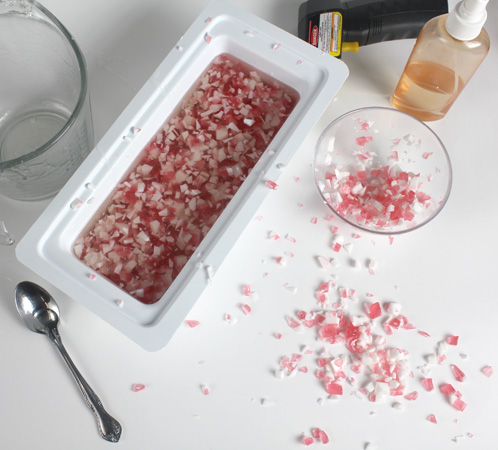 The aftermath and chaos of embedding the peppermint pieces. Hey, I never said this was going to be a clean project =)
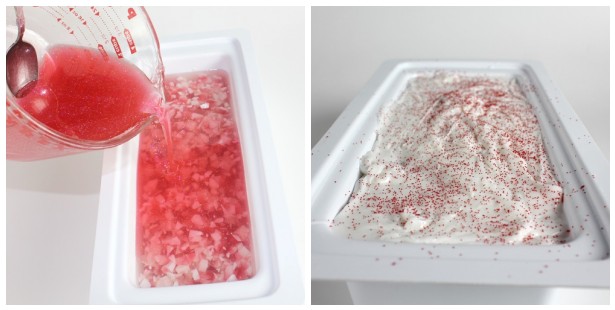
FIVE: Once the soap has cooled, pour the final layer of sparkly red soap followed by the rest of the white soap. Depending on how fast you’ve moved, you may have to reheat the red and white soap. Remember to cool the soap down to 125-130 degrees and spritz between layers!
SIX: For the textured white top, push the melted soap back and forth with a spoon while the soap cools. Keep pushing the soap as it starts getting gelatinous and hard. Then immediately sprinkle on the jojoba beads while the soap is still warm.
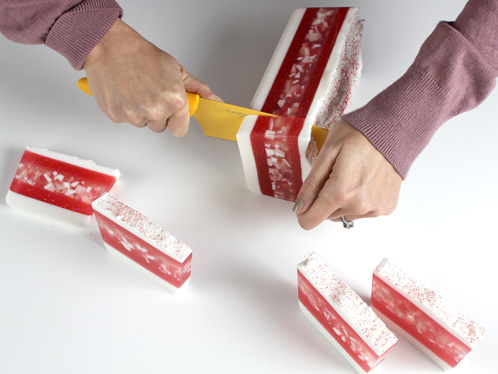
Cutting Tip: Avoid drag from the jojoba beads by cutting the soap on it’s side. If you cut from the top, the jojoba beads will drag down into your soap causing drag marks and stripes.
I hope this project inspires you like Marthat Stewart project inspired me. If it does, I’d love to see a picture of your project. Just post it on our Facebook page – I’m there every day! Happy Soaping!



Wow! 2 years later and this project is still in vogue in my book. Going to try a similar style for St. Patrick’s Day in a fresh green scent. Too cute!
Hi Tiffany!
Thank you so much for stopping by. If you get a chance to take pictures of your St. Patrick’s Day soap, we’d love to see how it turns out. You can share photos on Bramble Berry’s Facebook page. =)
Happy Soaping!
-Becky with Bramble Berry
https://www.facebook.com/BrambleBerry
About how many bars or slices can I get out of this? Does it make just one loaf?
I’m new to all this and trying to decide what to make! 🙂
THANK YOU!!
Gwen
Hi Gwen!
This recipe does only make about one loaf, you might have a tiny bit left over, but not enough for another loaf. The amount of bars/slices depends on how skinny you cut your bars, but I would say about 8 or 9 if you cut them at 1-inch. I hope this helps! 🙂
-Beck with Bramble Berry
That makes total sense. I did add all my pieces. Good news is that my soaps did look pretty amazing!! Thanks much!!
Hello there!
I absolutely LOVE your website; thank you so much for giving us tips and ideas of soap making. I’m 16 years old and I enjoy making homemade crafts.. you absolutely amaze me
thank you and keep it up!
Thanks Sam! I started making soap when I was 16 years old and it’s been a lifetime endeavor ever since – and a very rewarding, fun one at that! Welcome to the craft and thanks for being a fan.
This was my first attempt at a “fancy” soap. I weighed my soap (twice) but ended up with quite a bit of the red and white left over. The 9″ loaf filled up quickly with the chopped pieces. I now have about 1/4″ left to add the last layer of white.
Any thoughts as to why this happened? It’s all good cause I made a few personal size round soaps with the left overs. But, would love advice so I can correct for the next round!
I’m so glad you got a chance to try the recipe! I think it may have something to do with the amount of embedding pieces that you put into the clear middle layer. This part of the recipe may vary depending on how many of those pieces you add (Anne-Marie didn’t add all of hers). Even though the measurements didn’t turn out perfectly, I’m sure it still looks fabulous!
Courtney from Bramble Berry
Hi! I just made this soap last night, its really lovely, but when I try to cut a piece off the layers fall apart. 🙁 did I let it cool too much in between layers? Is there anyway I can get them to stick together or is my whole loaf ruined?
Spritzing the alcohol between layers is what helps the layers stick together. Make sure that you spritz the first layer of soap right before you pour the second layer. And fresh layers of soap will always stick better too.
If none of your layers stuck together then you can always remelt them and just start over.
Courtney from Bramble Berry
Thanks for the reply! I did spritz in between, maybe my alcohol is too old though, hmmm. I can remelt some of the layers, but the middle layer is impossible to remelt, but maybe I can lay it on top of the 2nd warm remelted layer and it will stick.
So if I added this correctly…for 68 ounces of soap base, you added 1 ounce of essential oil. Is that correct? Does this soap have the cooling, tingling effect from the peppermint?
One more question, If I wanted to have jojoba beads in an entire bar of soap, what measurement of jojoba beads would you add to what measurement of soap base?
Many thanks!!
You got it. The entire loaf has a total of 1 ounce of peppermint essential oil. I tried the bar and it does feel cool but it doesn’t tingle. I think jojoba beads would be a cute addition. Start with 1/4 teaspoon per pound and see what you think. You can always add more.
Good luck!
Courtney from Bramble Berry
Thank you!
I just now see it’s MP soap! Wow, love the last/top layer! It looks like CP soap!
Deffinately gonna try this soon!!
oooh they look lovely!
AM, You are so courageous !I’m so darn proud of you ! Takes guts to make that first bar/ loaf etc. and I’m finally diving in. Your Brambleberry staff is great/ your ingredients have my mind watering and your videod hands have me hopping !
I made some jewels from another site …and would like to know if you’ve ever attempted them…and my christmas loaf is cooling as I write. I have no idea if my red is bleed proof ( it’s from wilton ) so, keeping my fingers crossed. I had such a terribly hard time paring down my first order from BB…and now the kitchen island has constant new inhabitants…
Can hardly wait until I order my first birch mold and separator blades…omy, I can’t stop thnking about this !
laur, mom of 11 , guess what they’re all getting for christmas.
and they want it !
Hi Laurie,
Thanks for your note, your enthusiasm and your support. I’m delighted that you found us and I hope that your projects turn out fantastic!
I think Wilton food coloring bleeds but that’s totally fine! A little bleeding color won’t change that your soap is fantastic =)
Keep me posted on how your birch mold works out for you. We have a super cute tutorial making individual soaps (melt and pour) with teensy embedded eraser animals on the blog from a couple years back that I bet you’d love with your kids! =)
I love this! This year I am making all of my Christmas presents. It has become to commercial for me. I just placed my order for the items that I didn’t have so I can include this for more gift giving. Since finding you on YouTube, I think I have watched all of your videos multiple times. I learn something new with repeated views. I especially the gaffs at the end. Keep up the great work!!!
Aw, thanks Connie! You do me such an honor by watching those videos. We have so much fun making them and are just so delighted that people find value in them. You’ve made my night! =) And, thank you for the order from Bramble Berry. Those orders are what allow me to keep funding the videos. =)
What a great idea! So pretty and would smell incredible too. Thank you for yet another wonderful project.
Thank you Monica! We love Martha Stewart and definitely consider this an inspired project with helpful techniques (the topping) from Debbie at SoapyLove.com Soap allows for such great creativity and art in a very accessible way. =)
Just when I thought I had all my Christmas soap ideas planned, you come with another great idea!
Quick question: I have the 12″ loaf mold. By how much would I need to increase the amount of soap to fill that mold?
How gorgeous!!!
Thanks for explaining how to do a textured top! I can’t wait to try it!
I’m placing my order for these ingredients tomorrow! I can’t wait to try it out! 🙂
~Terra
Bramble Berry~!~You all are my heros!
love it…. and i can only imagine the smell…. and i was wondering how to do the top white layer like that…. thnx AM you re very nice… keep on posting… greetings from greece.
Love that sparkly red color. I’m off to check out the non-bleeding red – had no idea it was so good!
Absolutely Beautifil! So Christmasy!!!
I LOVE those peppermint soaps. So sweet! And congrats on being included in Martha’s holiday book!
Thank you. The Divine Ms. M is always the pinnacle of crafting in my opinion =))