Here’s Debbie with another super adorable SoapyLove project! When you’re done oohing and aahing over this tutorial, check out the totally rad soaps she taught at Soap Weekend Intensive 2012 using Bramble Berry’s neon colorants. -Anne-Marie

Two adorable looks with one mold!
I am so excited! The new Soapylove Ice Pop Mold is now available – it’s the baby sister of the Soapylove Ice Cream Cone Mold! Just like the ice cream version, there are many yummy and adorable design possibilities with this mold. Here are two versions to help inspire you. The first one is nice and easy, and the second is a little sexier. 😉
Here’s what you’ll need for both versions of this soapy project:
SoapyLove Orange Sherbet Fragrance Oil
Buy everything you need for these projects with the click of a button!

1 2 3 – easy!
This orange version is summery and stylish. With only three steps, you’ll be admiring your work in no time!
1. Melt 1/2 oz white soap base and color with a drop of orange liquid colorant. Using a pipette, fill just the deepest part of the mold.
2. Now mix a separate 1/2 oz of white soap with a drop of blue liquid colorant. Fill the dots and stick area with this soap (see the Neapolitan version for some tips on making perfect dots).
3. Once hardened, melt enough white soap to fill your mold (4 oz per bar). Add your choice of fragrance (Soapylove Orange Sherbet would be an excellent choice!) and allow to cool to 120-125 degrees. Spray hardened soap in mold with alcohol and top off mold. Allow to harden overnight (or put in freezer for 15-20 minutes) and pop out!

A little more time, but the results are so worth it!
Okay, so you’re ready for a little more flair? Well here you go and it just takes one more step than the Orange version! This is the perfect project to use your Sweet Treats Colorant Set for!
1. Melt 1/2 oz of white soap and color with liquid brown colorant. Fill the entire pop area of your mold. Repeat, but with red or pink colorant.
2. Put mold in freezer for 5 minutes, and pop out pops. 🙂 Cut them into thirds. Put pop parts back into mold, leaving a gap in the center. You can choose to leave the stick part on your mini soaps or not. I did one of each in the main photo.
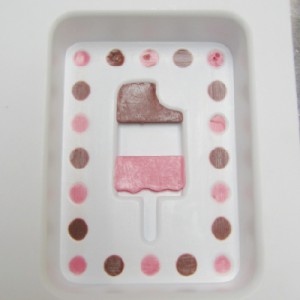
3. Using a pipette, fill dots with alternating pink and brown soap. Not too confident with your dot filling skills? Just overfill the dots, allow to harden, then scrape the mold with a card to reveal perfect dots!

Neapolitan Pop Soap, ready to fill.
4. Now melt enough white soap base to fill your mold (4 oz per bar), scent with your favorite fragrance from the Delectable Desserts Fragrance Kit, and allow to cool to 120-125 degrees. Spray hardened soap in mold with alcohol thoroughly, then gently pour your white soap in. Allow to harden overnight, or in the freezer for 15-20 minutes. Pop out and enjoy the oohs and aahs!
‘Til next time!
Debbie “Soapylove” Chialtas 🙂


![winningphoto[1]](https://www.soapqueen.com/wp-content/uploads/2014/06/winningphoto1-120x120.jpg)


Thanks Debbie, I love you tutorials
ahhhhhhhhhhhhhhhhh…they are so cute!!! Love them!
IT’S bautiful!
XOXO
Such a cute mold! Thanks for the helpful tutorial.
YUMMY! I could just eat that bar right now…not a good idea though. LOL How about choc.chip cookie dough or moose-tracks? It would be complicated but look oh so good!
~Nickie~
That’s a great idea Nickie! Let us know if you come up with a soap like that, we’d love to see how it turns out.
~Becky with Bramble Berry
The little ice pop soaps by themselves are CUTE too!
Super cute! The ideas are endless. A mint chocolate chip would be adorable as well. 🙂
What a fabulous idea! =)
~Becky with Bramble Berry