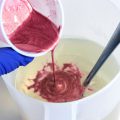
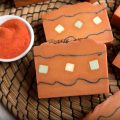
Learn how to combine 2 melt & pour techniques in this episode of Soap Queen TV. First, make a pink and white jellyroll soap which is a variation on the Pinwheel Soap Technique from the 4th of July Special Edition video. Then, embed the jellyroll into a melt and pour loaf, demonstrated in one of the earliest episodes of Soap Queen TV.
For this project I used hot pink, stark white and sparkly black for a striking, retro 80’s look (or as I like to call it, “retro-tastic!”), but feel free to choose any color combination.
Ingredients:
Clear M&P Soap Base
White M&P Soap Base
Non-Bleeding Red Color
Red-Blue Mica
Black Mica
Ginger Ale Fragrance
Strawberry Fragrance
Liquid Glycerin
Loaf Mold
Flexible Silicone Tray Mold


Is it just alcohol or a mix with water?
Hi Linda!
In this recipe, we use 70% rubbing alcohol that you can buy at your local grocery store. We find it to be the best for our melt and pour projects. 🙂
-Becky with Bramble Berry
Does 70 percent rubbing alcohol work?
Hi Jamilla!
70% Rubbing Alcohol is going to be the best to use for your Melt and Pour projects while 91% is going to be the best for cold process soaps and preventing soda ash. =)
~Becky with Bramble Berry
Is there a way to do this without using rubbing alcohol? I think it smells really bad =(
Thank you Anne-Marie!
Jamilla Holland
Hi Jamilla!
The rubbing alcohol smells actually evaporates off and isn’t in the final product! =)
~Becky with Bramble Berry
I mean I dont like the smell when I spray it onto my soap.
We’ve heard of some people using hairspray, but we’ve never found that to work very well for us. We’ve always used the 91% Rubbing Alcohol. I’ve found if the smell bothers me too much I open a window (or door), or even turn on a fan! Hope this helps! =)
~Becky with Bramble Berry
I`m so hooked on your tutorials, this looks so cool. I wish I could have seen it before doing my order, I would have included it in my list! lol (liquid glycerin)
Thanks for all your tutorials, you really help to give me confidence and want to make more! 🙂
Hi Kim! You might be able to find liquid glycerin in a local pharmacy, some do carry it! =)
-Becky with Bramble Berry
Here’s the link to the silicone mold https://www.brambleberry.com/Glossy-Silicone-Square-Tray-Mold-P4752.aspx
We’re not selling that clear mold anymore but we have a new mold with the same dimensions. Here’s the link https://www.brambleberry.com/12-inch-Loaf-Mold-P5051.aspx
I hope you get a chance to make the soap =)
Courtney from Bramble Berry
Love the look of this soap. What are the dimensions of the loaf pan?
Oops I hadn’t finished my response yet. I was going to say I hadn’t done M&P in awhile as well so think that had something to do with it. I go between M&P and CP but lately have focused on CP more.
I love ’em both equally but am like you and go in stages between the two. =)
Anne-Marie,
Thank you for the helpful tips on this and I’m going to try again. I use SFIC for my clear and white base and have tried others and this is my favourite so far.
Yes I realized I waited too long between layers on my first jelly roll but I made it work and still rolled it up. I’m happy the soap still looks good.
Fantastic – keep me posted on how it goes! =)
I made this soap on Saturday and it was one of the trickiest melt and pour projects I’ve done. The first attempt on Saturday I forgot to spray alcohol on the two layer jelly rolls after laying them in the mold (one of my double layers also split as the white M&P hardens up faster then the clear). I prayed for a miracle and cut my first bar which came out okay. The rest of the bars all fell apart and there were holes where M&P should have filled the centre of the jelly roll.
So Sunday my sister and I picked apart all the jelly roll bits and tried again making sure to spray liberally around the jelly roll layers with alcohol. I laid the jelly roll rolls in and poured the rest of my soap until it filled to the top. Again I had lots of air pockets in my finished product even though I kept trying to add melt and pour to the missed air pocket parts on the. So as I cut the bars (they cut fine this time) I had to do surgery on quite a few bars by adding melt and pour to the centre of the soap.
Anne-Marie you made it look so easy. Still not sure how to avoid the holes in the middle of the soap in the future but I think doing this in a vertical mold would be perfect.
I totally admit that I am not the best judge of ‘hardness’ on soap projects because I’ve been soaping for so long so I asked one of our instructors who teaches new soapers all the time on what she thought (that’s why I took an extra day to get back to you). Here is what she said:
“For the jelly roll, pour the two layers as soon as you can. The first white layer will still be soft and warm but firm enough to hold another layer. She’s probably waiting too long. Could always add more glycerin too.
It also sounds like she’s rolling the jelly roll too tight AND it takes a lot of rubbing alcohol to make the soap spread out through out the entire jelly roll.
My first attempt had holes in the middle too- more rubbing alcohol and looser “roll”.”
So, take heed, Courtney had trouble on her first attempt too (and that was with my instruction to guide her – LOL!). That timing is SO important for the two layers – hugely important – and of course, I always soap with the Bramble Berry house base and swear by it too for anything the requires some flexibility and give with it (even with that glycerin, you still need high quality soap base). =)
I hope this helps!
Aw thanks! I can’t wait to hear what you think of it when you DO try it =)
Gracias!!!!!
Cuidate mucho y al bebé.
Mariana
Oh so the lather is black? Yes, that’s just a usage rate thing. Use less and you’ll be all sorted out =)
Hi Anne thanks for answering my question!!
I just did a batch of black soap with Rosewood essential oil as a fragance and when I started using it the color migrates to my hands, not too much. Maybe I have to adjust the amount of black mica which is tricky to use I think…
Si me has entendido bien, yo he usado la base transparante y a veces la ESPUMA sale negra. Any suggestions are welcome, I ll try again using your proportions and I keep you posted.
Have a nice day!!
Mariana
From Mar D. Jabones
Foam? Like the soap base maybe? We used clear soap for the black base. Did I understand your question correctly?
I love black retro soaps!!! But is your foam black or white in this proportion?
Thanks for this new episode.
Take care!!
Mariana
from Mar D. Jabones
Thank you! I’m glad you enjoyed it. =)
I can’t wait to hear what you think of it! =)
Thanks! It was a really fun project to design and film.
Thanks! They’re fun to film and write. =)
Thanks! It’s very retrotastic, bright and fun. =)
Aren’t you sweet? Perhaps “well-rested?” LOL! =)
This is a cute idea and love the colours you used. I’m looking forward to trying this out.
I am watchin’ me some Soap Queen TV this weekend!
Awesome video! Now I want to go make some soap 🙂
You make it look so easy and I can’t wait to give it a try.
Fun, creative, exciting, colorful, useful. Is there anything cool that Soap Queen is not!?
Love them Anne Marie! I love the colours too you have picked out, I just want to try that now!
Cool! I just love watching your SoapQueenTV tutorials!!!