Simona from Bramble Berry marketing did a darling melt and pour project that turned out way too cute to not share with everyone. Thanks Simona! And check out her other guest post on Cocoa Powder (yum). Enjoy! -Anne-Marie
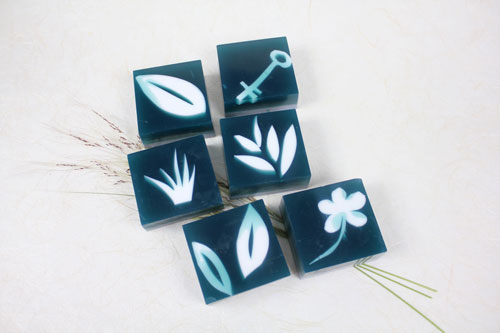
This soap evokes childhood memories of summer art projects. One of my favorites, a treat, was using Sun Print paper. Depending on how much paper we had, we’d spend hours collecting and doing practice arrangements – you have to be quick with the set up to achieve the “best” print. We’d run around the house and yard to gather various plants, feathers, keys and other fun and funky shaped objects. A patch of driveway would be selected and we’d layout our sheet, arranging our found objects just so on the paper. After carefully setting the glass onto the arrangement we’d anxiously watch and wait for the blue to turn to white. Then we’d run to the hose to “process” our masterpiece, watching the white turn back to blue where our objects were not.
If you have never made a layered soap before, please watch the Basic Layers episode on Soap Queen TV to brush up on the basics before tackling this project.
What You’ll Need:
Organic Clear Melt & Pour Soap Base
Shea Melt & Pour Soap Base
Non-Bleeding Teal
Activated Charcoal
Liquid Glycerin
Tangerine Essential Oil
Ylang Ylang Essential Oil
Lavender 40/42 Essential Oil
Cedarwood Essential Oil
12 bar square silicone mold
Buy everything you need with the click of a button!
SOAP INSTRUCTIONS:
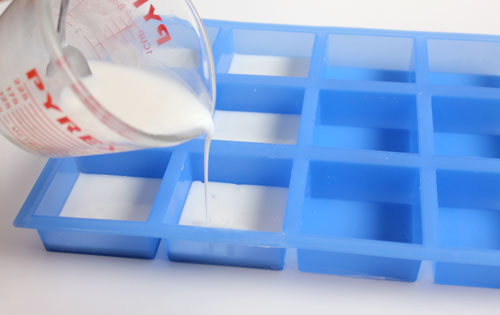
1) Melt 12 oz of Shea Melt & Pour base in a microwave safe cup, about 45 seconds. In 6 cavities of your 12 bar silicone mold, pour a thin layer, about an 1.5 oz, or ⅛” – ¼” deep. Spritz with alcohol to get rid of any bubbles.
2) While waiting for your white layer to set up, blend your essential oils, if you haven’t already. I liked equal parts Tangerine Essential Oil, Ylang Ylang Essential Oil and Lavender 40/42 Essential Oil.
3) Cut up and melt 18 oz of Organic Clear Melt & Pour Base. Mix 20-30 drops of Non-Bleeding Teal with a few spritzes of rubbing alcohol (helps avoid speckling) in a small mixing bowl. Add as much of the the Teal to your melted clear soap base to get the color you want. Stir well to fully incorporate the teal. Add your essential oil blend and mix well. Because the Tangerine Essential Oil is orange, your teal may end up on the greener side if you have a tangerine strong blend.
4) While your clear soap cools to about 125 degrees Fahrenheit, unmold the white layer. It’s time to cut out the shapes that represent the “print” part of the soaps. This is best done using a craft knife. You can either cut your shapes free-hand, or print out a template to help guide your cuts. Anne-Marie demonstrates this method in this SoapQueen.TV episode.
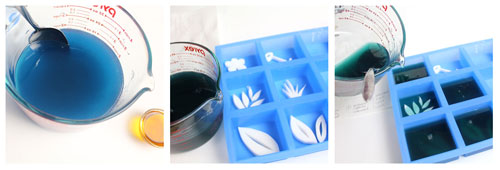
5) Prep your mold by spritzing with rubbing alcohol. Spray your cut-outs with alcohol and place them in the bottom of your 12 bar silicone mold.
6) Once your colored teal soap has cooled to around 125 degrees Fahrenheit, clear the skin off the top and pour slowly on top of your cut-outs. If they move, just reposition them with your finger and continue pouring. Spritz with alcohol to get rid of any bubbles. Let this layer harden to a point that will support the next layer.
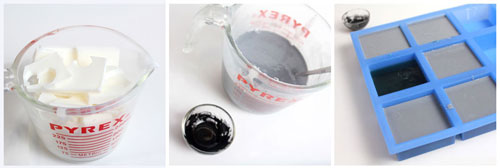
7) Gather the shea soap scraps from cutting and melt with the leftovers from step 1, if you have any left. Mix 2-3 mini scoops of Activated Charcoal with Liquid Glycerin and mix well being sure to work out all of the little clumps. Add the Activated Charcoal mixture to the melted Shea soap base to produce a grey hue of your liking. Mix thoroughly. When the soap temperature is about 125-130 degrees Fahrenheit, spray teal layer with alcohol, pour grey atop your teal layer, and spritz again with alcohol to pop any bubbles.
8) Once soaps have fully hardened, unmold and wrap as soon as possible to avoid glycerin dew.
Are you a visual learner? Want to see a bar of this soap in real life? No problem! you can. Mosey on over to the Soap Queen Lab and and grab yourself a bar – you’ll get printed instructions too!
Just completed my own take on this recipe and they’ve turned out brilliantly. Thanks for the share and have a lookie at the website if you’re interested 🙂 Rae
Hi Rachel,
I’m so glad to hear this recipe worked out for you! Layering soap is so much fun, and there is so much room for creativity. We’d love to see photos of your soaps on our Facebook page: https://www.facebook.com/BrambleBerry
Happy soaping 🙂
-Kirsten with Bramble Berry
hi , i love your soaps, I am inquiring about the wrapping of your soaps ? i
I use the clear soap bases and would like your thoughts on the type of clear wrapping that i could use so that the moisture does not evaporate from the soaps , or sweat. also I am trying to find away to wrap the soaps so that they stay clear without fingerprint smudges all over them ?
thanks Deanne
Good morning, Deanne!
The best way to wrap melt and pour (glycerin) soaps is to use plastic wrap and a heat gun. We’ve found that is gives it a professional look and also protects the soap from starting to sweat or have any little fingerprint smudges on them. You can check out this Soap Queen TV video that Anne-Marie made that can show you more options on packaging:
Soap Queen TV Episode 11: Packaging: http://www.youtube.com/watch?v=lD4bJgtaHMg
-Becky with Bramble Berry
To make oatmeel saop melt soap bar about 4 add almond milk almond oil vannila oil and shrdedd almond chopped a little stir pour in a muffin pan dry out PAKGING IDEA take a paper lunch bag insert soap twist between soap and bag tail wrap ribbon in bow above soap thanks hope you like it i do so simple for desighn after soap is dry take cookie cutter place on top of soap add thin layer of melted soap wella again hope you like it happy v day
Thanks for your comment, grula!
That sounds like a really interesting soap, do you have any pictures of it? If so, you can share them with us on Bramble Berry’s Facebook page:
https://www.facebook.com/BrambleBerry
And, we also have a couple Oatmeal-inspired soap recipes if you are interested:
Recipe for Oatmeal Melt and Pour Soap: http://www.soapqueen.com/bath-and-body-tutorials/melt-and-pour-soap/recipe-for-oatmeal-melt-and-pour-soap-2/
Bees Soap Kit: http://www.soapqueen.com/bath-and-body-tutorials/melt-and-pour-soap/bees-soap-kit/
Honeycomb Melt and Pour: http://www.soapqueen.com/bath-and-body-tutorials/melt-and-pour-soap/honeycomb-melt-and-pour/
Happy Soaping! =)
-Becky with Bramble Berry
I have been trying to think of how to do this-cyanotype is one of my other obsessions!!!!
Wow! Such a simple design yet stunning. I love the blue with the ultra white contrast.
So cute!!!
Awesome idea! I love sun prints. These soaps really capture that summertime nostalgia for me, and they’re just downright cool!
Oooo I love that teal color!
Love the contrast of the teal and white! Great job on the shapes, too.
I thought that as well. Love the teal + white together. 🙂
-Becky with Bramble Berry
These are absolutely adorable! That gorgeous blue color really sets off the while shapes, and they are so neat and dainty too. Great job Simona!
I do not do much M&P but I am also thinking that if your first pour of the white is not too thick you could use cookie cutters to get some shapes as well.
What a great suggestion! Thanks, Susie. 🙂
-Becky with Bramble Bery
What a wonderfully beautiful and creative idea.