
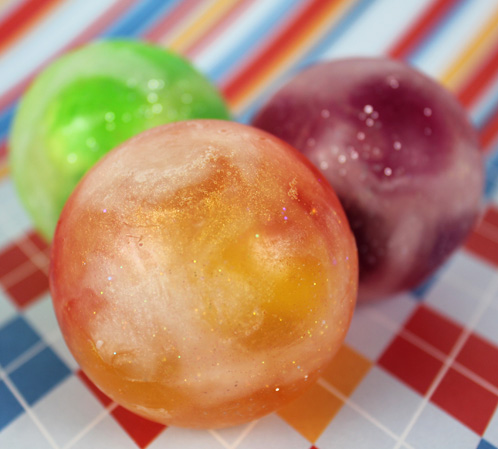
Raise your hand if you have childhood memories of begging your parents for change so you could buy a rubber bouncy ball from the quarter machine (me!!)? This soap is super nostalgic and reminiscent of those bouncy balls that weren’t in the quarter machine. These are the ones that were always sitting in plastic jugs on the counter and cost a couple of dollars. These are the SUPER BOUNCY BALLS.
Their swirls and sparkles were always mesmerizing as they sat on the high-up shelf. I wanted to recreate that look, using our new 4 Sphere mold and of course, some shimmery mica and glitter! Eventually the embeds will bleed and create an even more swirly effect. If only I could figure out a way to make them actually bounce like the real thing. Kids love these bouncy ball soaps during bath time!
Recipe for Part 1: The Embeds
12 ounces Clear Melt and Pour Soap Base
Canary LabColor
Peach LabColor
Tangerine LabColor
Lime LabColor
Citrus Green LabColor
Emerald LabColor
Tropical Pink LabColor
Purple Passion LabColor
6 – 9 Ball Silicone Molds (or you can use less molds and just make more batches)
Add everything you need for both parts of this project to your Bramble Berry shopping cart with the click of a button!
ONE: Cut the Clear Melt and Pour Soap into 1 inch cubes. In a heat-safe container, melt the soap on 30 second bursts in the microwave, stirring between bursts.
TWO: Once the soap is fully melted, split the soap into three 4-ounce portions.
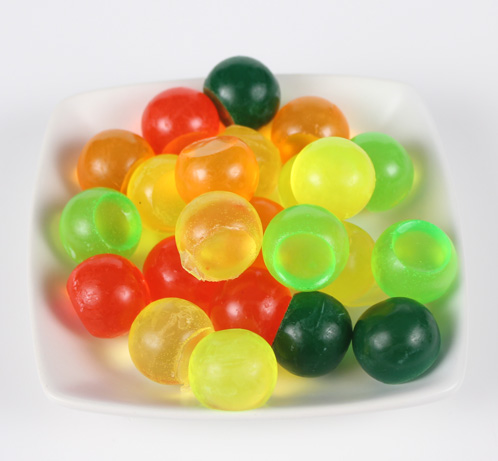
THREE: I made gradiants of three different colors, one for each of the 4-ounce portions: Oranges, Greens, and Pinkish-Purples. To achieve this effect, I colored the soap with step 1 (below) of each of the colorways, poured six cavities, then I added step 2 and poured six cavities, then step 3 and six cavities. So you’ll be building up from light color to darker color with the same 4 ounce portion. Here are the color amounts for each:
Oranges:
1. 10-15 drops diluted Canary LabColor
2. 20-25 drops diluted Peach LabColor
3. 15-20 drops diluted Tangerine LabColor
Greens:
1. 10 drops diluted Canary LabColor + 10-15 drops diluted Lime LabColor
2. 10-15 drops diluted Citrus Green LabColor
3. 15-20 drops diluted Emerald LabColor
Pinkish-Purples:
1. 8-12 drops diluted Tropical Pink LabColor
2. 8-12 drops diluted Tropical Pink LabColor + 5-7 drops diluted Purple Passion LabColor
3. 8-12 drops diluted Purple Passion LabColor
TIP: What you see is what you get with LabColors. Use these steps as a guideline, but if you want a more saturated color, add a few more drops!
Four: Allow the soap to fully harden, then unmold and move onto the next step.
Recipe for Part 2: The Spheres
18 ounces Clear Melt and Pour Soap Base
Super Pearly White Mica
Light Gold Mica
Iridescent Glitter
8-10 mL Lettuce Fragrance Oil
2-4 Sphere Silicone Molds
Mini Scoops
Add everything you need for both parts of this project to your Bramble Berry shopping cart with the click of a button!
ONE: Cut the Clear Melt and Pour into 1 inch cubes. In a heat-safe container, melt the soap on 30 second bursts in the microwave, stirring between bursts.
TWO: Once the soap has fully melted, add 8-10 mL Lettuce fragrance oil and stir until incorporated. I love this scent because it’s unexpected; fresh but floral at the same time!
THREE: Pour a teensy bit of soap into the bottom of each the spheres (do this with the two pieces separated) and rotate the mold so that the soap covers a little bit of the mold up the sides as well. Allow the soap to harden for a few minutes.
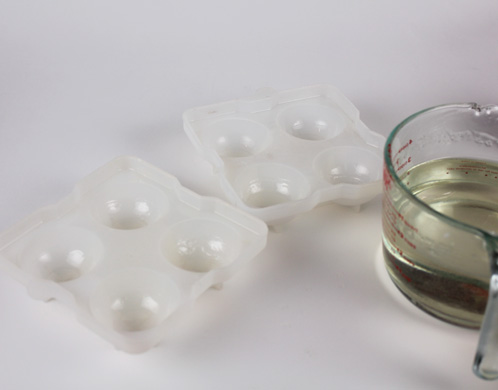 FOUR: Grab your embeds from part one. Take a handful and liberally spray them with alcohol, then stuff the 4 sphere molds full. I was able to fit 6-8 embeds per sphere. I also, for the most part, kept my color families together ie: greens with greens, etc. But a multi-colored sphere looks just as awesome!
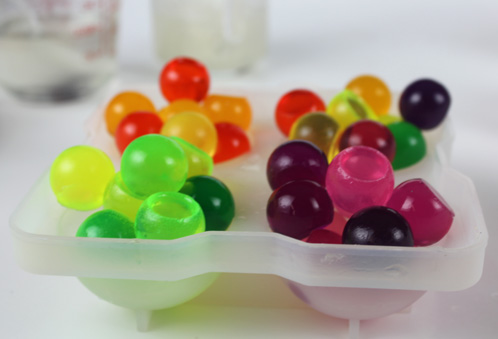
Fit the tops back onto the sphere molds, ensuring that there is a good seal between the two pieces around all of the cavities. If you can’t get a good seal, remove one of the balls. Shake the mold until all of the embeds have settled comfortably into the spheres. If you have embeds that are too close to the opening of the sphere mold, it can block the soap when you go to the next step.

If there’s a gap like this, the mold isn’t sealed and soap will leak out of the side. Remove one or two of the embeds to fix this!
FIVE: Split the clear soap into 5 equal parts (you may have to reheat it after getting all of those embeds to fit!). Color one portion with 3 scoops Light Gold Mica, another portion with 3 scoops Super Pearly White, the third portion with 2 scoops Iridescent Glitter, and leave the rest uncolored. Mix the micas and glitters well.
SIX: Now it’s time for the action! Give the insides of the sphere molds a good spraying of alcohol. For each sphere, you want to create swirly layers of the different micas and glitters, so start pouring randomly into all of the cavities a little bit of soap at a time. Don’t wait for the soap to harden between pours. I tried to alternate pours so they went mica-glitter-clear-mica-glitter, but the main point is to keep pouring while the previous layer is still liquid so that the soap will swirl! This part can get messy, but try to tap the molds on your work surface every so often to make sure there are no air bubbles getting in there. Keep going until you have filled all of the cavities.
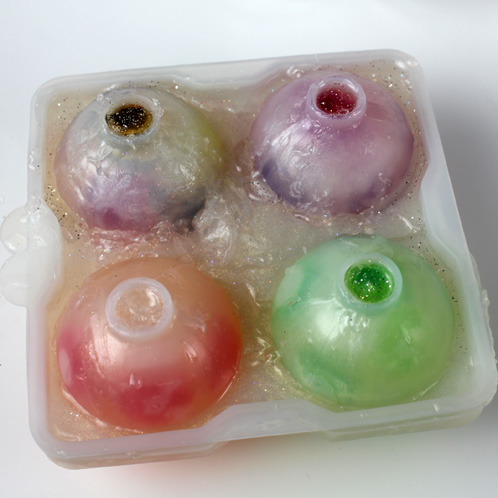 SEVEN: Allow the bouncy ball soap to fully harden, then remove them from the mold. The silicone makes unmolding super easy!
- 12 ounces Clear Melt and Pour Soap Base
- Canary LabColor
- Peach LabColor
- Tangerine LabColor
- Lime LabColor
- Citrus Green LabColor
- Emerald LabColor
- Tropical Pink LabColor
- Purple Passion LabColor
- 6 – 9 Ball Silicone Molds (or you can use less molds and just make more batches)
- Droppers
- 18 ounces Clear Melt and Pour Soap Base
- Super Pearly White Mica
- Light Gold Mica
- Iridescent Glitter
- 8-10 mL Lettuce Fragrance Oil
- 2-4 Sphere Silicone Molds
- Mini Scoops
- Cut the Clear Melt and Pour Soap into 1 inch cubes. In a heat-safe container, melt the soap on 30 second bursts in the microwave, stirring between bursts.
- Once the soap is fully melted, split the soap into three 4-ounce portions.
- I made gradiants of three different colors, one for each of the 4-ounce portions: Oranges, Greens, and Pinkish-Purples. To achieve this effect, I colored the soap with step 1 (below) of each of the colorways, poured six cavities, then I added step 2 and poured six cavities, then step 3 and six cavities. So you’ll be building up from light color to darker color with the same 4 ounce portion. Here are the color amounts for each:
Orange:10-15 drops diluted Canary LabColor + 20-25 drops diluted Peach LabColor + 15-20 drops diluted Tangerine LabColor
Green: 10 drops diluted Canary LabColor + 10-15 drops diluted Lime LabColor + 10-15 drops diluted Citrus Green LabColor + 15-20 drops diluted Emerald LabColor
Pinkish-Purples: 8-12 drops diluted Tropical Pink LabColor + 8-12 drops diluted Tropical Pink LabColor + 5-7 drops diluted Purple Passion LabColor + 8-12 drops diluted Purple Passion LabColor - Allow the soap to fully harden, then unmold and move onto the next step.
- Cut the Clear Melt and Pour into 1 inch cubes. In a heat-safe container, melt the soap on 30 second bursts in the microwave, stirring between bursts.
- Once the soap has fully melted, add 8-10 mL Lettuce fragrance oil and stir until incorporated. I love this scent because it’s unexpected; fresh but floral at the same time!
- Pour a teensy bit of soap into the bottom of each the spheres (do this with the two pieces separated) and rotate the mold so that the soap covers a little bit of the mold up the sides as well. Allow the soap to harden for a few minutes.
- Grab your embeds from part one. Take a handful and liberally spray them with alcohol, then stuff the 4 sphere molds full. I was able to fit 6-8 embeds per sphere. I also, for the most part, kept my color families together ie: greens with greens, etc. But a multi-colored sphere looks just as awesome!
- Fit the tops back onto the sphere molds, ensuring that there is a good seal between the two pieces around all of the cavities. If you can’t get a good seal, remove one of the balls. Shake the mold until all of the embeds have settled comfortably into the spheres. If you have embeds that are too close to the opening of the sphere mold, it can block the soap when you go to the next step.
- Split the clear soap into 5 equal parts (you may have to reheat it after getting all of those embeds to fit!). Color one portion with 3 scoops Light Gold Mica, another portion with 3 scoops Super Pearly White, the third portion with 2 scoops Iridescent Glitter, and leave the rest uncolored. Mix the micas and glitters well.
- Now it’s time for the action! Give the insides of the sphere molds a good spraying of alcohol. For each sphere, you want to create swirly layers of the different micas and glitters, so start pouring randomly into all of the cavities a little bit of soap at a time. Don’t wait for the soap to harden between pours. I tried to alternate pours so they went mica-glitter-clear-mica-glitter, but the main point is to keep pouring while the previous layer is still liquid so that the soap will swirl! This part can get messy, but try to tap the molds on your work surface every so often to make sure there are no air bubbles getting in there. Keep going until you have filled all of the cavities.
- Allow the soap to fully harden, then remove them from the mold. The silicone makes unmolding super easy!



My mold leaks and it is really tight :/
Hi Sisi!
I am so sorry to hear that you are having problems with this mold, I am here to help you troubleshoot and get your mold working for you. =)
If your mold is leaking, you will want to make sure that the tabs on this mold are lined up and firmly in place. The tabs are there to ensure that the two pieces of the mold are lined up for the perfect fit.
Another way to make sure that this mold doesn’t leak is to pour your soap at a lower temperature. When it is cooler, it becomes more viscous and less likely to seep out the edges.
I hope this helps! Let me know if you have any other questions. =)
-Becky with Bramble Berry
How cute! Why are there small ball embedded inside? It looks like it would be easier to just swirl some soap in the bigger sphere molds. Or is it done that way because you can actually see the little balls of soap inside the bigger soap ball?
Good morning, Linda!
We embedded the smaller balls in the larger spheres because we found that it gave the soap that perfect look and reminded us exactly of those bouncy balls from our childhood. And, in some of the soaps, you can actually see that fun little colorful ball (like the first picture). If you try it by just swirling, we’d love to hear how it turns out for you! 🙂
Happy Soaping!
-Becky with Bramble Berry
LOVE LOVE LOVE this! Now I’m gonna have to buy ALLLLL those sphere molds. They will make BEAUTIFUL soap favors!
We can’t wait to see how yours turn out! If you get any pictures, we’d love to see how they turned out. You can share them with us on Bramble Berry’s Facebook page:
https://www.facebook.com/BrambleBerry
-Becky with Bramble Berry
OK, so these really bounce? No rubber stuff in them? How do they bounce? Love them either way.
Hi Donna! We’d love for them to actually bounce, but they don’t. We gave them the name because they were so reminiscent of those bouncy balls we had as kids! 🙂
-Becky with Bramble Berry
WOW! I saw the title & nearly squealed 🙂 I used to collect them & still have a small(shoebox size) rubbermaid container w/ some of them. These look like my ball that looks like a rock w/ mica spread on it.
The soaps are AWESOME! They really do look like bouncy balls. LOVE IT!
~Nickie~
I love the idea of creating soapy bouncy balls. Approximately how long will it take for the colors to start bleeding? I’d like to make these for Christmas.
Good morning, Brienne!
The LabColors will probably start bleeding within a couple of weeks, more if more LabColor is added to the embeds. The pictures in this blog post were taken before the LabColors started to bleed too much and this is how they look like right away! I hope this helps. 🙂
-Becky with Bramble Berry
Awwww…..So many happy memories of bouncy balls come floating back! What a great idea!
Pretty! Love how they sparkle.
these are super cute!