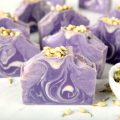
 Look at all the options available for these cute cut out soaps! The secret is to always use non-bleeding colors and make sure that you have both clear and white soap on hand for contrast.
The textured background soaps were made with either a cheese grater or very thinly sliced layered soaps to create interest and depth in the background of the cut outs.
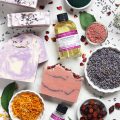
Follow the entire project and make your own spring cut out soaps here:
Day 1 – Set Up
Day 2 – Making the Flowers
Day 3 – Marbling
Day 5 – Embedding the Flowers

Thank you so much !!!!!! you are very nice !!
Hi Reo –
Thanks for commenting and asking a question. I’m also posting your question on the Teach Soap forum here:
http://www.teachsoap.com/forum/viewforum.php?f=6
I suspect that your layers are separating either because the soap isn’t poured soon enough after the first layer is poured – or the soap is older and more dried out. The older the soap is, the less the layers tend to stick together (in my experience).
Maybe someone on the Teach Soap forum will have some more helpful insight for you though! =)
These turned out so amazing!
Cute!! :o)
Hello Anne Marie !! i love your saop, i’m french, sorry for my language.
I do, me too, cosmetics “home Made”.
When i do saop Melt and poor, and i do two colors, my soap is separate. Do you know why ??
kisss
Audrey
Good eye! There is glitter in the blue squares in the middle row. It’s very cute in person but doesn’t pick up so great in the photos. =)
Oh wow, these are awesome. Is there glitter in some of them also?