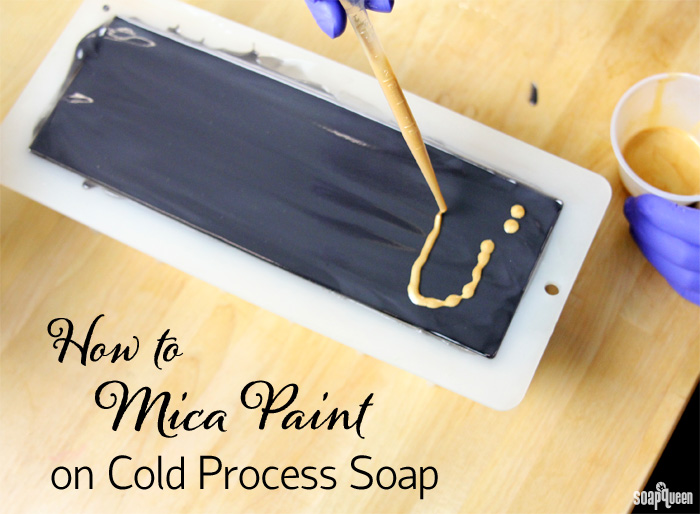
I love adding color and sparkle to my soap. It’s such a fun and easy way to give my projects lots of personality. Micas are a great way to add both color and shine to a wide variety of projects. They work great in melt and pour soap, bath bombs and more. Unfortunately, some micas do morph in cold process soap. This means that they may change color, or even turn to a dull gray. This can make adding micas to cold process soap tricky. Click here to learn more about micas.
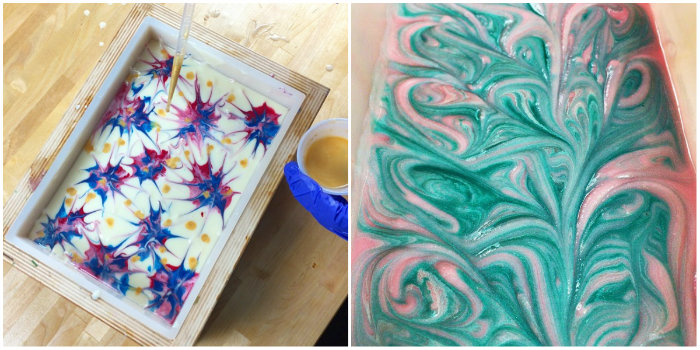
Mica painting is a fun technique that allows micas to be incorporated into cold process projects. It even works with micas that morph in cold process soap! Mica painting refers to adding a mixture of oil and mica to the top of wet cold process soap. This mixture is then swirled in various patterns. As the soap hardens in the mold, the oil is absorbed into the soap and leaves behind beautiful swirls of mica. It usually takes a full day for the oil of the mica mixture to sink back into the soap. Mica painting washes off once introduced to water. See the photo below for some fun mica painting examples!
To prepare micas for mica painting, they first need to be dispersed in a lightweight liquid oil. I like to use sweet almond oil or sunflower oil. Other good oil options include avocado oil, canola oil or chia seed oil. Disperse 1 teaspoon mica into 1 tablespoon of oil. Then, use a mini mixer to help get rid of any clumps.
If you’d like the mixture to be highly pigmented, you can add up to 2 teaspoons of mica per tablespoon oil. If much more mica is added, the mixture is more likely to be thick and may not swirl as well. If more oil is added, the oil may not soak back into the soap, leaving behind an oily top. When you are finished adding your mica to the top of the soap, spray very lightly with 99% isopropyl alcohol. Spraying too much can disrupt the swirl and cause the mica paint to expand and spread.
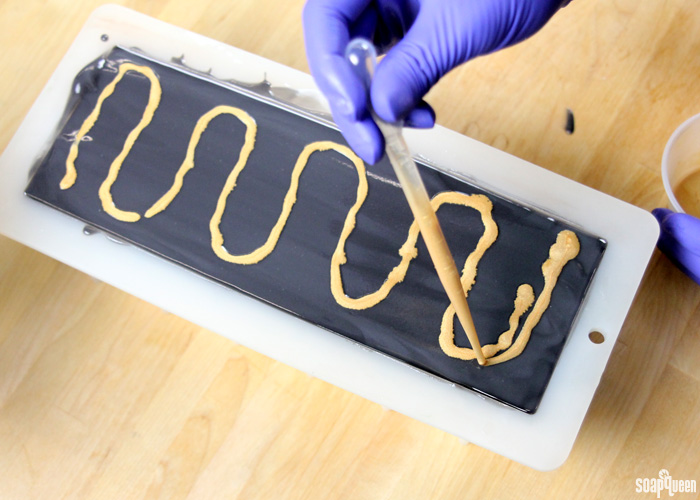 To apply the mica to the soap, I like to use droppers. This allows me to drop lines of mica (shown above) or small drops. Another thing to keep in mind is the texture of the cold process. If the soap is too thick it will not allow for fluid and smooth swirling. I recommend a thin to medium trace for mica swirls. Read more about trace here.
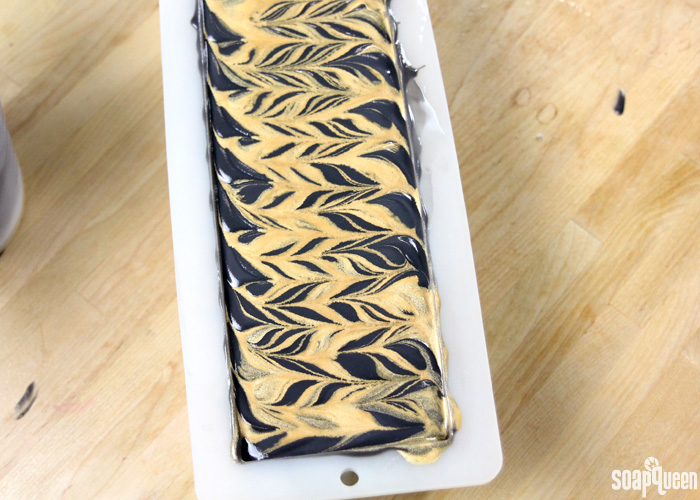
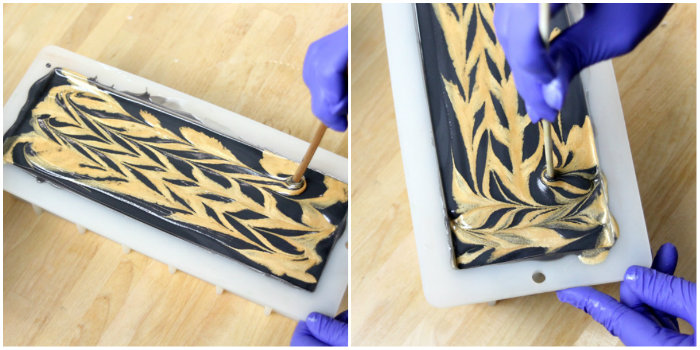 This beautiful gold mica swirl is demonstrated in the Black, White and Gold All Over Cold Process Soap. I love the way that the sparkly gold mica looks against the rich black cold process top. Mica painting is a great way to add some glam to an otherwise basic soap. This project uses the mica painting as you would soap batter to create thick lines of swirls.
 If you like the look of small swirls of mica rather than the thick lines, place dots of the mica/oil mixture to the top. Then, use a skewer to swirl the dots in random directions. To see this in action, check out the Bramble Berry Instagram video below! This process is demonstrated in the beautiful Vibrant Mehndi Cold Process Soap shown below, and the 4th of July Fireworks Cold Process Soap.
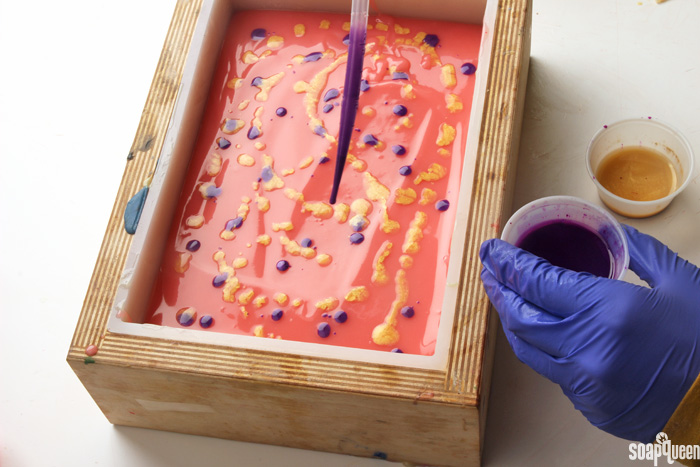
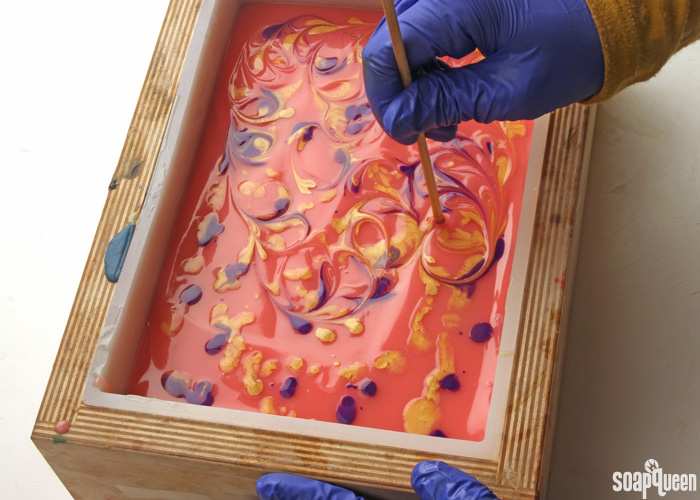
In the Instagram video below, you can see the mica painting in action. Drops of various dispersed micas were placed on the top of black cold process soap. Then, using a chopstick they were swirled in various directions. As they swirl, the various colors mix together slightly, creating a beautiful multi-colored effect.
Have you ever tried mica painting before? I love to use micas that usually morph in cold process soap on the top for sparkle and shine. It’s also super fun to do!


I know this might be a silly question but is it possible to use Alcohol Ink to add color to cold process soap as a colorant? I have been searching the internet but haven’t found anything either way.
Thanks!
Ruth
We don’t recommend alcohol color. Alcohol tends to accelerate trace quite a bit. Soap colorants work best, especially pigments. To use those, mix 1 teaspoon powder with 1 tablespoon of a lightweight oil. Mix well, and add 1 dispersed teaspoon at a time until you get a color you like. 🙂
Pigments: https://www.brambleberry.com/Pigments-C45.aspx
Find more color options here: http://www.soapqueen.com/bath-and-body-tutorials/tips-and-tricks/talk-it-out-tuesday-colorants/
-Kelsey with Bramble Berry
I had a problem with the top of my soap remaining sticky after Mica painting, even after my soap was totally cured. I dispersed 1 teaspoon of Mica to 1 tablespoon of Sweet Almond oil. I sprayed the top of my soap with 99% alcohol. Can the alcohol cause stickiness?
I missed this question, sorry about that Debbie. The oil is usually absorbed into the soap so it shouldn’t feel too sticky. Does the soap still feel that way?
-Kelsey with Bramble Berry
Ok just to be clear, this is just mica in oil that is dribbled and then a shallow swirl?
That is correct! You drop the mica/oil mixture on top of the soap and swirl it with a chopstick or dowel. It’s an easy technique that adds a bit of shimmer to the top of your soap. 🙂
-Kelsey with Bramble Berry
I just recently tried to paint shamrock green mica mixed with sunflower oil in the proportions you recommended and once the soap cured the mica changed colored. I now have purple green and gold mica lines on the top of my soap. Do you know what could have caused this? This was the first time I have ever tried to paint mica on my cold process soap, and I was hoping for it to come out better than it did 🙁
I did forget to spritz the alcohol on top once finished. Would that have caused the discoloration?
Hi Venez!
We have made several cold process soap loaves with Shamrock Green on top, and have had some inconsistent results. Sometimes it turns out a nice green, other times it morphs or fades. I believe that is because the color bleeds, and as it bleeds into the soap it reacts with it and morphs. We don’t recommend it for cold process soap. I’m sorry about that Venez.
The good news is that soap is still just fine to use! We also have some new green micas you may like for mica painting. 🙂
Apple Moss Green Mica: https://www.brambleberry.com/Apple-Moss-Green-Mica-P6350.aspx
Kelly Green Mica: https://www.brambleberry.com/Kelly-Green-Mica-P6353.aspx
Kermit Green Mica: https://www.brambleberry.com/Kermit-Green-Mica-P6352.aspx
Evergreen Mica: https://www.brambleberry.com/Evergreen-Mica-P6351.aspx
-Kelsey with Bramble Berry
Hi,
Can this technique also be used to create mica veins? I know you use a powder duster for this but I always create such a mess that way. I guess it would only work with a flat surface of soap since the liquid will created pools in the lower parts when having a textured top. And there is no risk of layer separation.
With kind regards,
Annemieke
Hi Annemieke!
I’m not entirely sure, we haven’t given that a try! My worry is that the oil used to mix the mica would saponify with the other oils, leaving pockets of color in the soap. Also, the mica may be more likely to morph, as it would turn into soap. I would recommend making a small test batch and seeing how it performs. Definitely let us know how it goes! 🙂
Also, if you’re worried about making a mess with the powder, one of our customers gave us a great tip. She recommends using a straw or dropper to gently distribute the powder. That makes it a little less messy, and means less colorant on you!
Droppers: https://www.brambleberry.com/Droppers-With-Suction-Bulb-P3802.aspx
-Kelsey with Bramble Berry
Hi Kelsey,
Thanks for the advice. I will keep these things in mind. I like to try new things and will give it a try.
I tried the droppers today for the mica veins but like the powder duster more for the bigger surfaces. The droppers work nice in the corners.
I think for using mica paint as veins, I will have to try out a few carrier oils also. I will need to find a balance between too runny and too thick…
Also, I did some mica paint with plastic molds today. I think you do this after unmolding. I have a 3D triquerta and a pumpkin mold and painted the shape prior to adding the soap. The mica stayed nicely in place when pouring.
With kind regards,
Annemieke
That’s awesome, thanks so much for letting us know! Also, definitely keep us posted. 🙂
Also, the customer recommends using the powder duster to drop the powder, then the straw or the droppers to distribute it. That way you’re not blowing on the color, which can cause a mess. Sorry for any confusion!
-Kelsey with Bramble Berry
Hi Kelsey,
I unmolded my plastic molds yesterday.
I used sunflower oil and your mica paint technique for my pumpkin mold and the pumpkins (painted in gold) and leaves (painted in green) came out so nice…. As long as you apply a thin layer this works very nice and can give you a very detailed picture.
I brushed a very thin layer of vaseline on parts of my triquerta mold (I think this works even nicer for the details when you melt the vaseline) and brushed on mica afterwards. If I recall correctly, vaseline will not turn into soap since it is a mineral oil and I expect it will never run when pouring soap. The picture is a bit less crisp than the mica paint technique. There are some parts where the shimmer is a bit dull…
With kind regards,
Annemieke
Thanks so much for the update Annemieke! The mica painted pumpkins sound so adorable. Also, you can use cyclomethicone to paint on your molds! It doesn’t turn into soap, so it works well for that technique. 🙂
Cyclomethicone: https://www.brambleberry.com/Cyclomethicone-P4560.aspx
-Kelsey with Bramble Berry
I am wanting to paint some small M&P soap portions, let the paint “dry” then pour into a clear M&P bar. Will the Mica paint bleed into the heated clear M&P? If it would, do you have any suggestions onto what colorants would not bleed?
Hi Tanya!
Non-bleeding colorants and temperatures will prevent any bleeding into the clear soap! Our color blocks are non-bleeding and super easy to use. All you have to do is shave off a few pieces into the melted soap and stir to incorporate. You can find those color blocks here: https://www.brambleberry.com/Color-Blocks-for-Melt-Pour–C340.aspx
After your paint is dry, you can melt the clear soap to pour over. Let the soap cool to 125F, then pour it slowly and carefully over the details. That way the soap won’t melt any of the details. 🙂
This video on making Gingerbread Man Soap has some great tips on working with melt and pour details and is very helpful: https://www.youtube.com/watch?v=KLr_3CLqir8
-Kelsey with Bramble Berry
How do you paint mica on soap tops in one even colour that looks like it’s been sprayed on? People say use a makeup brush but how does it stick without getting messy fingers when handled? When is it best to do this after unmoulding etc ??? Could you do a tutorial on this for CP soap? Tia
Hi Christine!
This sounds like a fun project! To get the look of mica being “sprayed on” the top of your soap, there are a few options. One option is to use a powder duster to apply a thin layer of mica across the top of the soap while still wet. The mica will adhere to the wet soap, and looks gorgeous. The mica can transfer to fingers when handled, and will wash off quickly when wet. You can see this technique in the tutorials below!
Alpine Adventures Cold Process Tutorial: http://www.soapqueen.com/bath-and-body-tutorials/cold-process-soap/alpine-adventures-cold-process-tutorial/
Christmas Tree Swirl Cold Process: http://www.soapqueen.com/bath-and-body-tutorials/cold-process-soap/christmas-tree-cold-process/
You can also apply mica to small areas of solid soap using a brush, as shown in the video below! Another option (that’s a little less messy) is to mix the mica with a little alcohol, and use a brush to apply the wet “mica paint.” You can see this in the Pumpkin on a Rope Tutorial.
Painting Soap with Mica Powder:
http://www.soapqueen.com/bath-and-body-tutorials/melt-and-pour-soap/painting-soap-with-mica-powder-video/
Pumpkin Soap on a Rope:
http://www.soapqueen.com/bath-and-body-tutorials/melt-and-pour-soap/pumpkin-soap-rope/
I hope this helps!
-Amanda with Bramble Berry
will the micas that morph in CP, morph if it’s just painted on?
Hi Tammy!
Micas that morph in cold process won’t morph on top of the soap. The color will stay nice and shimmery on top! You can see an example of that in the Mica Topped Cold Process Soap: http://www.soapqueen.com/bath-and-body-tutorials/cold-process-soap/soap-challenge-mica-topped-cold-process/
The Amethyst Purple Mica morphs inside cold process soap, but stays a pretty shimmery purple on top of it. 🙂
-Kelsey with Bramble Berry
I love the splatters one, it looks so fun and summer-y 🙂
I have a question about additives. So can you add kombucha in soap? It is a fermented tea drink that is carbonated. If so, would you be able to use this up to 100% in your soap recipe instead of water?
Here is more about kombucha https://en.wikipedia.org/wiki/Kombucha
Thank you!
Hi Emmeline!
So glad you love the soap! Definitely perfect for summer. 🙂
We haven’t tried using kombucha in soap before! I would recommend making a small test batch to see how it performs.
Before using it, I would recommend boiling it or letting it sit for a couple days uncapped to get rid of the carbonation. It may help to freeze or refrigerate the kombucha beforehand as well. There may be natural additives or sugars in the drink that can react with the lye. It can help to pop the soap in the freezer after it’s in the mold too.
If you give it a try, let us know how it goes! 🙂
-Kelsey with Bramble Berry
Does the mica swirl just stay on the surface or do the swirls sink down into the soap so you can see them when you cut it? Thanks!
They stay on the surface 🙂
HI Jill!
Tammy is correct – the swirls will stay on the surface. You can see an example of a cut bar of soap with a mica swirl in the Black, White and Gold All Over Cold Process: http://www.soapqueen.com/bath-and-body-tutorials/cold-process-soap/black-white-gold-cold-process/
If you’d like a swirl throughout the whole bar, you can use an in-the-pot or drop swirl technique! I’ll include tutorials for those below. 🙂
Sea Clay Swirl Cold Process: http://www.soapqueen.com/bath-and-body-tutorials/cold-process-soap/sea-clay-swirl-cold-process/
Silky Berry Cold Process Soap: http://www.soapqueen.com/bath-and-body-tutorials/cold-process-soap/silky-berry-cold-process-soap-on-soap-queen-tv/
Keep in mind the mica can morph inside the soap, so it’s best to just use the mica painting on top. The Mica Topped Cold Process Soap Tutorial combines a swirly design and mica painting. It’s the best of both worlds. 🙂
Mica Topped Cold Process: http://www.soapqueen.com/bath-and-body-tutorials/cold-process-soap/soap-challenge-mica-topped-cold-process/
-Kelsey with Bramble Berry