LabColors are easy to use and adored soap colorants from Bramble Berry. I’m delighted to show you how to use them in cold process soap to maximize your colorant possibilities. Before reading on, if you haven’t read about the colorants and how to properly dilute them, read about them HERE.
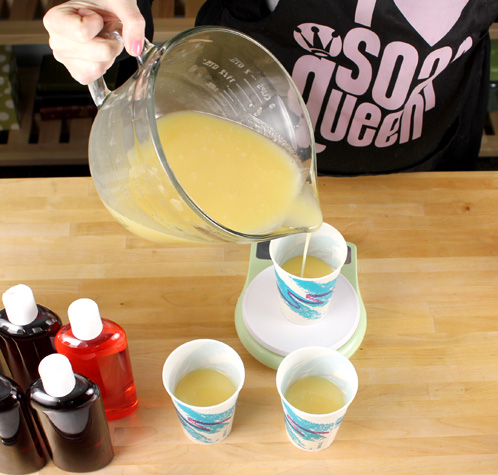
The recipe I used is a favorite for testing colorants. It’s a two pound batch that allows a lot of time to hand stir in many different colors.
Recipe: 25% Coconut Oil, 40% Olive Oil, 25% Palm Oil, 10% Palm Kernel Flakes, 3% Superfat, 5% water discount. Use the Bramble Berry Lye Calculator, set to figure by percentages, to make up whatever size recipe you want with those percentages. I divided my soap batter into 8 separate containers, 4 ounces in each cup and hand stirred in each colorant. When testing colorants, it’s important NOT to scent the soap. We just want to see how the colorant reacts with the soap without any extra variables. Many fragrances and essential oils will discolor the soap anything from an ivory to a yellow to a green to a a pink to a brown. My usage rates per color varied between 2ml-6ml. I’ll share my exact usage for some bright and fun colors in a later post so stay tuned!
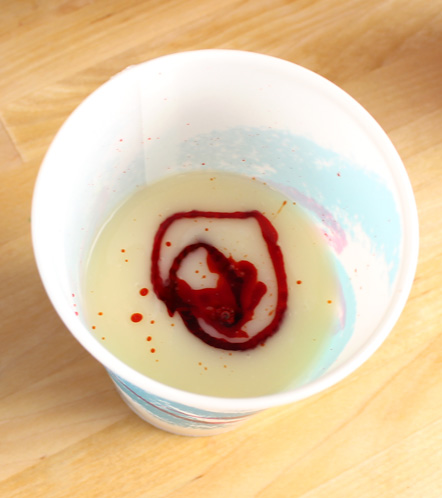 LabColor in soap batter before mixing
Gel phase is KEY when using LabColors. What is gel phase? Gel phase simply refers to a part of the saponification (soapmaking) process where the soap gets extremely warm and gelatinous – up to 180 degrees. Soap that has not gel-phased is still soap. There is nothing wrong if your soap does not gel phase. You will find slight color, texture and shine variations in gelled versus ungelled soap. Some soapers prefer not to have their soap gel at all so do not insulate their soap and mix at lower temperatures. Non-gelled soap tends to look more creamy, more matte and take a bit longer to evaporate out its excess water. I personally prefer gel phase so I always insulate and even used a heating pad in this particular round of testing. Again, it is a personal preference for soapmaking in general. However, with Labcolors, going through gel phase ensures a brighter, more even color.
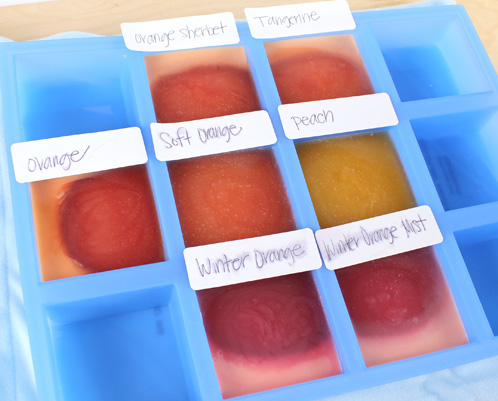 Above is another great example of gel phase starting in the middle and spreading out. Go gel phase go.
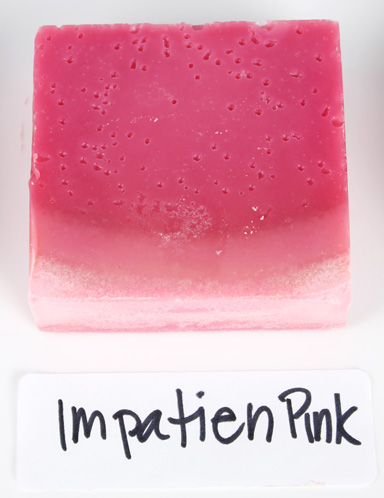 Check out the partial gel phase on this soap above. Can you believe the color difference? The ‘dots’ are from the soap boiling in the mold. Whoops.
Note to self: When using a silicone mold and a heating pad (trying to force gel phase) keep it on low to medium heat. High heat will cause the soap to boil and bubble a little bit. Thus the holes on the bottom of the soap in the photo above. I know better than that! Whoops.
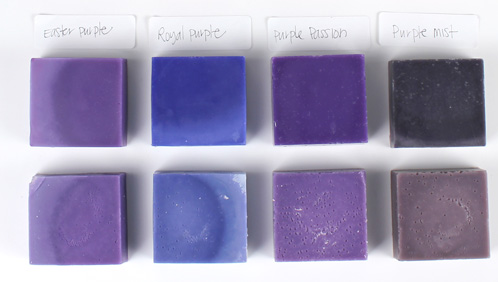 Above is a great example of how gel phase can affect the color hue. The bottom row of soaps are the exact same colors and usage rates as the top row. Can you tell the difference in color? The top row went through more of a gel phase than the bottom row. We love gel phase, especially when using LabColors. It really makes the colors pop!
Have a question about this blog post? Come join us at Bramble Berry’s Facebook page and we can help you out with any of your soapy questions!
![lab2[1]](https://www.soapqueen.com/wp-content/uploads/2013/10/lab21-120x120.jpg)
Would it possible to add color to bath salts/soaks and body scrubs using lab colors?
Hi Cally!
LabColors do work great for coloring bath salts, soaks and scrubs. They are water soluble too so they are less likely to leave that ‘colored ring’ around the tub than an oil based color would.
Here is a quick tutorial on how to dilute them:
http://www.soapqueen.com/bath-and-body-tutorials/tips-and-tricks/diluting-bramble-berry-labcolors/
I hope this helps! Let us know if you have any other questions. =)
-Becky with Bramble Berry
Great information on how the gel phase in soap affects colorants. I’m still learning about cold process soapmaking. I have tried to stop my soaps from gelling by putting in the freezer but get a partial gel in the center using a 4 pound wooden mold. Looks terrible. What’s a good soaping temperature to start at that would help keep soap from going through the gel phase and to keep ash from forming on top of my soap sould I still use clear wrap or will that cause it to heat up too much too?
Hi Judy!
If you want to prevent your soap from going through gel phase the most important thing would to be soaping at lower temperature. Keeping it around 90-100 and not insulating will also prevent the gel phase. And, as soon as you are done soaping, you can pop it in the refrigerator (or freezer) to help prevent it as well.
The best way we have found to stop having soda ash on the top of our CP soap would be to spray with 99% rubbing alcohol and covering with a piece of cardboard. We don’t typically use plastic wrap if we are trying to prevent gel phase as that will keep much of the heat in the soap.
I hope this helps! Let me know if you have any other questions. =)
-Becky with Bramble Berry
P.S. You can also use ice cubes for water (measure out how much water you need in advance and freeze) to keep the lye water even cooler!
Great info on LabColors and cold process! In the top photo, can you tell me what kind of plastic bottles you have your LabColors in? My craft store bottles leak when I shake them up, and this gets color everywhere. The bottles above look like they might be better than mine. Does BB sell them?
Thanks!
Those are our PET clear bottles with disc caps.
https://www.brambleberry.com/Bottles-C193.aspx
They come in 4 oz. and 8 oz. size. =)
About gel phase, I made some CP soap using the same mould in this post and got a partial gel phase – some parts of the soap were shiner than others. I put saran wrap over the mould before covering it with some towels inside a big polystyrene box. I don’t have a heating pad nor an oven so how can I ensure that the gel phase extends to all corners of the soap?
Pour your lye water and oils 15 degrees warmer and that will ensure that the soap goes through a healthy and full gel phase.
I HEARD CP SOAP HAD GEL PHASE. SOME DON’T.
1.HOW TO GET SOAP GEL PHASE?
2.NO GEL PHSES SOAP IS MORE BEAUTIFUL
THAN GEL SOAP?
3.BLOCK SOAP IS BETTER THANK DIVIDED SOAP?
THANKS REPLY
Yep. Some soapmakers choose to gel while others don’t. It’s a personal preference thing. Gelled soap looks a little more glossy and bright. To get gel phase, insulate your soap to keep the temperature up as it cools. If you do not want to go through gel phase, soap at a cooler temperature and do not insulate the soap as it cools.
The shape of your soap is also a personal preference.
Courtney from Bramble Berry
I just started using Lab Colors and like them alot. My fave so far is Flamingo Pink. 🙂 I gel my soap in the oven on low (170) instead of using a heating pad. It work great as long as you are watching it closely!
WOW. Realy interesting to see how gel phase brings out those colours. Thanks for this bit of information.
I have never used a heating pad before! I didn’t know that I could. I let the soap go through its natural gel phase, insulate it or not (depending of the design) or put it in the fridge for a bit.
Why do you need to add extra heat to a normal gel phase? Is it only for silicone molds? My molds are in wood or in plastic.
As Amber said above, you don’t always need to use a heating pad. It depends on your soaping and room temperatures. The silicone molds are a little harder to insulate so we’ve been experimenting with the heating pad, trying to keep the soap warmer for longer.
I wouldn’t change a thing in your soaping technique if you can get your soap to go through gel phase in your wooden molds. We never have trouble either.
Courtney from Bramble Berry
After making soap for 12 years your Blueman soap post inspired me to try coloring my soap. Followed your instructions and the soap turned out beautiful. Thank you.
I’m now experimenting with other mica & pigment colors & am not getting the colors that I’d hoped for. After looking at your pictures I think maybe the soap isn’t going through gel phase. Was wondering – How long do you leave the heating pad on? I use your wooden slab mold. Love the dividers.
Thanks for your help.
You don’t always need to use a heating pad to achieve gel phase. And how long you use a heating pad depends on the temperature you soap at and the temperature of the room you leave your soap in. In the warehouse we usually insulate and leave our heating pad on low for 3 or 4 hours – and check it a few times to make sure it isn’t overheating. – Amber
And something else at play with the silicone molds is that they don’t breathe at all so soap that boils can easily pock mark. But even with that variable, we love ’em and think they’re the best for testing!
Courtney from Bramble Berry
I’ve had that exact thing happen to me (bubbling soap) when I used that same mold on a heating pad. It really doesn’t take much heat, does it?
The air pockets you see are from air getting mixed in the soap batter. Since we made one batch of soap and divided it into numerous separate mugs to add color, some of the last ones to get mixed reach a thicker trace and air bubbles were an issue. You can avoid the bubbles by pouring at a lighter trace.
Fascinating post, I have the basic black, red and purple but I rarely gel my soaps and instead put them in the fridge. Now I know why my colours are different. I recently made a rose though with the basic red and did the CPOP method (as I’m in a hurry for this scent) and it’s a beautiful shade of pink.