

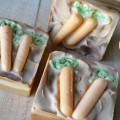
For many glycerin soap crafters, what really seduces us are those clear, gorgeous colors you can only get with melt & pour soap. Alas, it’s a troubled love affair since these colors seem to only be happy when they’re used alone. When different clear colors are combined into one soap bar, they just don’t get along and bleed together into an ugly blur (like what eventually happened to my soapsicle, above). But where there’s a will, there’s a way. Understanding what they do is the key to showing off of their beauty.
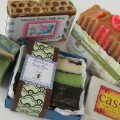
 1) Let it bleed. If you submerge soap embeds that are made with non-bleeding colorants, you will not be able to see any change in the embed color. Monday’s tutorial of Vivid Soap Blocks shows this approach. These Lime Soap Bars also show how I used white and lime green together. The white will absorb the green, but it’s submerged so the bleeding won’t be noticeable.
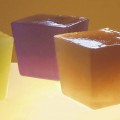
 One great asset of Labcolors is how economical they are. Just one drop colors a pound of clear soap very vibrantly. So be careful when you’re adding soap or you can quickly overdo it.
The reason that clear soap colorants bleed is explained very well by Anne-Marie in her post here. They are made of water based dyes that seek out and color anything containing water that they touch – namely your soap base. But here are two ways to deal with this:
 1) Let it bleed. If you submerge soap embeds that are made with non-bleeding colorants, you will not be able to see any change in the embed color. Monday’s tutorial of Vivid Soap Blocks shows this approach. These Lime Soap Bars also show how I used white and lime green together. The white will absorb the green, but it’s submerged so the bleeding won’t be noticeable.
2) Used very lightly, the bleeding will be virtually unnoticeable. Add a drop of color to create just a tint, and use non-bleeding colors for the rest of your soap. In the cloud soapsicles I used just a tiny amount of Brilliant Blue Labcolors, but the bleeding is so faint it won’t effect my other embeds.
 One great asset of Labcolors is how economical they are. Just one drop colors a pound of clear soap very vibrantly. So be careful when you’re adding soap or you can quickly overdo it.
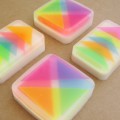
You can also blend these colors to create any shade of the rainbow! It’s so fun to add a drop of this, a touch of that, and create something completely unique. You can even get Blending Charts to show you lots of options.
So even though there are a couple of tricks to making multi-colored soaps using clear colorants like Labcolors, they’re a must. I strongly suggest adding the 12 color basic set to your toolbox and see how many new looks you can create!

Can you tell me how and when to place the embeds into the soapsicle?
Hi Michelle –
It’s just a generic popsicle mold that is poured with lots of patience =)
Debbie wrote up some basic instructions for the popsicle here:
http://teachsoap.com/soapsicle.html
I LIKE YOUR POPSICLE SOAPS. WHERE DID YOU GET YOUR MOLD FROM? HOW DO YOU POUR MORE THAN ONE COLOR??
THANKS
MICHELE
Thank you for the great tips!
This was a very interesting post with great ideas. I love your creativity!!
Oh my gosh, that rainbow popsicle soap is adorable!
*WANT*
I’ve never attempted to make my own soap, but it looks like a fun project. I might have to try it sometime.
Thanks for another great post. I mostly use lab colors with my melt n pour and I love them. They last a long time too.
Hi:
Thanks for the tips!
: – )
I love your popsicle soaps, and have so since the very first time I saw them featured on this Blog.
Erin