Melt and pour soap and cold process soap are both made by emulsifying sodium hydroxide lye and a variety of oils. Both are skin loving and far more gentle than store bought, detergent based soap. Despite these similarities, melt and pour soap have very different textures. These textures lend themselves better to different soaping techniques. For example, it’s easier to achieve straight layers with melt and pour soap, while the fluid texture of cold process soap allows for easy swirling.
Melt and pour soapers often ask if swirled cold process soap recipes can be recreated with melt and pour soap. Unfortunately, the answer is usually no. Cold process soap batter has the ability to stay fluid for a long time. This fluid texture is crucial for dragging the soap with a chopstick, dowel, hanger swirl tool or comb swirl tools. Melt and pour on the other hand, begins to harden once it cools to about 125 ° F, which only takes a few minutes. For example, as shown in the how to do the Peacock Swirl in Cold Process Soap video on Soap Queen Tv, the soap must be fluid and workable during the mixing, pouring the swirling process which can take 10-20 minutes!
While it’s not possible to recreate complex cold process swirls with melt and pour, swirls are still achievable…they will just look a little different =). Check out the Soap Queen TV Episode 3: Swirling M&P above to see an example of the beautiful swirls you can create in melt and pour. The key to creating swirls with melt and pour soap is temperature. When liquid, melt and pour soap is much thinner than cold process soap. The causes the colors of melt and pour soap to easily blend together. When attempting to swirl melt and pour soap, this can cause a muddled look rather than defined swirls. As melt and pour soap cools, it also becomes thicker. The cooled, slightly thicker texture helps avoid the colors from swirling together too much.
A great example of melt and pour swirls is the Thai Tea Melt and Pour tutorial. This simple design uses two colors, orange and white, to create the look of freshly poured cream. In order for this design to look realistic, it’s crucial for the soap to swirl but not fully mix into the orange. Temperature is key! First, the orange soap is poured into the mold at around 130 ° F. Then, the white soap is poured into the mold immediately after at around 120 ° F. At this temperature, the white soap will start to harden as you pour. The cool temperature allows the white soap to break into the orange and swirl slightly, but harden quickly after without becoming muddled.
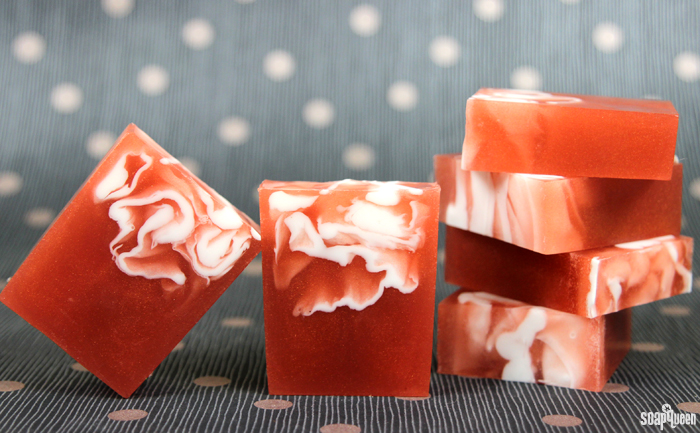 The swirls in the Thai Tea Melt and Pour are created y pouring slightly cooled white soap into slightly cooled orange soap.
The warmer your melt and pour soap is, the more the melt and pour colors will swirl together. In the 3D Psychedelic Double Pour Swirl, orange and blue soap are poured into the mold at around 135 ° F. As you can see, the colors swirled together more than in the Thai Tea Melt and Pour. Another great example is in the Faux Swirl Melt and Pour Cubes, which features various colors swirled together at 130-135 ° F. The result is a beautifully swirled and fluid effect. If you’re looking for more examples of this technique, check out the Easter Ducky Soap tutorial.
 The 3D Psychedelic Double Pour Swirl tutorial uses slightly hotter melt and pour soap to create more swirls.
If you want to ensure your layers stay separate from each other, check out the Goodness, Gracious Great Balls of Freedom tutorial. This project involves red, white and blue layers that feature a slightly swirled appearance. To achieve this the first color is poured, then manipulated as it dries to create texture. This way, the layers stay separate but have a subtle bleeding effect.
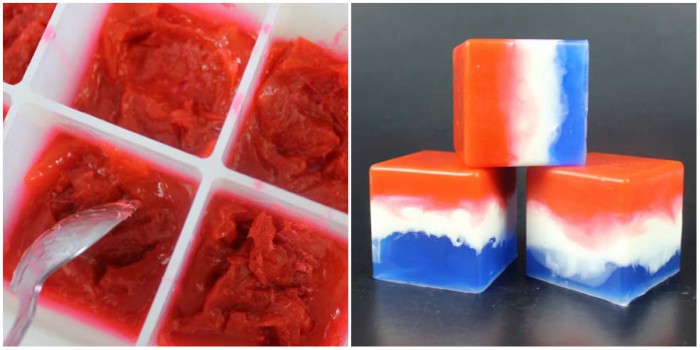 The layers in the Goodness Gracious Great Balls of Freedom are created by using melt and pour with cooler temperatures.
Another fun technique for creating a swirled effect with melt and pour soap, is shown in the Groovy Peace Sign Melt & Pour Soap tutorial. Drops of liquid LabColors are placed into the mold. As the soap is poured, the colors swirl together. The result is a watercolor-like effect. This technique is one of my new favorites, it’s so beautiful! Keep in mind that because LabColors do bleed, the colors within the soap will change over time.

Below are some of my tips to keep in mind when swirling melt and pour. Like any technique, it’s important to remember that practice makes perfect. Also, no melt and pour swirl will look exactly alike. Go into swirling melt and pour with an open mind!
- Temperature is key. I highly recommend having a infrared thermometer nearby when working with melt and pour, particularly when creating swirls.
- The hotter the melt and pour soap, the more the colors will blend together. I don’t recommend swirling melt and pour about 135 ° F, or the colors may swirl together completely.
- For more defined swirls, pour the colors together around 120 ° F, but be ready to move fast! At this temperature, the melt and pour soap will harden quick.
- Don’t over swirl! It can be tempting to use a chopstick or dowel to swirl the melt and pour together once poured. In general, melt and pour soap does a great job of swirling when poured. If using a tool to further swirl the soap, just a few motions will do the trick.
- Pouring the melted soap into different areas and at different heights will help create more interesting swirls.
- Different brands (and even different varieties of the same brand) have different ingredients, which may cause the melt and pour to behave differently. For example, one type of soap could be much heavier than the other, which would cause it to sink to the bottom of the mold rather than swirling together. For best results, I recommend sticking with the same brand of melt and pour bases when doing a swirled project.
- While this is a personal preference, I recommend using non-bleeding colorants when swirling melt and pour. This way, your swirls will stay crisp and defined. Click here to read more about Non-Bleeding Colorants from Bramble Berry.
What tips do you have for swirling melt and pour soap? I would love to hear about your techniques!



Hello, if my soap is at 125F there is already skin on top of it. Is there any way to stop it from forming that quickly? Thank you.
When the soap is that cool is does start to form a skin, but it should still be fluid. Is it almost solid at that temperature, or can you still pour it?
-Kelsey with Bramble Berry
It is fluid with the skin on. Is it how supposed to be? In your videos it looks like your soap stays fluid for such a long time! But I must say I live in UK and sadly I cannot try your bases, it is different brand. But I love your website and tutorials :-). Lots of inspiration here!
That is normal – the soap starts to harden around 130-135F, so by the time it’s at 125F it will have a skin. Just give it a good stir to get everything melted and fluid and then pour into the mold. If that skin is a bit too thick, pop it back in the microwave for 5-10 seconds to get it workable again. 🙂
-Kelsey with Bramble Berry
Thank you for reply. But now I have another problem. At around 130 my soap just became “gummy” within few seconds. Could it be fragrance oil?
Thank you soooo much for this tutorial. I have been looking for a way to jazz up my melt and pour recipes so they are not so boring and this was just the ticket!
You’re welcome Tonya! Have fun making some swirly melt and pour. 🙂
-Kelsey with Bramble Berry
hello All the way from India!!!!
Your ideas are just phenomenal and so inspirational.
Thank you for sharing all of this with all of us.
Thank you so much for your sweet comment Karan! It means a lot to us. 🙂
-Kelsey with Bramble Berry
At what temperature do you need to achieve before pouring?
You want the soap to be around 120-125F! At that temperature, it is thick enough to create swirls, rather than mixing the colors together. Be prepared to move quickly though, at that temperature the soap is starting to solidify. If it hardens up, you can pop it back in the microwave for about 5 seconds or so. 🙂
-Kelsey with Bramble Berry
I really like mixing colored MP soaps, but my colors continue to bleed into the color beside it. What colorants should I be using for clear and goat milk bases? Is the problem just the colorant type or does the soap base make a difference?
Hi Jo!
Certain colors, like water-based LabColors, will bleed in the soap. To prevent that we recommend using non-bleeding colors! You can find a list of those colors here: https://www.soapqueen.com/bath-and-body-tutorials/tips-and-tricks/bramble-berrys-non-bleeding-colors/
My favorite non-bleeding colorants are Color Blocks. They are concentrated blocks of melt and pour. They’re super easy to use! Just shave off a few pieces into the melted soap and stir well. 🙂
Learn more about using color blocks here: https://www.soapqueen.com/bath-and-body-tutorials/melt-and-pour-soap/easy-color-blocks-for-melt-and-pour/
Color blocks: https://www.brambleberry.com/Color-Blocks-for-Melt-Pour–C340.aspx
-Kelsey with Bramble Berry
Can I color clear mp to a white base. Or do I need to buy a white base.
Hi Heather!
You can color a clear base white if you like! Our Titanium Dioxide Color Block creates a true white in soap: https://www.brambleberry.com/Color-Block-Non-bleeding-Titanium-Dioxide-P5363.aspx
To use it, shave off a few pieces into your melted soap and mix well. This video shows you how to work with color blocks: http://www.soapqueen.com/bath-and-body-tutorials/melt-and-pour-soap/easy-color-blocks-for-melt-and-pour/
You can also use Shimmer Super Pearly White Mica to get a white with a beautiful shimmer: https://www.brambleberry.com/Color-Block-Shimmer-Super-Pearly-White-P5349.aspx
We used Super Pearly White Mica to color clear soap in this Icy White Rose Melt and Pour Soap: https://www.brambleberry.com/Sample-Idea-Sheet-for-December-2015.aspx
-Kelsey with Bramble Berry
Aside from the soluble paper, is there another method to getting writting or pictures inside soap?
Does it have to be a laser printer? Im assuming any other form would bleed? I dont have a lazer printer, so Im wondering how I could print things to go inside melt and poor soap as in maybe a place that does use one and could print for me?
Hi Dana!
In our tests, water soluble paper is the best way to go. You can use either a inkjet or a laser printer with water soluble paper. The key is to make sure the printer is a top loading printer. If the paper needs to “wrap” around the bottom (like in a bottom feed printer) the paper can get stuck and damage your printer. The paper is so thin, that it can get stuck easily in this style of printer. A local printing store may be able to help! I would just make sure they are somewhat familiar with the paper…you would hate to damage a printer of theirs 🙂
To prevent bleeding for both inkjet and laser printers, we recommend printing a few days in advance to let the design dry. Then lightly spray the paper with aerosol hairspray to “set” the ink. The design can still bleed over time, but this really helps! Let us know if you have any more questions Dana 🙂
-Amanda with Bramble Berry
I use the swirl for my Vanilla Bean glycerin soap. Half is white and the other half is brown like an actual vanilla bean. It looks so beautiful in the center! The scent isn’t half bad either! 🙂
That sounds beautiful! Creamy and warm. 🙂
-Kelsey with Bramble Berry
Vanilla Bean Fragrance Oil: https://www.brambleberry.com/Vanilla-Bean-Fragrance-Oil-P3922.aspx