Yes, there is an easy way to swirl melt and pour soap. All you have to do is get your soap to the sweet spot temperature and it couldn’t be easier. We call it the “Faux Melt and Pour Swirl”. Check out the original melt and pour swirl on Soap Queen TV. If you make this soap (or a variation of it) I want to see it. Post pictures on the BB Facebook Fan Page!

Ingredients
32 oz Clear Soap Base
16 oz White Soap Base
1 Teaspoon Electric Bubble Gum Colorant
1 Teaspoon Tangerine Wow Colorant
1 Teaspoon Fired Up Fuchsia Colorant
3 Tablespoons Liquid Glycerin
1 oz Cherry Blossom Fragrance Oil
Tools
3 heat safe containers
Spray Bottle of rubbing alcohol
![]() Buy everything you need in the click of a button!
Buy everything you need in the click of a button!

Color Prep
Orange Colorant
1 Tablespoon Liquid Glycerin
1 Teaspoon Tangerine Wow
Bubble Gum Pink Colorant
1 Tablespoon Liquid Glycerin
1 Teaspoon Electric Bubble Gum
Fired Up Fuchsia Pink Colorant
1 Tablespoon Liquid Glycerin
1 Teaspoon Fired Up Fuchsia
Mixing the Colorants: Blend the colorants and the liquid glycerin together with a mini mixer. Be sure to stir a little bit with the mixer before turning it on, otherwise you’ll be standing in a pink cloud of colorant. If you’re unsure about pre-mixing colorants, there’s a “SoapQueen Short” video about it here.
Faux Swirls
ONE: Melt 32 ounces of clear soap in the microwave on 30 second burst until fully melted. Then mix in .25 oz of Cherry Blossom Fragrance Oil.
TWO: Once the fragrance is mixed in, separate the soap into two heat-safe containers. Mix in 10 drops of your glycerin and tangerine colorant mixture to the first container of clear soap . I dropped the colorant in with a mini scoop (I’ve been using it a lot lately for my colorants- loving it). Mix well and cover the orange soap with plastic wrap to keep it warm. Add 8 drops of your glycerin and bubble gum colorant mixture to the second container of clear soap. Mix well and cover with plastic wrap. Set aside.
THREE: Melt 16 ounces of white soap base in the microwave on 30 second bursts until the soap is completely melted. Add .75 oz of Cherry Blossom Fragrance Oil and 8 drops of the glycerin and fired up fuchsia colorant mixture. Mix well.

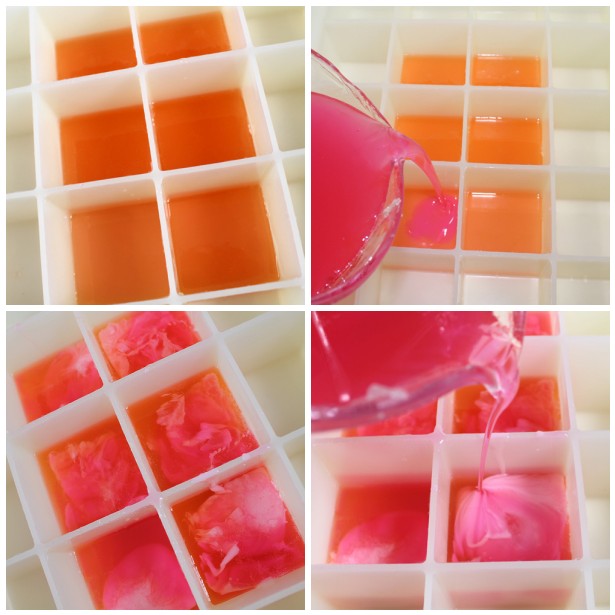
FIVE: Pour a little layer of orange soap into 6 cavities of the cube mold, about 1/8th inches thick. Next, a little of the clear pink soap on top of the orange soap. Try pouring each layer into a different corner of the cube cavity for more color variation in the final soap. Next, pour a little opaque pink soap on top of the pink and orange layers. Again, pour the soap into the opposite corner of the mold cavity to create color variation and swirl. Keep rotating soap pours until all six cavities are full.
Tip: We’re not doing layers so you don’t need to spray each layer. But I kept my spray bottle of rubbing alcohol on hand and sprayed a layer or two on occasion to get rid of any air bubbles. Just remember to move quickly so the layers don’t set up. The magic temperature is between 130-135 degrees.

SIX: Let the soap cool for 4-6 hours before attempting to unmold.


Hi there! Please can you tell me what else I can use to mix the colorants apart from Glycerin?
Thank you.
Hi Tamory!
We have found that Glycerin is the best way to disperse pigments for melt and pour soap. Unfortunately water and alcohol do not work well. For more information regarding dispersing your pigments, you may find this video helpful!
How to Disperse Neon Pigments:
http://www.soapqueen.com/bath-and-body-tutorials/tips-and-tricks/soap-queen-short-how-to-use-neon-pigments/
I hope this helps! 🙂
-Amanda with Bramble Berry
I got this kit as a Christmas gift and just got around to making this soap. It was really fun until I started pouring. I found I kept having to remelt it during the pouring so chunks wouldn’t fall into the mold. I checked the temp before pouring and it was 135*, I think the next time I try this I will pour at a warmer temp, unless there are any other suggestions?
Thanks
Hi Liz!
I’m so glad to hear you gave this kit a try :). When you say chunks, was your soap thoroughly melted to begin with, or did this chunks form after the soap was melted? You can soap slightly hotter, but just keep melting your soap is short bursts so you don’t melt your soap! You do need to work fairly quickly to avoid the soap hardening up as you pour. I hope this helps Liz, let me know if you have more questions 🙂
-Amanda with Bramble Berry
The chunks formed after I had melted the soap and added color and fragrance. Once I unmolded them, they look like a crummy layered bar, not swirled at all 🙁 I’ll have to order more soap base and try again.
Thanks!
Hi Liz!
I’m sorry to hear this happened! If your bar is crummy, that makes me wonder if the base was burned. This can happen if it is heated too much. Do you think this is possible? This could also happen if your soap base is old. Also, was anything added to your soap base? Looking forward to helping you further 🙂
-Amanda with Bramble Berry
This recipe is for 6 cubes? I would like enough to fill the 25 cube silicone mold. Can anyone help me with amounts? I’ve only done CP before and never MP. I also want to do Fuschia, Black, and White for my daughter Lily’s dance team. Fragrance suggestions for middle school girls and coaches? Thanks, Debi
Hi Debi!
This recipe is only for six cubes (each cube holds 5 oz), but you can definitely make it big enough to fit the 25-cube silicone mold (https://www.brambleberry.com/25-Cube-Soap-Silicone-Mold-P5124.aspx). Here are the new calculations of what you would need if you were using the larger mold:
86 ounces (5.4 lbs) of Clear Melt and Pour Base
39 ounces (2.4 lbs) of White Melt and Pour Base
If you are wanting to do a Fuchsia, Black and White mix for your daughters dance team, I would suggest the following non-bleeding colors:
Fired Up Fuchsia Colorant: https://www.brambleberry.com/Fired-Up-Fuchsia-Colorant-P4967.aspx
Super Pearly White Mica: https://www.brambleberry.com/Super-Pearly-White-Mica-P3463.aspx
Luster Black Mica: https://www.brambleberry.com/Luster-Black-Mica-P3453.aspx
And would consider any one of the following sweet fragrances for your these soaps that the girls will just fall in love with.
Creamsicle Cybilla Fragrance Oil: https://www.brambleberry.com/Creamsicle-Cybilla-Fragrance-Oil-P3368.aspx
Hello Sweet Thang Fragrance Oil: https://www.brambleberry.com/Hello-Sweet-Thang-Fragrance-Oil-P3632.aspx
Moonlight Pomegranate Fragrance Oil: https://www.brambleberry.com/Moonlight-Pomegranate-Fragrance-Oil-P3626.aspx
Just make sure to use Vanilla Color Stabilizer if you use any FO with vanillin in it so that you can prevent browning.
Vanilla Color Stabilizer: https://www.brambleberry.com/Vanilla-Color-Stabilizer-P4156.aspx
I hope this helps! Let me know if you have any other questions. =)
-Becky with Bramble Berry
Hello, i used only clear melt and pour base and added 1 teaspoon of talcom powder to 2 of the 4 colours that i used to give them a pearly look and i have to say it looked great!
Hi Emmy!
That sounds absolutely wonderful, we’d love to see pictures of your soaps if you were able to get any. You can share them with us on Bramble Berry’s Facebook page. Another way we’ve found to get that pearly look in these soaps is to use the Super Pearly White Mica. It gives the soaps that pop of shimmer that everyone just loves. =)
Super Pearly White Mica: https://www.brambleberry.com/Super-Pearly-White-Mica-P3463.aspx
Happy Soaping!
-Becky with Bramble Berry
https://www.facebook.com/BrambleBerry
Hello! I tried this great recipe and very easily got the hang of it. However, you can see the lines where I poured the clear pink then the clear orange. Does this mean I sprayed too much alcohol…or temp problems? I poured at 135. Thanks!!!
Hi Erica!
If you could give us a little more information about these lines, I’d love to help troubleshoot it for you. How high from the mold were you pouring the soap? We like to soap with M&P (Melt & Pour) anywhere from 120-130 degrees Fahrenheit. If you have any pictures of this particular batch, we’d love to see them. You can share them with us on Bramble Berry’s Facebook page or send them to info(at)brambleberry(dot)com.
-Becky with Bramble Berry
https://www.facebook.com/BrambleBerry
I love this soap but… mine turned out different but it was sooo beautiful and sells great to my customers! love it! I’ll try to post a pic later 🙂
I’m so glad that you like it, Caitlin! We’d defintley loved pictures. You can share them with us on Bramble Berry’s Facebook page.
https://www.facebook.com/BrambleBerry
-Becky with Bramble Berry
Hi, I attempted to melt my shea butter M&P soap base today and it was an epic fail! I tried the microwave – 20 to 30 sec bursts and then the double boiler. Both ways, it clumped up when I was stirring (slowly) waiting for it to cool enough to pour. I’m so discouraged right now! Please help.
Thanks so much
Hi Shell!
Were you taking the temperatures on your M&P base when you were melting it? Typically we like to keep it around 130 degrees Fahrenheit when we are pouring our melt and pour soaps. If you try this again, try taking the temperature of the soap when you pull it out of the microwave and make sure it is all melted. 🙂
-Becky with Bramble Berry
Would substituting say, shea butter base, instead of white base effect this recipe at all? Do you think it would have the same look?
Hi Gretchen! Since both bases are white and have the same color, I don’t think it is going to change anything except the lather of your soap. You’ll have to tell us how it turns out! =)
~Becky with Bramble Berry
I loved this soap the first few batches I made! However, I bought the 25 lb premium white & premium clear bases from brambleberry and since then the opaque base consistently sinks to the bottom of the mold leaving me with a layered bar. I loved the tie-dyed look I was getting when I was using the 1 lb blocks ( came in the starter/ variety pack from brambleberry), and I make sure to check my temps, what am I doing wrong?! Help!
Good morning Sarah! I’d love to help troubleshoot this for you. What temperatures are you soaping at? For this recipe, try soaping around 120-125 and see if that makes a difference for you. Sometimes if you are soaping at too high or too low of a temperature the soap is going to act a little funny. =)
-Becky with Bramble Berry
Bit better! Still not the same results I had with the 1 lb blocks though, are they different? Thanks for your help! These are some of my favorite bars.
Hi Sarah! The 1 lb. and the 25 lb. soaps that you have are the same kind of soap, so there shouldn’t be any difference between them. But, I am so happy to hear that it is working a bit better for you. Try experimenting a little more with the temperatures and you will find that sweet spot that will make them swirl like they did before! =)
-Becky with Bramble Berry
I noticed that the instructions in the swirl soap kit has one pouring at 120-125. When I made tha kit the swirl pattern come out great. I made the cube recipe and poured at 130-135 into a loaf mold. I have the BB heat tool. Everything over swirled. I lost the hot pink and orange for the most part. I posted the pictures on FB. Why 120 for Swirl kit but 130 for the Faux Swirl? Was it the loaf mold?
Are you using the house base or the bulk base?
The pouring temperature can be between 120 and 130. When I followed this recipe (because they’re so cute) I poured around 130 and it worked great since I let the soap sit out while I was pouring each color. You’ll also notice that the swirls look a little bit different than the swirl kit. These layers are meant to melt and blend with each other for that faux look. Give it another try and just bring the temps down a little. It’s such a cute design =)
Courtney with Bramble Berry
can the glycerin/color mixture be saved if there are leftovers?
Yes, definitely! =)
So I made these wonderful little cubes yesterday. I waited until all the soaps were under 134 degrees. When I went to pour them they set up to quickly and I got layers instead of swirling and I was working quickly. The soap in the container also got a skin on it and I had to reheat the whole batch so I could pour it. I just bought a new fancy temperature gauge also. Do you have any suggestion? Pour at a higher temperature? Keep plastic on the containers? Ugh, help!!!!
Which base were you using? The Bramble Berry ‘house’ bases (https://www.brambleberry.com/Bramble-Berry-Bases-C11.aspx). Other bases will have different melt points to work with. It’s probably just a matter of using a slightly higher temperature if it’s another base.
I used Brambleberry’s bases.
Which ones specifically? We have the bulk bases that have a higher melt point and the house bases (which shouldn’t give you any trouble at those temps). I’m guessing it was the bulk bases? If it was the bulk bases, yes, work with those at a slightly higher temp and that will solve your woes =)
I bought the 10 lbs block of the clear and this time I used the 1 lb goats milk. I am going to try it at a higher temp this afternoon. I’ll let you know how it turned out. Thx for your info. By the way I am following you on PInterest. What an awesome site!!!!
Hi Tanja! Did you stir the soap as it cooled? That’s the trick to avoiding the skin. I made this soap too (because it’s sooooo cute) and poured at 135 degrees and it worked perfectly. I also kept an eye on all three soaps and stirred them as they cooled. Keep us posted!
Courtney from Bramble Berry
Mission accomplished. Yes, I stirred and stirred. Kept my eyes on them and got them all to about 139 degrees. I also kept the plastic on them as I poured (except for the spout of course). I didn’t want another mishap. They came out awesome. Thank you Courtney and Anne-Marie for your help and expertise. My next adventure is cold-processed soap. 🙂
Hi i had the exact same issue, i got the skin and they started setting up quickly too, i got layers. i might try again with slightly higher temps. Will it work not in a cube tray, i have just a normal square soap mould
Hi Julie!
What base are you using for this recipe? If you are using any of the bulk bases, you would need a higher temperature. 🙂
-Becky with Bramble Berry
What is the purpose of the liquid glycerin and why do you start off using 10 drops and then you use 8 drops and 8 drops?
I love the look of these soaps, I will definitely have to try them!!
The liquid glycerin is to mix up the colorants so they don’t clump in your melt and pour soap. Check out the video that we linked to above http://www.soapqueen.com/bath-and-body-tutorials/tips-and-tricks/soap-queen-short-how-to-use-neon-pigments/
The usage rates are different for each colorant. Feel free to add as much or as little colorant as you want to really make this project your own. Anne-Marie wanted a brighter orange which is why she used 10 drops. But the pink colors didn’t seem to need that much, which is why she only used 8 drops.
I hope that helps explain the process!
Courtney from Bramble Berry
Can I keep the left over glycerin/color after the soap is made?
Those are really pretty. I love the colors.
These are so fun!
Only 1 oz Cherry Blossom Fragrance Oil for 56 ounces of soap base? Is this a typo?
Thank you for the tutorial.
Pam
Yes. One ounce is the correct quantity for the Cherry Blossom. Don’t worry, they still smell pretty strong =)
Generally we recommend 1/4-1/2 ounce of fragrance oil per pound of melt and pour soap base.
Courtney from Bramble Berry
Awesome! I’ve been wanting to know how to do this. I’ve been obsessed with swirling with MP ever since I started soap crafting one year ago. I’ve only learned how to do it by layering, like in your Soap Queen video using the loaf mold. I like this look a lot but all of the layering is very labor intensive. I love the look and immediacy of this! Excellent! Also makes me want to buy the cube mold, pronto!
I totally agree. Layering can be labor intensive. This recipe is quick and easy!
Courtney from Bramble Berry
So clever!
These are so beautiful! And I love those cubes. I’ll have to get that mold!
I’m sure you’ll come up with something super duper creative- like always =)
Courtney from Bramble Berry
SO pretty, but then I do love pink. I think I need that mold a little more every time you use it in a tutorial…
You’re going to love this mold! We can’t stop doing tutorials with it! And it’s great for MP and CP =)
Courtney from Bramble Berry
These are just gorgeous!!! lovely colours…
I love the way they look. So pretty. Thanks.
I LOVE THESE! Have been looking for a design idea for a citrus soap I’ve been wanting to do and this is perfect. Thank you!!!!
Citrus would be a great fragrance oil for these colorants!
Courtney from Bramble Berry
LOVE!