I had a dream about this soap project and I actually got up to write notes down in my phone. Does anyone else ever have soaping dreams? It’s a blessing and a curse. I didn’t get much restful sleep that night (I dare you try to sleep with giant ducks roiling in foamy soap!) but I did come away with a super cute Rubber Ducky Soap project! I hope you like it.
I used the swirling cube technique from a couple weeks ago. Don’t you just love how easy it is to swirl by controlling your temperatures? I want to see you make this project or a variation of it on the Bramble Berry Facebook page. Flaunt your Easter soaps!
 Ingredients
32 oz Clear Soap Base
32 oz White Soap Base
Royal Blue LabColor
Blue Mix LabColor
Blue Green LabColor
Celestial Waters Fragrance Oil
Castile Liquid Soap
Rubber Ducks
NOTE: The rubber ducks in this tutorial have been discontinued. The kit now contains Duck Erasers.
10” Silicone Loaf Mold
Buy everything you need in the click of a button!![]()
SOAP INSTRUCTIONS
ONE: In a large heat safe container, melt 32 ounces of clear soap in the microwave. Once the soap is melted, separate the soap evenly into two containers (16 ounces in each container).

TWO: Add 9 ml of Celestial Waters fragrance oil and 50 drops of diluted Blue Green LabColor to the first batch of melted clear soap. Mix well and set aside. Unsure how to mix up your Labcolors? Click here to learn how to dilute your LabColors.
THREE: To the second batch of clear soap, add 9 ml of Celestial Waters, 20 drops of diluted Royal Blue LabColor and 30 drops of diluted Blue Mix LabColor. Mix well and set aside.
FOUR: In another large, heat safe container, melt 16 ounces of white so soap base in the microwave.
FIVE: Since the Celestial Waters fragrance oil is yellow in color, we’re only going to add 3 ml of the fragrance oil to the white soap base. We want it to stay nice and white. Leave the soap uncolored.
SIX: Let all three containers of soap cool down to 130-135 degrees. Try to time it so they cool at the same time.
HINT: If one of the three soaps cools down first, pop it back in the microwave for 10 seconds. All three soaps need to be at 130-135 degrees Fahrenheit before pouring. Please note that these temperatures work with the Bramble Berry ‘house’ bases – the bulk bases and other brands will utilize different melt and set points.

SEVEN: Once the soaps are at the ideal pouring temperature, pour a little bit of the teal soap into the mold (about 1/4 inch). Then pour the same amount of the blue soap followed by the white soap. Repeat this pouring pattern, alternating soap colors. Spritz with rubbing alcohol to get rid of air bubbles along the way. Once all of the soap is in your mold, let it cool for 4-6 hours before you carefully unmold.

FROSTING INSTRUCTIONS
ONE: Combine 16 ounces of melted white soap base, 8 Tablespoons of Castile Liquid Soap and 6 ml of Celestial Waters fragrance oil in an electric mixer. Whip the ingredients together on medium switching to high after one minute. Keep mixing until the mixture forms fluffy, whipped peaks that look like frosting.

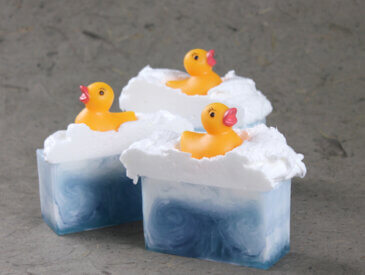
TWO: Use a spatula to quickly frost the entire loaf of soap then swiftly and evenly nestle 6 rubber ducks into the fluffy frosting.
HINT: I frosted what would be the “bottom” of the soap loaf, which is the top of the soap after you’re done pouring.
THREE: Let the frosting harden for about an hour and the ducky soap is ready to cut! Quack! Quack!

Rubber Ducky Soap Tutorial
Ingredients
- 32 oz Clear Soap Base
- 32 oz White Soap Base
- Royal Blue LabColor
- Blue Mix LabColor
- Blue Green LabColor
- Celestial Waters Fragrance Oil
- Castile Liquid Soap
- Rubber Ducks
- NOTE: The rubber ducks in this tutorial have been discontinued. The kit now contains Duck Erasers.
- 10 ” Silicone Loaf Mold
Instructions
- In a large heat safe container, melt 32 ounces of clear soap in the microwave. Once the soap is melted, separate the soap evenly into two containers (16 ounces in each container).
- Add 9 ml of Celestial Waters fragrance oil and 50 drops of diluted Blue Green LabColor to the first batch of melted clear soap. Mix well and set aside. Unsure how to mix up your Labcolors? Click here to learn how to dilute your LabColors.
- To the second batch of clear soap, add 9 ml of Celestial Waters, 20 drops of diluted Royal Blue LabColor and 30 drops of diluted Blue Mix LabColor. Mix well and set aside.
- In another large, heat safe container, melt 16 ounces of white so soap base in the microwave.
- Since the Celestial Waters fragrance oil is yellow in color, we’re only going to add 3 ml of the fragrance oil to the white soap base. We want it to stay nice and white. Leave the soap uncolored.
- Let all three containers of soap cool down to 130-135 degrees. Try to time it so they cool at the same time.If one of the three soaps cools down first, pop it back in the microwave for 10 seconds. All three soaps need to be at 130-135 degrees Fahrenheit before pouring. Please note that these temperatures work with the Bramble Berry ‘house’ bases – the bulk bases and other brands will utilize different melt and set points.
- Once the soaps are at the ideal pouring temperature, pour a little bit of the teal soap into the mold (about 1/4 inch). Then pour the same amount of the blue soap followed by the white soap. Repeat this pouring pattern, alternating soap colors. Spritz with rubbing alcohol to get rid of air bubbles along the way. Once all of the soap is in your mold, let it cool for 4-6 hours before you carefully unmold.
- Combine 16 ounces of melted white soap base, 8 Tablespoons of Castile Liquid Soap and 6 ml of Celestial Waters fragrance oil in an electric mixer. Whip the ingredients together on medium switching to high after one minute. Keep mixing until the mixture forms fluffy, whipped peaks that look like frosting.
- Use a spatula to quickly frost the entire loaf of soap then swiftly and evenly nestle 6 rubber ducks into the fluffy frosting.
- Let the frosting harden for about an hour and the soap is ready to cut! Quack! Quack!