This post was written by the always talented and creative Amanda from Lovin’ Soap. If you can’t get enough of her creative outlook on soap projects, click here to pick up a couple of her soap E’Zines. They’re practically instant gratification since you’ll be able to download them within a day of purchasing. ~Anne-Marie
The magic of this realistic soap rock tutorial is all in the layering and the mica/oxide lines. You can play around with different shades for the rock using gray, brown or even black and different shades of mica/oxides for the lines. For the mica/oxides lines you can use bright colors such as pink, blue and green to get amazing looks. So let’s get to it! If you are new to cold process soapmaking START HERE (and pay extra attention to the lye safety video). This is probably one of my all time favorite palm free recipes. This recipe is high in olive oil. Olive oil makes for a softer soap upon unmolding but cures into a bar that is as hard as a rock! (pun intended!) The “softer soap upon unmolding” characteristic of this recipe is what gives us the perfect base for squishing, forming and creating our rock shapes.

Ingredients
Olive Oil – 12 oz
Coconut Oil – 8 oz
Rice Bran Oil – 6 oz
Cocoa Butter – 4 oz
Castor Oil – 2 oz
Water – 9 oz
Sodium Hydroxide – 4.4 oz
You’ll also need
2 teaspoons Vintage Gray Mica (since we are out-of-stock of this, you can just use a pinch of the Luster Black Mica)
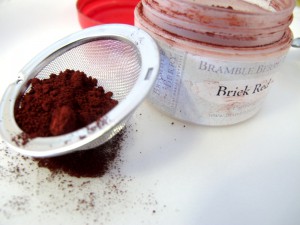
1 tablespoon Brick Red Oxide
1.5 oz Plum Tea Fragrance Oil
Small Tea Strainer (or jar covered with pantyhose to dust mica)
10″ Silicone Loaf Mold
Buy everything you need in the click of a button! ![]()
Gear up in your goggles and gloves. Be sure to follow all safety precautions when working with sodium hydroxide and caustic soap.
Step 1 – Weigh out the water and lye. Carefully pour the lye into the water to make the lye solution. Set that aside to cool down.
Step 2 – Weigh out the coconut oil and cocoa butter. Melt.
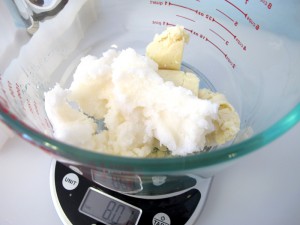
Step 3 – Add the castor oil, olive oil and rice bran oil to the melted solid oils.
Step 4 – Add the Vintage Grey mica (or Luster Black mica) and fragrance oil to the oil mixture. Go ahead and zap it with the stick blender to get the mica all mixed up.
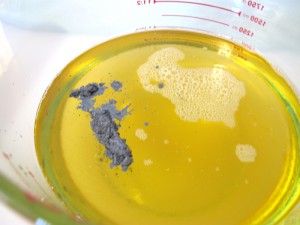
Step 5 – Bring soap to a light trace.
Step 6 – You can make as many layers as you want. I did four layers total which allowed me to have three mica/oxide lines. Pour about 1/4 of the mixture into your mold.
Step 7 – Dust with the brick red oxide. There are several ways to dust mica/oxide on a layer of soap. You can use a tea strainer like I do or you can cover a small jar with panty hose. Have your dusting color ready to go before you get started.
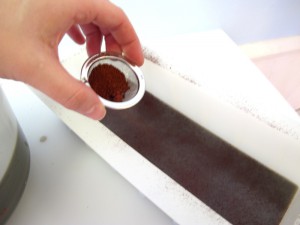
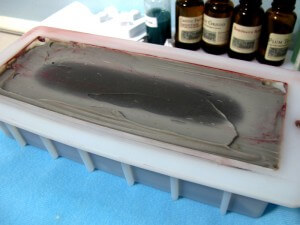
VERY IMPORTANT! When dusting layers with mica, oxides or other powders be sure to not over do it. I like to keep plenty of the soap peaking through. You can see plenty of grey peaking through the red oxide in the picture above. If you do too much…the layers will simply break apart.
Step 8 – Pour the next layer. I like to gently scoop out the next layer with my spatula. If you just dump/pour it…you run the risk of it breaking through the bottom layer. I tested a small bit and it broke through so I simply let the soap sit for about 5 minutes and it was ready to go.Repeat this until you get all four layers poured. Do not dust the top with mica or oxide or the mooshing/forming step will be super messy!
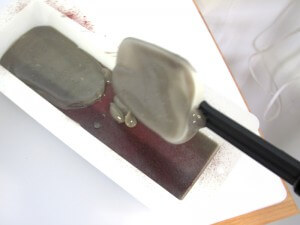
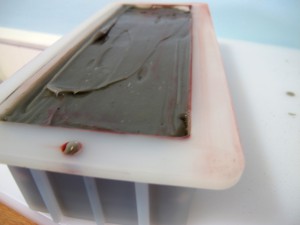
Tip – I like to gel this recipe so I put my soap on a heating pad and covered it with a cardboard box to help it along. I think it helps with the color and also the texture when we’re mooshing/forming the rocks. It is a personal preference though. Here the soap is going through gel phase.
Step 9 – Let your soap sit for 24 hours and unmold!
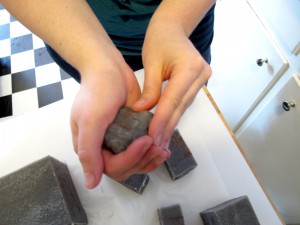
Step 10 – Now it’s time for the mooshing…the squishing…and the forming of the rocks. Cut your soap into 1-2″ bars and then cut the bars into two or three pieces. Its all a matter of how big you want your rocks. I did several sizes which I think looks better when on display.
Step 11 – Using your hands, form the pieces into rock shapes. If your soap gelled you are probably okay to not wear gloves. If your soap did not gel and still might be a bit zappy – use gloves. Don’t worry about getting them completely smooth or perfect. More organic and rough shapes turn out looking the best.
Step 12 – Once you get the general shape that you want…take it over to the sink and polish it under some water. This helps to smooth it out a bit and really look realistic.
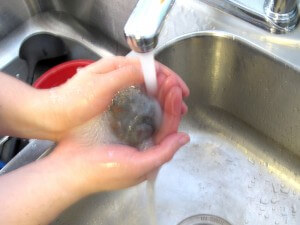
Step 13 – Set the wet rocks onto a paper towel to dry.
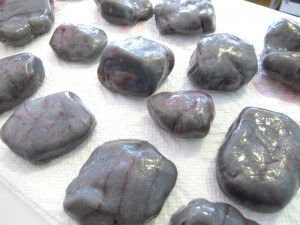
Tip – Check out the mica/oxide lines! I think that is what really sets them off and makes them look real. Cure these as you would your regular bar soap. I like to cure mine a good four weeks.
Holiday Soap Design Tip: This concept would be great for making coal soap around Christmas time. To get a darker black I like to use charcoal powder with a pinch of black oxide. Charcoal powder is less likely to bleed (on a washcloth) but the pinch of black oxide helps to darken it up. Another great way to get a good black is to soap with an alkanet infused olive oil and a bit of charcoal or black oxide. To make your black soap dark…be sure it goes through gel phase.

Happy Soaping!
Amanda Griffin, www.lovinsoap.com
PS from Anne-Marie – I actually have some of this great soap in my greedy little hands and it is just as lovely and unique-looking in person. Fantastic technique Amanda! Remember, if you like Amanda’s flair for soap design, she has THREE E-Zines for sale here. Her projects are fun, inventive and inspiring.