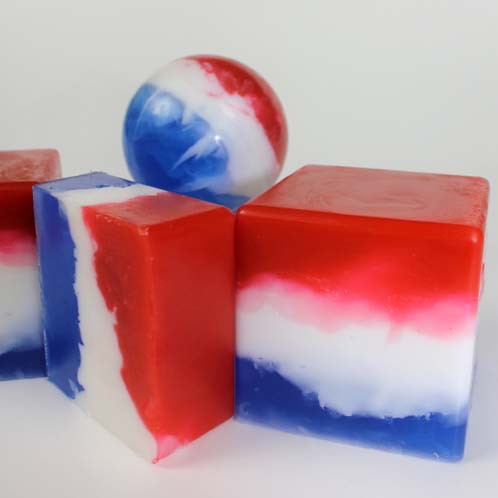
Happy weekend! I was inspired by this awesome 4th of July Fudge (pinned onto my 100 Days of Summer Pinterest page, naturally) to create a tutorial using our brand spankin’ new 4-sphere silicone mold, along with the 9-cube silicone mold that I’m still obsessing over. I built sand bottle-like layers in the cubes by manipulating the melt and pour as it dried. In the spheres, I used some of the ideas from this Soap Queen TV episode to create marbled swirls. The color scheme is as American as apple pie, so what better to use than Bramble Berry’s Red Apple Fragrance Oil? Either of these intermediate techniques can easily be modified for a beginner by creating basic layers in the cubes and spheres, and can be varied by using different thicknesses in the layers. If you don’t have these molds, it’s okay, this technique works for all kinds of molds (the thicker the mold, the better).

Ingredients
46 ounces Clear Melt and Pour Base
23 ounces White Melt and Pour Base
6 drops Liquid Cherry Colorant
15 drops Liquid Red Oxide
15-20 drops Liquid Blue Oxide
Spoon
Chopstick, Dowel or Skewer
 Click here to add everything you need for this project to your Bramble Berry shopping cart!

One: Cut up 23 ounces of the Clear Melt and pour Base into 1 inch chunks. In a heat safe container, melt the Clear Melt and Pour Base on quick 30 second bursts in a microwave. Be careful not to over heat the soap! Bramble Berry’s house melt and pour base pours best at 125-135 degrees.
Two: Mix in 6 drops of Liquid Cherry colorant and 15 drops of Liquid Red oxide. Add .4 ounces of Red Apple Fragrance oil and stir in well. What you see is what you get, so if you’re unhappy with the color, add some more of either red until you get the hue you want.
Three: Pour the soap into the 9 cube silicone mold, filling each of the cavities about 1/3 of the way full. It’s totally fine to eyeball it. You’ll have extra soap left; set it aside for the bonus round!
Four: Stir the soap in the cavities as it cools and starts to thicken. Add texture, dips and divots in the soap until it’s too hard to manipulate any longer. Clean up any drips on the sides of the mold cavities with your clean-up tool. Drips are fine but they take away from the design.

Five: Cut up all of the White Melt and pour Base into 1 inch chunks. In a heat safe container, melt the White Melt and Pour Base on quick 30 second bursts in a microwave. Add .4 ounces of Red Apple Fragrance oil and stir well.
Six: Spray the red layer with Isopropyl Alcohol (Rubbing Alcohol) and pour the white soap into 9 cube silicone mold, filling the second third of the mold. Set aside the extra soap. Like you did with the red layer, mix the white layer with a spoon as it cools and add the wavy texture. Clean up any drips.
Seven: Cut up the other 23 ounces of the Clear Melt and pour Base into 1 inch chunks. In a heat safe container, melt the Clear Melt and Pour Base on quick 30 second bursts in a microwave. Add 15-20 drops (depending on how deep you want your color) of the Liquid Blue oxide and .4 ounces of Red Apple Fragrance oil and mix in well. Spray the white layer with Isopropyl Alcohol and pour the blue soap to fill the rest of the mold. Spray the blue soap with Isopropyl Alcohol to eliminate air bubbles, and set aside to cool.

And now it’s time for the bonus round! Remember all that leftover soap you have? Go ahead and reheat (if necessary) it on 15-30 second bursts and pull out your 4 sphere silicone mold!
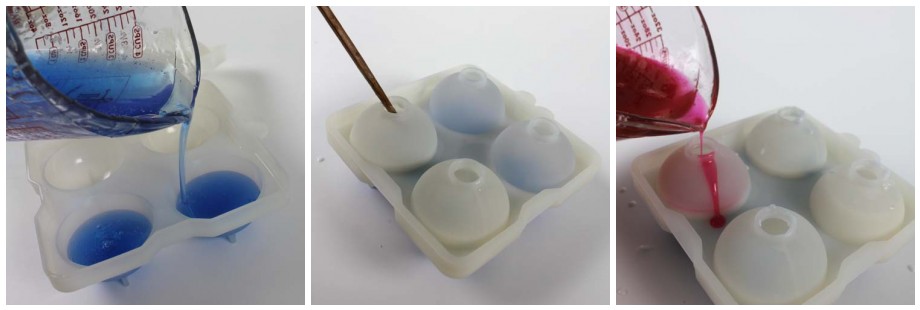
Bonus Round Soap (he he, get it?): Fill each of the cavities in the Round Silicone Mold about 1/3 of the way full with blue soap. Wait a few minutes for the soap to form a skin, spray it with Isopropyl Alcohol, and pour a layer of white soap. Using a chopstick or skewer stuck into the opening at the top of the mold to agitate the two layers, creating a swirly effect. When the white soap has formed a thin skin, spray it with Isopropyl Alcohol and pour the red soap. Get that chopstick in there and work it around for a bit. Allow the soap to fully harden.


Double Bonus: Cutting the cubes in 1/2 makes the perfect guest size soap!


gosh these are really super cute – I see a variety of color use with this technique
Hi Cindy!
Aren’t they fun? I agree, the possibilities are endless with this technique! If you give it a try, we would love to see photos on our Facebook page 🙂
https://www.facebook.com/BrambleBerry
-Amanda with Bramble Berry
I love the colours (with just the red and white we would have the Canadian flag). Happy 4th of the July. 🙂
You could totally do that for Canada Day! I can’t wait to hear all about the different variations people make on this project!
-Becky with Bramble Berry
LOVE this technique!! LOVE IT!!
Great technique! I love the finished look 🙂
It’s fun to try and create texture by manipulating the soap as it cools. There are a lot of design options for that (I’m thinking rainbow soap with “pillowy” clouds next).