Happy Weekend! I hope you have amazing weekend with fun, sun and family. I am going to be gone this weekend (headed to Olympia to hang with my family) and so this project will hopefully suffice for your weekend of fun activities with your family.
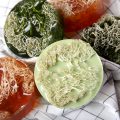
3-D Loofah Soap
Supplies:
Clear Melt and Pour soap base
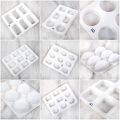
12 Bar Round Silicone Mold (The 3D Round Mold has been discontinued and replaced with our 12 Bar Round Silicone Mold)
Microwave safe container
Saran Wrap
Spritzer bottle filled w/ rubbing alcohol
Colorant optional, not needed if loofah is colored
Fragrance oil
Loofah
Butter Knife
1. Take apart your 3-D mold and place on counter.
2. Get your loofah and place into the mold (if your loofah is large this may be tricky, here is what we did to get ours to fit)
a. Pull a small side of the loofah away from the body.
b. Wrap this layer around the rest of the loofah, enclosing it into a ball.
c. Lay this into your mold, using first your finger then your butter knife to hold it in place.
d. Leaving the butter knife there to hold the loofah in place, assemble your mold.
e. Once the mold is assembled and rubber bands are in place, slide the butter knife out of the top opening, your loofah is tucked nicely inside!
3. Cut your melt and pour into 1″ cubes, put into microwave safe container and cover with saran wrap.
4. Microwave for 30sec intervals until soap is melted.
5. Add your fragrance (and color if you choose).
6. Spray a few times into the mold with your alcohol.
7. Pour your melted soap base into the mold, watch as you do this, the soap will rise to the top and settle a few times as it soaks into and around the loofah. Keep filling until you are sure it is full.
8. Spray the top with alcohol.
9. Slighthy tip the mold side to side and tap on the counter to release any trapped air bubbles. (You may want to repeat this step a few times)
10. Spray the top with alcohol.
11. Let sit for a few hours until hardened. (The longer you wait the easier it is to unmold).
12. Trim the edges of the soap, if you have to cut away a little bit of loofah this is okay. It should still hold together once you get down to it.
Your family and friends will be amazed and delighted by your scrubby soap on a rope triumph.
BathCake, you could use ANY 3D mold.
Katie, I am psyched to read that you tried this project. How did it turn out?
Shoot! That pouf is not easy to get in the mold! But I finally did and got the soap poured. I’m excited and can’t wait to see how mine turns out. I used an orange pouf and a Ginger Peach fragrance. Yippee! Thanks Anne-Marie!!!
How cool is that?? 🙂 Thank you for the tutorial! I wonder, can I use any 3D mold or do I need the round?
~Erin
Looks like fun! Another fun summer project to try. Maybe I should switch to m&p until I get my kitchen back for cp. Now there’s a thought.
Thanks! I was starting to get a wee bit frustrated with the whole situation.
I always wanted to try this but wasn’t sure how to do it.
I do have one question though.
You say Loofah but that looks like a body poof sponge to me.
The Loofah or Luffa I am familar with is the vegetable that you turn into a scrubber.
Maybe we call them different things in different parts of the country. I just wanted to be sure to get a body poof/puff and not be looking for one with a loofah in it. lol
Thank you for the tutorial, Anne-Marie! I hope Pretty-in-Pink and Erin from the TeachSoap forum see this too. This was one of the M&P projects they were interested in on the forum.
Hope you have a fun weekend with your family!:)
I definitely want to try this one, but it’ll have to be after I get my splint off and after the vacation. Hope you’ll have a fun family weekend!
Thanks for the project info. In my next order, I will have to get the 3D mold so I can try this out. Have a great weekend.