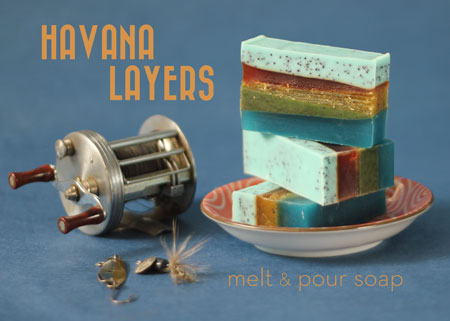
The Havana Classic series continues today with this super sensory melt and pour project. Loaded with natural additives such as Shredded Loofah, Poppy Seeds, Lemon Peel, White Pumice and Walnut Shells, this is a fun textured bar of soap that exfoliates as it cleans.
Now through March 26 we’re rolling out specials tutorials, coupons and discounts as part of Havana Classic. Subscribe to our newsletter, and keep an eye on our Facebook page, Instagram, Twitter, Tumblr, Homepage and the blog for the coupon codes so you don’t miss the savings!

What You’ll Need:
28 oz Clear Melt & Pour Soap Base
3/4 tsp Blue Raspberry Colorant
6 tsp White Pumice
2 mini scoops Green Chrome Colorant
1 tsp Walnut Shells
1/2 tsp Paprika
1/4 tsp Lemon Peel
2 tsp Shredded Loofah
4 mini scoops Titanium Dioxide
2 tsp Poppy Seeds
Scraper/Cutter
99% Isopropyl Alcohol
2 lb Wood Loaf Mold
2 lb. Wood Log Mold Silicone Liner
0.8oz Tobacco & Bay Leaf Fragrance Oil
3 .15CC Scoops
 Click here to add everything you need for this project to your Bramble Berry shopping cart!
ONE: Place 2# Silicone liner inside wooden mold. Slide the Scraper/Cutter tool under the long edge of the mold, metal side first, until the wood handle is touching the mold so that the mold is at a slight angle.
TWO: Cut up 28 oz clear melt and pour and place in microwaveable bowl. Heat in 30 second bursts until melted.
THREE: Stir in 0.8oz of Tobacco & Bay Leaf fragrance oil to your melted soap. Separate out 8 oz of soap into a small cup.
FOUR: In a small container, mix 1/2 tsp Blue Raspberry colorant, 4 tsp White Pumice, and 1 Tbsp of Rubbing Alcohol. Pour this mixture into the 8 oz of soap, and gently stir.
FIVE: Pour the colored soap into lined wood mold, and spritz liberally with alcohol.

SIX: From your large bowl of melted soap, separate 4 oz of soap. If needed, heat in 10 second bursts until soap is liquid.
SEVEN: In a small container, mix two mini scoops Green Chrome Oxide, 1 tsp Walnut Shells, and 1 tsp Rubbing Alcohol. Pour this mixture into the 4 oz of soap, and gently stir.
EIGHT: Check on the first layer of soap in your wood mold. If it has a firm skin on it, pull out the cutter, and slide it under the opposite side of the wood mold. If is is still quite liquid and cannot hold its shape, wait a few minutes, then switch sides with the cutter once the soap is more set.
NINE: After switching the angle on the mold, spritz soap liberally with alcohol again. Then, pour your green layer of soap over the blue layer. Make sure your green layer is not hotter than130°F, or you risk melting through your first layer. Spritz with alcohol.

TEN: Portion out 4 oz more soap into a small cup. If needed, heat in 10 second bursts until soap is liquid.
ELEVEN: In a small container, mix together 1/4 tsp Lemon Peel with 1 tsp Alcohol. Pour into soap. Next, mix in 2 heaping tsp of Shredded Loofah. Repeat steps eight and nine with your yellow layer.

TWELVE: In a small container, mix together 1/2 tsp Paprika, 2 tsp Pumice, and 1 Tbsp Alcohol. Pour this mixture into the separated 4 oz of soap, and gently stir. Repeat steps eight through ten with your red layer.

THIRTEEN: Heat remaining 8 oz of soap in 10 second bursts. In a small container, mix together 4 mini scoops Blue Raspberry, 4 mini scoops of Titanium Dioxide, and 4 tsp Alcohol. Pour mix into remaining soap, and add 2 tsp Poppy Seeds.

FOURTEEN: After 24 hours, slip your soap out of the silicone liner, and place it on its side to cut. This will help avoid drag marks through your bars. Enjoy!


I would really like to make the aftershave. Is there a tutorial or recipe available? The Tobacco and Bayleaf fragrance is amazing. Love it.
Hi there!
It sure it! You can find the recipe for the Aftershave on our Tumblr page!
Aftershave Tutorial: http://soapqueen.tumblr.com/post/80273451460/from-now-until-march-26th-well-showcase
Can’t wait for you to try it! The men in the office really enjoyed it
-Amanda with Bramble Berry
Love this!!! Would it be possible to make this with CP I wonder….
Hi Cyndi!
I think you could definitely make something similar with cold process We used a similar technique with our Circular Soapy Geometry Tutorial! If you give it a try, let us know how it goes
Circular Soapy Geometry Tutorial:
http://www.soapqueen.com/bath-and-body-tutorials/melt-and-pour-soap/circular-soapy-geometry-tutorial/
-Amanda with Bramble Berry
Thanks for your reply Amanda. I think I will try a CP version, because I’m so enamored with this soap!
Just what is the alcohol’s purpose in this recipe?
~Cyndi~
Hi Cyndi!
The alcohol helps the layers stick together, and it also helps get rid of any bubbles that may appear in the soap. I really recommend having a bottle of alcohol on hand for this project because there are so many layers! When doing cold process, spraying the soap at the end helps reduce soda ash
-Amanda with Bramble Berry
I was just wondering if it’s the alcohol that prevents the exfoliants for coming to the top of the soap layers. I tried a coffee soap this week and most of the coffee grains came to the top of the soap, but in these photos they look well dispersed.
Hi Lyn!
Sometimes dispersing exfoliants in melt and pour can be a little tricky! If the soap is too hot and liquid, the exfoliants may go to the top, or to the bottom. If you mix in the exfoliants when the soap has cooled and begins to thicken up, they will remained dispersed You can see in a few of the photos how thick the melt and pour started to be
-Amanda with Bramble Berry
What an intriguing project for a beginner! I think I’d love to make this or similar formula soon. Love the step-by-step photos.
Hi Carole!
I’m happy to hear you enjoyed this tutorial If you get photos of your project, we would love to see them on our Facebook page!
-Amanda with Bramble Berry