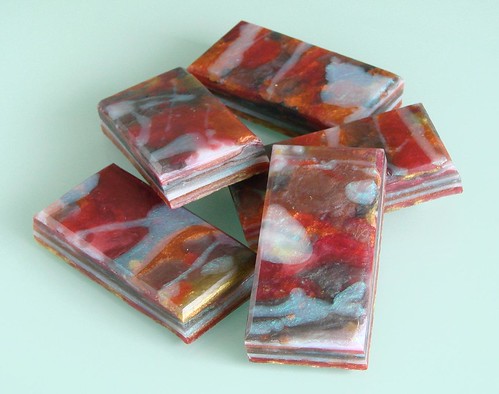
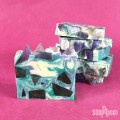
For this week’s Soap Queen tutorial I’m going to show you how to make these complicated looking marbled soaps – but they couldn’t be easier! I love this project because you can use up leftover soap scraps and it makes a fancy soap from a plain tray mold.
Timing is the most important aspect of this project, so just make sure you don’t have any distractions so you can closely pay attention to the temperature and consistency of your soap bases as you create your marble soap.
Ingredients
2 lbs Shaving M&P Soap
Energy Fragrance Oil
Guest Rectangle Slab Mold
Opalescent Green
Merlot Mica
Copper Sparkle
Luster Black
Heavy Metal Gold Mica
Tools
Microwave safe container
5 small bowls or mugs for soap
Spray bottle of rubbing alcohol
Stir stick or spoon
Soap Cutter or Knife
One: Chop up the shaving melt & pour soap base and place in a glass container. Melt in a microwave in short 30 second bursts – stirring in between each heating.
Two: Separate the soap into 5 different containers. If you don’t have enough heatsafe measuring cups, try using ceramic coffee mugs. The key is that the containers need to be able to be heated if your soap hardens up on you.
Three: Add your fragrance and a different color of mica to each container. Stir to combine.
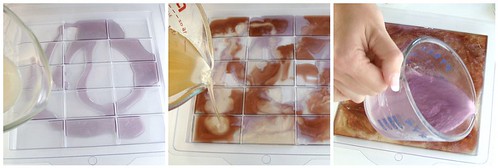
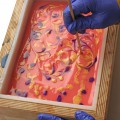
Tip: Try spraying the top of the liquid soap with rubbing alcohol if the micas aren’t mixing in well.Four: Drizzle a little soap from one of your mugs into the mold and spritz with alcohol. Leave lots of ‘blank’ spaces. These are where the next colors will go. You’ll do many passes so less is more.
Tip: Try spraying the top of the liquid soap with rubbing alcohol if the micas aren’t mixing in well.Four: Drizzle a little soap from one of your mugs into the mold and spritz with alcohol. Leave lots of ‘blank’ spaces. These are where the next colors will go. You’ll do many passes so less is more.
Five: Once the soap is cool but not solid, drizzle another color on top. Continue alternating between soap colors until you fill up the mold. Spritz with alcohol frequently. Be sure to keep stirring the other colors so that they don’t form a skin on top before you can pour them into the mold. And, don’t forget, keep that alcohol spray going generously.
Six: Give a final spritz of the rubbing alcohol to the soap and allow to cool for 24 hours before removing from the mold.
Seven: Once the soap is set-up, cut the marbled bars into individual rectangles using a knife or soap cutter.
Be sure to check back next Thursday for another great step-by-step Tutorial!



Thank you for this wonderful tip!I am a new soapmaker and had been looking for techniques how to make a marbled soap.
Thank you so much for stopping by, you’ll have to let us know how your marbled soap turns out! =)
-Becky with Bramble Berry
does it have to be alcohol rub or can i use witch hazel to spritz the layers, thanks
It does need to be rubbing alcohol – sorry =( I’ve tried Witch Hazel and it just doesn’t work the same way as rubbing alcohol.
Rubbing alcohol is what really works. Witch Hazel won’t help the layers adhere (and you don’t want to risk it with a cute project with this).
-Courtney from Bramble Berry
*here* is a picture – http://twitpic.com/gqm97.
i thought you had me at swirling, but wow this was awesome and so amazing! thanks again! –Ayesha
Ayesha – I can't wait to see your photo! Yippeee! And yes, pouring two at a time is totally fine as long as the colors go in different ways and patterns.
Janelle – For your first batch, maybe try this starter beginner one with just two colors:
http://teachsoap.com/doublepour.html
video on it here: http://www.youtube.com/watch?v=uMCwq7A-yn8
That way, you can move up to 2, 3, 4 and 5 colors after you master the two.
Thanks for the tutorial! I made this last night and wow it was a little harder than I thought. Especially because I had to pay attention to the temps and consistency of all 5 colors (as you said) but towards the end, I got tired and I started pouring 2 at a time. Will post a pic – thanks again!!
-Ayesha
That's the tricky thing about the mold – it has beveled edges already! Coolio, eh?
Lovely stuff (as always). I like the way you've bevelled the edges too (or so it looks). Really nice!
Ooh, I have that mold, and what a easy way to make a marbled look!
Great! Glad that you like it. Janelle, the mold we used is this one: https://www.brambleberry.com/Guest-Rectangle-Tray-Mold-1-sheet-P3995.aspx
It's a really great guest tray rectangle mold.
Hi
I am very new to this and wanted to know if this is a good recipe to try as my first. It looks so good 🙂
Also what was the mold used (size or product code)
thanks
B – Yes, it's just a 'hope for the best' when remelting scraps. Anything to get hot enough to flash off the fragrance will damage the soap too much and you'll be left with an icky stinky mess. I'll do a blog post on reusing scraps one of these days =)
Anon – You can make it without mica but make sure the colorants are non bleeding. =)
i WANT TO MAKE THIS BUT CAN i LEAVE OUT THE MICA?
Joy Joy (joyous) – yes, the layers all adhered to eachother. Easy peasy when you pour at the same time. Come visit me in Bellingham soon. I would love to catch up!
Anon – Yes, you can mix colors but Labcolors bleed – so make sure you choose non-bleeding liquid colorants. =) Shaving Melt and Pour is a type of soap that Bramble Berry sells that is extra lather-y and slippery for shaving. You can use any type of base.
Debbie – Any type of clear melt and pour should work a-okay. =)
Jessie – great idea! Thank you for sharing.
So pretty! I am going to have to try this right away!! I just love the look of the marbled colors.
I use small tupperware containers, the kind that you can get in a 4-5 pack for a dollar, they work perfectly and stack together to take up less room when I'm not using them.
I also have a different set that I use for CP/HP soaps, since the lye and fragrance oil doesn't eat through them!
I have so many scraps I need to use and maybe give away as gifts. This will work great for that! Maybe I will try and sell a couple on Etsy too. Great idea! I have that mold too, I need to use it!!! Silly me.
Now I need to go digging for my fall colors…this is lovely!
Love this post! I'm just now learning m&p and my question for this project is about using scraps and such. I mentioned I'm still learning so I have lots of soap that is, ahem, less than stellar and I'd love to be able to re-melt it into something usable and/or sellable. (I've got way more attempts gone wrong than my family could use in a year) If the scraps that I'd be using for this project are already scented, would I need to just hope for the best with all the blended scents, or is there a way to "flash off" the fragrance without disturbing the water balance of the soap base?
Beautiful! I'm going to try this but I'm wondering does it have to be shaving M&P? I can't wait to give this a try!
Great looking soaps. Thanks for the tutorial.
This looks great but I have ???
can you use both micas and liquid
colors also what do you mean by shaving melt and pour
JANIE IN Katy Tx
oh wowowowowow
this is just my kind of style
thanks for sharing how to these 🙂
hey Anne Marie it's Joy in Sequim. just wondering if the different layers all adhered to each other?? it's so cool!
have the best Labor Day holiday! hugs.