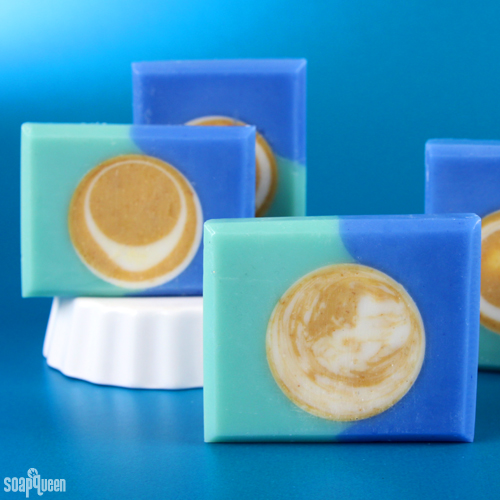
Trying new soap techniques keeps the craft interesting, fresh and fun! This Misty Maritime Moon soap was created for the Negative Space Embed Challenge via Great Cakes Soapworks in August. The negative space embed technique involves cutting holes into the base of soap and later filling the holes with fresh soap.
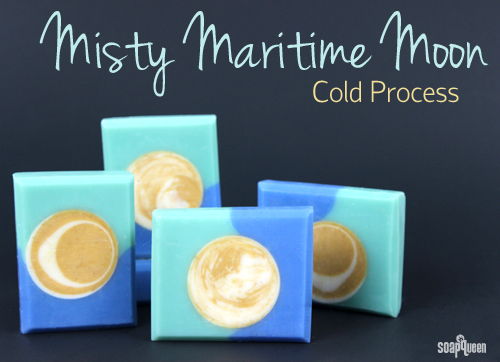
Created with a fresh combination of Pineapple Cilantro, Orange Peel Cybilla and Ocean Rain Fragrance Oils, this soap smells crisp and bright. Orange Peel is used to give both color and texture to the embeds, while titanium dioxide provides contrast. The dual blue tones are made using the Multi-Pour Sectioning Tool, but cardboard can also be used as shown in the Mantra Swirl tutorial. Thanks for all the great name suggestions for this soap via Facebook, they were so much fun to read!
This technique is so exciting because of all the possibilities of shapes you can create. You aren’t limited by the embedding molds you own. Taking a walk through the hardware store opens up all kinds of new possibilities. Having more control over the design is another benefit. Six color rainbow faux-funnel pour coming up next!

What You’ll Need:
Base of the Soap:
15.3 oz. Coconut Oil
15.3 oz. Palm Oil
17.9 oz. Olive Oil
2.5 oz. Avocado Oil
7.2 oz. Sodium Hydroxide
16.8 oz. Distilled Water
2.5 oz Ocean Rain Fragrance Oil
1 oz. Pineapple Cilantro Fragrance Oil
Aqua Pearl Mica
Ultramarine Blue Pigment
5 Pound Mold with Sliding Bottom
Multi-Pour Sectioning Tool
Circular Pipes (PVC Pipes)
Negative Embeds:
5.4 oz. Coconut Oil
6.3 oz. Olive Oil
5.4 oz. Palm Oil
.9 oz. Avocado Oil
2.6 oz. Sodium Hydroxide
5.9 oz. Distilled Water
Orange Peel, Powder
Yellow Oxide
Titanium Dioxide
1 oz. Orange Peel Cybilla Fragrance Oil
 Click here to add everything you need for this project to your Bramble Berry shopping cart!
 If you’ve never made Cold Process soap before, stop here! I highly recommend checking out our FREE four part SoapQueen.tv series on Cold Process Soapmaking, especially the episode on lye safety. And if you’d rather do some reading, Bramble Berry carries a wide range of books on the topic, including my newest book, Soap Crafting. You can also checkout the digital downloads for that instant gratification factor.
SAFETY FIRST: Suit up for safe handling practices! That means goggles, gloves and long sleeves. Make sure kids, pets, and other distractions and tripping hazards are out of the house or don’t have access to your soaping space. Always soap in a well-ventilated area.
COLOR PREP: Disperse 2 teaspoons of the Aqua Pearl Mica into 2 tablespoons of Sunflower or Sweet Almond Oil (or any other liquid oil). Disperse 1 teaspoon Ultramarine Blue Oxide into 1 tablespoon of light liquid oil. Use a mini mixer to get the clumps of color worked out smoothly.
FRAGRANCE BLEND: In a glass container, combine 2.5 oz. of Ocean Rain Fragrance Oil and 1 oz. of Pineapple Cilantro Fragrance Oil. Set aside.
ONE: Slowly and carefully add the lye to the water and gently stir until the lye has fully dissolved and the liquid is clear. Set aside to cool.
TWO: Combine the coconut oil, olive oil, avocado and palm oils (remember to fully melt then mix your entire container of palm oil before portioning). Once the lye water and the oils have cooled to 130 degrees or below (and are ideally within 10 degrees of each other), add the lye water to the oils and stick blend until thin trace. If you’d like a harder bar of soap that releases faster from the mold, you can add sodium lactate to the cooled lye water. Use 1 teaspoon of sodium lactate per pound of oils in the recipe. For this recipe, you’d add about 3 tsp. sodium lactate.

 THREE: Once the batter has reached a light trace, split the batch in half. Each container will be about 4 cups.
 FOUR: Add 2 tbs. of Aqua Pearl Mica into one container, and 1 tbs. of Ultramarine Blue into the other. Use a whisk to gently combine.
 FIVE: Add half of the Ocean Rain and Pineapple Cilantro Fragrance Oil blend into each container. You can eyeball it! Use a whisk to mix in.
 SIX: Gently pour both colors of soap into the two Multi-Pour Sectioning Tool. To help the soap batter evenly spread throughout the sections, you can alternate pouring from each end.
 SEVEN: Once the sections are full, slowly remove the center divider straight up and out of the soap. Gently tap down the mold to disperse any bubbles.
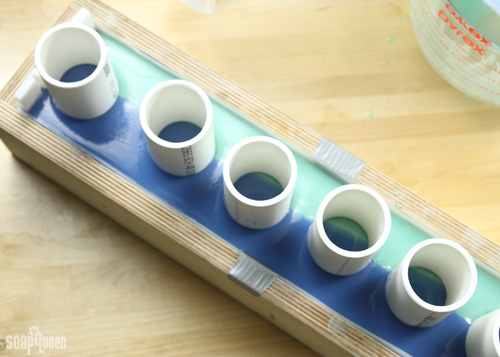
 EIGHT: Gently push the PVC pipes into the center of the soap. Make sure there is space between each pipe, and between the mold and the pipes on the ends.
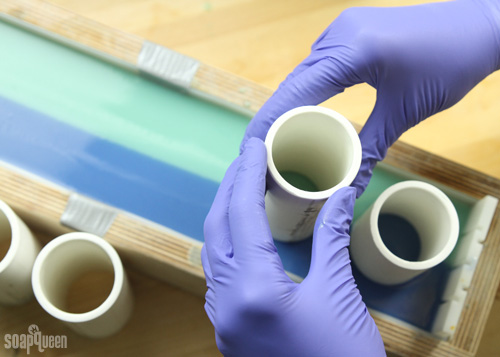 NINE: Spray with 99% isopropyl alcohol to prevent soda ash. Let soap in the mold for 3-4 days before attempting to remove the pipes. The pipes should be fairly easy to pull up and out of the soap. If not, give them more time. If after three to four days the pipes are still difficult to remove, place the soap into the freezer for 3-4 hours. Remove from the freezer, and attempt to remove the pipes again after a few hours. Patience is key.
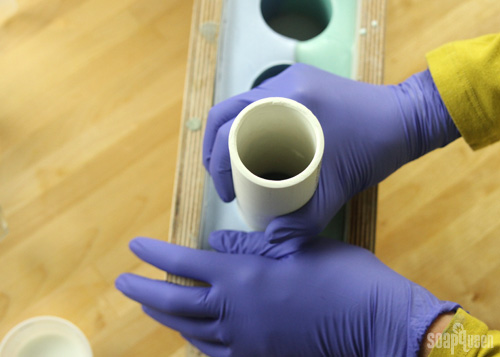
The amount of soap needed to fill the negative space may be different from this tutorial, depending on how large your pipes are. To find the amount of total soap needed to fill the holes, place all the embeds on a scale. The weight of the embeds are approximately how much soap you need to make. You may want to create an additional couple ounces of soap to ensure you have enough.
For this soap, both an In-The-Pot-Swirl and an alternating drop swirl technique are shown. As you can see from the final photos, each swirl technique results in a very different bar of soap. You can decide to do both styles of swirl and alternate filling the holes, or you can choose one to use throughout the entire loaf.
SAFETY FIRST: Suit up for safe handling practices! That means goggles, gloves and long sleeves. Make sure kids, pets, and other distractions and tripping hazards are out of the house or don’t have access to your soaping space. Always soap in a well-ventilated area.
COLOR PREP: To ensure that the Titanium Dioxide blends smoothly into the soap batter, we recommend micronizing it before dispersing it in oil. Please note this is an optional tip but it does help with the titanium dioxide clumping in the soap =) To micronize colorant, simply use a coffee grinder to blend the colorant to break up any clumps of color and prevent streaks of white from showing in the final soap. We like to use a coffee grinder that has a removable, stainless steel mixing area for easy cleaning. Then, disperse 1 teaspoons of the colorant into 1 tablespoons of sunflower or sweet almond oil (or any other liquid oil). Finally, disperse 1 teaspoon of the Yellow Oxide into 1 tablespoon of sunflower or sweet almond oil (or any other liquid oil). Disperse 2 teaspoons Orange Peel into 2 tablespoons of light liquid oil. Use a mini mixer to get the clumps of color worked out smoothly.
FRAGRANCE BLEND: In a small glass container, measure 1 oz. Orange Peel Cybilla Fragrance Oil and set aside.
ONE: Combine the coconut oil, olive oil, avocado and palm oils (remember to fully melt then mix your entire container of palm oil before portioning). Once the lye water and the oils have cooled to 130 ° F or below (and are ideally within 10 degrees of each other), add the lye water to the oils and stick blend until thin trace.
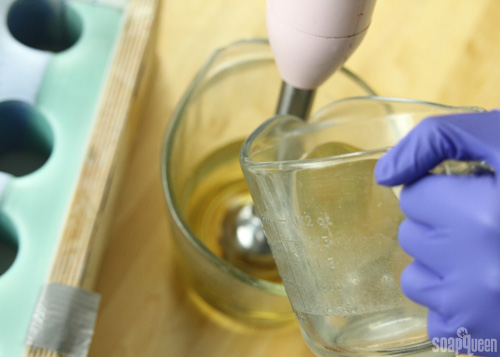 TWO: To one container, add 1/2 tsp. Yellow Oxide and 2 tbs. orange peel. The Orange Peel adds gentle exfoliation, and a texturized look. To the other container, add all of the Titanium Dioxide. Use a whisk to thoroughly incorporate pigments.
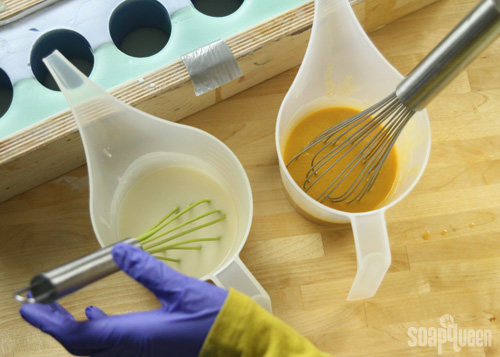 THREE: Add one half of the Orange Peel Cybilla Fragrance Oil to each container. No need to measure, you can eyeball it. Use a whisk to fully incorporate.
 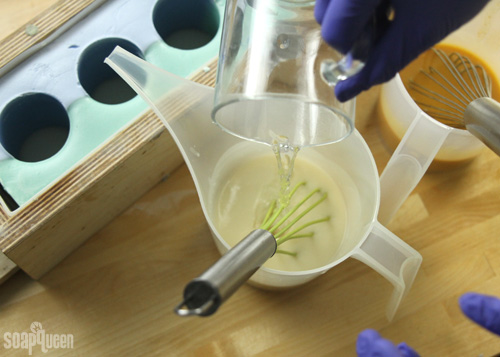 THREE: Time to choose what swirl technique to use! If you prefer the alternating drop swirl, move on to “step five.” If you prefer the In-The-Pot-Swirl, move on to the next step.
FOUR: To create an In-The-Pot-Swirl, pour the white soap into the container containing the yellow soap at three different points: 12:00 o’clock, 4:00 o’clock and 8:00 o’clock. Pour the soap from a high point to ensure the soap penetrates through the entire container. Use a dowel to swirl the soap by running the dowel through all three pouring points. Only stir once! You want to swirl it, but not blend it completely. 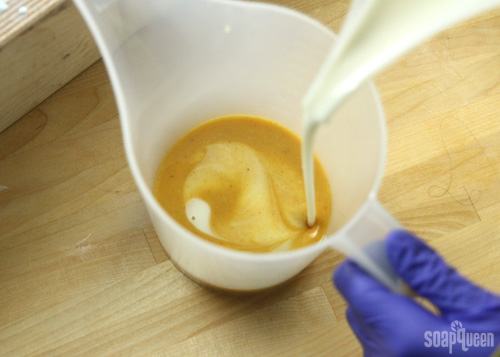 FIVE: Slowly pour the soap into the holes. Once full, spray with 99% isopropyl alcohol to help prevent soda ash. Unmold after 3-4 days. Allow to cure for 4-6 weeks and enjoy!
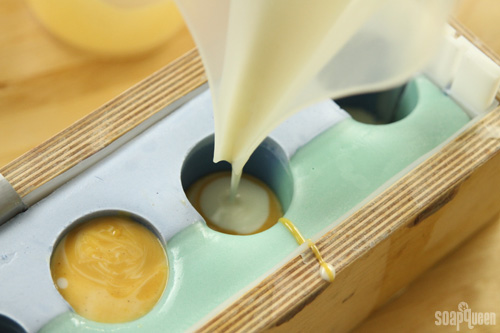
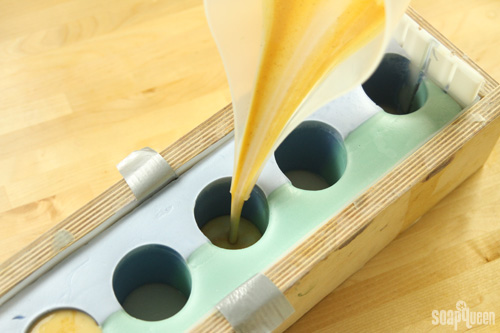 SIX: For the drop swirl, alternate pouring the orange and yellow soap into the same hole using 3 second pours. Once full, spray with 99% isopropyl alcohol to help prevent soda ash. Unmold after 3-4 days. Allow to cure for 4-6 weeks and enjoy!
 When it’s time to cut, you can cut the loaf in the traditional way, but in order to achieve the results shown in the photos, the bars need to be cut horizontally. If you’re not sure how to cut bars horizontally, there’s a video for that here.
Have you tried the negative embed soaping technique yet? I’m excited to experiment with it more! In fact, a new negative embed soap was created yesterday =)


I had an idea that I thought would produce a similar bar of soap and then I saw this and thought great minds DO think alike. However, when I read the process it is totally different from what I was thinking so I want a professional opinion. I’ve NOT had good luck with the vertical wood mold but want to keep trying and I thought I would put a paper towel tube in the center for the center round color and pour two colors at the same time on each side. My thought was if the two colors are poured at the same time, they should meet equally and a second person could pour the center soap to keep the pressure semi equal. Any thoughts or opinions? Thanks for everything!
We haven’t given that a try, so I’m not entirely sure! I think pouring both sides of the soap at the same time is a good idea, as it will help keep the tube in place and distribute the weight equally. Then, you can remove the tube. You may also try a sturdier embed like plastic or PVC. That may stay in place a bit better. I would recommend making a test batch to see how it goes!
-Kelsey with Bramble Berry
Hello guys, the photos from this article seem to have been removed… I am so curious about how this was made… is there any video for this or can you please re-upload the pics?
Thanks so much, Veronika
Hi Veronika!
We are working on getting the pictures reuploaded! Sorry about any inconvenience. We have our IT team working on it now. 🙂
-Kelsey with Bramble Berry
Hi! Can I make the embeds using your Low swear melt & pour soap base? Thanks!
You can! Low sweat melt and pour bases work great as embeds, and save a bit of time. 🙂
LCP Clear Melt and Pour Base: https://www.brambleberry.com/SFIC-LCP-Clear-Melt-And-Pour-Soap-P4383.aspx
LCP White Melt and Pour Base: https://www.brambleberry.com/SFIC-LCP-White-Melt-And-Pour-Soap-P3190.aspx
We used the LCP White in the Sahara Sunset Cold Process Soap with great results: https://www.soapqueen.com/bath-and-body-tutorials/cold-process-soap/sahara-sunset-cold-process-soap-tutorial/
-Kelsey with Bramble Berry
Hi! I’m new to soap- and candle-making, and I’ve learned so much from your site and videos over the last few days! I’m trying to develop my brand identity, and I was wondering if this process could be recreated somehow for high-melting point candle waxes for a candle with a specific shape or scent in the middle? I know I would have to find a tall shape/pipe in a heat-resistant material if I were to try this inside the container from start to finish, but I was wondering if you could ’embed’ a pre-made pillar candle into a container candle for the same effect? Do you know if anyone has tried this yet?
Hi Jeannine!
That sounds like an awesome idea! We haven’t tested that idea out yet, but I believe it could work. The key would be pouring your wax when it’s cooler, that way the embed won’t melt. I think a temperature of around 130F would be cool enough!
Wick size would also be important. You’ll want to choose a wick that’s big enough for the entire container, not just the pillar candle. You can find out what size wick you need with this handy chart: https://www.brambleberry.com/Wicks-C22.aspx
Let us know how it goes!
-Kelsey with Bramble Berry
Do you have to use PVC for this or would other materials like metal “pipes” or shapes also work?
Thanks
Hi Susan!
You can definitely use other shapes for this project! If you use metal, avoid aluminum. It reacts with the lye and creates a toxic gas which is very dangerous.
We recommend working with plastic, as it comes out of the soap the easiest. It also helps to rub a thin layer of mineral oil or cyclomethicone on the pipes so they release easier. 🙂
-Kelsey with Bramble Berry
Cyclomethicone: https://www.brambleberry.com/Cyclomethicone-P4560.aspx
Having no plastic around currently, I used some extra empty toilet paper rolls I had kept for a project. I set them in the mold and poured around them at a medium trace, then immediately poured into them one color at a time (I used four colors). After pouring, I slowly pulled the rolls out. The end product was great! No spreading into the base color, AND I can reuse the rolls–not sure how many time I’ll get out of them, but two is more than one 😉 !
Hi Dawn!
That’s awesome, thanks so much for sharing! What a great use of leftover toilet paper rolls. 🙂
-Kelsey with Bramble Berry
What a great idea. Thanks for the tutorial. One question though. I absolutely love the way the edges are beveled. I use the soap tool from Brambleberry.com, but my edges are still not coming out looking so cleanly beveled like in the images above. Any advice? Thanks!
Hi Brittany!
I’m so happy you like the tutorial!
When you bevel your soap, you want it to be firm enough so the edges aren’t squished, but not too firm that it’s hard to bevel. We usually bevel our soaps when they have been curing for 2-3 weeks depending on the recipe. I’ll include a helpful link below. 🙂
-Kelsey with Bramble Berry
Soap Beveller/Shaver: https://www.brambleberry.com/Soap-BevellerShaver-P4141.aspx
5 Tips to Create Professional Looking Soap: http://www.soapqueen.com/bath-and-body-tutorials/tips-and-tricks/5-ways-professional-soap/
I love this idea would love to see bow you cut it
Hi Kevin!
To cut these bars, we cut thicker pieces. Then, we cut those two in half horizontally so you can see the fun pattern inside.
I’ll include a video that shows the technique we used the cut them. 🙂
-Kelsey with Bramble Berry
Making Cotton Candy Cold Process Soap on Soap Queen TV: https://www.youtube.com/watch?v=91bZTNeGmuk
I love this technique! I’m a sucker for any kind of embeds. I did something very similar to this before, but I used drinking straws (like little tiny pipes!). Here’s how they turned out: http://sironasprings.wordpress.com/2012/11/12/a-soap-challenge-mixing-media/
Hi Ruth!
Wow, those look awesome! I love the cute little detail the yellow and green dots give. 🙂
-Kelsey with Bramble Berry
What size were the pipes you used for this, they look pretty small??
Hi Melissa!
We used pipes that were about 5 inches long and 1 3/4 inches wide. You can use bigger or smaller pipes if you’d like though. 🙂
-Kelsey with Bramble Berry
So why is it that the new soap doesn’t “melt” the older soap? Thanks.
The soap is not melt and pour which means it isn’t hot. Think of it like making concrete. Once the soap sets, it’s pretty hard to make it liquid again!
Hi Brandy!
Calla is correct – the base soap is very sturdy and has a high melting point, unlike melt and pour soap.
When you pour the fresh soap into the negative space, it won’t melt the existing soap. 🙂
-Kelsey with Bramble Berry
What did you do with the soaps in the pipes? I would love to see what they look like. 🙂
Hi Martina!
Some of the soap was donated, and some of it is in our office bathrooms so we can keep our hands clean. 🙂
You can definitely use the leftovers as regular soap. There are also several fun uses for soap scraps, like adding them to a new batch or making laundry soap out of them. I’ll include some ideas below!
-Kelsey with Bramble Berry
Cherry Blossom Glitter Cold Process Soap: http://www.soapqueen.com/bath-and-body-tutorials/cold-process-soap/cherry-blossom-glitter-cold-process/
Coconut Cream Pie Cold Process Soap: http://www.soapqueen.com/bath-and-body-tutorials/cold-process-soap/coconut-cream-pie-cold-process/
Three DIY Laundry Soap Recipes: http://www.soapqueen.com/bath-and-body-tutorials/home-crafts/three-diy-laundry-soap-recipes/
So, does the soap stick together after you cut it? I have had problems with new soap/old soap pours with the layers separating.
Hi Diana!
The trick to getting the layers to stick together is to make sure your recipes are the same for the base soap and the embeds. That way they will both cure at the same rate.
With this recipe, the embeds stayed intact. 🙂
-Kelsey with Bramble Berry
I had better start making things instead of just writing ideas down in a notebook! At least after seeing this, I know that what I was planning can work well. As someone – like most people, I guess – with very limited funds to spend on experiments that may go wrong, I appreciate you all doing the experimenting for me/us! While salvaging a “failed” soap is ok, it can be a more of a problem when the original soap contained lots of colors or expensive specialty oils. A failed experiment can cost so much, and your tips and expertise have given me the confidence to try the kinds of artistic things (with color, especially – I am hopeless, you should see my paint choices!)I never would have attempted without you. Thanks! The in-the-pot swirl for this soap makes a great moon
Hi Kristen!
Thank you so much for your kind words!
We definitely had to try this recipe a couple of times to get all the kinks worked out. We are happy to be able to pass our tips on and help out fellow soapers. 🙂
-Kelsey with Bramble Berry