Candles are popular anytime, but especially so during the cold and dark winter months. They fill the room with a warm glow, light and scent. When spring comes, candles are a time-tested way to add color and scent to your space. This Purple Blackberry Flower Candle is scented with the sweet and juicy Blackberry Sage Cybilla Fragrance Oil. This project features flower wax cut-outs that add a spring flair.
To make the flower cut-outs, pour beeswax into a Glossy Silicone Square Tray Mold. Once the wax has cooled down but is still warm, use the Flower Template as a stencil to draw flowers into the wax. If you do not have a Glossy Tray Silicone Mold, other silicone molds such as the 6″ Silicone Slab Mold would work well too. These flowers are then layered onto the candle, and held in place with hot wax.

What You’ll Need:
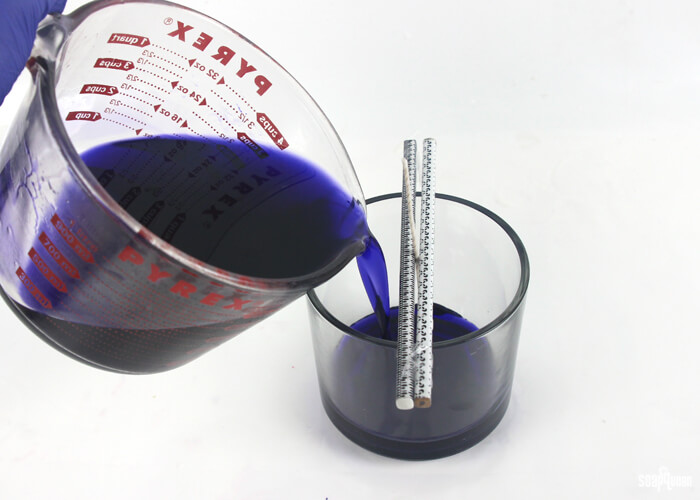
Round Glass Candle Jar
NOTE: The candle jar shown in this tutorial has been discontinued. The kit now contains the Tapered Neck Candle Jar. The amounts of wax and fragrance may need to be adjusted slightly.
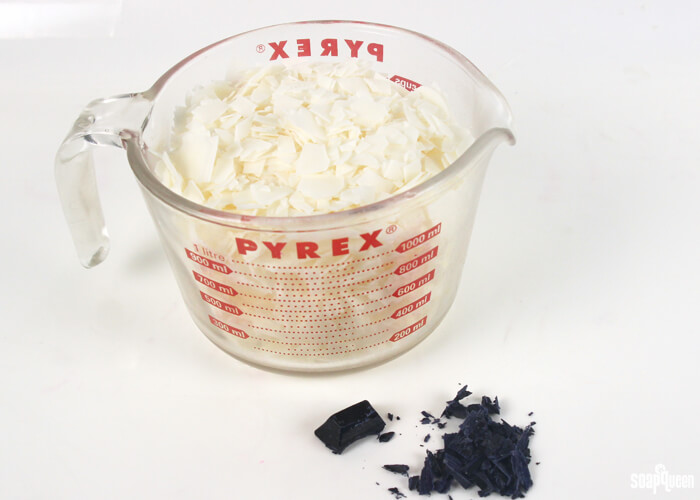
14 oz. EcoSoya Advanced Soy Wax
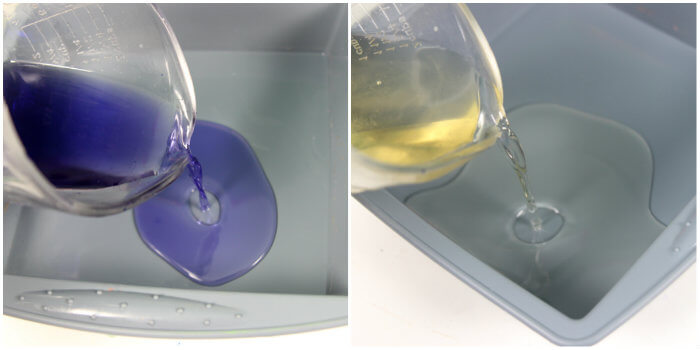
6 oz.White Beeswax
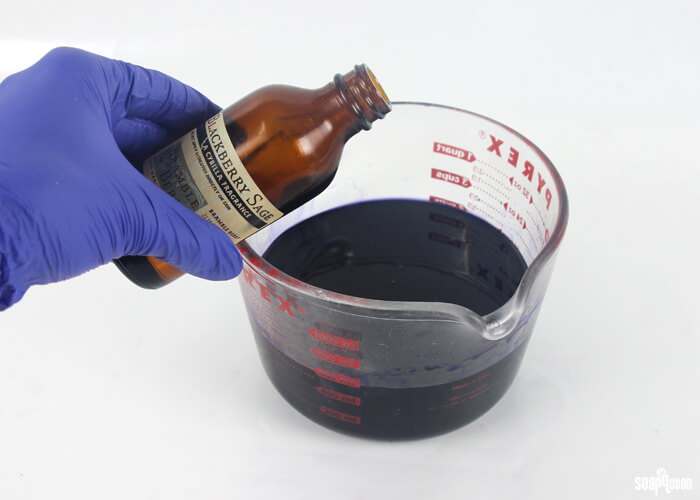
1 oz.Blackberry Sage Cybilla Fragrance Oil
Cd-20 Wick
Purple Wax Dye Block
Flower Template
Optional: Glossy Silicone Square Tray Molds (2 molds)

Click here to add everything you need for this project to your Bramble Berry shopping cart!
ONE: In a large heat safe container, melt 14 oz. of Advanced EcoSoya Wax and shavings of the Purple Wax Dye Block in the microwave using 30 second bursts. For this candle, the majority of the wax dye block was used to create a vibrant, rich purple color. If you prefer a lighter purple, use less colorant.
TIP: The color of your candle will lighten once it cools and hardens. To test the color, dip a cold spoon into the hot melted wax. The wax will soon cool and harden, and will demonstrate what color the candle will be. This technique is referred to as the “Frozen Spoon Trick,” and works great for lip products as well.
 TWO: Once you are happy with the color, add 1 oz. of the Blackberry Sage Cybilla Fragrance Oil and use a spoon to thoroughly combine.
 THREE: Place the wick in the center and use chopsticks, pencils or dowels to hold the wicks in place. Slowly and carefully pour the purple wax into the container. Set aside, and allow to fully cool and harden.
FOUR: While the candle cools, it’s time to make the flowers. Cut out the flower stencils from the Flower Template. Melt 6 oz. of white beeswax in a heat safe container using 1 minute bursts. Beeswax has a high melting point, and takes longer to melt than most waxes. Because of this, be careful when removing the container from the microwave as it will be very hot!
FIVE: Split the wax in half, and color one container lightly with shavings of the Purple Wax Dye Block. Pour both containers of wax into two Glossy Silicone Square Tray Molds. If you do not have two molds, you can split this step into two; simply melt 3 oz. of white beeswax at a time and only color one batch.
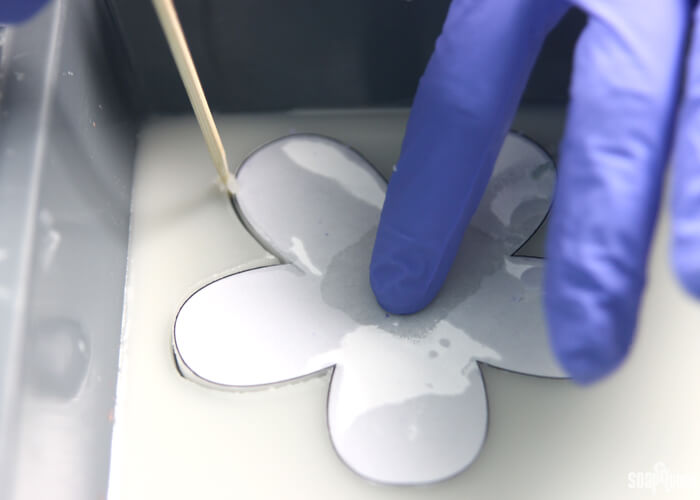
 SIX: Soon, the beeswax will begin to cool and harden. Once the beeswax can be touched with your finger and does not pull away, gently place the flower cut-outs on the wax. Using a chopstick or wood skewer, use the flower as a stencil and “draw” a flower into the wax. Move quickly as the beeswax hardens fast.
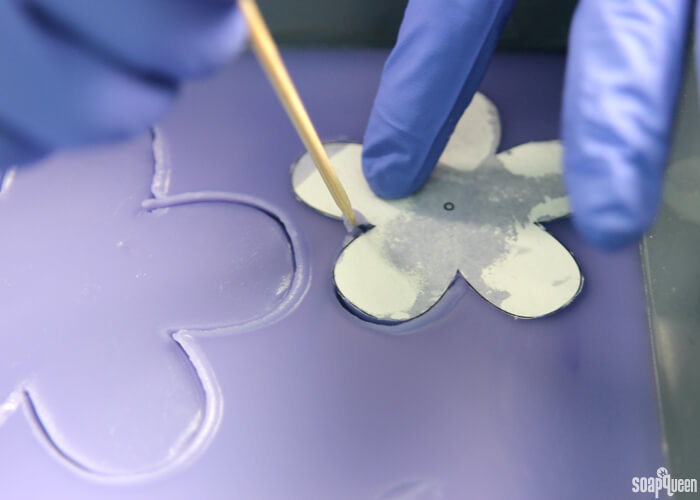
 SEVEN: Continue drawing both small and large flowers into the white and purple wax. You only need one small and one large flower for each candle, but you will be able to carve more than two flowers. Carve more for future candles, or save the wax to remelt and reuse later.
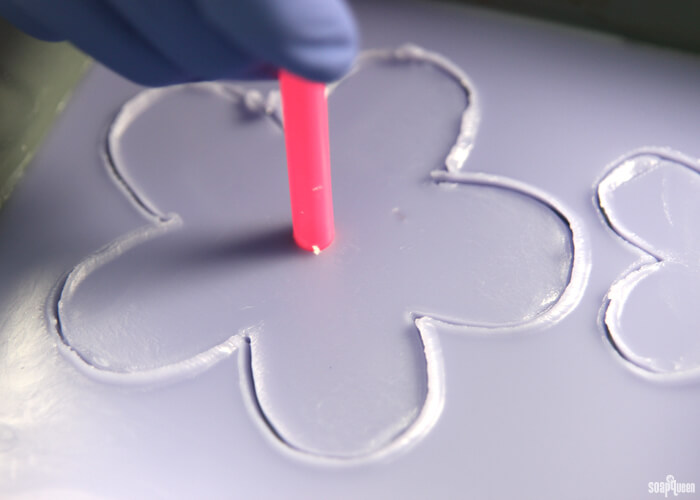
 EIGHT: Use a straw or the end of your carving tool to create a hole in the center of your flower. This is where the wick will be threaded, so ensure it is large enough for the wick to fit through. Set the trays of flowers aside to fully cool and harden before removing the flowers from the mold.
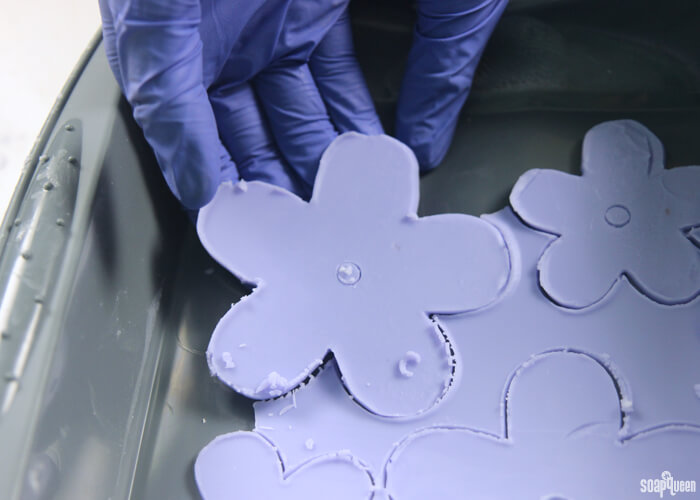
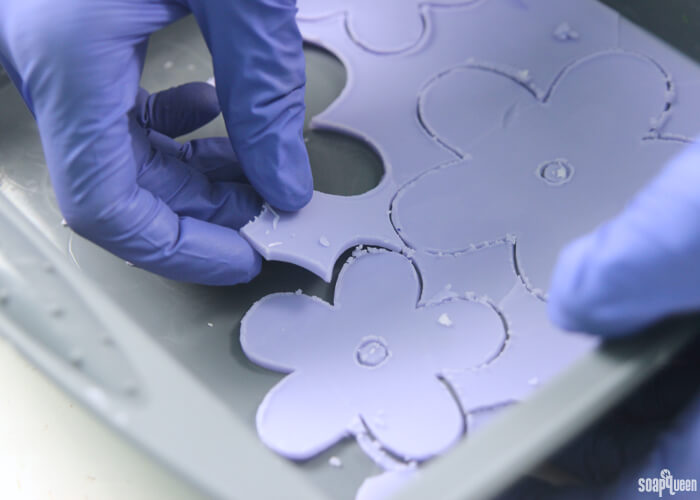
 NINE: Once the wax has fully cooled, gently press the bottom of the mold, around the flowers. The wax around the flowers will begin to break, releasing the flower shapes. Be very careful during this step, you don’t want to break the flowers! If this happens don’t worry. Remelt and wax, pour and trace the flowers again. =)
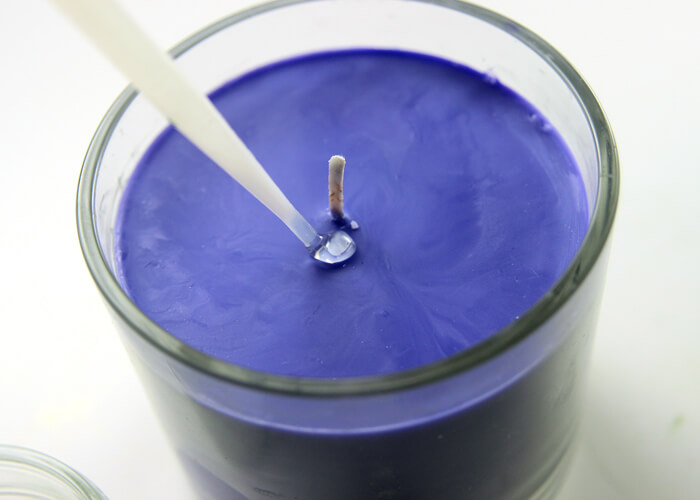
 TEN: Melt a very small amount of beeswax in the microwave using 30 second bursts. Use a dropper or spoon to drop a small amount of wax near the wick.
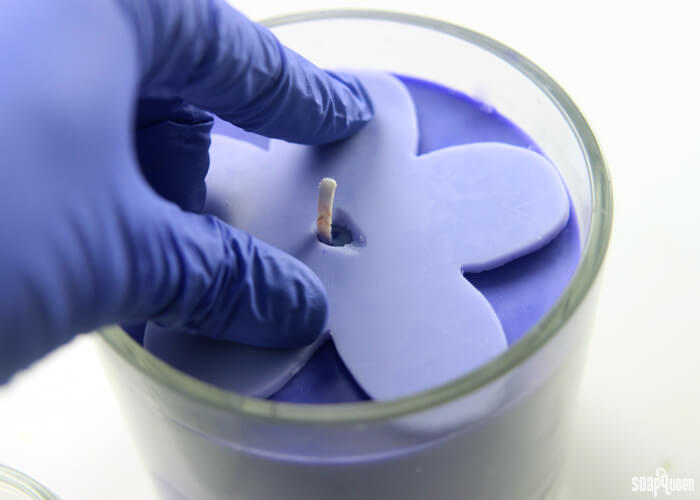
 ELEVEN: Gently place a large flower onto the candle and hot wax. The hot wax will adhere the flower to the candle.
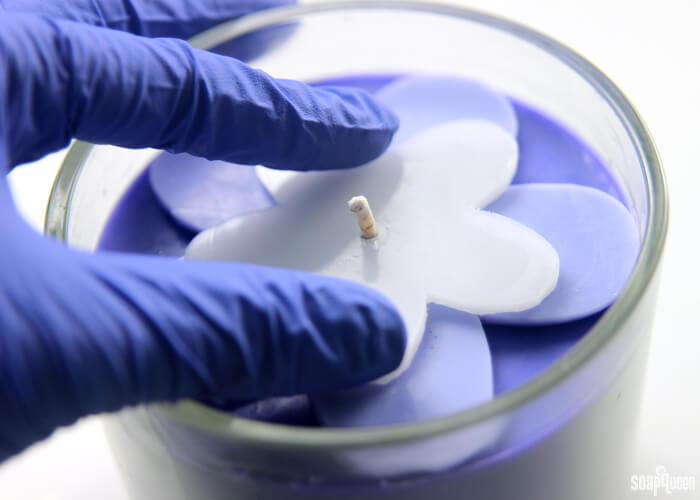
 TWELVE: Place a small amount of hot wax on the large flower, and gently place a small flower on top. Be careful not to press too firmly, as this could crack the flowers. When ready to use, light the wick and enjoy! Reminder, never leave a burning candle unattended, and hot candles can damages surfaces so always use a hot plate or covering.


Purple Blackberry Flower Candle
Ingredients
- Round Glass Candle Jar
- 14 oz. EcoSoya Advanced Soy Wax
- 6 oz.White Beeswax
- 1 oz.Blackberry Sage Cybilla Fragrance Oil
- Cd-20 Wick
- Glossy Silicone Square Tray Molds 2 molds
- Purple Wax Dye Block
- Flower Template
Instructions
- In a large heat safe container, melt 14 oz. of Advanced Ecosoya Wax and shavings of the Purple Wax Dye Block in the microwave using 30 second bursts. For this candle, the majority of the wax dye block was used to create a vibrant, rich purple color. If you prefer a lighter purple, use less colorant.[br}The color of your candle will lighten once it cools and hardens. To test the color, dip a cold spoon into the hot melted wax. The wax will soon cool and harden, and will demonstrate what color the candle will be. This technique is referred to as the “Frozen Spoon Trick,” and works great for lip products as well.
- Once you are happy with the color, add 1 oz. of the Blackberry Sage Cybilla Fragrance Oil and use a spoon to thoroughly combine.
- Place the wick in the center and use chopsticks, pencils or dowels to hold the wicks in place. Slowly and carefully pour the purple wax into the container. Set aside, and allow to fully cool and harden.
- While the candle cools, it’s time to make the flowers. Cut out the flower stencils from the Flower Template. Melt 6 oz. of white beeswax in a heat safe container using 1 minute bursts. Beeswax has a high melting point, and takes longer to melt than most waxes. Because of this, be very careful when removing the container from the microwave as it will be very hot!
- Split the wax in half, and color one container lightly with shavings of the Purple Wax Dye Block. Pour both containers of wax into two Glossy Silicone Square Tray Molds. If you do not have two molds, you can split this step into two; simply melt 3 oz. of white beeswax at a time, and only color one batch.
- Soon, the beeswax will begin to cool and harden. Once the beeswax can be touched with your finger and does not pull away, gently place the flower cut-outs on the wax. Using a chopstick or wood skewer, use the flower as a stencil and “draw” a flower into the wax. Move quickly as the beeswax hardens fast.
- Continue drawing both small and large flowers into the white and purple wax. You only need one small and one large flower for each candle, but you will be able to carve more than two flowers. Carve more for future candles, or save the wax to remelt and reuse later.
- Use a straw or the end of your carving tool to create a hole in the center of you flower. This is where the wick will be threaded, so ensure it is large enough for the wick to fit through. Set the trays of flowers aside to fully cool and harden before removing the flowers from the mold.
- Once the wax has fully cooled, gently press the bottom of the mold, around the flowers. The wax around the flowers will begin to break, releasing the flower shapes. Be very careful during this step, you don’t want to break the flowers! If this happens don’t worry =) Remelt and wax, pour and trace the flowers again.
- Melt a very small amount of beeswax in the microwave using 30 second bursts. Use a dropper or spoon to drop a small amount of wax near the wick.
- Gently place a large flower onto the candle and hot wax. The hot wax will adhere the flower to the candle.
- Place a small amount of hot wax on the large flower, and gently place a small flower on top. Be careful not to press too firmly, as this could crack the flowers. When ready to use, light the wick and enjoy!