
When you don’t have time to make cold process soap, hot process soap making is a good next choice. The extra heat speeds up the saponification process, which cuts down on cure time. Hot process soap only requires 1-2 days in the mold, even with palm-free recipes like this one. With St. Patrick’s Day right around the corner, this hot process soap will be ready in time to celebrate the holiday.
This Luck of the Irish Hot Process soap features layers of green ombré. Each layer is defined with a line of Gold Sparkle Mica, which adds plenty of shimmer. Don’t use too much mica – a thick mica vein may cause the layers to separate from each other. When creating this effect it’s important to work fast. Hot process soap has a tendency to thicken quickly, which can make creating even layers tricky.

What You’ll Need:
10″ Silicone Loaf Mold
10.2 oz. Coconut Oil
10.2 oz. Olive Oil
8.5 oz. Rice Bran Oil
3.4 oz. Shea Butter
1.7 oz. Avocado Oil
1 oz. Sodium Lactate
4.7 oz. Sodium Hydroxide Lye
11.2 oz. Distilled Water
2.5 oz. Kentish Rain Fragrance Oil
Chrome Green Oxide
Gold Sparkle Mica
Optional: Powder Duster

Click here to add everything you need for this project to your Bramble Berry shopping cart!
COLOR PREP: Disperse 1 teaspoon Chrome Green Oxide in 1 tablespoon of sunflower or sweet almond oil (or any other liquid oil). Have the Gold Sparkle Mica close by to use in between all the layers.
SAFETY FIRST: Suit up for safe handling practices! Goggles, gloves, and long sleeves are your soap making uniform. Be sure that kids and pets are out of the house or unable to access your soaping space, and always soap in a well-ventilated area. Make sure the soap volume will not fill up more than half of your crock pot. If you have never made cold process soap before, I highly recommend you get a couple of basic recipes under your belt before trying out this tutorial. Check out this (free!) 4-part series on cold process soap making, especially the episode on lye safety.
ONE: Slowly and carefully add the lye to the water and gently stir until the lye has fully dissolved and the liquid is clear. Set aside to cool. Once cooled, add sodium lactate. Sodium lactate is used in hot process at 3% of the oil weight to help produce a smoother bar.
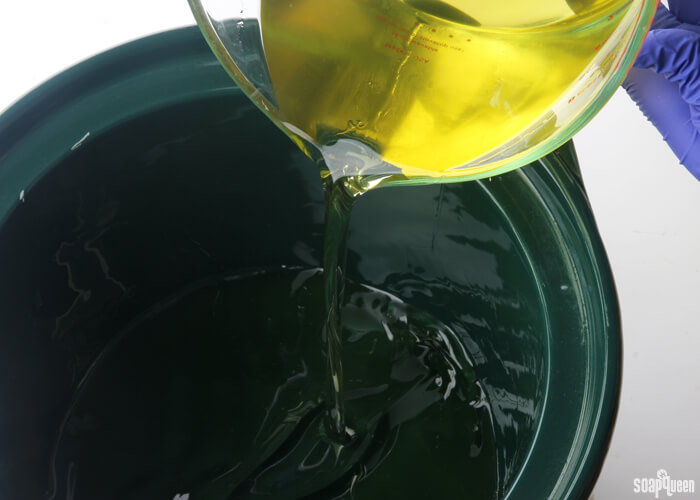
TWO: Melt and combine the coconut oil, shea butter, olive oil, rice bran oil and avocado oil. Pour the oils into your Crock Pot pot. Slowly add the lye water to the oils. Make sure the mixture does not fill up more than half of the crock pot or cooking vessel.
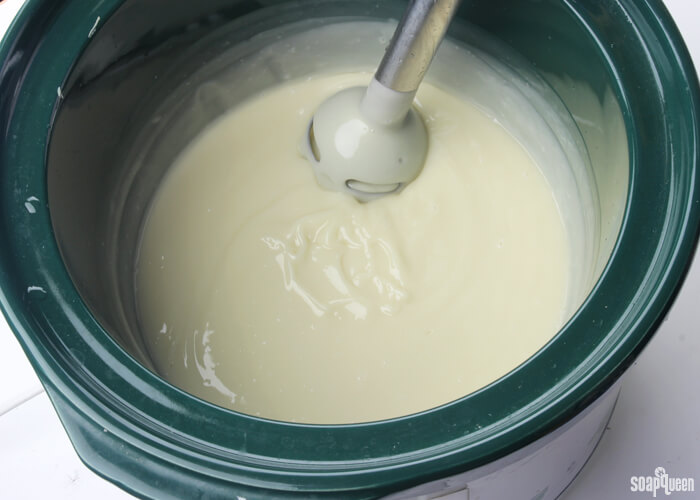
 THREE: Mix with a stick blender until a thick trace is achieved.
 FOUR: Put the lid on the crock pot and set it to low. After 15 minutes, check the soap to see the progress made. Starting from the outside, the texture and color of the soap will start to change into a glossy, slightly Vaseline-like texture. If the middle does not appear to be changing, stir the batch to ensure even cooking. Don’t be surprised if the soap starts to grow in volume. Do not leave your soap unattended in the first 30 minutes of cook time for this reason. If the soap gets too high in the pot, wearing gloves, take the pot off heat and stir like crazy.
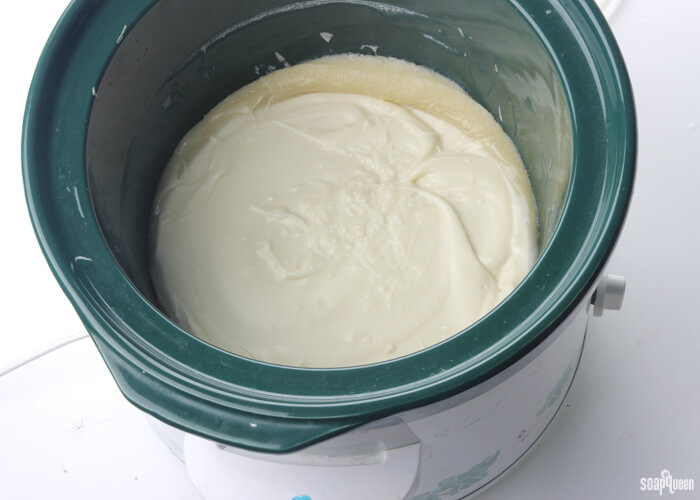 FIVE: The batch will be ready when it’s the texture of glossy, thin mashed potatoes. This may take another 15 minute session or even two or three more stir’n’waits. When you think it’s ready, use a pH strip to test the levels. It should be showing below a 10. Be sure not to overcook the soap; you don’t want too dry a texture for the next steps!
 NOTE: The amount of time that the soap takes in the Crock Pot phase can depend on the size and shape of your Crock Pot. The flatter ones meant for roasts may go a bit quicker because the soap will be spread out thinner on the heated surface. Because this is a small batch of soap, you may find it will cook faster than larger batches. For our standard sized Crock Pot, the soap took approximately 30 minutes to cook.
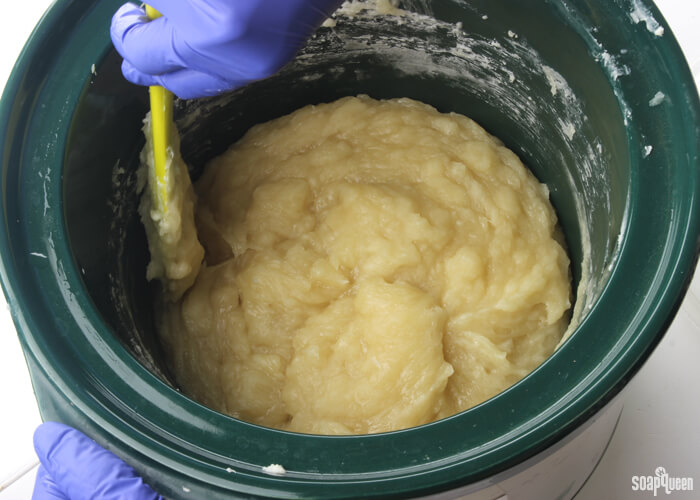
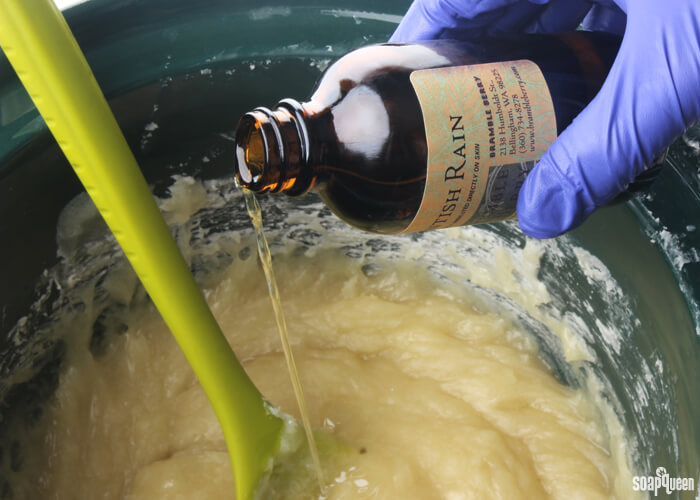
SIX: When the soap is ready, add the Kentish Rain fragrance oil blend and mix well. Turn the crock pot off.
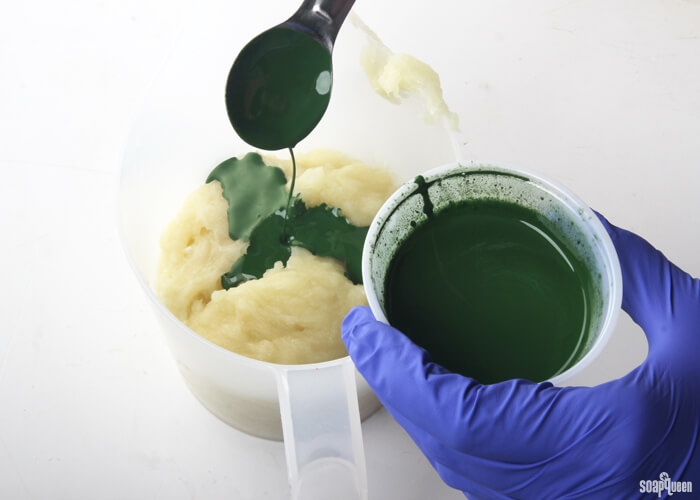
 SEVEN: Spoon out about 300 mL of soap into a container, and add 2 tsp. of dispersed Chrome Green Oxide. Use a spoon or spatula to mix in the color thoroughly.
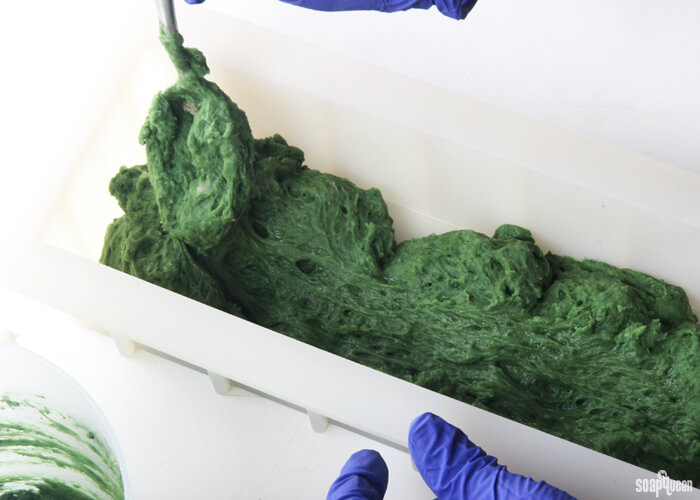
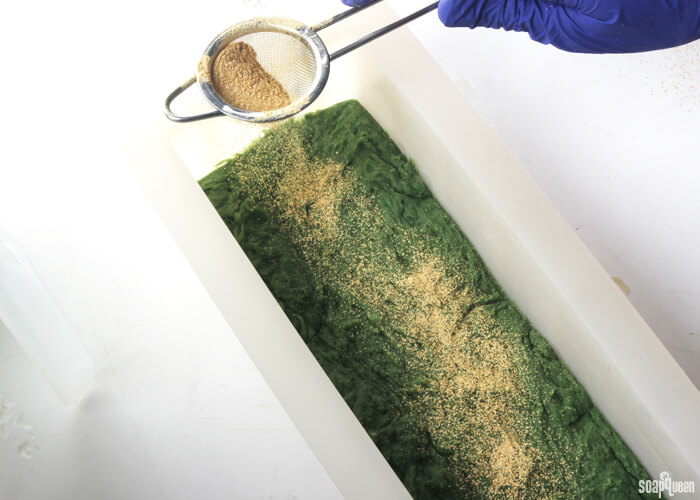
 EIGHT: Transfer the green soap into the mold, and tap the mold firmly on the counter to evenly distribute. Tap a small amount of Sparkle Gold Mica into the powder duster, and sprinkle the gold mica onto the green soap evenly. Only apply a thing layer; if too much mica is used the layers may separate.
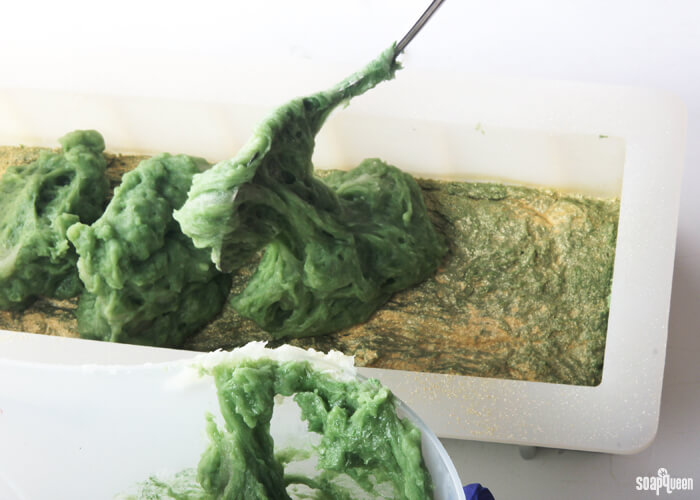
 NINE: Scoop out another 300 mL of soap into a separate container and add 1/2 tsp. dispersed Chrome Green Oxide. Stir in the color thoroughly. Plop the soap on top of the first layer. Placing the soap into different areas of the mold makes it easier to evenly distribute the soap. Gently use a spoon or spatula to gently spread the soap. You can also use your gloved hands to gently spread the soap, but be careful as it may be hot to the touch. Tap the mold firmly onto the counter to help spread the soap evenly.
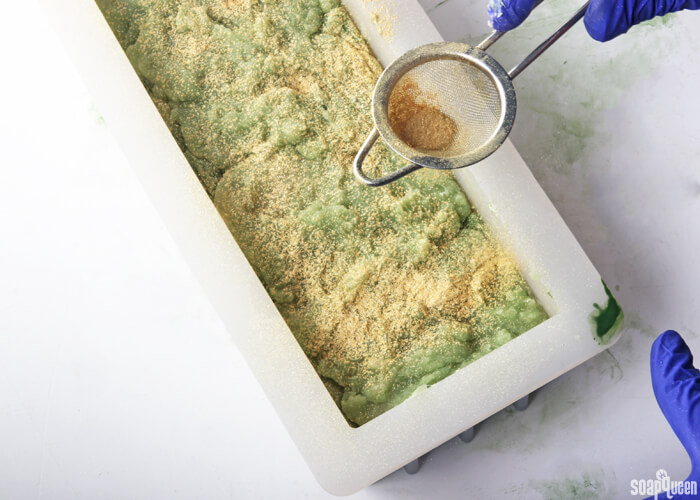
 TEN: Use the powder duster to create a thin layer of mica on top of the second layer.
ELEVEN: Scoop out approximately 300 mL of soap and add 1/4 tsp. dispersed Chrome Green Oxide. Stir in the color thoroughly. Layer the soap into the mold, using the same method as in step nine. Use the powder duster to create a thing layer of mica on top of the third layer.
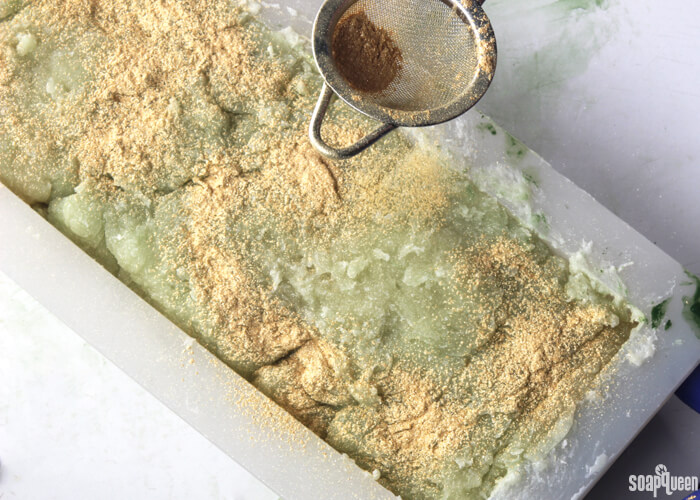
 TWELVE: Scoop out the remaining soap and add 1/8 tsp of dispersed Chrome Green Oxide. Stir in the color thoroughly. Layer the soap into the mold, using the same method as in step nine. For this layer, you may find it helpful to gently press the soap with your hands to create a more even top. Tap the mold firmly on the counter, and use the powder duster to top the soap with a thin dusting of gold mica.

 THIRTEEN: Allow the soap to harden in the mold for 1-2 days. Unmold and cut. This soap is ready to use right away but will last longer in the shower after a full 4-6 week dry and evaporation time.

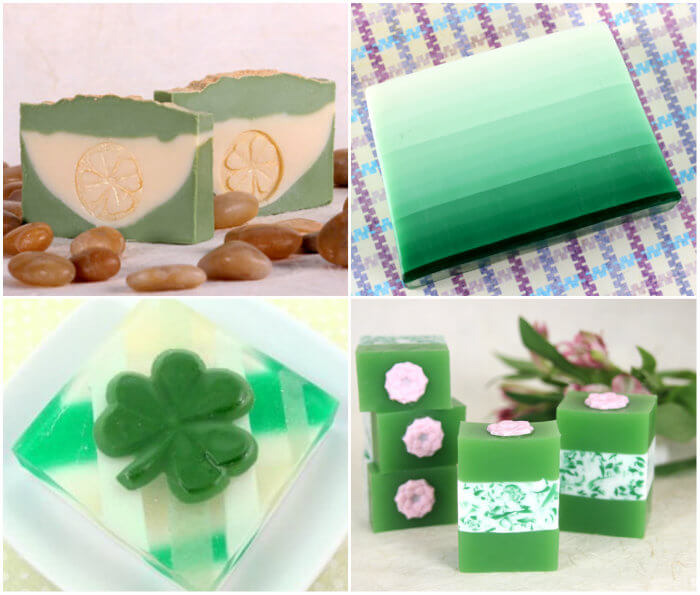
Looking for even more St. Patrick’s Day projects? Check out these green tutorials below!
Top left, clockwise: Shamrock Cold Process, Green Machine Melt and Pour, Soapy Plaid, Green Meadow Melt & Pour

Luck of the Irish Hot Proces
Ingredients
- 10 ″ Silicone Loaf Mold
- 10.2 oz. Coconut Oil
- 10.2 oz. Olive Oil
- 8.5 oz. Rice Bran Oil
- 3.4 oz. Shea Butter
- 1.7 oz. Avocado Oil
- 1 oz. Sodium Lactate
- 4.7 oz. Sodium Hydroxide Lye
- 11.2 oz. Distilled Water
- 2.5 oz. Kentish Rain Fragrance Oil
- Chrome Green Oxide
- Gold Sparkle Mica
- Optional: Powder Duster
Instructions
COLOR PREP: Disperse 1 teaspoon Chrome Green Oxide in 1 tablespoon of sunflower or sweet almond oil (or any other liquid oil). Have the Gold Sparkle Mica handy to use in between all the layers.
SAFETY FIRST: Suit up for safe handling practices! Goggles, gloves, and long sleeves are your soap making uniform. Be sure that kids and pets are out of the house or unable to access your soaping space, and always soap in a well-ventilated area. Make sure the soap volume will not fill up more than half of your crock pot. If you have never made cold process soap before, I highly recommend you get a couple of basic recipes under your belt before trying out this tutorial. Check out this (free!) 4-part series on cold process soap making, especially the episode on lye safety.
- Slowly and carefully add the lye to the water and gently stir until the lye has fully dissolved and the liquid is clear. Set aside to cool. Once cooled, add sodium lactate. Sodium lactate is used in hot process at 3% of the oil weight to help produce a smoother bar.
- Melt and combine the coconut oil, shea butter, olive oil, rice bran oil and avocado oil. Pour the oils into your Crock Pot’s pot. Slowly add the lye water to the oils.
- Mix with a stick blender until a thick trace is achieved.
- Put the lid on the Crock Pot and set it to low. After 15 minutes, check the soap to see the progress made. Starting from the outside, the texture and color of the soap will start to change into a glossy, slightly vaseline-like texture. If the middle does not appear to be changing, stir the batch to ensure even cooking. Don’t be surprised if the soap starts to grow in volume. Do not leave your soap unattended in the first 30 minutes of cook time for this reason. If the soap gets too high in the pot, take the pot off heat and stir like crazy.
- The batch will be ready when it’s the texture of glossy mashed potatoes. This may take another 15 minute session or even two or three more stir’n’waits. When you think it’s ready, use a pH strip to test the levels. It should be showing below a 10. Be sure not to overcook the soap; you don’t want too dry a texture for the next steps!
- The amount of time that the soap takes in the Crock Pot phase can depend on the size and shape of your Crock Pot. The flatter ones meant for roasts may go a bit quicker because the soap will be spread out thinner on the heated surface. Because this is a small batch of soap, you may find it will cook faster than larger batches. For our standard sized Crock Pot, the soap took approximately 30 minutes to cook.
- When the soap is ready, add the Kentish Rain fragrance oil blend and mix well. Turn the crock pot off.
- Spoon out about 300 mL of soap into a container, and add 2 tsp. of dispersed Chrome Green Oxide. Use a spoon or spatula to mix in the color thoroughly.
- Transfer the green soap into the mold, and tap the mold firmly on the counter to evenly distribute. Tap a small amount of Sparkle Gold Mica into the powder duster, and sprinkle the gold mica onto the green soap evenly. Only apply a thing layer; if too much mica is used the layers may separate.
- Scoop out another 300 mL of soap into a separate container and add 1/2 tsp. dispersed Chrome Green Oxide. Stir in the color thoroughly. Plop the soap on top of the first layer. Placing the soap into different areas of the mold makes it easier to evenly distribute the soap. Gently use a spoon or spatula to gently spread the soap. You can also use your gloved hands to gently spread the soap, but be careful as it may be hot to the touch. Tap the mold firmly onto the counter to help spread the soap evenly.
- Use the powder duster to create a thin layer of mica on top of the second layer.
- Scoop out approximately 300 mL of soap and add 1/4 tsp. dispersed Chrome Green Oxide. Stir in the color thoroughly. Layer the soap into the mold, using the same method as in step nine. Use the powder duster to create a thing layer of mica on top of the third layer.
- Scoop out the remaining soap and add 1/8 tsp of dispersed Chrome Green Oxide. Stir in the color thoroughly. Layer the soap into the mold, using the same method as in step nine. For this layer, you may find it helpful to gently press the soap with your hands to create a more even top. Tap the mold firmly on the counter, and use the powder duster to top the soap with a thin dusting of gold mica.
- Allow the soap to harden in the mold for 1-2 days. Unmold and cut. This soap is ready to use right away but will last longer in the shower after a full 4-6 week drying time.