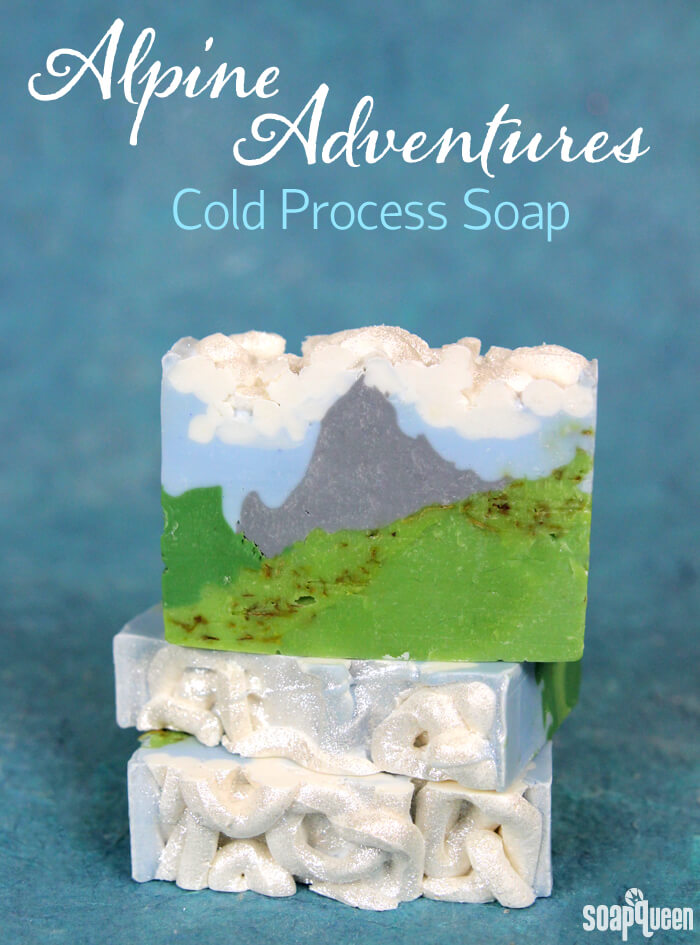
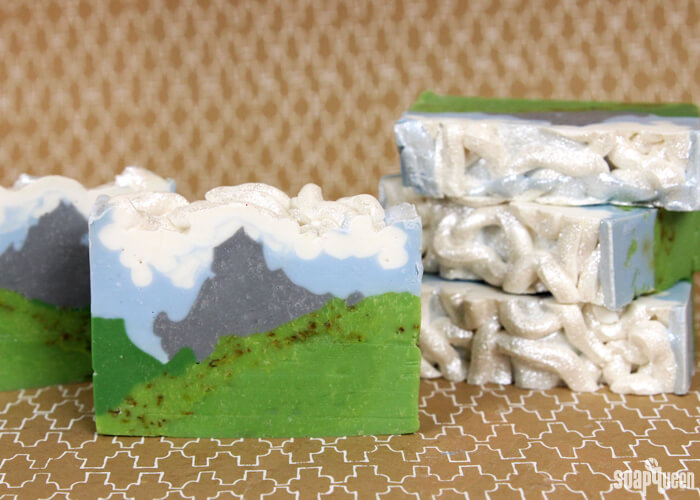
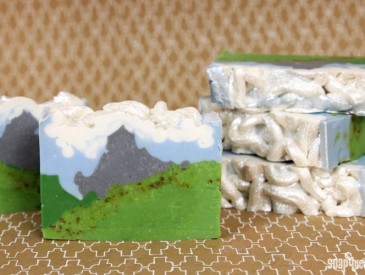
The Swiss countryside is famous for its sweeping mountain landscapes. The rolling green hills and snowy peaks of the Alps were the inspiration for this Alpine Adventures Cold Process Soap. When I look at these bars, I can’t help but sing, “The hills are alive with the sound of music!” in my head. Scented with a combination of Fresh Snow Fragrance Oil and Heavenly Honeysuckle Fragrance Oil, this soap smells floral and clean. It’s the next best thing to actually being in the beautiful Swiss Alps.
Landscape soaps have become one of my favorite cold process soap projects. I love scouring Pinterest for inspiration landscape photos, and the challenge of recreating them with soap. Recently, on the Bramble Berry Facebook page, I asked soapers to share their landscape soaps and was blown away! It was so fun to see all the soaps there and this one really grabbed my eye: Morning Glory Cold Process Soap created by Soco Soaps. Great soapers obviously think alike! 😉 Click here to see more of Karey’s creations on Instagram. If you’re looking for more landscape soap inspiration, check out the Sahara Sunset Cold Process Soap tutorial.
This project includes several steps, layers and colors all done with a thick thick trace. It is an advanced technique, or rather, series of them. It requires a good understanding of trace, particularly working with a thick trace. If you’ve never made soap using a thick trace, I would recommend getting a few simple recipes under your belt first, such as the Layered Lilac Loofah Cold Process Soap. I also highly recommend having your workstation thoroughly prepped with plenty of spare spoons, containers and whisks just in case! For more tips on setting up your soaping area, check out this blog post.
What You’ll Need:
10″ Silicone Loaf Mold
7.1 oz. Avocado Oil
2.4 oz. Cocoa Butter
11.8 oz. Coconut Oil
10.4 oz. Olive Oil (Pomace)
11.8 oz. Palm Oil
3.8 oz. Shea Butter
6.6 oz. Sodium Hydroxide Lye
15.6 oz. Distilled Water
.8 oz. Fresh Snow Fragrance Oil
2 oz. Heavenly Honeysuckle Fragrance Oil
Green Chrome Oxide
Yellow Mica
Bright Blue Jeans Colorant
Snowflake Sparkle Mica
Black Oxide
Titanium Dioxide
Disposable Frosting Bags
Calendula Petals

Click here to add everything you need for this project to your Bramble Berry shopping cart!
If you’ve never made Cold Process soap before, stop here! I highly recommend checking out our FREE four part SoapQueen.tv series on Cold Process Soapmaking, especially the episode on lye safety. And if you’d rather do some reading, Bramble Berry carries a wide range of books on the topic, including my newest book, Soap Crafting. You can also checkout the digital downloads for that instant gratification factor.
SAFETY FIRST: Suit up for safe handling practices! That means goggles, gloves and long sleeves. Make sure kids, pets, and other distractions and tripping hazards are out of the house or don’t have access to your soaping space. Always soap in a well-ventilated area.
COLOR PREP: To ensure that the Titanium Dioxide blends smoothly into the soap batter, we recommend micronizing it before dispersing it in oil. Please note this is an optional tip but it does help with the titanium dioxide clumping in the soap =) To micronize colorant, simply use a coffee grinder to blend the colorant to break up any clumps of color and prevent streaks of white from showing in the final soap. We like to use a coffee grinder that has a removable, stainless steel mixing area for easy cleaning. Then, disperse 2 teaspoons of the colorant into 2 tablespoons of sunflower or sweet almond oil (or any other liquid oil). In separate containers, disperse 1 teaspoon of Bright Blue Jean Colorant, Yellow Mica, Black Oxide and Green Chrome Oxide into 1 tablespoon of lightweight liquid oil. Use a mini mixer to get rid of any clumps. Have Snowflake Sparkle Mica nearby for dusting on the very top of the soap.
FRAGRANCE PREP: In a glass, fragrance safe container, blend together 2 oz. of the Heavenly Honeysuckle Fragrance Oil and .8 oz. of the Fresh Snow Fragrance Oil. Set aside.
ONE: Slowly and carefully add the lye to the water and gently stir until the lye has fully dissolved and the liquid is clear. Set aside to cool.
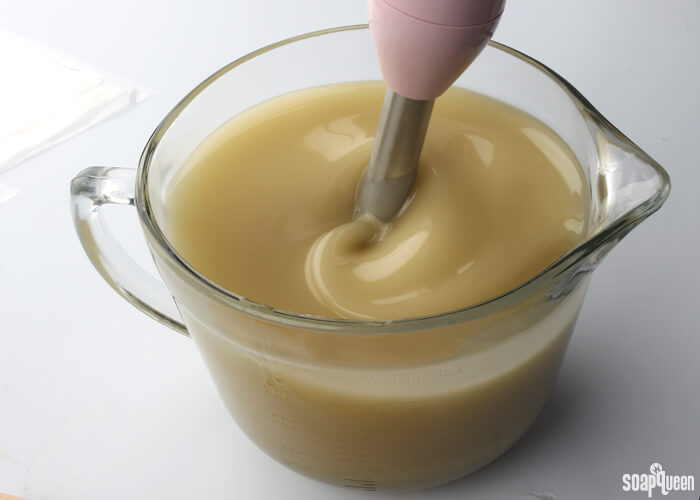
TWO: Combine the coconut oil, olive oil, avocado oil, shea butter, palm oil and cocoa butter (remember to fully melt then mix your entire container of palm oil before portioning). Once the lye water and the oils have cooled to 130 degrees or below (and are ideally within 10 degrees of each other), add the lye water to the oils and stick blend until you reach a light trace. If you’d like a harder bar of soap that releases faster from the mold, you can add sodium lactate to the cooled lye water. Use 1 teaspoon of sodium lactate per pound of oils in the recipe. For this recipe, you’d add about 2 tsp. sodium lactate.
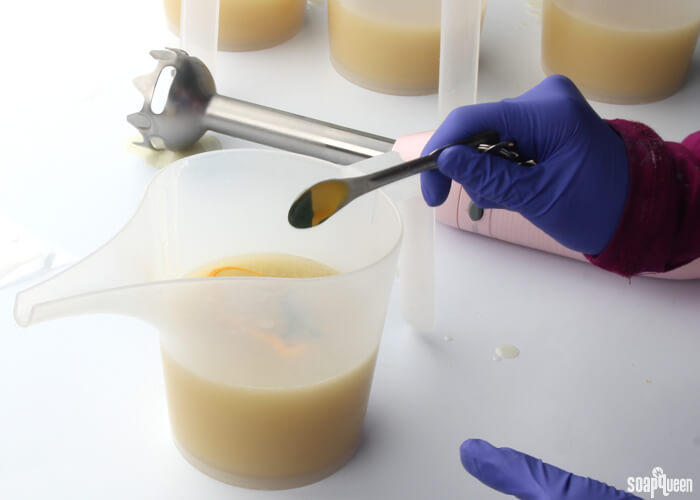
 TWO: Once you’ve reached a light trace, pour the soap into six separate containers, with the following amounts below. You can see what each container will eventually be colored with. I recommend adding the colorant and fragrance right before pouring or piping into the mold. Some of these containers need a very thick trace, while some need to be a little bit thinner. Add the colorant and fragrance oil to each batch gives you more control over the texture of the soap.
- Container A (400 mL) Light green: 1/2 tsp. dispersed Green Chrome Oxide + 1/4 tsp. dispersed Yellow Mica
- Container B (300 mL) Light green with calendula petals: 1/2 tsp. dispersed Green Chrome Oxide + 1/4 tsp. dispersed Yellow Mica
- Container C (200 mL) Dark Green: 1 tsp. dispersed Green Chrome Oxide
- Container D (350 mL) Gray: 1/2 tsp. dispersed Super Pearly White Mica + 1/4 tsp. dispersed Black Oxide
- Container E (400 mL) Blue: 1/2 tsp. dispersed Titanium Dioxide + 1 tsp. dispersed Bright Blue Jean Colorant
- Container F (400 mL) White: 1 1/2 tsp. dispersed Titanium Dioxide
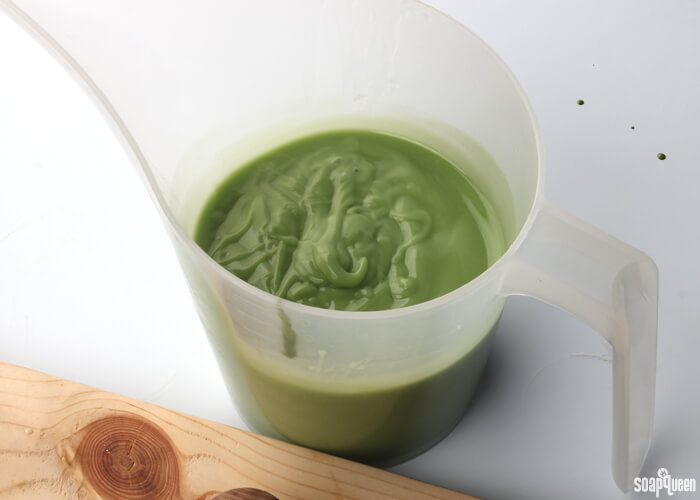
 THREE: To container A (400 mL), add 1/2 teaspoons of dispersed Yellow Mica, and 1/4 teaspoons of dispersed Green Chrome Oxide. Add about 1/6th of the fragrance oil blend (it’s okay to eyeball it), and use a stick blender until the green soap reaches a nice thick trace.
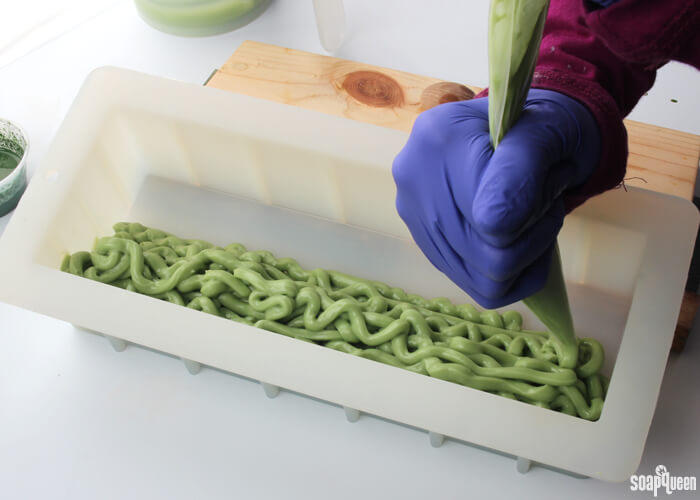
 FOUR: Transfer the green soap into a disposable frosting bag, and cut off the tip of the bag, creating a hole about 1-2 centimeters wide. Angle the 10″ Silicone Loaf Mold (we propped ours up with the lid to the Tall Narrow Wood Loaf Mold) and begin squirting the green soap into the corner of the mold. You want the tallest part of the soap to be against the side, and slowly slope down toward the center of the mold. Just keep in mind that you’re creating the hills! This “hill” should take up about 3/4 of the bottom of the mold.
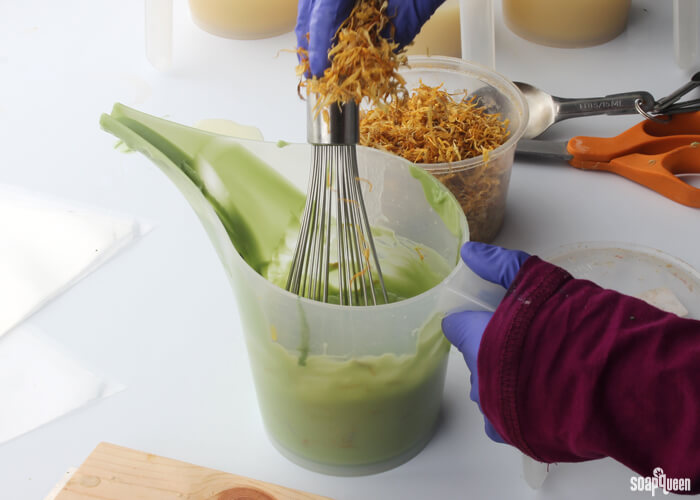
 FIVE: To container B (300 mL) add 1/2 tsp. of dispersed Yellow Mica, 1/4 tsp. of dispersed Green Chrome Oxide and about 1/6th of the fragrance blend (it’s okay to eyeball it). Use a whisk to blend these ingredients together. Then add three heaping tablespoons of calendula petals to the batter. Use a whisk to mix in. If the soap is extremely thin, stick blend the mixture for a few seconds to thicken slightly. The soap should be a medium trace.
SIX: Place the green soap with calendula petals into a disposable frosting bag, and cover the already poured green soap with the soap containing calendula petals. Do not pour this soap into the empty space of the mold, that comes next!
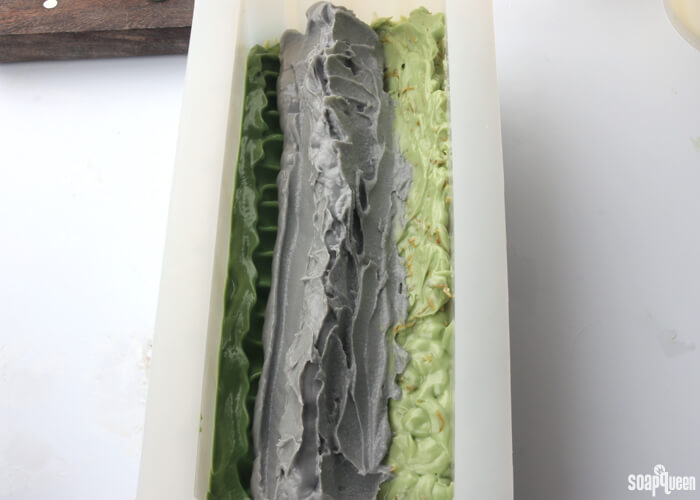
 SEVEN: To container C (200 mL) add 1 tsp. of dispersed Chrome Green Oxide. Stick blend the soap to a thick trace, and place the dark green soap into the empty corner of the mold. Use a spoon to build the height up on the sides.
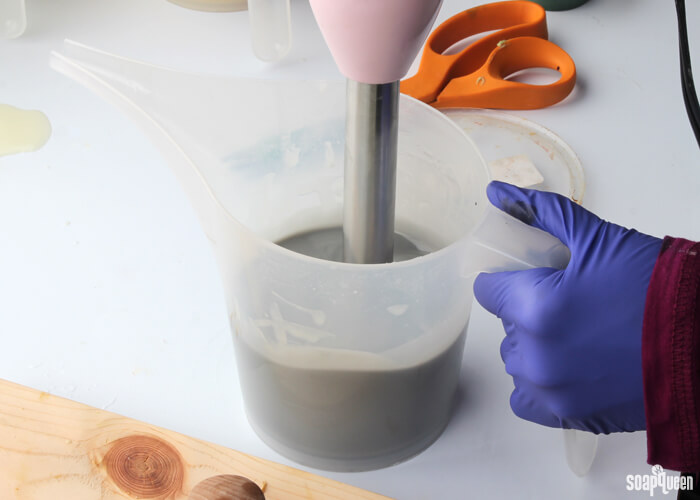
 EIGHT: To container D (350 mL) add 1/2 teaspoons of dispersed Super Pearly White Mica and 1/4 teaspoon dispersed Black Oxide. Add about 1/6th of the fragrance oil blend, it’s okay to eyeball it. Use the stick blender to blend the colorants and fragrance, continuing to stick blend until you’ve reached a thick trace.
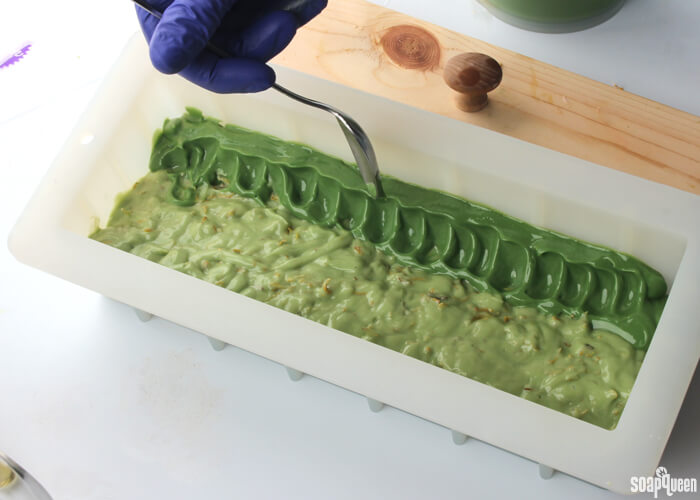
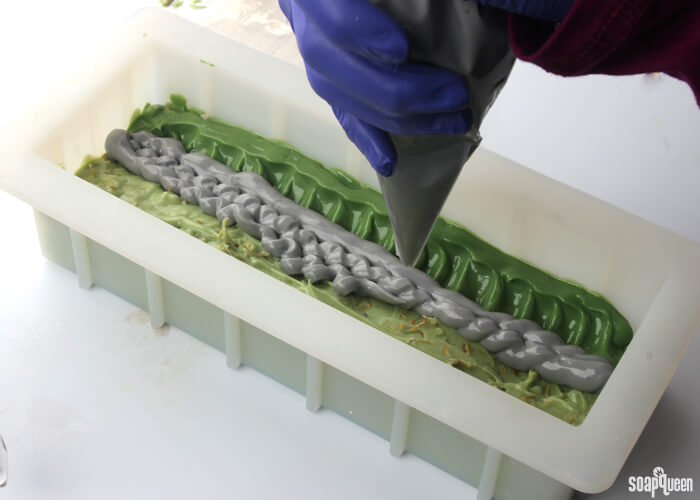
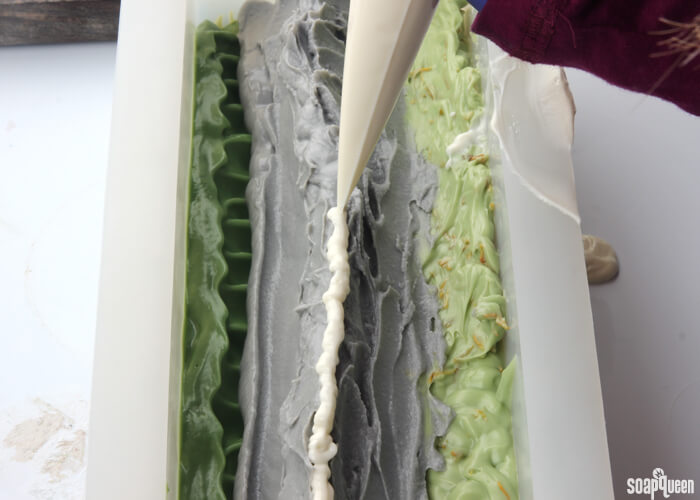
 NINE: Now it’s time to make the mountain. Place the gray soap into a disposable frosting bag, and begin squirting the soap in between the light and dark green layers. Squirt 2-3 thick lines of gray soap down the length of the mold. Then, begin piping more layers of gray on top, building height. Use a spoon or small spatula to shape the mountain into a fine peak.
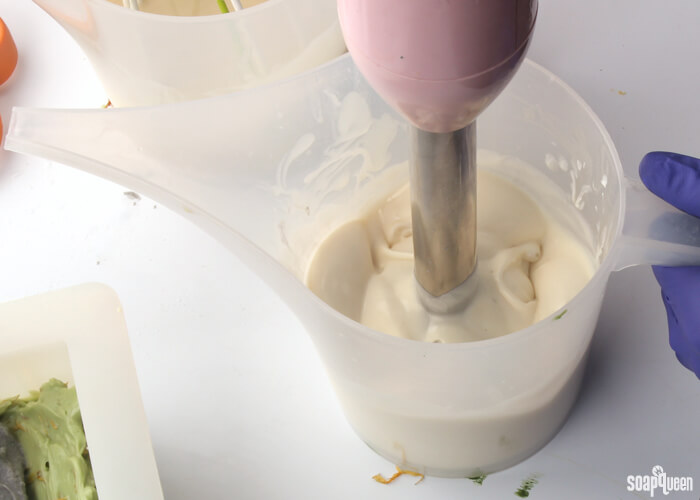
 TEN: Once you have your mountain, it’s time to mix the remaining colors. To container E (400 mL) add 1 1/2 teaspoons dispersed titanium dioxide and stir to combine. Add about 1/6th of the fragrance oil blend, and stir to combine. Stick blend the white soap into a medium to thick trace. Place the soap into a disposable frosting bag.
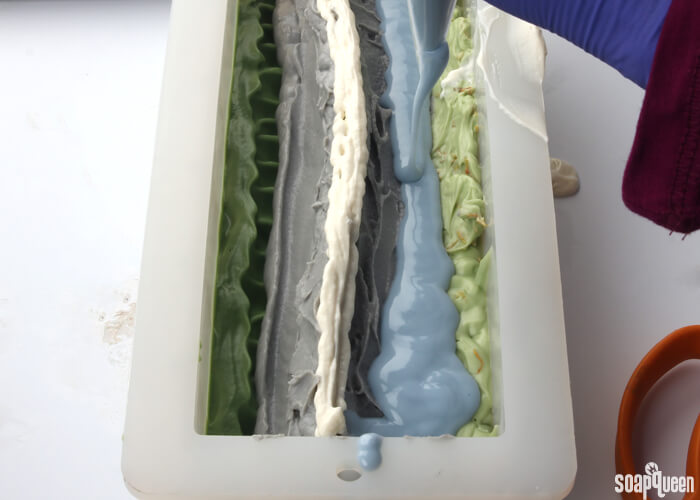
 ELEVEN: Cut a small hole off the tip of the disposable frosting bag and top of peak of the mountain with white soap. To the last container (400 mL), add 1/2 teaspoon of the dispersed titanium dioxide and 1 teaspoon dispersed Bright Blue Jean Colorant. Add the remaining amount of fragrance oil blend and whisk to combine. If the soap is still extremely thin, stick blend for a few seconds to slightly thicken. The soap should be pourable but still able to support the thick white soap on top. Pour the blue soap over the green layers and onto the mountain.
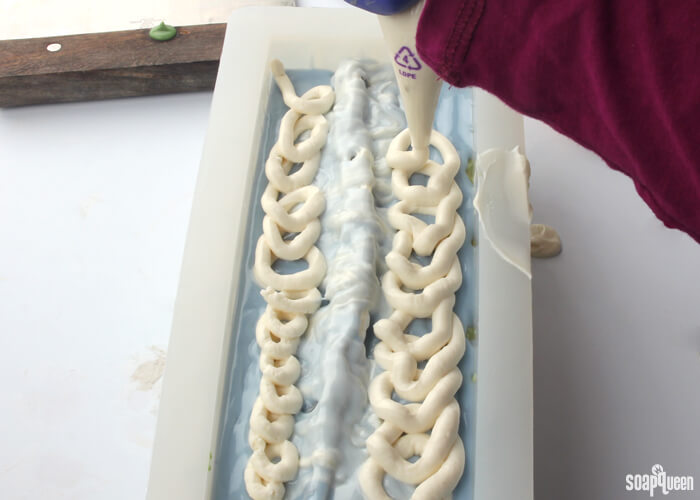
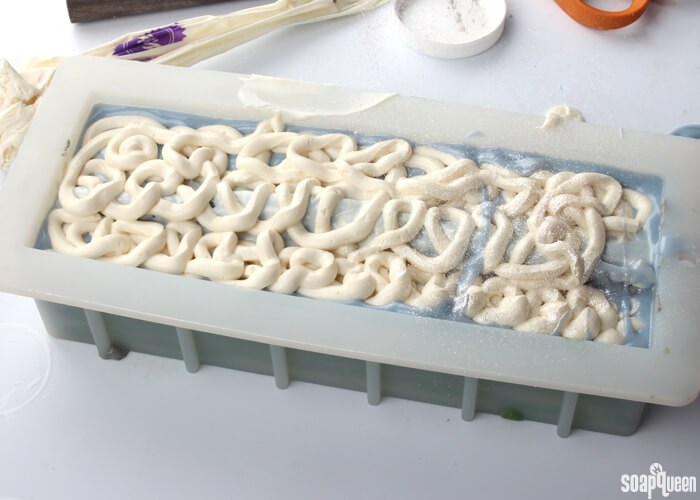
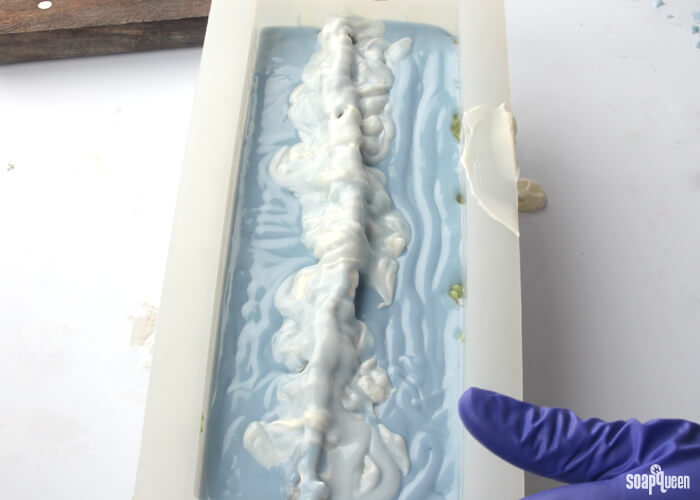
 TWELVE: Use the rest of the white soap to create “clouds” on the top of the soap. Pour the soap in looping pattern over the top of the sky and mountain. Once covered, sprinkle the top with Snowflake Sparkle Mica.
 Allow the soap to remain in the mold for 3-4 days. Because this recipe contains a fair amount of hard oils, you may be able to remove it sooner. Remove from mold, cut into bars and allow to cure for 4-6 weeks. Enjoy!

Have you ever made a landscape soap before? I’d love to hear your tips and tricks. Post a comment or join us on the Facebook page for more discussion of thick trace soaps.
Alpine Adventures Cold Process Tutorial
Ingredients
- 10 ″ Silicone Loaf Mold
- 7.1 oz. Avocado Oil
- 2.4 oz. Cocoa Butter
- 11.8 oz. Coconut Oil
- 10.4 oz. Olive Oil Pomace
- 11.8 oz. Palm Oil
- 3.8 oz. Shea Butter
- 6.6 oz. Sodium Hydroxide Lye
- 15.6 oz. Distilled Water
- .8 oz. Fresh Snow Fragrance Oil
- 2 oz. Heavenly Honeysuckle Fragrance Oil
- Green Chrome Oxide
- Yellow Mica
- Bright Blue Jeans Colorant
- Snowflake Sparkle Mica
- Black Oxide
- Titanium Dioxide
- Disposable Frosting Bags
- Calendula Petals
Instructions
SAFETY FIRST: Suit up for safe handling practices! That means goggles, gloves and long sleeves. Make sure kids, pets, and other distractions and tripping hazards are out of the house or don’t have access to your soaping space. Always soap in a well-ventilated area.
COLOR PREP: To ensure that the Titanium Dioxide blends smoothly into the soap batter, we recommend micronizing it before dispersing it in oil. Please note this is an optional tip but it does help with the titanium dioxide clumping in the soap =) To micronize colorant, simply use a coffee grinder to blend the colorant to break up any clumps of color and prevent streaks of white from showing in the final soap. We like to use a coffee grinder that has a removable, stainless steel mixing area for easy cleaning. Then, disperse 2 teaspoons of the colorant into 2 tablespoons of sunflower or sweet almond oil (or any other liquid oil). In separate containers, disperse 1 teaspoon of Bright Blue Jean Colorant, Yellow Mica, Black Oxide and Green Chrome Oxide into 1 tablespoon of lightweight liquid oil. Use a mini mixer to get rid of any clumps. Have Snowflake Sparkle Mica nearby for dusting on the very top of the soap.
FRAGRANCE PREP: In a glass, fragrance safe container, blend together 2 oz. of the Heavenly Honeysuckle Fragrance Oil and .8 oz. of the Fresh Snow Fragrance Oil. Set aside.
- Slowly and carefully add the lye to the water and gently stir until the lye has fully dissolved and the liquid is clear. Set aside to cool.
- Combine the coconut oil, olive oil, avocado oil, shea butter, palm oil and cocoa butter (remember to fully melt then mix your entire container of palm oil before portioning). Once the lye water and the oils have cooled to 130 degrees or below (and are ideally within 10 degrees of each other), add the lye water to the oils and stick blend until you reach a light trace. If you’d like a harder bar of soap that releases faster from the mold, you can add sodium lactate to the cooled lye water. Use 1 teaspoon of sodium lactate per pound of oils in the recipe. For this recipe, you’d add about 2 tsp. sodium lactate.
- Once you’ve reached a light trace, pour the soap into six separate containers, with the following amounts below. You can see what each container will eventually be colored with. I recommend adding the colorant and fragrance right before pouring or piping into the mold. Some of these containers need a very thick trace, while some need to be a little bit thinner. Add the colorant and fragrance oil to each batch gives you more control over the texture of the soap.<br>Container A (400 mL) Light green: 1/2 tsp. dispersed Green Chrome Oxide + 1/4 tsp. dispersed Yellow Mica<br>Container B (300 mL) Light green with calendula petals: 1/2 tsp. dispersed Green Chrome Oxide + 1/4 tsp. dispersed Yellow Mica<br>Container C (200 mL) Dark Green: 1 tsp. dispersed Green Chrome Oxide<br>Container D (350 mL) Gray: 1/2 tsp. dispersed Super Pearly White Mica + 1/4 tsp. dispersed Black Oxide<br>Container E (400 mL) Blue: 1/2 tsp. dispersed Titanium Dioxide + 1 tsp. dispersed Bright Blue Jean Colorant<br>Container F (400 mL) White: 1 1/2 tsp. dispersed Titanium Dioxide
- To container A (400 mL), add 1/2 teaspoons of dispersed Yellow Mica, and 1/4 teaspoons of dispersed Green Chrome Oxide. Add about 1/6th of the fragrance oil blend (it’s okay to eyeball it), and use a stick blender until the green soap reaches a nice thick trace.
- Transfer the green soap into a disposable frosting bag, and cut off the tip of the bag, creating a hole about 1-2 centimeters wide. Angle the 10″ Silicone Loaf Mold (we propped ours up with the lid to the Tall Narrow Wood Loaf Mold) and begin squirting the green soap into the corner of the mold. You want the tallest part of the soap to be against the side, and slowly slope down toward the center of the mold. Just keep in mind that you’re creating the hills! This “hill” should take up about 3/4 of the bottom of the mold.
- To container B (300 mL) add 1/2 tsp. of dispersed Yellow Mica, 1/4 tsp. of dispersed Green Chrome Oxide and about 1/6th of the fragrance blend (it’s okay to eyeball it). Use a whisk to blend these ingredients together. Then add three heaping tablespoons of calendula petals to the batter. Use a whisk to mix in. If the soap is extremely thin, stick blend the mixture for a few seconds to thicken slightly. The soap should be a medium trace.
- Place the green soap with calendula petals into a disposable frosting bag, and cover the already poured green soap with the soap containing calendula petals. Do not pour this soap into the empty space of the mold, that comes next!
- To container C (200 mL) add 1 tsp. of dispersed Chrome Green Oxide. Stick blend the soap to a thick trace, and place the dark green soap into the empty corner of the mold. Use a spoon to build the height up on the sides.
- To container D (350 mL) add 1/2 teaspoons of dispersed Super Pearly White Mica and 1/4 teaspoon dispersed Black Oxide. Add about 1/6th of the fragrance oil blend, it’s okay to eyeball it. Use the stick blender to blend the colorants and fragrance, continuing to stick blend until you’ve reached a thick trace.
- Now it’s time to make the mountain. Place the gray soap into a disposable frosting bag, and begin squirting the soap in between the light and dark green layers. Squirt 2-3 thick lines of gray soap down the length of the mold. Then, begin piping more layers of gray on top, building height. Use a spoon or small spatula to shape the mountain into a fine peak.
- Once you have your mountain, it’s time to mix the remaining colors. To container E (400 mL) add 1 1/2 teaspoons dispersed titanium dioxide and stir to combine. Add about 1/6th of the fragrance oil blend, and stir to combine. Stick blend the white soap into a medium to thick trace. Place the soap into a disposable frosting bag.
- Cut a small hole off the tip of the disposable frosting bag and top of peak of the mountain with white soap. To the last container (400 mL), add 1/2 teaspoon of the dispersed titanium dioxide and 1 teaspoon dispersed Bright Blue Jean Colorant. Add the remaining amount of fragrance oil blend and whisk to combine. If the soap is still extremely thin, stick blend for a few seconds to slightly thicken. The soap should be pourable but still able to support the thick white soap on top. Pour the blue soap over the green layers and onto the mountain.
- Use the rest of the white soap to create “clouds” on the top of the soap. Pour the soap in looping pattern over the top of the sky and mountain. Once covered, sprinkle the top with Snowflake Sparkle Mica.
- Allow the soap to remain in the mold for 3-4 days. Because this recipe contains a fair amount of hard oils, you may be able to remove it sooner. Remove from mold, cut into bars and allow to cure for 4-6 weeks. Enjoy!