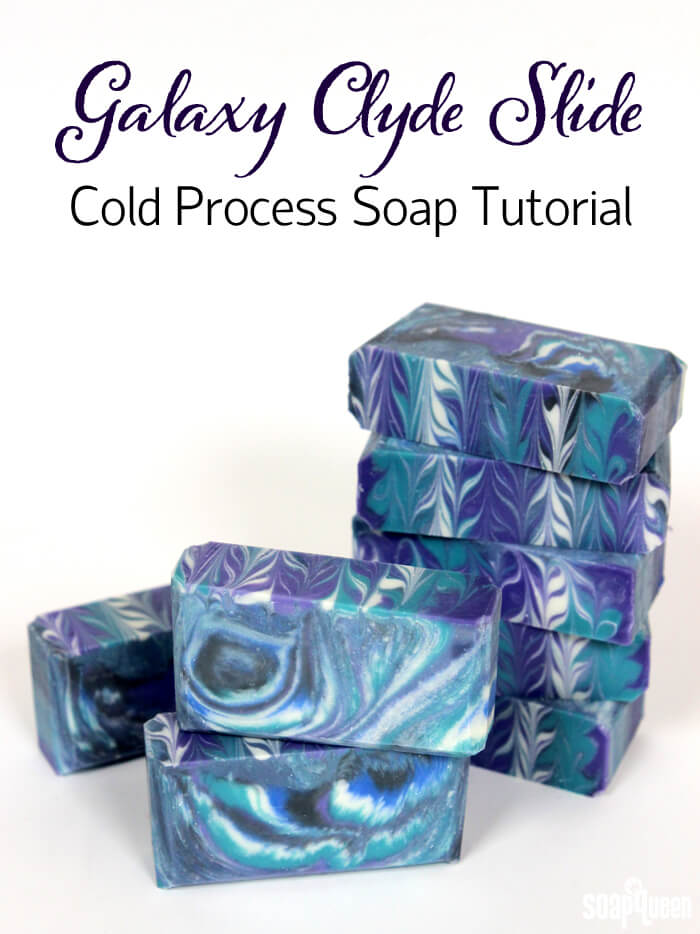
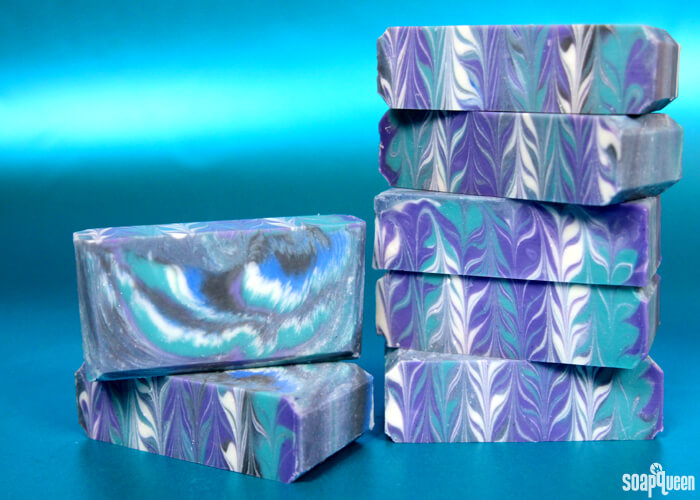
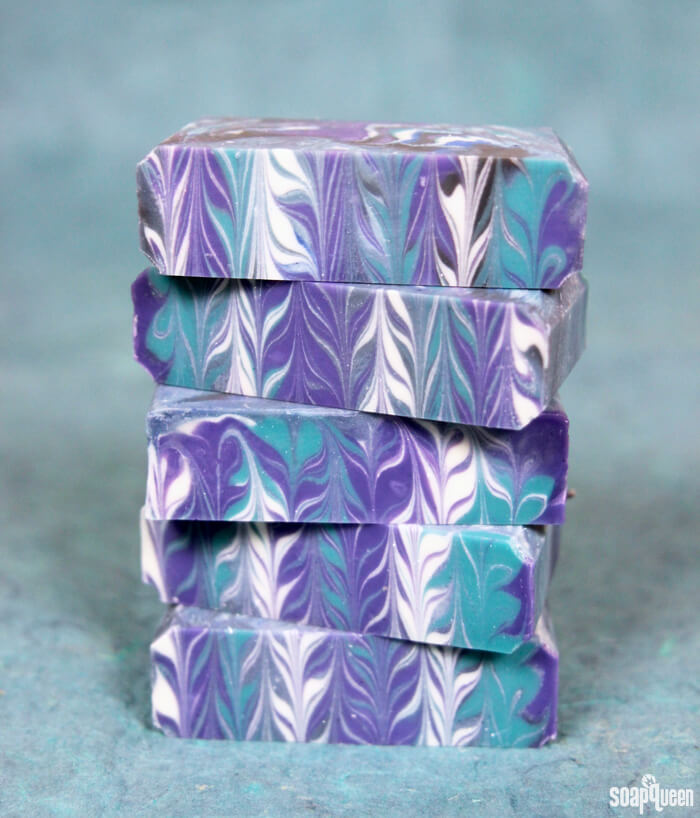
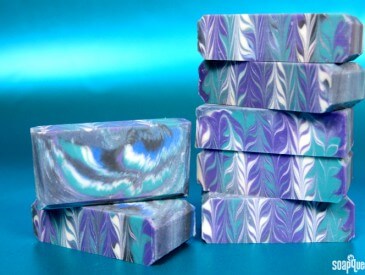
This celestial inspired cold process project was created with a technique known as the “Clyde Slide.” This technique was created by Clyde Yoshida of Vibrant Soaps; be sure to check out his awesome YouTube channel here. This fun swirl involves layering multiple colors in one pot, then pouring the soap into the mold. As the soap “slides” into the mold it creates a unique pattern in each bar.
Once I cut into these bars, I was immediately reminded of space! The combination of swirling black, purple, blue and white hues bring to mind images of the Milky Way and far away galaxies. How fitting that the new Star Wars movie comes out tonight =).When making this recipe, be sure to use fragrance oils that give you lots of time to work. I combined Green Fig Fragrance Oil and Pomegranate and Black Currant Fragrance Oil to create a green and fruity scent that smells out of this world (hah, get it?).
What You’ll Need:
10″ Silicone Loaf Mold
3.3 oz. Sweet Almond Oil (10%)
3.3 oz. Canola Oil (10%)
1 oz. Castor Oil (3%)
6.6 oz. Coconut Oil (20%)
12.2 Olive Oil (37%)
6.6 oz. Palm Oil (20%)
4.5 oz. Sodium Hydroxide Lye
10.9 oz. Distilled Water
1.4 oz. Green Fig Fragrance Oil
1 oz. Pomegranate & Black Currant Fragrance Oil
Black Oxide
Titanium Dioxide
Ultramarine Blue Oxide
Green Chrome Oxide
Ultramarine Violet Oxide

Click here to add everything you need for this project to your Bramble Berry shopping cart!
 If you’ve never made Cold Process soap before, stop here! I highly recommend checking out our FREE four part SoapQueen.tv series on Cold Process Soapmaking, especially the episode on lye safety. And if you’d rather do some reading, Bramble Berry carries a wide range of books on the topic, including my newest book, Soap Crafting. You can also checkout the digital downloads for that instant gratification factor.
SAFETY FIRST: Suit up for safe handling practices! That means goggles, gloves and long sleeves. Make sure kids, pets, and other distractions and tripping hazards are out of the house or don’t have access to your soaping space. Always soap in a well-ventilated area.
COLOR PREP: To ensure that the Titanium Dioxide blends smoothly into the soap batter, we recommend micronizing it before dispersing it in oil. Please note this is an optional tip but it does help with the titanium dioxide clumping in the soap. =) To micronize colorant, simply use a coffee grinder to blend the colorant to break up any clumps of color and prevent streaks of white from showing in the final soap. We like to use a coffee grinder that has a removable, stainless steel mixing area for easy cleaning. Then, disperse 1 teaspoons of the colorant into 1 tablespoon of sunflower or sweet almond oil (or any other liquid oil). Then in separate containers, disperse 1 teaspoon of the Green Chrome Oxide, Black Oxide, Ultramarine Violet Oxide and Ultramarine Blue Oxide into 1 tablespoon of lightweight liquid oil. Use a mini mixer to get rid of any clumps.
FRAGRANCE PREP: Blend together 1.4 ounces of Green Fig Fragrance Oil and 1 ounce of Pomegranate and Black Currant Fragrance Oil in a glass, fragrance oil safe container. Set aside.
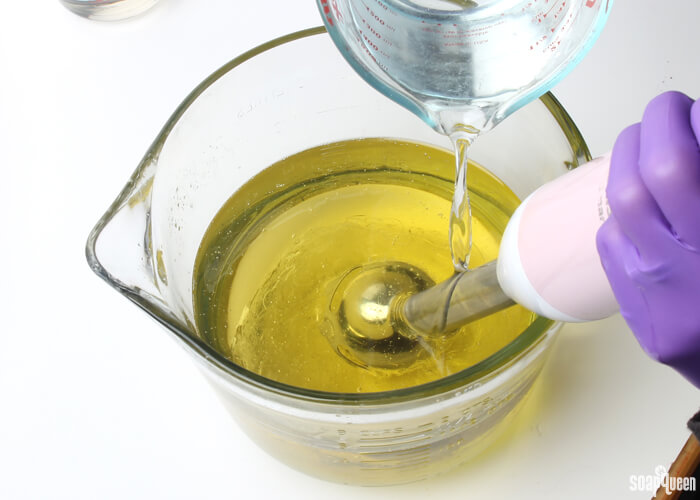
ONE: Slowly and carefully add the lye to the water and gently stir until the lye has fully dissolved and the liquid is clear. Set aside to cool.
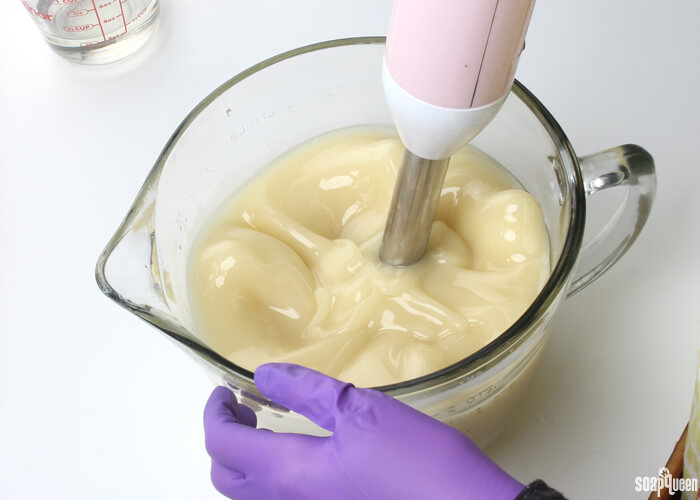
TWO: Melt and combine the coconut oil, olive oil, canola oil, castor oil, sweet almond oil and palm oils (remember to fully melt then mix your entire container of palm oil before portioning). Once the lye water and the oils have cooled to 130 degrees or below (and are ideally within 10 degrees of each other), add the lye water to the oils and stick blend until thin trace. If you’d like a harder bar of soap that releases faster from the mold, you can add sodium lactate to the cooled lye water. Use 1 teaspoon of sodium lactate per pound of oils in the recipe. For this recipe, you’d add about 2 teaspoons of sodium lactate.
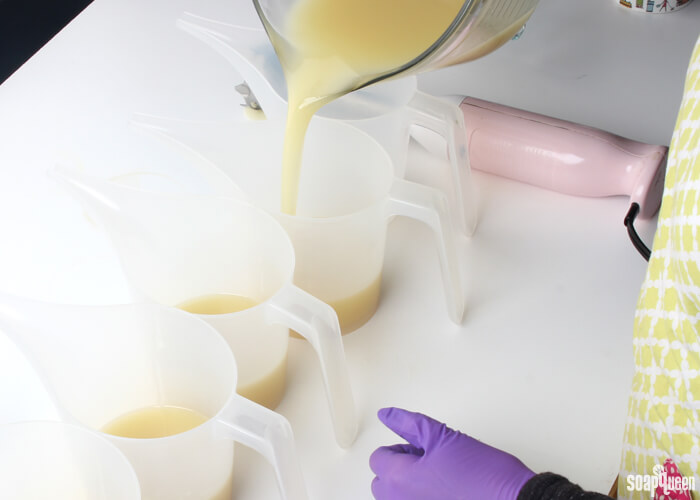
 THREE: Once the batter has reached a very light trace, pour the batter into five equal containers. Each container will hold about 250 mL.
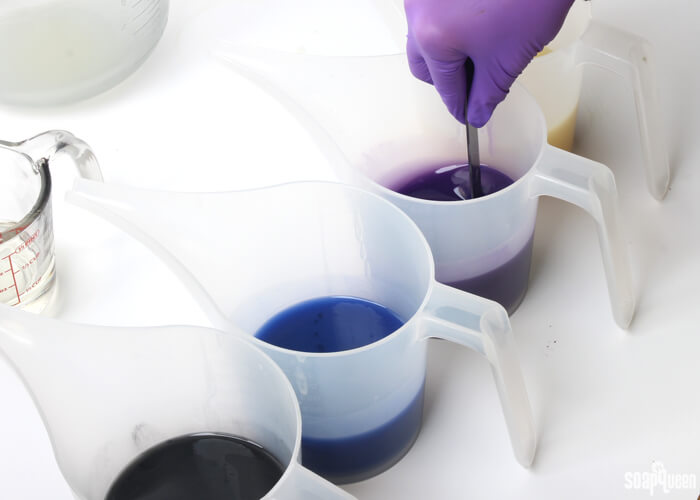
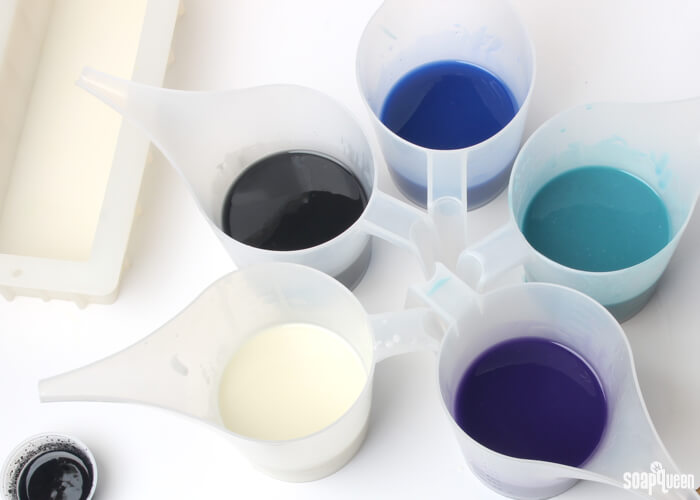
 FOUR: To each container, add the following amounts of dispersed colorants below and use a spoon or whisk to fully mix in.
- A: 2 teaspoons dispersed Titanium Dioxide
- B: 1/4 teaspoon dispersed Black Oxide
- C: 1/2 teaspoon dispersed Ultramarine Blue Oxide
- D: 1 1/4 teaspoon dispersed Ultramarine Violet Oxide + 1/8 teaspoon Ultramarine Blue Oxide
- E: 1/4 teaspoon dispersed Ultramarine Blue Oxide + 1/2 teaspoon dispersed Green Chrome Oxide + 1/4 teaspoon dispersed Titanium Dioxide
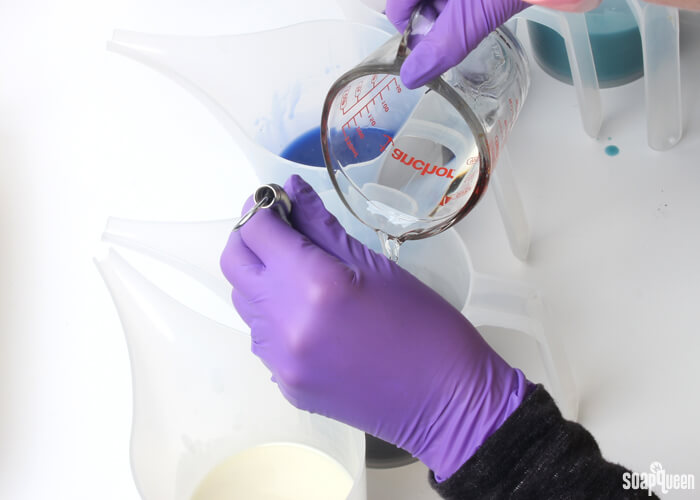
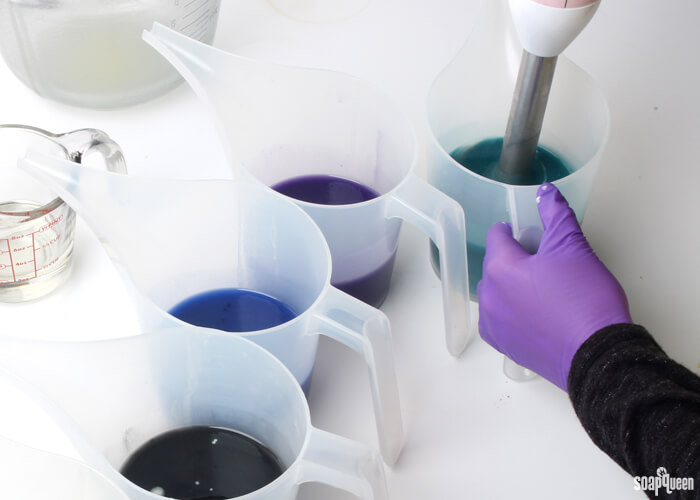
 FIVE: Add the fragrance blend evenly into each container. It’s okay to eyeball it! If your soap still has an extremely thin trace, pulse each container with the stick blender (from lightest to darkest) for about 3-5 seconds to slightly thicken the mixture. You want the consistency to be thin enough to easily pour, but thick enough that the colors won’t mix together.
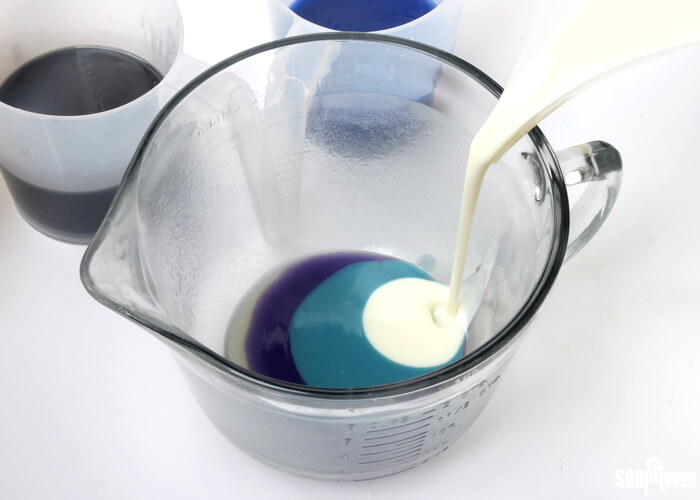
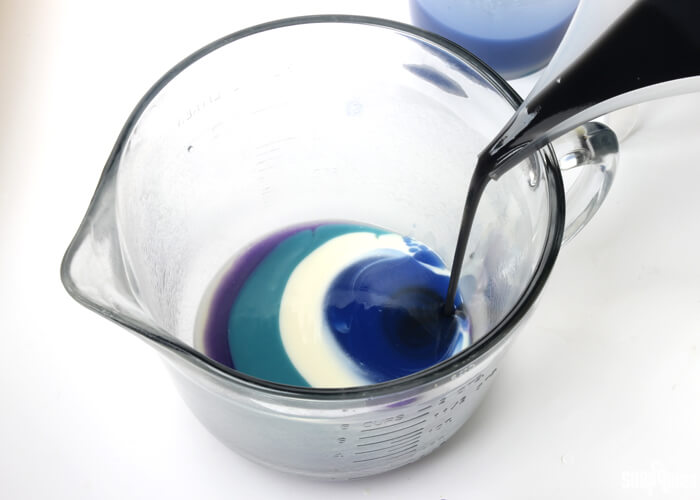
 SIX: Choose the color order that you would like to use. The order I used was black, purple, teal, white, blue. But you can use whatever order you like. You just want to keep the order consistent. Begin pouring the first color into a large bowl, allowing the soap to run down the side of the bowl slightly. As you pour count “1, 2, 3, 4” to keep each pour consistent. The amount of soap you pour at a time is up to you; the more soap you pour into the bowl at a time, the less total layers there will be.
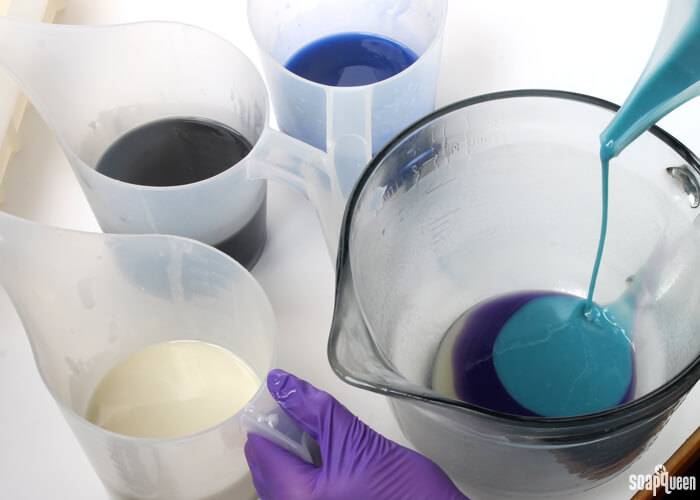
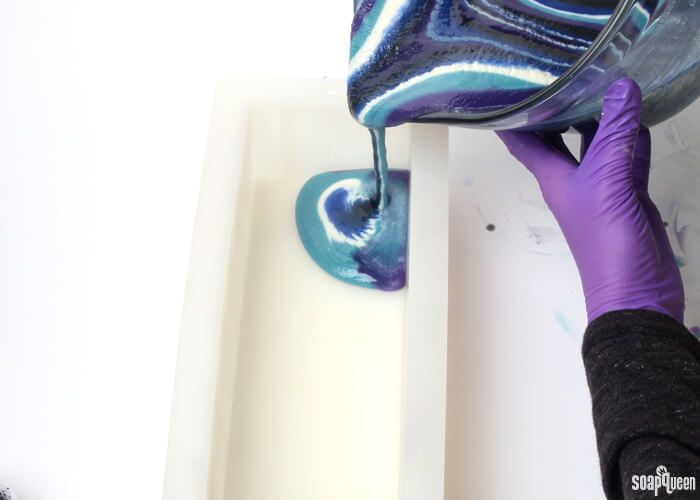
Continue pouring each color into the bowl, counting during each pour until each color is almost used up. Save a small amount of the white, purple and teal shades (or whichever colors you prefer) to do a swirl design on the top.
 SEVEN: Once the soap has been poured into the mixing bowl, carefully pour the soap into one corner of the mold until completely filled. The colors will begin to blend together, but that’s okay. Once completely filled, tap the mold on the counter firmly to help get rid of any bubbles.
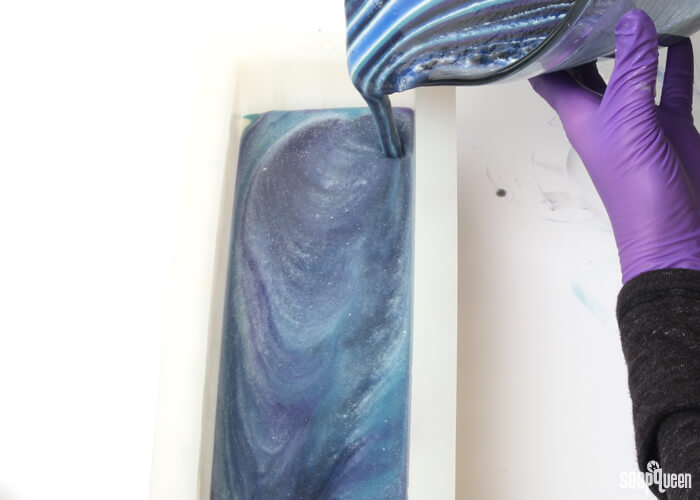 EIGHT: Using the leftover soap, carefully pour thin lines of each color lengthwise down the mold on the top of the soap. Pour carefully to ensure the colors do not break through into the soap.
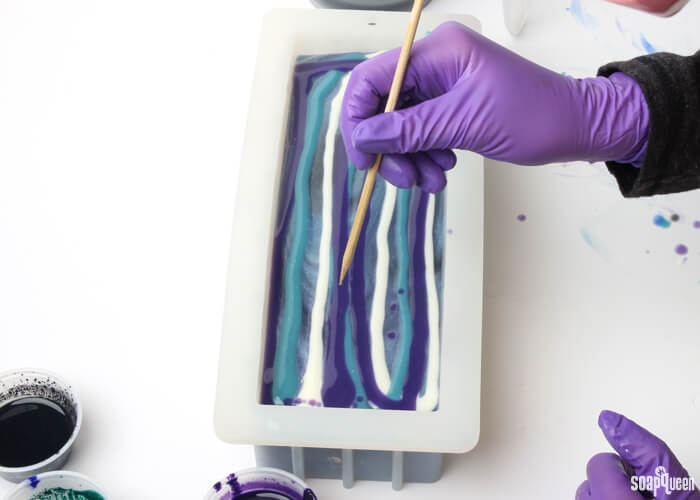
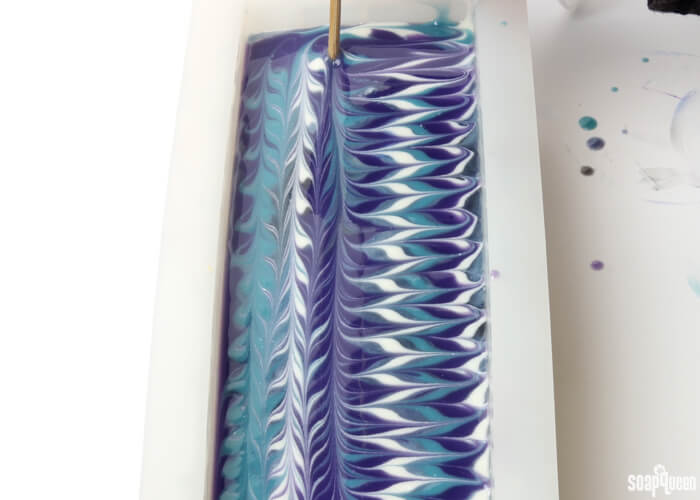
 NINE: Once each color has been placed on top, drag a dowel or chopstick vertically in an S-shaped curve across the lines of soap you just poured. Continue this pattern down the entire length of the mold. Do not insert the chopstick into the bottom of the mold, you only want to swirl the very top.
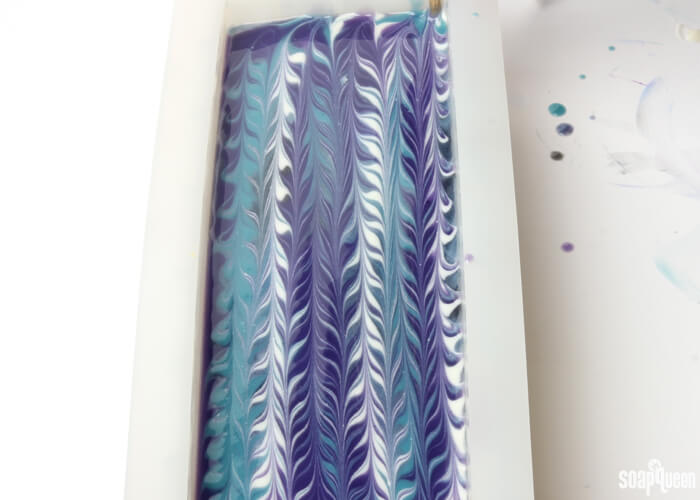
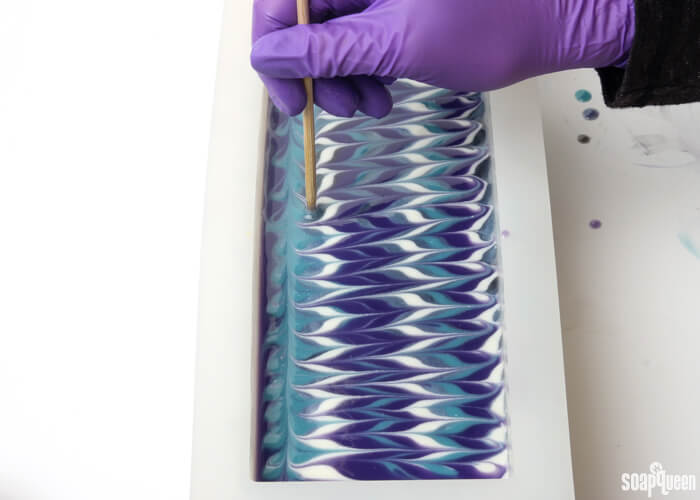 TEN: Then, use the dowel or chopstick to create S-shaped curves down the length of the mold in the opposite direction. Spritz with 99% isopropyl alcohol to prevent soda ash. Cover the soap and insulate for 24 hours. Allow the soap to stay in the mold for 3-4 days. Unmold, and cut into bars. Allow the bars to cure for 4-6 weeks. Enjoy!
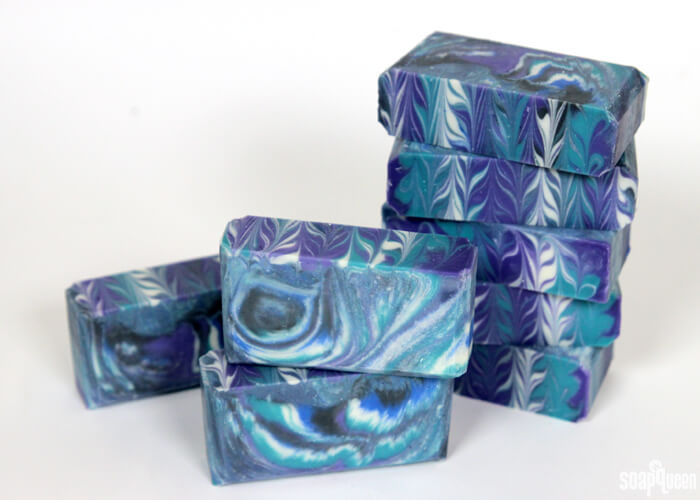
Have you tried the Clyde Slide yet technique yet? I can’t wait to experiment with more color combinations!
Galaxy Clyde Slide Cold Process Tutorial
Ingredients
- 10 ″ Silicone Loaf Mold
- 3.3 oz. Sweet Almond Oil
- 3.3 oz. Canola Oil
- 1 oz. Castor Oil
- 6.6 oz. Coconut Oil
- 12.2 Olive Oil
- 6.6 oz. Palm Oil
- 4.5 oz. Sodium Hydroxide Lye
- 10.9 oz. Distilled Water
- 1.4 oz. Green Fig Fragrance Oil
- 1 oz. Pomegranate & Black Currant Fragrance Oil
- Black Oxide
- Titanium Dioxide
- Ultramarine Blue Oxide
- Green Chrome Oxide
- Ultramarine Violet Oxide
Instructions
SAFETY FIRST: Suit up for safe handling practices! That means goggles, gloves and long sleeves. Make sure kids, pets, and other distractions and tripping hazards are out of the house or don’t have access to your soaping space. Always soap in a well-ventilated area.
COLOR PREP: To ensure that the Titanium Dioxide blends smoothly into the soap batter, we recommend micronizing it before dispersing it in oil. Please note this is an optional tip but it does help with the titanium dioxide clumping in the soap =) To micronize colorant, simply use a coffee grinder to blend the colorant to break up any clumps of color and prevent streaks of white from showing in the final soap. We like to use a coffee grinder that has a removable, stainless steel mixing area for easy cleaning. Then, disperse 1 teaspoons of the colorant into 1 tablespoon of sunflower or sweet almond oil (or any other liquid oil). Then in separate containers, disperse 1 teaspoon of the Green Chrome Oxide, Black Oxide, Ultramarine Violet Oxide and Ultramarine Blue Oxide into 1 tablespoon of lightweight liquid oil. Use a Mini Mixer to get rid of any clumps.
FRAGRANCE PREP: Blend together 1.4 ounces of Green Fig Fragrance Oil and 1 ounce of Pomegranate and Black Currant Fragrance Oil in a glass, fragrance oil safe container. Set aside.
- Slowly and carefully add the lye to the water and gently stir until the lye has fully dissolved and the liquid is clear. Set aside to cool.
- Melt and combine the coconut oil, olive oil, canola oil, castor oil, sweet almond oil and palm oils (remember to fully melt then mix your entire container of palm oil before portioning). Once the lye water and the oils have cooled to 130 degrees or below (and are ideally within 10 degrees of each other), add the lye water to the oils and stick blend until thin trace. If you’d like a harder bar of soap that releases faster from the mold, you can add sodium lactate to the cooled lye water. Use 1 teaspoon of sodium lactate per pound of oils in the recipe. For this recipe, you’d add about 2 teaspoons of sodium lactate.
- Once the batter has reached a light trace, pour the batter into five equal containers. Each container will hold about 250 mL.
- To each container, add the following amounts of dispersed colorants below and use a spoon or whisk to fully mix in.A: 2 teaspoons dispersed Titanium DioxideB: 1/4 teaspoon dispersed Black OxideC: 1/2 teaspoon dispersed Ultramarine Blue OxideD: 1 1/4 teaspoon dispersed Ultramarine Violet Oxide + 1/8 teaspoon Ultramarine Blue Oxide
- E: 1/4 teaspoon dispersed Ultramarine Blue Oxide + 1/2 teaspoon dispersed Green Chrome Oxide + 1/4 dispersed Titanium Dioxide
- Add the fragrance blend evenly into each container. It’s okay to eyeball it! If your soap still has an extremely thin trace, pulse each container with the stick blender (from lightest to darkest) for about 3-5 seconds to slightly thicken the mixture. You want the consistency to be thin enough to easily pour, but thick enough that the colors won’t mix together.
- Choose the color order that you would like to use. The order I used was: black, purple, teal, white, blue. But, you can use whatever order you like! You just want to keep it consistent. Begin pouring the first color into a large bowl, allowing the soap to run down the side of the bowl slightly. As you pour count “1, 2, 3, 4” to keep each pours consistent. Continue pouring each color into the bowl, counting during each pour until each color is almost used up. Save a small amount of the white, purple and teal shades (or whichever colors you prefer) to do a swirl design on the top.
- Once the soap has been poured into the mixing bowl, carefully pour the soap into one corner of the mold until completely filled. The colors will begin to blend together a little, but that’s okay. Once completely filled, tap the mold on the counter firmly to help get rid of any bubbles.
- Using the leftover soap, carefully pour thin lines of each color length-wise down the mold on the top of the soap. Pour carefully to ensure the colors do not break through into the soap.
- Once each color has been placed on top, drag a dowel or chopstick vertically in an S-shaped curve across the lines of soap you just poured. Continue this pattern down the entire length of the mold. Do not insert the chopstick into the bottom of the mold, you only want to swirl the very top.
- Then, use the dowel or chopstick to create S-shaped curves down the length of the mold in the opposite direction. Spritz with 99% isopropyl alcohol to prevent soda ash. Cover the soap and insulate for 24 hours. Allow the soap to stay in the mold for 3-4 days. Unmold, and cut into bars. Allow the bars to cure for 4-6 weeks. Enjoy!
I was so excited to try the clyde slide technique, and I finally did last night! I didn’t quite get the results I was hoping for though, my green turned out to be an olive green rather than teal as shown in the picture, and by the time I was finished with my layers and ready to pour into the mold it was pretty thick…so it kinda plopped into the mold rather than pour fluidly. There’s nothing wrong with the recipe of course, just didn’t work fast enough, so it was all me lol! This gives me the excuse to try again ;3 and practice makes perfect! Not bad for my first attempt though, I’m okay with the results but will definitely be trying again until I get the results I want! Here’s my first clyde slide attempt XD
https://www.instagram.com/p/BRwQ522AB2F/
Not too bad considering it was my first time trying!
That looks awesome Bleu! I love how each one of your bars has a unique swirl. 🙂
-Kelsey with Bramble Berry
I love this design! I will be trying this technique soon but I am wondering about the dispersed colorant used in this design. Is there ever a worry about using too many colors dispersed in oil. I am always perplexed about how much extra I can use. Should this be oil that I discount from my recipe or can I safely add extra oil to disperse colorants without fear of altering my recipe too much? Does that make sense?
Because you’re adding the color in teaspoon and tablespoon amounts, it won’t add too much extra oil to the batch. If you prefer, you can reduce the superfat to 3-4% instead of 5%. That will account for any extra oil. 🙂
Learn more about superfat here: https://soapqueen.com/bath-and-body-tutorials/cold-process-soap/superfatting-soap-an-explanation-2/
You can also take oil from your main batch to mix the color. Just make sure to add all that oil back into your batch. Also, don’t prep the color too far ahead of time or the oil can harden!
-Kelsey with Bramble Berry
I just tried this technique for the first time. I’m so excited! It looked great in the mold and the anticipation may very well do me in before I can unmold and cut it lol
I had to grab a quick snap before I finished the top, in hindsight…next time I may just leave it like this 😀
https://www.instagram.com/p/BHBmJ97DJ5d/
It looks amazing Angie, thank you for sharing! I love the cool pattern you got. It sort of reminds me of a woven blanket. 🙂
-Kelsey with Bramble Berry
Just made this soap and even though my trace accelerated much too fast, I still think it is going to look great. I do have a question because this is the first time I have ever used a silicon mold, I normally use wood with custom covers. My soap is right to the top if a little rounded over. How do I cover this effectively and not ruin my lovely swirl top?
Thank you.
Hi Erin!
That’s awesome, glad the soap went well! To cover the top, you can take a piece of cardboard and bend it in the middle. That creates a “tent” you can pop over the mold to protect the top. Then, you can wrap it with a towel or blanket if you like. 🙂
-Kelsey with Bramble Berry
I’d love to make this soap! 😀
Do you think it would be worth lye discounting by 5%?
Hi Troy!
We formulate most cold process recipes to have a 5% superfat, also known as a 5% lye discount. I would not recommend lye discounting much more than 7%, or you may find the final bar to be a little soft. I hope this helps, glad you’re going to give this project a try!
-Amanda with Bramble Berry
Thanks Amanda!
I’m a big fan of this site by the way and love getting inspiration from the tips, recipes and videos. I’ve encouraged a few friends to make soap and now they’re fans of this site too 😀
I’m also looking at making the Rose Garden, Mermaid Tail, Black White and Gold All Over, Natural Colorant Taiwan Swirl, and Honey Bee recipes. Can you tell me if these have been lye discounted
Hi Troy!
I’m so glad you’re enjoying the site! :). All of those recipes have been formulated with a 5% superfat. If the recipe doesn’t say anything about the superfat, you can assume it has a 5% discount. Let me know if you have any more questions 🙂
-Amanda with Bramble Berry
Hello! thank you for all you do, the tutorials, Brambleberry, the Periscope videos, with your help I have just made my first cold process soap. I made this Galaxy Clyde Slide soap. I am so excited and I don’t think I can wait the 3 – 4 days to take it out of the mold! But I wouldn’t have been able to make it without all your amazing information. Thanks again!
You’re very welcome Jessica! Thank you for your sweet comment. Definitely let us know how the soap turns out. Also, just a warning, soaping is a very addictive hobby. 😉
-Kelsey with Bramble Berry
My husband and I made this yesterday. We tried to unmold this pm, but the bottom is still quite sticky. We took it out of the mold and placed it on its side. Hopefully by tomorrow it will be hard enough to cut it, I can’t wait….
I replaced the palmoil with cocobutter, ran it through the lye calculator and it came out yo the same amount of lye. I also used 38% of water, maybe that’s why it soo soft.
More update later.
Thanks for this recipe
Hi Andrea!
You’re welcome, so glad you like the recipe! Typically, soap takes about 3-5 days to harden enough to unmold and cut. Palm-free recipes are on the softer side, so they may take up to a week or so. I think your soap will be ready to cut in another day or so. 🙂
Sodium lactate helps the soap unmold and cure faster! You can add 1 tsp. per pound of oils to your cooled lye water. Read more about sodium lactate here: https://soapqueen.com/bramble-berry-news/sunday-night-spotlight-sodium-lactate/
-Kelsey with Bramble Berry
Please, I want to know how you cut the soap into such shapes and also the shelve lifespan of the soap. thank you
Hi Seth!
We used a sharp kitchen knife to cut the soap, and a Soap Beveller to clean the edges up. We love the beveller, it creates such a professional look. 🙂
Soap Beveller: https://www.brambleberry.com/Soap-Beveller-P4141.aspx
See how to use the tool in the 5 Tips to Create Professional Looking Soap: https://soapqueen.com/bath-and-body-tutorials/tips-and-tricks/5-ways-professional-soap/
Also, this soap will last about one year. The shelf life of the soap depends on the oils used in the recipe. The oils in this recipe all last about a year. If the soap contained an oil with a shorter shelf life, like hazelnut oil (3 months), the soap will last about 3 months. 🙂
Read more about oil shelf lives here: https://soapqueen.com/bath-and-body-tutorials/tips-and-tricks/free-beginners-guide-to-soapmaking-common-soapmaking-oils/
Get more tips for storing cold process soap so it lasts here: https://soapqueen.com/bath-and-body-tutorials/tips-and-tricks/how-to-store-handmade-bath-products/
-Kelsey with Bramble Berry
I tried this first using my own recipe and a Karma-type fragrance, and unfortunately trace accelerated too fast and it really didn’t work out well at all. The second time I relented and used the same types and % of oils here. I also actually used the black raspberry vanilla fragrance like Clyde used since apparently it’s well known to behave. I also whisked in the fragrance LAST, after separating everything and blending the colorants. Happy to say it looks beautiful! Can’t wait to cut it. The actual “slide” wasn’t too hard at all for a newbie like me. I think the trick is to use a really slow moving recipe and don’t stick blend the fragrance like I did the first time.
Hi Amanda!
That’s awesome, so glad the soap turned out beautifully! I just love when that happens. Also, you are correct – a slow-moving recipe and whisking the fragrance oil in is key for this technique. 🙂
-Kelsey with Bramble Berry
Can I use melt and pour soap base for this?
Hi Monique!
Cold process has a unique texture that allows for this design. It may be a bit more tricky in melt and pour soap, but you can get a similar look!
You can use a melt and pour swirling technique to get a galaxy look. To do so, pour the soap into your mold in random places and from random heights. You want the soap to be around 130F so everything swirls nicely. Read more about how to swirl melt and pour here: https://soapqueen.com/bath-and-body-tutorials/tips-and-tricks/tips-for-swirling-melt-pour-soap/
The fragrance amounts will be different for melt and pour. To find out how much fragrance to add, you can use our handy dandy Fragrance Calculator: https://www.brambleberry.com/Pages/Fragrance-Calculator.aspx
For the colors, color blocks would work really well: https://www.brambleberry.com/Color-Blocks-for-Melt-Pour–C340.aspx
We also have a fun galaxy melt and pour project you may like. I’ll include the link below. 🙂
Cold Process Planets in a Melt and Pour Galaxy: https://soapqueen.com/bath-and-body-tutorials/melt-and-pour-soap/otion-repost-planet-soap/
-Kelsey with Bramble Berry
Thank you so much for sharing your experience on soap making . I have a question , I hope you could help me . I couldn’t find any drinkable distilled water in Australia . Could I use demineralised water for battery or iron machine which I could find it in the cleaning section ? Hope to hear from you soon ! Thank you
Hi Alicia!
We’ve had the best luck with distilled water for soap. We haven’t tested demineralised water, so I’m not entirely sure if that would work! My worry is it may have bits of microbes or metal in it. You may want to make a small test batch to see if you notice any odd reactions to the water. If not, you can use it for a larger batch. 🙂
-Kelsey with Bramble Berry
Another soaper told me that The Soap Queen made a soap using the Clyde Slide. What a nice surprise. It turned out wonderfully! Thanks for linking viewers to the YouTube channel too. I think you’re awesome!
Thank you so much for sharing your technique Clyde! We absolutely love your YouTube channel and couldn’t wait to give it a try. We think you’re awesome too! 🙂
-Kelsey with Bramble Berry
Clyde is definitely the artist! He has some really creative designs! Love his work!
Me too, his videos are so fun to watch! 🙂
-Kelsey with Bramble Berry