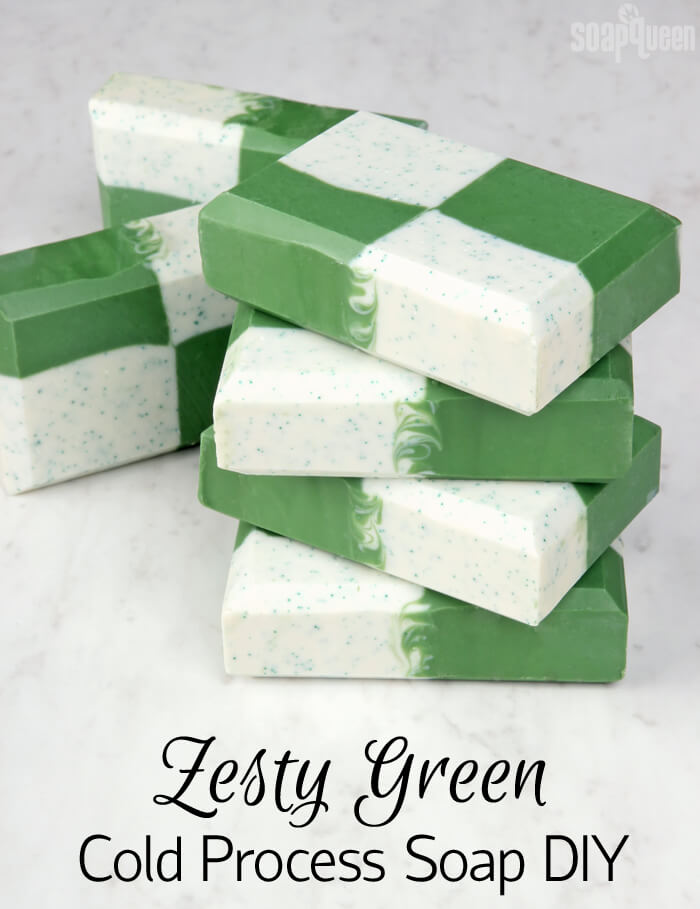
Looking for soap that’s going to spruce up your product line, or maybe get customers talking? Say hello to the new Green Salsa Fragrance Oil. It’s a unique scent that smells like jalapeño peppers with a touch of bergamot and ginger. It’s zesty, spicy and completely unique. I will admit, it may not be everybody’s favorite (our office is divided), but those who love it seriously love it. It’s really bold and adventurous!
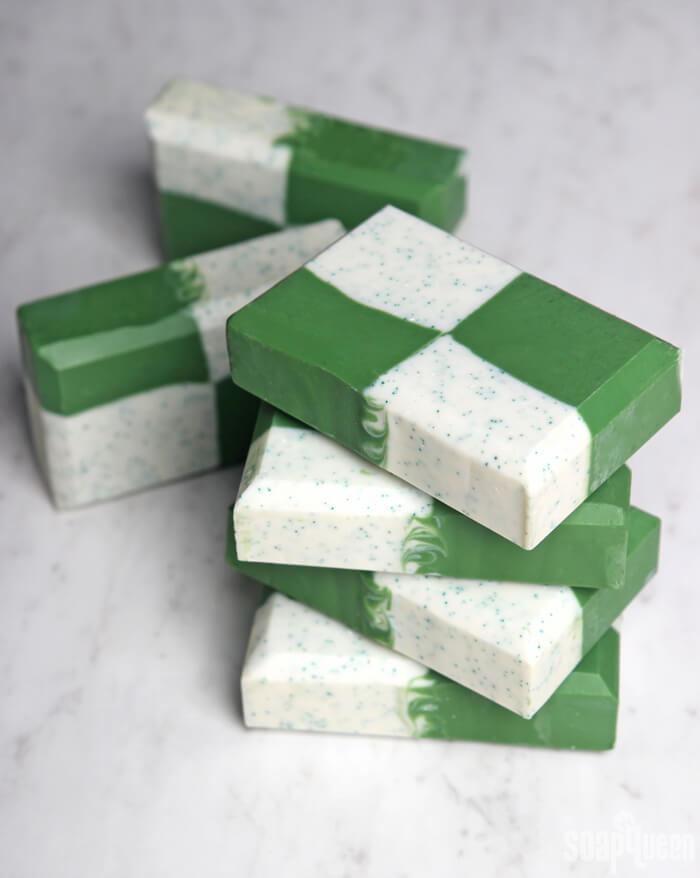
For this project, I blended Green Salsa Fragrance Oil with Ginger Lime Fragrance Oil for more citrus notes. It reminds me a bit of a jalapeño margarita! It’s intriguing, and I can’t stop smelling it. Green Chrome Oxide Pigment and Green Forest Jojoba Beads match the green scent, and the jojoba beads give the bar a bit of scrub. Learn more about jojoba beads here.
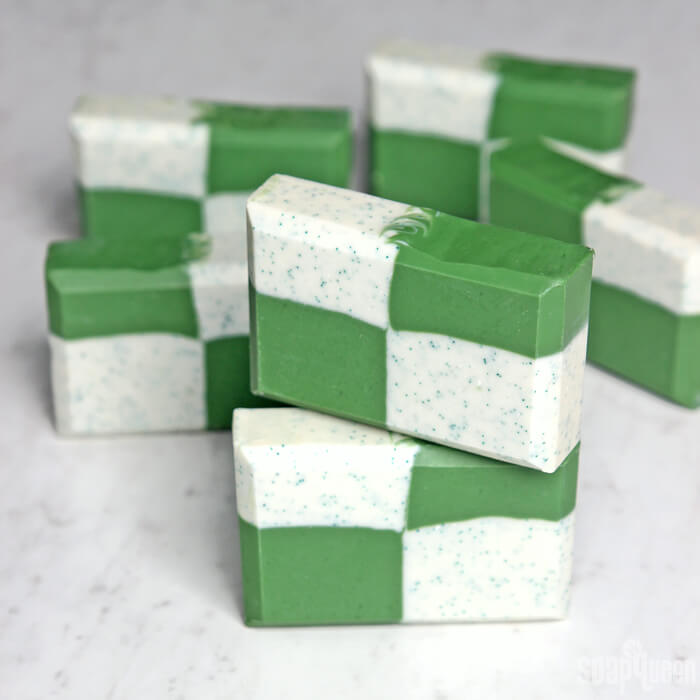
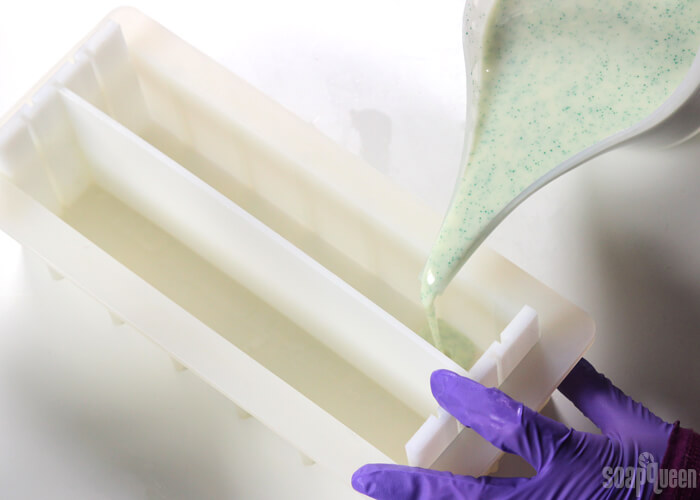
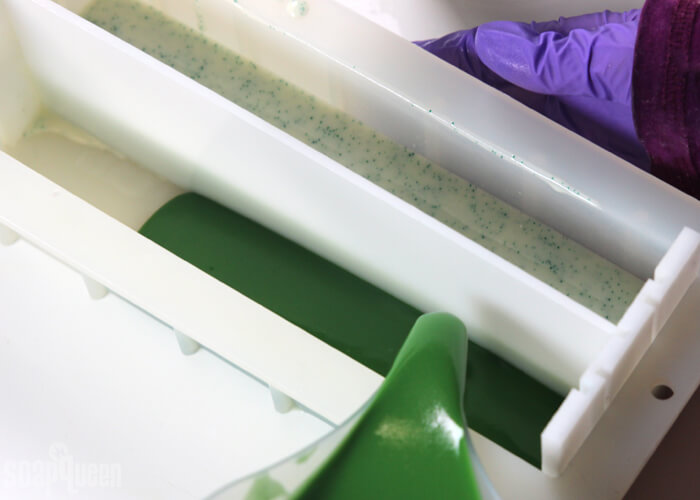
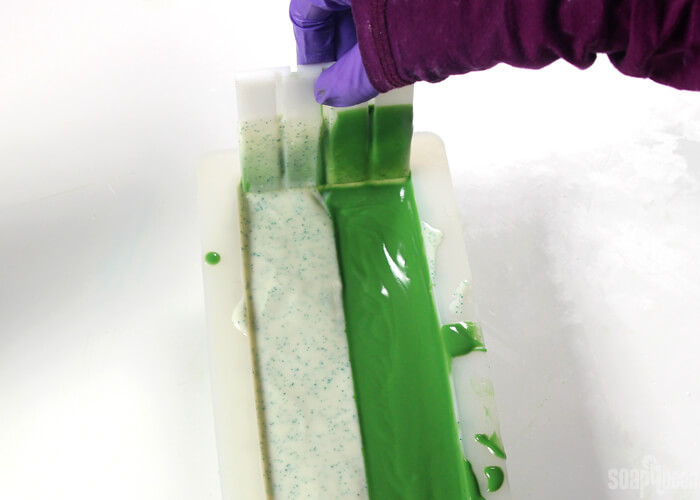
The Multi-Pour Tool for 10″ Silicone Loaf helps create the checkered pattern in these bars. This soap requires layers, so a good understanding of trace is helpful for this project. The Green Salsa Fragrance Oil accelerates the soap slightly, so be prepared for that. The Swirl Quick Mix makes sure you have plenty of time to work. But, be careful to not over stick blend! My layers didn’t come out completely perfect (I used a little too much on the bottom) but I still think it looks pretty cute. =)
What You’ll Need:
10″ Silicone Loaf Mold
Multi-Pour Tool for 10″ Silicone Loaf
33 oz. Swirl Quick Mix
4.6 oz. Sodium Hydroxide Lye
10.9 oz. Distilled Water
1 oz. Ginger Lime Fragrance Oil
1 oz. Green Salsa Fragrance Oil
Green Chrome Oxide Pigment
Titanium Dioxide
1 Tbs. Green Forest Jojoba Beads

Click here to add everything you need for this project to your Bramble Berry shopping cart!
If you’ve never made cold process soap before, stop here! I highly recommend checking out our FREE four part SoapQueen.tv series on Cold Process Soapmaking, especially the episode on lye safety. And if you’d rather do some reading, Bramble Berry carries a wide range of books on the topic, including my newest book, Pure Soapmaking. You can also checkout the digital downloads for that instant gratification factor.
SAFETY FIRST: Suit up for safe handling practices! That means goggles, gloves and long sleeves. Make sure kids, pets, and other distractions and tripping hazards are out of the house or don’t have access to your soaping space. Always soap in a well-ventilated area.
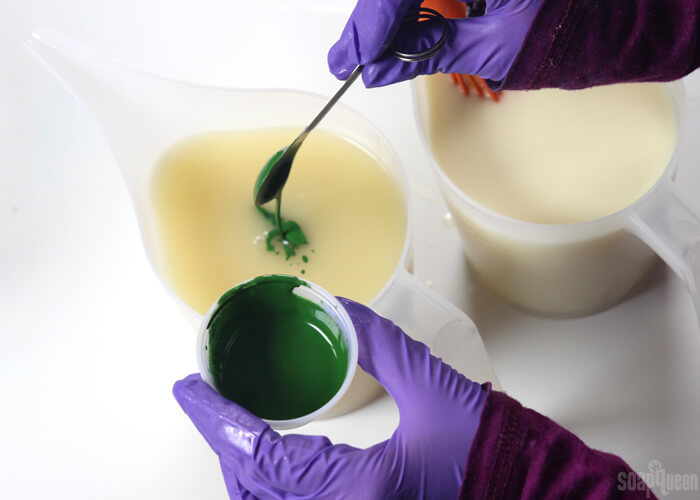
COLOR PREP: To ensure that the Titanium Dioxide blends smoothly into the soap batter, we recommend micronizing it before dispersing it in oil. Please note this is an optional tip but it does help with the titanium dioxide clumping in the soap. =) To micronize colorant, simply use a coffee grinder to blend the colorant to break up any clumps of color and prevent streaks of white from showing in the final soap. We like to use a coffee grinder that has a removable, stainless steel mixing area for easy cleaning. Disperse 2 teaspoons of the colorant into 2 tablespoons of sunflower or sweet almond oil (or any other liquid oil). Then, disperse 1 teaspoon Green Chrome Oxide Pigment into 1 tablespoon lightweight liquid oil. Use a mini mixer to help get rid of any clumps. Have the jojoba beads nearby and ready.
FRAGRANCE OIL PREP: In a glass, fragrance oil safe container, measure 1 ounce Green Salsa Fragrance Oil and 1 ounce Ginger Lime Fragrance Oil. Set aside.
ONE: Slowly and carefully add the lye to the water and gently stir until the lye has fully dissolved and the liquid is clear. Set aside to cool.
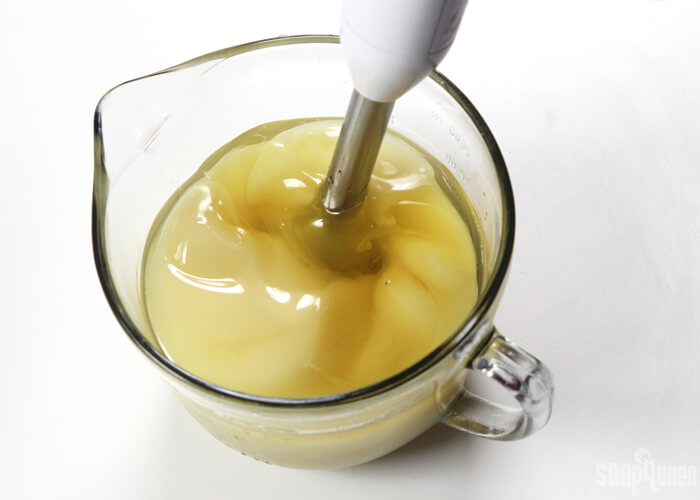
TWO: Fully melt the Swirl Quick Mix until completely clear. Give the bag a good shake to fully mix the oils together. Pour 33 ounces of the mix into your soaping bowl. Once the lye water and the oils have cooled to 130 degrees or below (and are ideally within 10 degrees of each other), add the lye water to the oils and stick blend until thin trace. If you’d like a harder bar of soap that releases faster from the mold, you can add sodium lactate to the cooled lye water. Use 1 teaspoon of sodium lactate per pound of oils in the recipe. For this recipe, you’d add about 2 teaspoons sodium lactate.
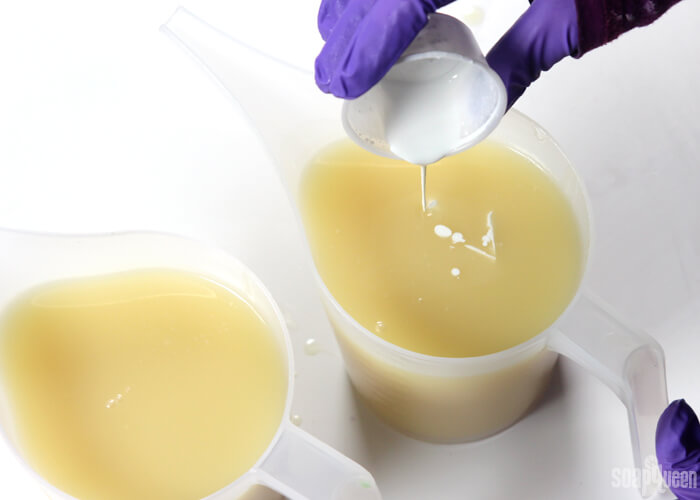
TWO: Once you’ve reached a thin trace, split the containers into two separate containers. To one container add all the dispersed titanium dioxide, and add all the dispersed Green Chrome Green into the other container. Whisk in the colorants to fully combine. To the white soap, add 1 tablespoon of the Forest Green Jojoba Beads, and whisk to combine.
THREE: Add the fragrance blend evenly into both containers and whisk to fully mix in.
FOUR: Pour half of the white soap into one half of the mold, and half of the green soap into the other side. Gently tap the mold on the counter to help level the soap and get rid of bubbles.
FIVE: Now, wait a couple minutes for the soap in the mold to harden and become more firm. This helps it support the second layer. While you’re waiting, slowly whisk the soap in the containers to keep it fluid.
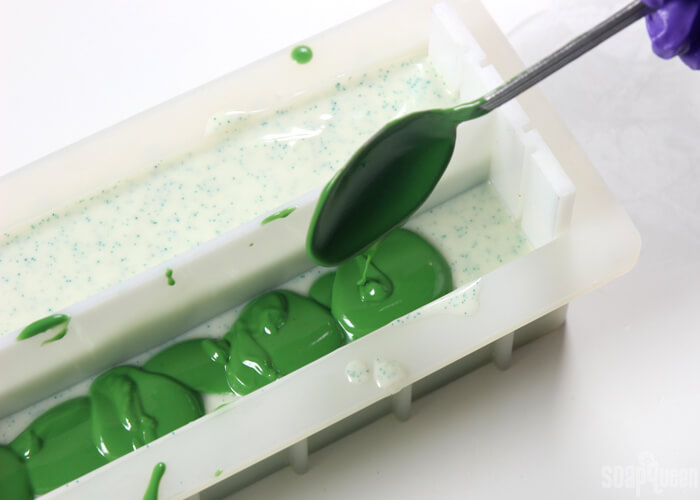
SIX: After a few minutes, give the mold a little shake. If the soap in the mold seems sturdy enough to support the layer on top, carefully pour the green soap onto the white, and the white soap onto the green. For this step, it can be helpful to carefully place the soap on top with a spoon until covered, then gently pour the remaining soap over. Or, pour over a small spatula or back of the spoon to flood the soap and help it pour more gently and evenly. This will help prevent the top layer from breaking through, and keeps the layers separate and straight.

SEVEN: Once all the soap is in the mold, slowly and carefully remove the center divider by pulling up and out. Then, remove each of the divider pieces at the end up and out. Tap the mold on the counter to help settle the soap and get rid of any bubbles. Use a chopstick or dowel to insert into the very, very top of the soap and lightly swirl down the center.
EIGHT: Spray the top with 99% isopropyl alcohol to help prevent soda ash. Leave uncovered at room temperature so the soap doesn’t get too hot and melt the jojoba beads. You can also place the soap in the fridge for 5-24 hours to keep it cool.
NINE: Allow the soap to stay in the mold for 2-3 days. Remove from the mold, and cut into bars. Allow to cure for 4-6 weeks. Enjoy!

Zesty Green Cold Process Soap Tutorial
Ingredients
- 10 ″ Silicone Loaf Mold
- Multi-Pour Tool for 10″ Silicone Loaf
- 33 oz. Swirl Quick Mix
- 4.6 oz. Sodium Hydroxide Lye
- 10.9 oz. Distilled Water
- 1 oz. Ginger Lime Fragrance Oil
- 1 oz. Green Salsa Fragrance Oil
- Green Chrome Oxide Pigment
- Titanium Dioxide
- 1 Tbs. Green Forest Jojoba Beads
Instructions
SAFETY FIRST: Suit up for safe handling practices! That means goggles, gloves and long sleeves. Make sure kids, pets, and other distractions and tripping hazards are out of the house or don’t have access to your soaping space. Always soap in a well-ventilated area.
COLOR PREP: To ensure that the Titanium Dioxide blends smoothly into the soap batter, we recommend micronizing it before dispersing it in oil. Please note this is an optional tip but it does help with the titanium dioxide clumping in the soap. =) To micronize colorant, simply use a coffee grinder to blend the colorant to break up any clumps of color and prevent streaks of white from showing in the final soap. We like to use a coffee grinder that has a removable, stainless steel mixing area for easy cleaning. Disperse 2 teaspoons of the colorant into 2 tablespoons of sunflower or sweet almond oil (or any other liquid oil). Then, disperse 1 teaspoon Green Chrome Oxide Pigment into 1 tablespoon lightweight liquid oil. Use a mini mixer to help get rid of any clumps. Have the jojoba beads nearby and ready.
FRAGRANCE OIL PREP: In a glass, fragrance oil safe container, measure 1 ounce Green Salsa Fragrance Oil and 1 ounce Ginger Lime Fragrance Oil. Set aside.
- Slowly and carefully add the lye to the water and gently stir until the lye has fully dissolved and the liquid is clear. Set aside to cool.
- Fully melt the Swirl Quick Mix until completely clear. Give the bag a good shake to fully mix the oils together. Pour 33 ounces of the mix into your soaping bowl. Once the lye water and the oils have cooled to 130 degrees or below (and are ideally within 10 degrees of each other), add the lye water to the oils and stick blend until thin trace. If you’d like a harder bar of soap that releases faster from the mold, you can add sodium lactate to the cooled lye water. Use 1 teaspoon of sodium lactate per pound of oils in the recipe. For this recipe, you’d add about 2 teaspoons sodium lactate.
- Once you’ve reached a thin trace, split the containers into two separate containers. To one container add all the dispersed titanium dioxide, and add all the dispersed Green Chrome Green into the other container. Whisk in the colorants to fully combine. To the white soap, add 1 tablespoon of the Forest Green Jojoba Beads, and whisk to combine.
- Add the fragrance blend evenly into both containers and whisk to fully mix in.
- Pour half of the white soap into one half of the mold, and half of the green soap into the other side. Gently tap the mold on the counter to help level the soap and get rid of bubbles.
- After a few minutes, give the mold a little shake. If the soap in the mold seems sturdy enough to support the layer on top, carefully pour the green soap onto the white, and the white soap onto the green. For this step, it can be helpful to carefully place the soap on top with a spoon until covered, then gently pour the remaining soap over. Or, pour over a small spatula or back of the spoon to flood the soap and help it pour more gently and evenly. This will help prevent the top layer from breaking through, and keeps the layers separate and straight.
- Once all the soap is in the mold, slowly and carefully remove the center divider by pulling up and out. Then, remove each of the divider pieces at the end up and out. Tap the mold on the counter to help settle the soap and get rid of any bubbles. Use a chopstick or dowel to insert into the very, very top of the soap and lightly swirl down the center.
- Spray the top with 99% isopropyl alcohol to help prevent soda ash. Leave uncovered at room temperature so the soap doesn't get too hot and melt the jojoba beads. You can also place the soap in the fridge for 5-24 hours to keep it cool.
- Allow the soap to stay in the mold for 2-3 days. Remove from the mold, and cut into bars. Allow to cure for 4-6 weeks. Enjoy!