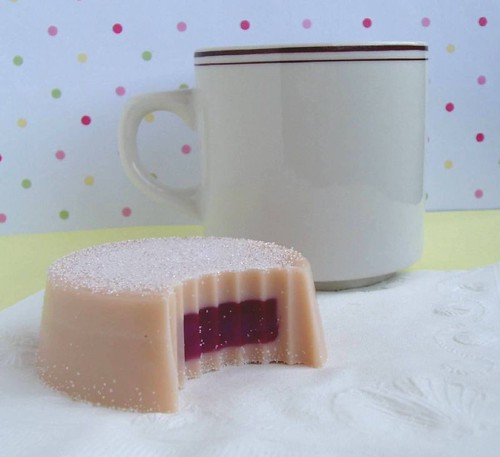
Learn how to make these beauties … and more! A new episode SoapQueen.TV debuts tomorrow.
Tutorials on soapmaking, bath fizzies, lotions and more
Filed Under: Personal Ramblings
Learn how to make these beauties … and more! A new episode SoapQueen.TV debuts tomorrow.
Filed Under: Bath Fizzies

Directions (from Luke)
First, I used a large plastic bowl to mix the citric acid and baking soda together. I used a whisk for this step, and mixed for a good 5 minutes until I was sure the powder was properly blended.
Second, I used a pigment scoop to mix in a small amount of Rose Pearl Mica. I began with 3 heaping spoonfuls but continued to add a few more to darken the bath bombs (caution: bombs will darken after using witch hazel. Too much Mica tends to leave a ring around the tub. Easy to clean-up, but a possible annoyance). I blended this for another few minutes.
Third, I added .75 ounces of herbal essence fragrance oil, distributing evenly using the dropper. After adding the fragrance I used a mixing spoon to stir. Blend well for another minute or so. The concentration of herbal essence I used made a very potent bath bomb. In future bath bombs, I will likely use a fresher fragrance such as Champagne in lower quantities.
Fourth, I began to mix slowly while squirting witch hazel into the batch. When the batch began to thicken, I stirred and sifted using my fingers. After a few minutes, the batch began to thicken and clumped when squeezed which is the perfect consistency.
Fifth, Using the hockey puck mold, I took a handful of the batch and squished it to the bottom of the mold, packing it down. I placed the rubber ducky into the mold, and the packed around and above it until covered. I found when using the ducky, I added more of the bath bomb mix than I had intended, ending up with a tray of muffins. I packed these down with my hand, and set them aside.
Sixth, I checked on them an hour later. They were beginning to harden, and a few cracks began appearing on top. I decided to go for broke, and removed the bombs from the molds. They were still hard-packed, but I didn’t like their muffin shape. I decided to hand-pack them as if packing a snowball. After getting them into rough circles, I lightly spritzed the outside with witch hazel and smoothed them down. Satisfied with their shape, I let them sit out to dry overnight.
Voila! The bombs dried nicely, completely concealing the rubber duckies inside! A few had developed small cracks, but they weren’t deep and didn’t affect the ability of the bomb to stay together. The size of them allowed for a particularly long fizzy-period. The duckies from the first batch didn’t pop out of the bath bomb for over a minute and a half!
My girlfriend Erika did another small batch after me. She used twice the colorant (hence the warning of the ring around the tub). She managed to fit the duckies completely into the hockey puck mold while still completely concealing them. This allowed for a smaller, more durable bath bomb that still smelled just as fragrant. More of her batch tended to develop cracks, which may be attributed to the duckies expanding while the bombs were drying.
There you have it!
-Luke
Video Below (email subscribers – you need to click through to the blog to see it). In a large tub, the water would not discolor. Enjoy!
Filed Under: Bramble Berry News
 Have you tried Grapefruit Lily before? It’s a lighter, romantic fragrance with a clean finish. Though this fragrance is heavy on the Lily notes, the touch of Grapefruit makes it an intriguing scent. It’s also a fun scent to blend. I’ve included a few blends below that really make this fragrance a great one to keep in some way, shape or form year round. I hope you enjoy them and if you have any to share with your fellow Soap Queen readers, please let comment. I’d love to know what you’re doing with this fragrance.
Blend #1
3 parts Grapefruit Lily
1 part Mango Mango
1 part Ginger Lime
Blend #2
2 parts Grapefruit Lily
1.5 parts Gardenia
1.5 parts Raspberry Violet
Blend#3
2.5 parts Grapefruit Lily
2.5 parts Apricot Freesia
 Blend #4
3 parts Grapefruit Lily
1 part Lily of Valley, Cybilla
1 part Romance (Discontinued)
Blend #5
2 parts Grapefruit Lily
2 parts Coconut, Cybilla
1.5 parts Sandalwood Vanilla
Blend #6
2 parts Grapefruit Lily
2 parts Vanilla Select
1 part Spearmint Essential Oil
Filed Under: Business Musings
I recently attended the Women Presidents’ Organization annual conference where Lynda Applegate (professor at Harvard, author of numerous books) spoke on how to not only survive but THRIVE in this economy. Her main premise was that small companies can really take advantage of this economy because of how nimble we are. I took the following notes during her presentation. They’re a bit choppy but all still excellent points for coming out of this recession strong.
In order to thrive in this economy, we need to execute on three things:
Stabilize – shore up cash flow, make sure processes are solid, reaffirm pricing models. One way that we’re doing this at Bramble Berry is to look over all of our sourcing to make sure that we’re getting the best pricing we can on everything. And, of course, we renewed our line of credit to make sure we have ready access to capital.
Strategize – focus on the essentials but don’t let opportunity pass you by, ruthlessly execute strategy. One way that we’re working on executing our strategy is by developing new lines within our existing company. Look for an announcement about a creative flanker line debuting mid July from the Bramble Berry family.
Innovate – try new things, be an industry leader (within reason. Don’t neglect your core business while innovating). We took this to heart by purchasing the Heavy Duty Mold line and are now manufacturing soap molds from a warehouse in Bellingham.

The key question for any small business right now is “How do I take control of my business and how do I stabilize?” This is no time at all to be reckless. There is tremendous uncertainty out there and none of it is really known. Cutting without strategy is not the answer. If all you do is cut fat, then muscle, then bone, you will not be prepared to come out of the crisis healthy. You don’t know what to cut unless you’ve thought ahead to say “Where are these opportunities going to be?” What if you lay off your staff only to realize that the economy is bright again but you can’t take advantage of those opportunities? As you think about the opportunities, as you stabilize, be sure you are strategizing at the same time and continue to build your business with precision and focus.
Innovation during this time is going to be critical. “You cannot fix the economy by throwing money at it. It is not a money mess. It is the failure of sustained innovation.”
New leaders often emerge during crisis: 18 of the 30 companies in the Down Jones Industrials were founded during an economic downturn.There are opportunities for those with cash still in this market. However, this can bring another issue up: buying on a whim.
Don’t buy anything just because it’s cheap! Do not ever buy businesses just because they are cheap. It’s like shopping at a discount store and there are discounted stuff on the table and you pick something out and go “I don’t know what I’m going to do with this but it’s SO cheap!” And then you never use it. Don’t buy things you don’t have a clear plan for.
Crisis helps focus business and drive efficiency. It is much easier to teach values of frugality, sacrifice and patience to employees, partners (and your children) during this time of turmoil.
By running your business better, you will start to build more recognition by the fact that you’re a survivor. People will start to flock to you.
If you sit here waiting on the sidelines, you’re going to miss the biggest opportunity of your time. Whether that opportunity is to really lead your company and make it stronger and build your brand around the fact that you’re a survivor, whether you’re seeing those adjacent opportunities, whether you’re cutting back so you can get strong At all times though, keep your eye on why you’re doing what you’re doing, on your strategy. What’s the medium term positioning that’s going to help me think through where I’m going and how do I play defense to make sure I’m strong in the back?
Filed Under: Personal Ramblings
Filed Under: Personal Ramblings


Filed Under: Personal Ramblings


Filed Under: Tips & Tricks
Have you ever had a bar of soap that bleached out in the sun or gradually turned dark brown? If you’re doing outdoor craft fairs this year, this is an especially pertinent topic. In this episode, I’ll show you how to use UV Inhibitor and Vanilla Color Stabilizer to prevent this from happening.
Soap Queen TV Episode 7: How to prevent morphing and fading from Soap Queen on Vimeo.
Listed below are the ingredients I used to make the soaps in this video.
For the Peach soap:
4 oz. clear soap base
Peach labcolor
Peach fragrance
3 grams UV Inhibitor
Owl mold
For the Vanilla Bean Soap:
4 oz. white soap base
3 ml Vanilla Color Stabilizer
3 ml Vanilla Bean fragrance oil
Rectangle mold
Filed Under: Melt & Pour Soap
Step 1: Melt about 16 oz of clear melt and pour soap base. Stir in 1/2 oz of Lavender 40/42 essential oil and about 1/2 tablespoon of light gold mica. Pour soap into your brownie pan or loaf mold. Spritz with rubbing alcohol to eliminate any bubbles.
Tip: To avoid spots and speckles, mix your oxide with a little rubbing alcohol before adding it to the soap base. SoapQueenTV Episode #2 covers mixing oxides (minute 4:00) & using lavender herbs in soap (4:30).
Step 3: For the second layer, melt another 16 oz of clear melt and pour soap base. Mix in 1/2 oz of Lavender 40/42 essential oil and 1/2 tablespoon of ultramarine violet oxide. Spritz the first soap layer with rubbing alcohol to help the two layers adhere. Pour the second layer and spritz again with rubbing alcohol to eliminate bubbles. Let second layer cool.
Step 4: For the third layer, melt 16 oz of white melt and pour soap base. Mix in 1/2 oz Lavender 40/42 essential oil and 1/2 tablespoon of light gold mica. Spritz the second soap layer with rubbing alcohol to help the two layers adhere. Pour the third layer and spritz again with rubbing alcohol to eliminate bubbles.
Step 5: For the fourth and final layer, melt 8 oz of clear melt and pour soap base (we want this layer to be a little thinner than the other layers to really showcase the lavender buds). Mix in 1/4 oz Lavender 40/42 essential oil and between 1/4 – 1/2 cup of lavender buds. Again, spritz the third soap layer with rubbing alcohol to help the two layers adhere. Pour your fourth layer and spritz again with rubbing alcohol to eliminate bubbles. Let cool completely before cutting.
Step 5: Cut these lavender beauties in any shape or size you want. We cut ours with a crinkle cutter and finished them off by putting them in lavender organza bags. Make these as fresh as possible, right before the wedding, because Lavender buds do go brown in soap (eventually). Episode #2 of SoapQueenTV has a shot of an aged Lavender soap around minute 4:47.
Filed Under: Melt & Pour Soap

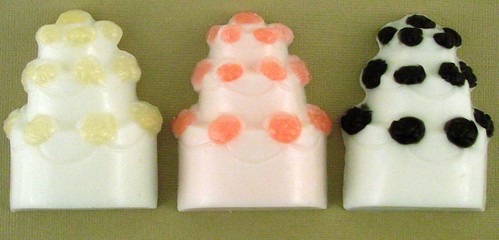
Step 1: Melt 4 oz of clear melt and pour soap base. Add a pinch of light gold mica (or whatever colorant you’re using) and mix together. With your injector tool (droppers will work), fill each little flower on the wedding cake mold with your colored soap. Let the flowers cool.
Tip: When using oxides, to avoid spots and speckles, mix your powdered colorant with a little rubbing alcohol before adding it to the soap base.
Step 2: Melt approximately 8-10 oz of white melt and pour soap base. Mix in ¼ oz White Tea and Ginger fragrance oil and 1/2 tablespoon oflight gold mica (adding the mica is optional, it will give the wedding cake a slight shimmer).
Step 3: Let your soap cool to 120 degrees before pouring your second layer. Spritz the flowers with rubbing alcohol before pouring the second layer to make sure the layers will adhere. Pour your second layer and spritz again with rubbing alcohol to eliminate bubbles. Let the soaps cool for 4-6 hours before popping out of the molds.
Note: If the soap does not cool to 120 degrees, it will melt your flowers in the mold. This would be a shame since getting the flowers perfect takes a bit of effort. So make sure to control the temperature of your soap by heating in 30 second intervals in the microwave.
Hint: For the Pink Wedding Cake Soaps, use the liquid non-bleeding red in the clear soap base for the flowers and the non-bleeding red in the white soap base for the cake. You will only need 1 drop. A little goes a long way when using the non-bleeding red!
Filed Under: Melt & Pour Soap
 What You’ll Need:
Step 1: Melt 8 oz of white melt and pour soap base. Mix in about 1 teaspoon of sparkle gold mica (feel free to use more). Pour between 1/4 inch and 1/2 inch of soap into your brownie pan. Spritz with rubbing alcohol to eliminate bubbles. Let cool completely. This layer will be used for the embedding cut outs pieces.
Tip: To avoid spots and speckles when using powdered oxide colorants, mix your oxides with a little rubbing alcohol before adding it to the soap base.
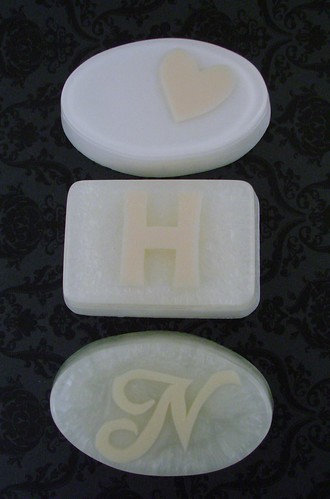
Step 2: Pop the cooled soap out of the mold and prepare to get creative. Cut out initials or hearts using cooking cutters or cut them out free hand (we used an exacto knife). Do whatever your heart desires and put your cut outs aside, they will be needed shortly.
Step 3: Melt 4 oz of clear melt and pour soap base and add 1/4 oz Champagne Fragrance Oil (or fragrance of your bride’s choice).
Step 4: Let the clear soap cool to 120 degrees and pour about 1/8 inch of the clear soap into one cavity of your basic soap mold. Immediately spritz the clear layer with rubbing alcohol and spritz your cut out piece (generously). Place your cut out piece into the liquid clear soap and give it a final spritz to eliminate bubbles. Repeat process in each cavity of your basic soap molds and let the layers cool.
Note: If the soap does not cool to 120 degrees, it will melt your cut-out pieces. So make sure to control the temperature of your soap by heating in 30 second intervals in the microwave and stirring in between heat bursts.
Step 5: It’s time for the second layer. Melt about 16 -20 oz of clear melt and pour soap base. Add 1/2 oz of Champagne fragrance oil and approximately 1/4 teaspoon of light gold mica. Spritz your first layer with rubbing alcohol before pouring your second layer to help the layers adhere. You can choose to fill your mold all the way up or only half way up if you want to create a third layer. The sky is the limit! Let the soaps cool for 4-6 hours before popping out of the molds.
Filed Under: Bramble Berry News
Dog shirts, aprons and regular human shirts – we’ve got it all at the shop. I just got two more t-shirts to wear tomorrow when we film more SoapQueen.tv episodes. We’re filming ‘Back to School’ and ‘4th of July’ episodes tomorrow.
Filed Under: Bramble Berry News
We’ve been hard at work on the technology that powers www.brambleberry.com The photo below is a photo of the new look that the Bramble Berry site will be debuting in July (taken with my favorite business tool – the iPhone). In addition to the facelift, it’s a more inuitive site with a better search function, order tracking and a wish list. It will be fun to share wish lists with eachother.

Filed Under: Melt & Pour Soap
The newest Soap Queen TV Episode is all about the ‘double pour’ technique. I like this soap project because it’s versatile and looks much more complicated as a soap than it is as a technique.
Soap Queen TV Episode 6: The Double Pour from Soap Queen on Vimeo.
Ingredients used for the first project in this episode:
Clear soap base
Orange mica
Light gold mica
Energy fragrance
Loaf mold
Basic shapes mold
Ingredients used for the second project in this episode:
Clear soap base
Copper mica
Merlot mica
Heavy Metal Gold mica
Energy fragrance
Tools for both projects:
Heat safe containers
Spoons
Spray bottle with Rubbing Alcohol
Happy Soaping!