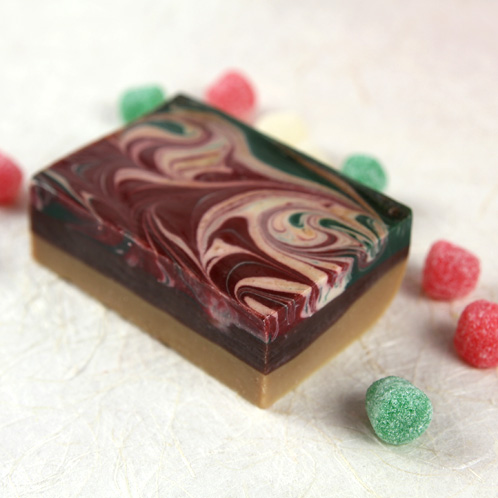
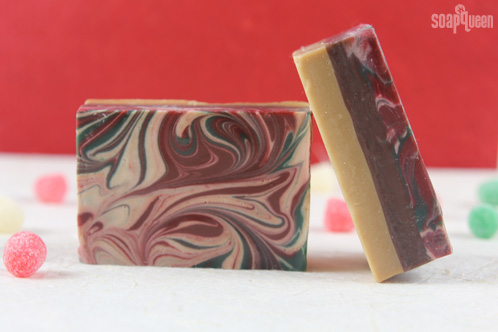
Holiday madness is officially upon us … well, it is if you’re a cold process soaper! I am always so inspired by all the wonderful treats and desserts that show up at yearly holiday parties, and we wanted to try and replicate a delectable holiday treat in soap form. This recipe was inspired by a lovely dessert I came across on Pinterest: soft, doughy cookies with ample fudge and swirled holiday frosting. Delish!
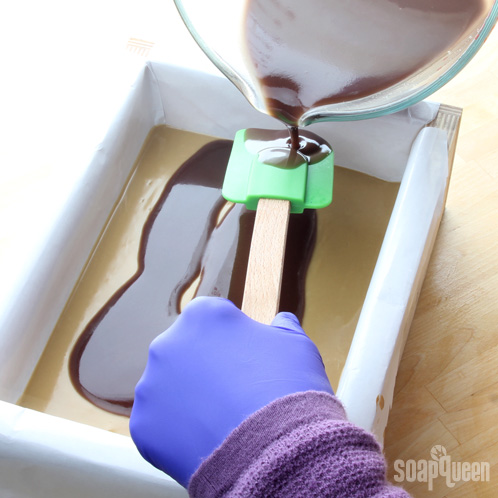
The goal with this soap is to get your layers as straight as possible by using a pour-over-the-spatula technique. We also incorporated the fragrance sample of the month, the delightfully warm Chai Tea Cybilla. It does discolor in cold process soap, which is something we kept in mind when formulating this recipe. In the end, we think the result is just as sweet as the original dessert inspiration!
What you’ll need:
1.6 oz. Avocado Oil
6.4 oz. Coconut Oil
9.6 oz. Olive Oil
6.4 oz. Palm Oil
.96 oz. Palm Kernel Flakes
1.6 oz. Shea Butter
5.4 oz. Sweet Almond Oil
4.4 oz. Sodium Hydroxide
10.5 oz. distilled water
2 oz Chai Tea Cybilla Fragrance Oil
Click here to add everything you need for this project to your Bramble Berry shopping cart!
If you don’t want to make this oil blend from scratch, check out our Swirl Quick Mix. You’ll get the same great swirly results but we mix and assemble the oil for you!
If you’ve never made Cold Process soap before, stop here! I highly recommend checking out our FREE four part SoapQueen.tv series on Cold Process Soapmaking, especially the episode on lye safety. And if you’d rather do some reading, Bramble Berry carries a wide range of books on the topic, including my newest book, Soap Crafting. You can also checkout the digital downloads for that instant gratification factor.
COLOR PREP:
- Dark top – Disperse 1 teaspoon of Dutch Cocoa Powder in 1 tablespoon of liquid oil (we like Sunflower Oil or Sweet Almond Oil). Disperse 1 teaspoon of Yellow Oxide in 1 tablespoon of liquid oil and 1 teapsoon Titanium Dioxide in 1 tablespoon of liquid oil.
- Light brown base – Disperse 1 teaspoons of Cappuccino Mica in 1 tablespoon of liquid oil and 1 additional teaspoon of Dutch Cocoa Powder in 1 tablespoon of liquid oil.
- Swirls – Disperse 1 teaspoon of each colorant (Hydrated Chrome Green, Merlot Mica, Titanium Dioxide and Electric Bubblegum) into 1 tablespoon of liquid oil.
MOLD PREP: Be sure to line your mold with freezer paper (shiny side up!) before you begin. We like using two pieces to cover the length of the mold and one large sheet to cover the width.
SAFETY FIRST: Suit up for safe handling practices! That means goggles, gloves and long sleeves. Make sure kids, pets, and other distractions and tripping hazards are out of the house or don’t have access to your soaping space. Always soap in a well-ventilated area.
ONE: Slowly and carefully add the lye to the water and gently stir until the lye has fully dissolved and the liquid is clear. Set aside to cool.
TWO: Completely melt and combine the Palm oil, Coconut oil, and Palm Kernel Flakes (remember to fully melt then mix your entire container of Palm Oil before portioning). Add the Avocado oil, Olive oil, Sweet Almond oil and Shea butter and stir to combine and gently melt the Shea Butter. Once the lye water and the oils have cooled to 130 degrees or below (and are ideally within 10 degrees of each other), add the lye water to the oils and stick blend until thin trace. If you’d like a harder bar of soap that releases faster from the mold, you can add Sodium Lactate to the cooled lye water. Use 1 teaspoon of Sodium Lactate per pound of oils in the recipe.
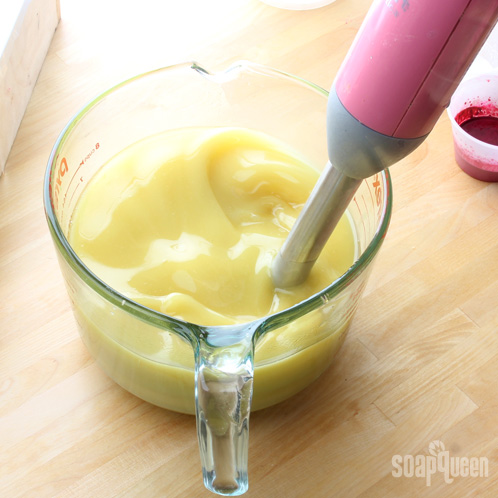
TWO: In a large container, split off 2 cups of batter. This will form the top layer of the cookie. Set it aside for now. In three other smaller containers, pour off 1 – 1.5 cups of batter into each. The batter in these containers will become the swirled colors on top. Set them aside for now.

THREE: In the original container, add 2 teaspoons of dispersed Cappuccino Mica and 1 teaspoon of dispersed Dutch Cocoa Powder. Use a stick blender to get the batter to a thick trace — you want it to be firm enough to hold up the top two layers without breaking through. Add about .5 ounce of fragrance oil to the batter and mix well.
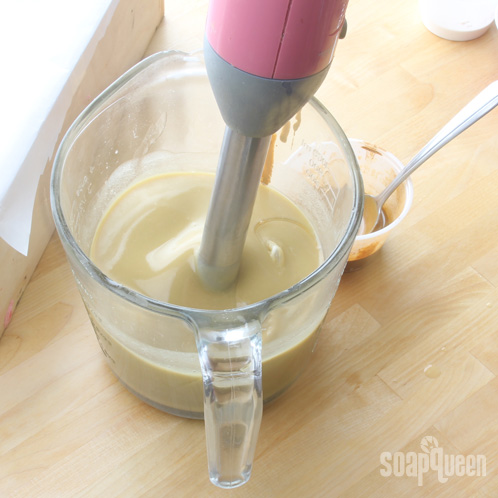
FOUR: Use a spatula to scrape all the batter into the mold. Tamp the mold on the table several times to disperse bubbles and ensure even and level coverage.
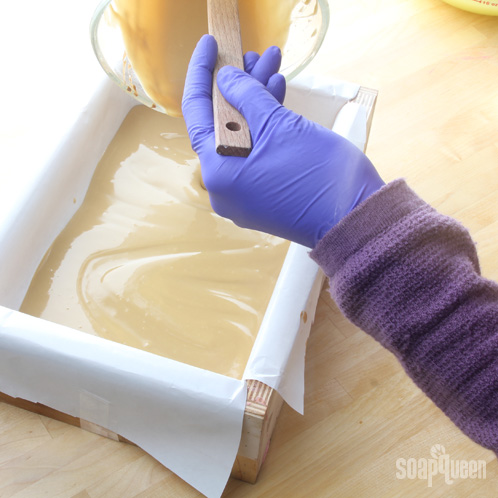
FIVE: Add about 1 ounce of fragrance oil to the large cup of uncolored batter. Mix well with a wire whisk or spatula.
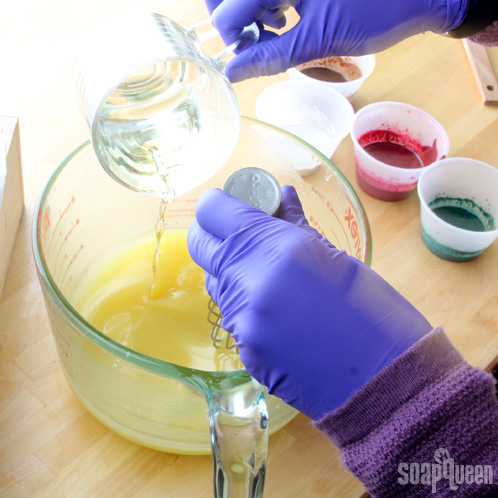
SIX: Add two teaspoons of dispersed Dutch Cocoa Powder, 1 teaspoon of dispersed Yellow Oxide and 1 teaspoon of dispersed Titanium Dioxide. Mix well with a wire whisk or spatula.
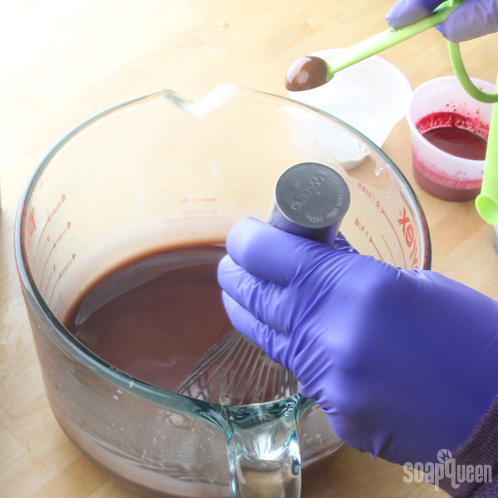
SEVEN: After the color and fragrance have been fully incorporated, carefully pour the dark batter over a spatula into the mold. This will help to keep the layers smooth and straight.
EIGHT: Add 1.5 teaspoons of dispersed Titanium Dioxide to one container of uncolored soap and 1.5 teaspoons dispersed Hydrated Chrome Green to another. In the last container, add 1.5 teaspoons dispersed Merlot Mica and 2 teaspoons dispersed Electric Bubblegum. Mix in the colorants from lightest to darkest with a wire whisk or spatula.
Add the remaining fragrance oil to the green and red cups of soap batter. Do not add any fragrance oil to the white container because it will discolor.
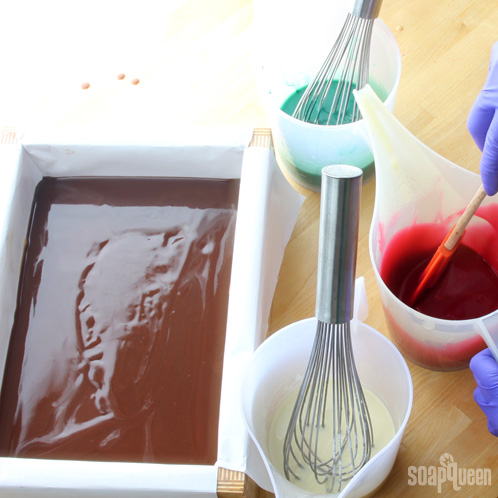
NINE: Pour each color one by one in a horizontal zig-zag pattern across the mold. Repeat the pattern until you’ve used all the batter in each cup.
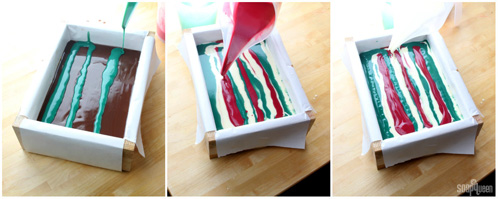
TEN: Instert a chopstick or dowel 1/4 inch into the top of the soap, starting in the bottom left hand corner. Drag the tool through the soap in a vertical zig-zag until you reach the end of the mold.
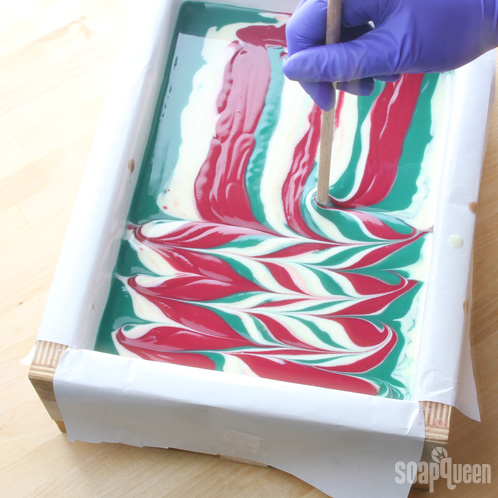
Bonus: Here is an Instagram video demonstrating the first part of the swirl (click the arrow to play).
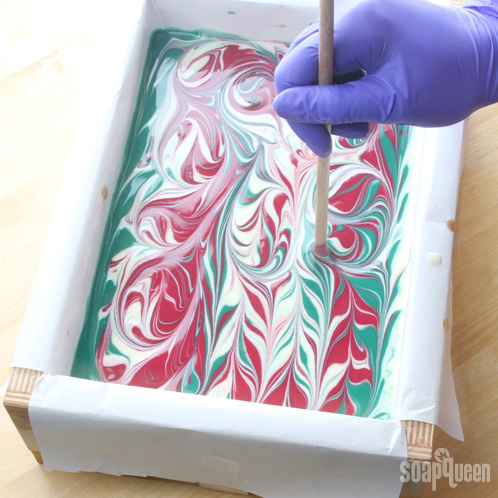
ELEVEN: Beginning in the upper left hand corner, use the tool to make large, swooping loops through the soap, working your way across the mold. Once you end, make loops down the side and then loop your way back across the mold to the right. The idea is to achieve big swirls.
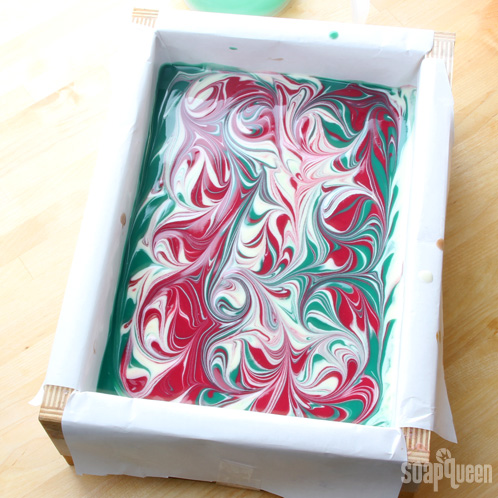
Allow the soap to sit for 5 – 7 days before unmolding. Keep in mind, the Chai Tea Cybilla Fragrance Oil WILL discolor the soap — it’s an example of intentional discoloration (for another great example, check out this Black & Tan Beer Soap tutorial)! The colors will become much more muted than when they were first poured. Allow the soap to cure for 4 – 6 weeks and then cut. Cut the soap horizontally to emphasize the beautiful top swirls and enjoy!

hola soy de México del d,f me gustaría saber si mandan a México sus productos me encantan¡¡¡¡¡
Hi Angy!
We do indeed ship internationally, for more information on our international policies, you can click the link below 🙂
International Policies: https://www.brambleberry.com/Store-Policies-and-Shipping-Info-W11.aspx#International
I hope this helps, Happy Soaping! 🙂
-Amanda with Bramble Berry
I’m fairly new to cold process soap. I have to say I love this site and all the tutorials. I just received everything to make this soap for X-mas gifts, along with my 18 bar mold. My question is if I double this recipe will I get the same results. I had a bad soap batch when it came to making the Apple N Jack recipe. I cut the recipe in half for my mold and it was a disaster. Please help! One good think I have to say your recipe for the Cranberry Chutley sweater tutorial was great. I made them last year and everyone loved them. Thank you!!
Hi Lizzette!
I’m so glad you find our tutorials helpful, and I’m thrilled you have enjoyed delving into the world of soaping! 🙂 You can double the recipe, just make sure to run your new, doubled recipe through a lye calculator. You can find the lye calculator on Bramble Berry’s website in the bottom left corner of the homepage 🙂
Lye Calculator: https://www.brambleberry.com/Pages/Lye-Calculator.aspx
I hope this helps Lizzette! If you get some pictures of your soap, we would love to see them on our Facebook page 🙂
https://www.facebook.com/BrambleBerry
-Amanda with Bramble Berry
I too fell in love with this soap the moment I saw it and just had to make it. I ordered everything I needed to make it (I’ve never made CP soap before) and couldn’t wait yo try it. So I got all my stuff out and ready this morning and every thing was going beautiful until I blended the lye water into the oil. My oils were at 128* and my lye water was 127*. I blended it to thin trace (or what I thought was) and then divided it up and it turned into the consistency of pudding. In an attempt to get my bottom layer pourable again I microwaved it and it turned into this nasty cottage cheese like mess. Where did I go wrong????
Hi Michelle!
We are so excited that you are trying out cold process soap and can’t wait to see how your soaps turn out. Unfortunately, cold process is different than melt and pour in that you cannot microwave it once it has started to set up. Once you’re soap reaches a pudding-like consistency, you will want to start pour it in the molds before it sets up all the way!
If it didn’t turn out the way you expected, we suggest rebatching it, so that you can get a soap that you like. Here is a great video from Anne-Marie on how to do that:
Soap Queen TV Presents: How to Make Rebatch Soap: http://www.soapqueen.com/bath-and-body-tutorials/cold-process-soap/soap-queen-tv-presents-how-to-make-rebatch-soap-2/
For more information on cold process soaping, here is a great blog post on the basic terms of cold process:
Free Beginner’s Guide To Soapmaking: Cold Process: http://www.soapqueen.com/bath-and-body-tutorials/cold-process-soap/free-beginners-guide-to-soapmaking-cold-process/
I hope that this helps! Let us know if there is anything else we can do for you. =)
-Becky with Bramble Berry
Sorry, one more question. Since I was short 5.4 ounces of oil in my recipe, how will that affect my final soap product??
Hi Lisa!
If you didn’t have 5.4 ounces of oil that was called for in your soap and you used the same amounts of lye and water, your soap is going to be lye-heavy and shouldn’t be used on the skin. Once your soap has hardened, I suggest doing the zap test (licking your soap like you would a 9-volt batter). If it zaps your tongue, it is lye-heavy and you will want to use it for laundry soap or rebatch. I hope that this helps! =)
-Becky with Bramble Berry
Lisa:
I also suggest you run your recipe through the lye calculator and include the oil you used for mixing your colors… With my calculations you will just be OK if you used 3.4 oz of oils to mix your colorants.
I always put every recipe through the lye calculator – just in case. When I ran this recipe through, I noticed that it did include the Almond Oil in with the carrier oils, even though the directions never had you add the Almond Oil into the soap (and a total of 3 different people blogged about it, but nothing has been changed).
I hope this helps and hopefully everyone else that uses this recipe will be able to figure it out so they don’t end up with lye-heavy soap too.
That was our bad! The Sweet Almond Oil should have been included in step two. I’m sorry, I misunderstood the first time you pointed it out, Sly. It has now been fixed 🙂
-Kirsten with Bramble Berry
This recipe looks beautiful, but I too did not see the sweet almond oil in the part of the directions that listed what oils to combine. I concluded that the sweet almond oil was just used to mix all the colorants and I was wrong! When I added them all together I said to myself, “there is not enough oil here for a 9 bar recipe.” And sure enough when I tried to divide the batch out into the portions listed I did not have near enough soap. I adjusted as needed and poured a beautiful 9 bar mold. You end by saying this makes 8 bars, but how do I do that in my 9 bar mold with dividers????
It is a beautiful bar of soap, albeit a little skinny :), and I used almond biscotti for the fragrance, which worked wonderfully and reacted similarly to the chai fragrance listed.
A beautiful Christmas bar!
Hi Lisa!
I’ve totally done that before! But we are glad to see that you enjoyed this recipe and can’t wait to see how it turned out for you. Be sure to share any soapy pictures you get with us on Bramble Berry’s Facebook page. =)
Happy Soaping!
-Becky with Bramble Berry
I LOVE this recipe! I used to make peppermint brownies for friends and family and Christmas. Now I’m envisioning modifying this recipe a little bit to get peppermint brownie soap. I love getting tutorials from SoapQueen in my inbox. They always give me new ideas.
Hi Tiffany!
We would love to see how you modify this recipe, the peppermint brownie idea just sounds amazing. Be sure to share any fun soapy pictures that you get with us on Bramble Berry’s Facebook page. =)
-Becky with Bramble Berry
https://www.facebook.com/BrambleBerry
This is a beautiful soap and I can’t wait to make it. Thank you for the fun recipe…
I do find these instructions confusing.
1) It looks to me like all of the Almond oil is used for colorants…that might be helpful to note this.
2) The “top” layer (lighter color) is really the bottom layer of the cookie (plus the swirls are on top). The dark “bottom layer” is really the top layer of the cookie.
3) Why color the lighter layer with cappuccino & cocoa powder? The chai Tea FO will color it much darker than the final photo and then will there really be any contrast between the layers?
4) Also, Why is yellow oxide & TD added to the cocoa powder for the darker layer? That seem counter intuitive – that it would be lightening it up.
Thank you for your clarifications.
Hi Sly,
Wonderful, so excited for you to try this recipe out, it’s a good one. 🙂
Thanks for pointing that out, I’d be happy to clarify!
1. In this recipe, we dispersed all the colorants in Sweet Almond Oil. The oils we list do not include the oil we used to disperse the colorants!
2. That’s a very good observation, and you are correct! When we wrote the tutorial, we wrote it in the order we poured the colored soaps. Because we poured the light layer first, we called that the “top” even though in the final soap it becomes the base. I’ve edited the tutorial to include your suggestions though because I think it makes the instructions much more clear 🙂
3. We added the cappuccino mica and dutch cocoa powder to the bottom layer to give it a slight bit of color. Although the fragrance oil does discolor, we took that into account and added only a small bit in comparison to the dark brown layer (the light layer got .5 oz. as opposed to the dark layer, which got a full ounce.) So, while the light brown layer discolored, the dark brown layer discolored even darker, retaining the contrast between the layers.
4. We added the yellow oxide and titanium dioxide purely for aesthetic reasons. We wanted to get the look of nice, creamy dark chocolate and so we played around with color combinations until we got what we liked! The yellow oxide is actually quite a dark yellow and added warmth to the brown, while the titanium dioxide was just enough to stabilize the brown and kept it from getting too dark.
Thanks again for your questions, and please let me know if this helps. Happy soaping! 🙂
-Kirsten with Bramble Berry
Kristen:
1) In my copy of the recipe the almond oil IS listed with all the other oils, but is only used to disperse the colorants…so I guess this recipe is an exception to your rule.
Thank you for all the other information & clarifications.
you have different oils in your recipe than in your written instructions?
Hi Trisha,
Good catch! We’ve edited the step two instructions and they are now correct 🙂
-Kirsten with Bramble Berry