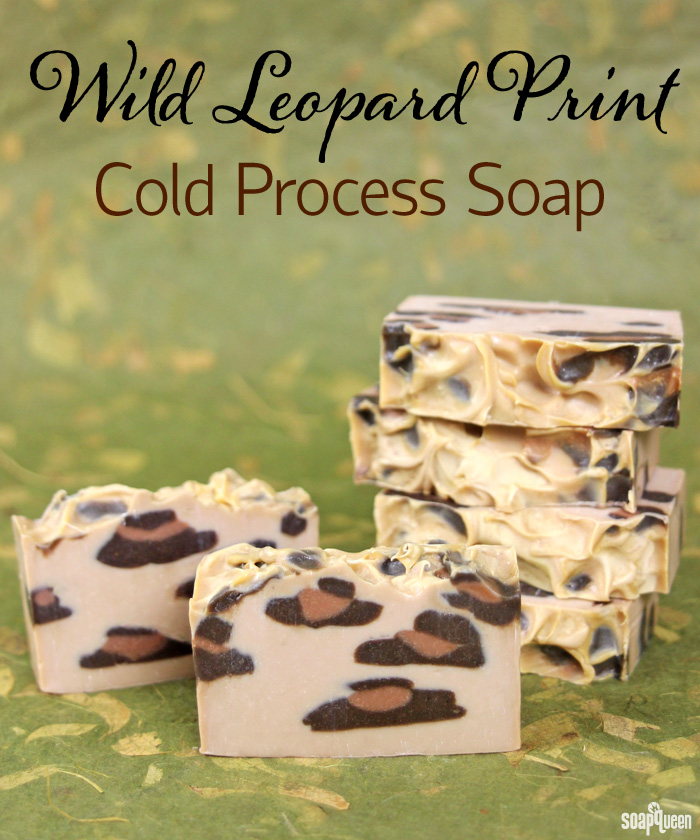
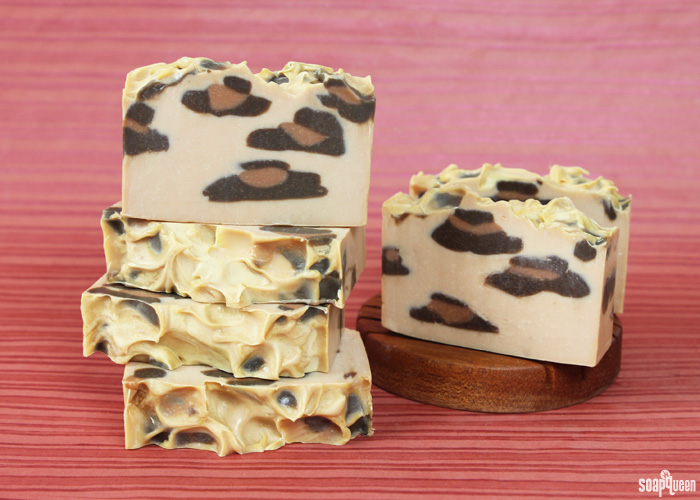
This Wild Leopard Print Cold Process soap was inspired by the beautiful coats of African leopards. This artistic soapy effect requires a thick trace to create the spots inside. Soap is placed in frosting bags and layered on top of each other. Once cut, realistic-looking animal spots are revealed! You can see another example of this technique with fun, bright colors in this Leopard Spots tutorial.
This soap is scented with a warm and smoky blend of Mayan Gold and Black Tea Fragrance Oils. A small amount of Cinnamon Leaf Essential Oil adds spice, and helps create a thick trace, as it accelerates. This soap is made with a great blend of oils and butters, including cocoa butter and tamanu oil. The tamanu oil gives this soap batter a bright yellow color, which works great for this color palette. Click here to learn more about tamanu oil.
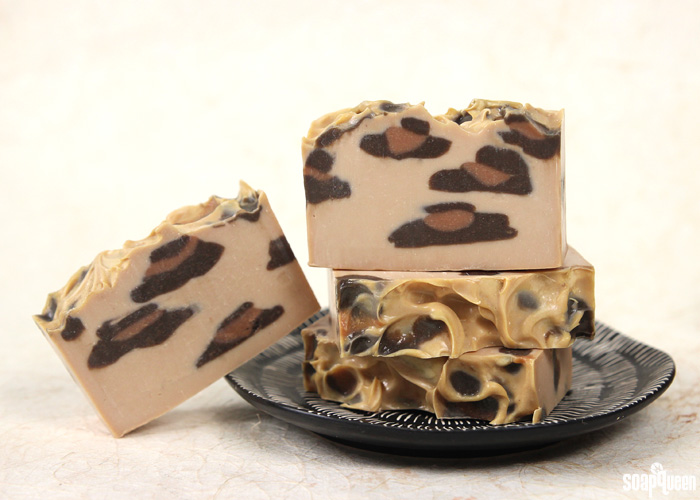
What You’ll Need:
10″ Silicone Loaf Mold
7.2 oz. Canola Oil
2.5 oz. Cocoa Butter
7.2 oz. Coconut Oil
3.6 oz. Hazelnut Oil
5.4 oz. Olive Oil
8.3 oz. Palm Oil
1.8 oz. Tamanu Oil
5 oz. Sodium Hydroxide Lye
11.9 Distilled Water
1.2 oz. Mayan Gold Fragrance Oil
1.2 oz. Black Tea Fragrance Oil
5 mL Cinnamon Leaf Essential Oil
Activated Charcoal
Cocoa Powder
Copper Sparkle Mica
Titanium Dioxide
Two Disposable Bags

Click here to add everything you need for this project to your Bramble Berry shopping cart!
If you’ve never made Cold Process soap before, stop here! I highly recommend checking out our FREE four part SoapQueen.tv series on Cold Process Soapmaking, especially the episode on lye safety. And if you’d rather do some reading, Bramble Berry carries a wide range of books on the topic, including my newest book, Soap Crafting. You can also checkout the digital downloads for that instant gratification factor.
SAFETY FIRST: Suit up for safe handling practices! That means goggles, gloves and long sleeves. Make sure kids, pets, and other distractions and tripping hazards are out of the house or don’t have access to your soaping space. Always soap in a well-ventilated area.
COLOR PREP: To ensure that the Titanium Dioxide blends smoothly into the soap batter, we recommend micronizing it before dispersing it in oil. Please note this is an optional tip but it does help with the titanium dioxide clumping in the soap =) To micronize colorant, simply use a coffee grinder to blend the colorant to break up any clumps of color and prevent streaks of white from showing in the final soap. We like to use a coffee grinder that has a removable, stainless steel mixing area for easy cleaning. Then, disperse 1 teaspoon of the colorant into 1 tablespoon of sunflower or sweet almond oil (or any other liquid oil). In a separate container disperse 1 teaspoon activated charcoal in 1 tablespoon light weight liquid oil. Then, in separate containers disperse 3 teaspoons cocoa powder and 3 teaspoons Copper Sparkle Mica in 3 tablespoons liquid oil. Use a mini mixer to disperse any clumps.
FRAGRANCE PREP: In a glass, fragrance safe container, blend together 1.2 ounces of Mayan Gold Fragrance Oil, 1.2 ounces Black Tea Fragrance Oil and 5 mL Cinnamon Leaf Essential Oil. Set aside.
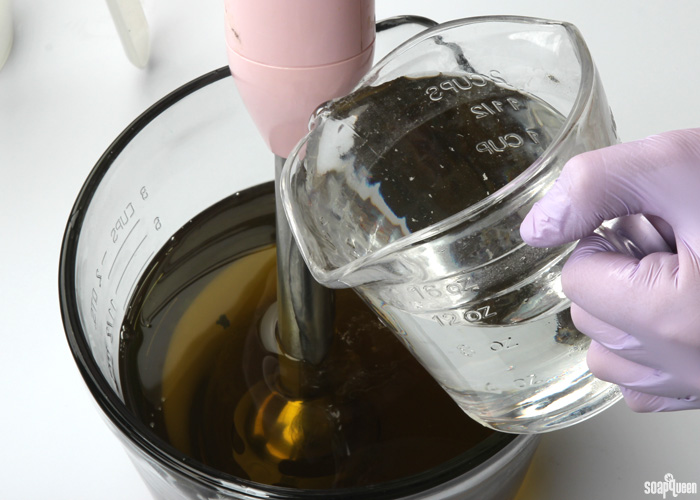
ONE: Slowly and carefully add the lye to the water and gently stir until the lye has fully dissolved and the liquid is clear. Set aside to cool.
TWO: Combine the coconut oil, olive oil, hazelnut oil, tamanu oil, canola oil, palm oil and cocoa butter (remember to fully melt then mix your entire container of palm oil before portioning). Once the lye water and the oils have cooled to 130 degrees or below (and are ideally within 10 degrees of each other), add the lye water to the oils and stick blend until you reach a light trace. If you’d like a harder bar of soap that releases faster from the mold, you can add sodium lactate to the cooled lye water. Use 1 teaspoon of sodium lactate per pound of oils in the recipe. For this recipe, you’d add about 3 tsp. sodium lactate.
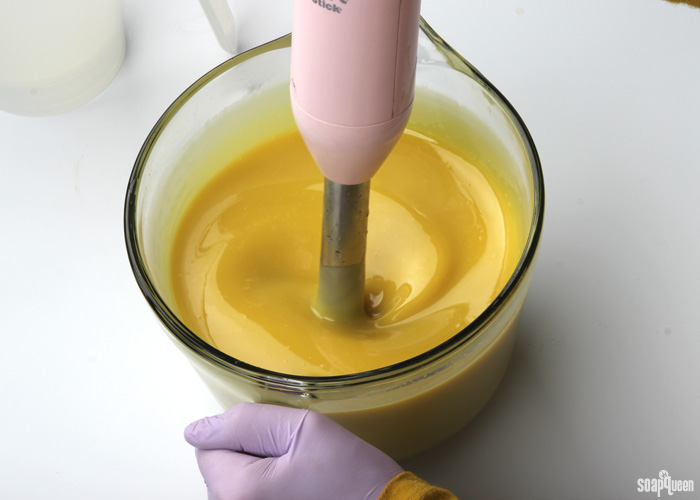 THREE: Once you have reached a thin trace, add the fragrance oil blend and use a whisk to thoroughly mix in.
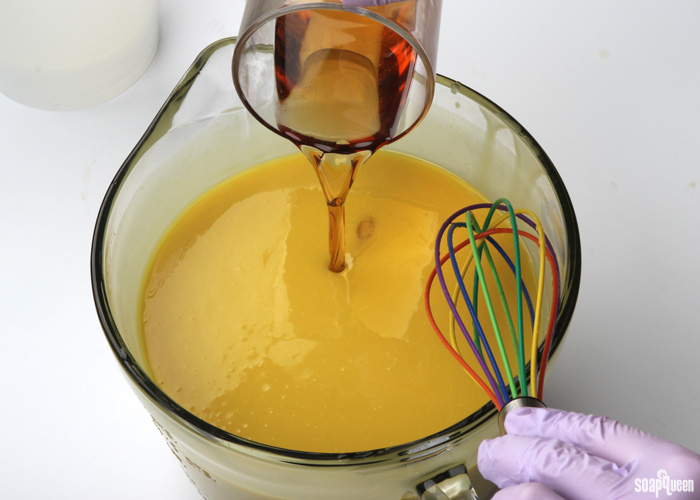
FOUR: Split the soap into three containers. The largest container will contain about 4 cups. The second should measure about 400 mL, and the last should contain about 300 mL.
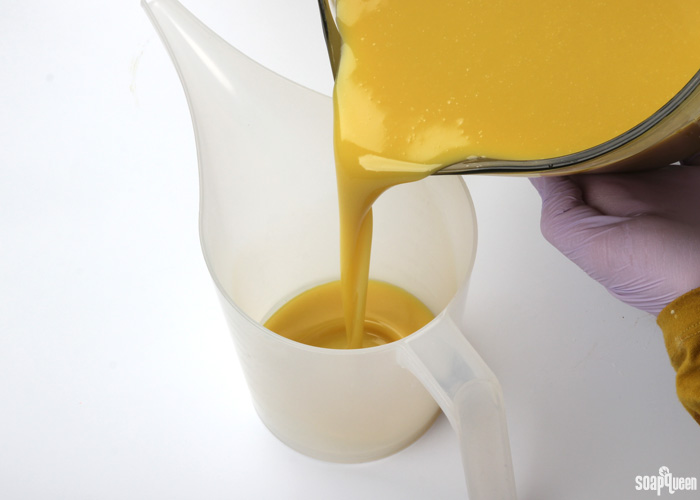
FIVE: To the largest container, add 2 teaspoons dispersed Titanium Dioxide and 1/2 tsp. dispersed Copper Sparkle Mica. Use a whisk to thoroughly mix in the colorants.
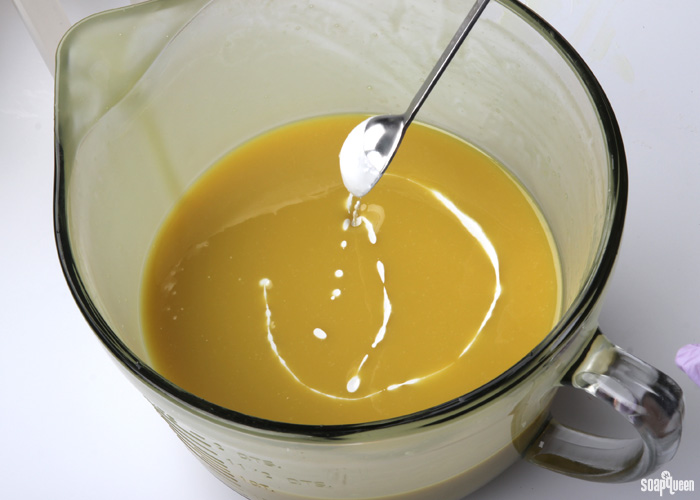
SIX: To the 400 mL container, add 3 teaspoons dispersed cocoa powder, 1/2 teaspoon Copper Sparkle Mica and 1 teaspoon dispersed Activated Charcoal. To the other remaining container, add 1/2 teaspoon dispersed Copper Sparkle Mica and 1/2 teaspoon dispersed cocoa powder. Use whisks to thoroughly mix in the colorants.
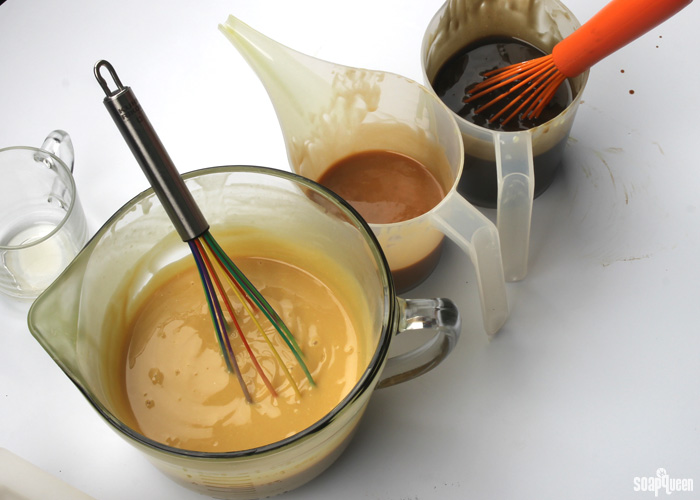
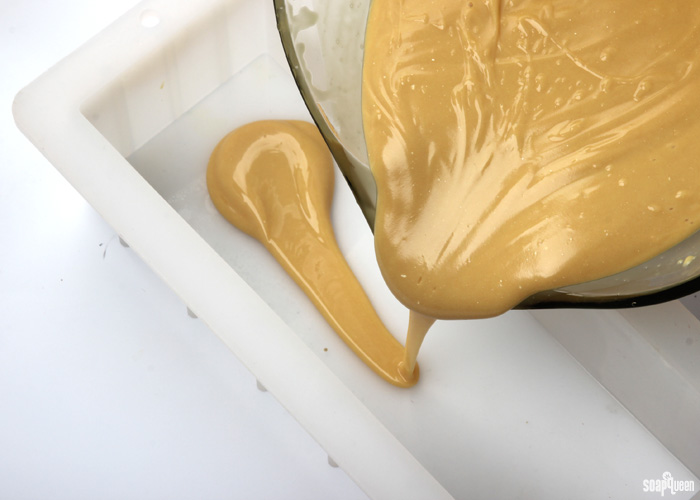
SEVEN: Pour a thin layer of the lightest soap into the mold. You only need to pour enough soap to create a thin layer. Tap the mold on the counter to release any bubbles, and set aside.
EIGHT: You need both darker colored soaps to be a nice thick texture. You want the soap to be thick enough to hold its shape when squeezed out of the disposable bags. If your soap is already thick, proceed to step nine. If not, use a stick blender to blend the colors until they have reached a thick pudding texture.
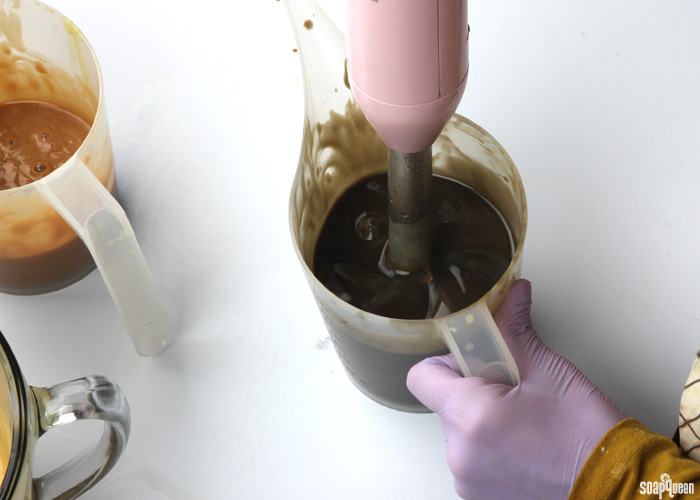
NINE: Use a large spoon to transfer the darker colored soap into separate disposable frosting bags. You may want to have empty containers handy to place the bags in when you’re not using them. Use scissors to cut the tip of the bag to create a hole about 1/2 inch across into each bag.
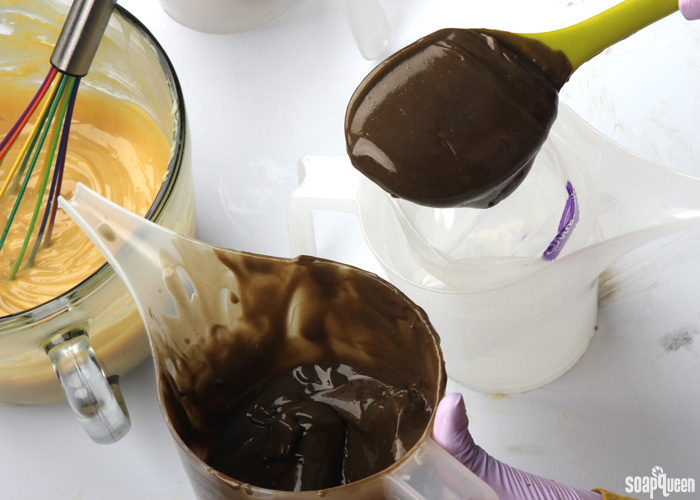
TEN: Starting in the lower left corner of the mold, squirt the brown soap diagonal across the mold until you reach the other side. Continue to create lines parallel to each other about 2-3 inches apart down the entire length of the mold. I was able to make 5 lines. Depending on how big you made the hole in your disposable bag, you may want to thicken the line with additional passes.
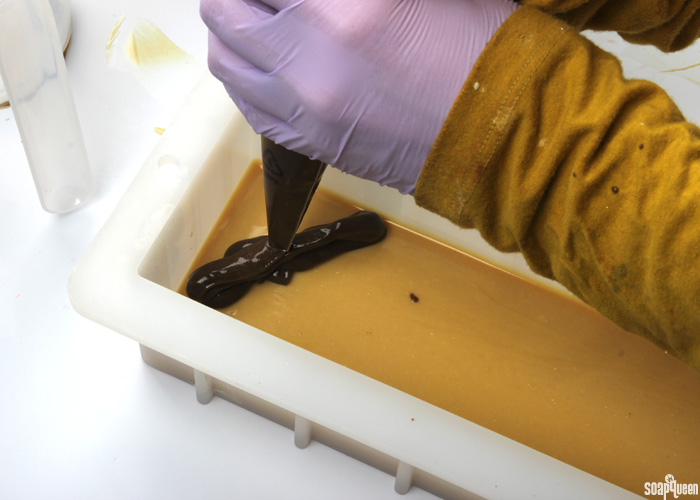
ELEVEN: After you have made lines with the dark soap, place a smaller line in the center with the medium tan colored soap. You don’t want this to be the same width, this line should be slightly thinner.
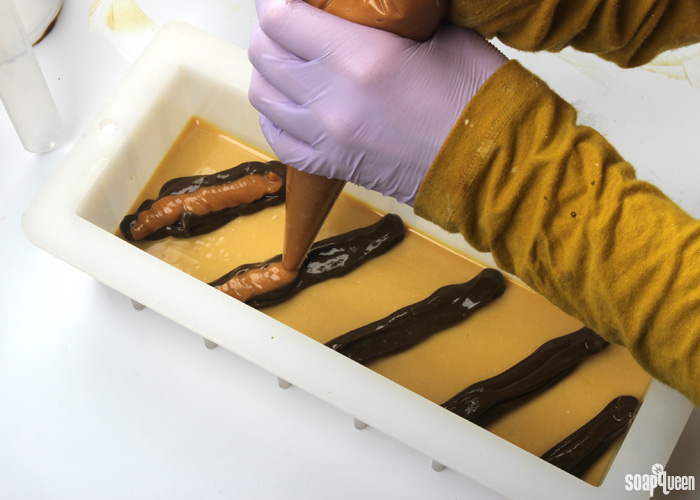
TWELVE: Then, cover the medium tan lines with the dark brown. Don’t worry about the medium tan line being perfectly covered!
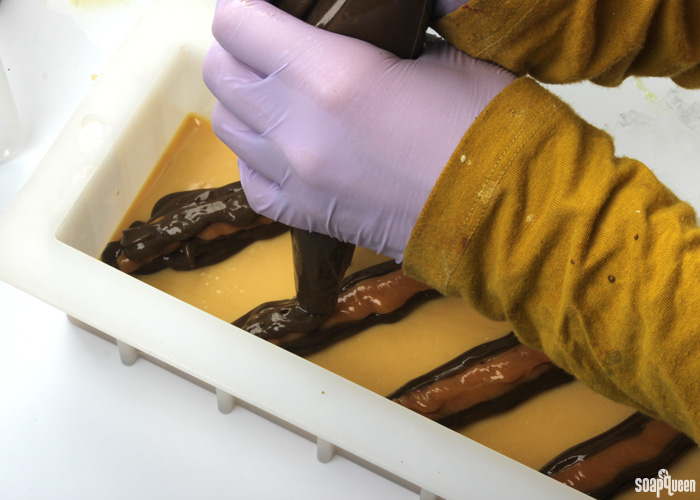
THIRTEEN: Using a large spoon, place the light colored soap in between each line. Place enough soap in between to make the soap all one height. Tap gently, and begin to cover the lines with the lightly colored soap. Don’t fill the mold up all the way, only add enough light tan soap until the lines are just covered. Use the spoon to even out the layer.
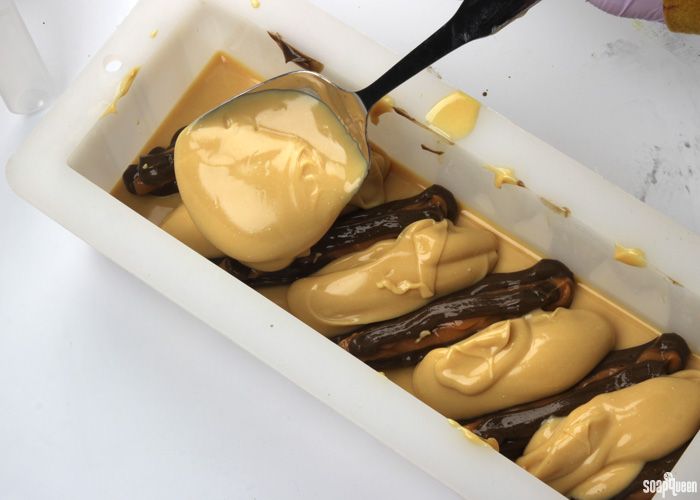
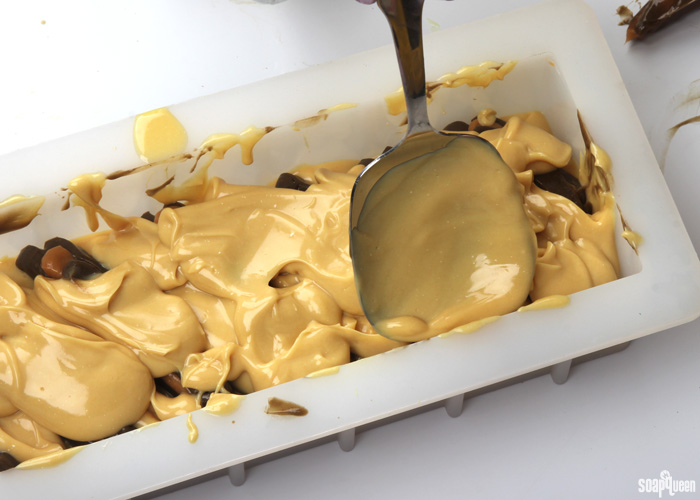
FOURTEEN: Repeat the process of making lines with the dark colored soap diagonally down the length of the mold. The lines should go in the opposite direction as the first layer. Then, cover the dark lines with a thinner line of medium tan soap. Cover each line with dark brown soap, then fill in each space with light tan soap, then cover. Repeat this process once more for a total of three layers.
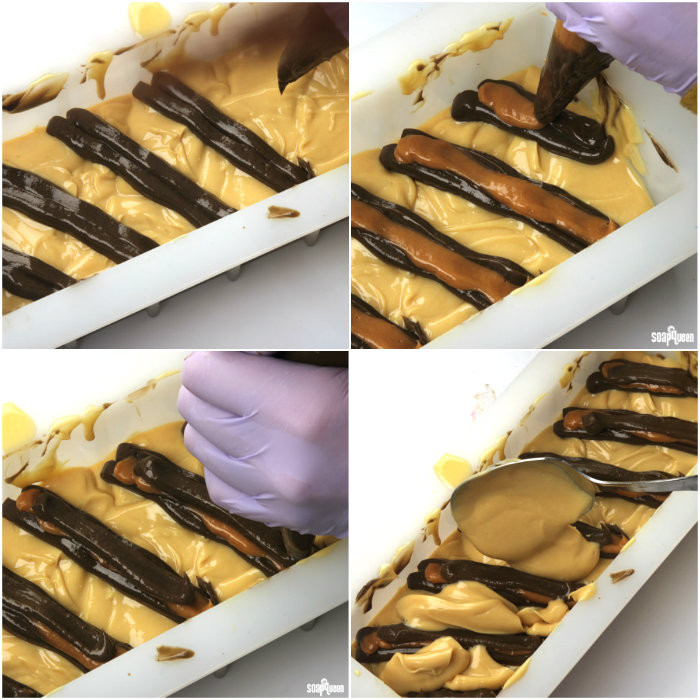
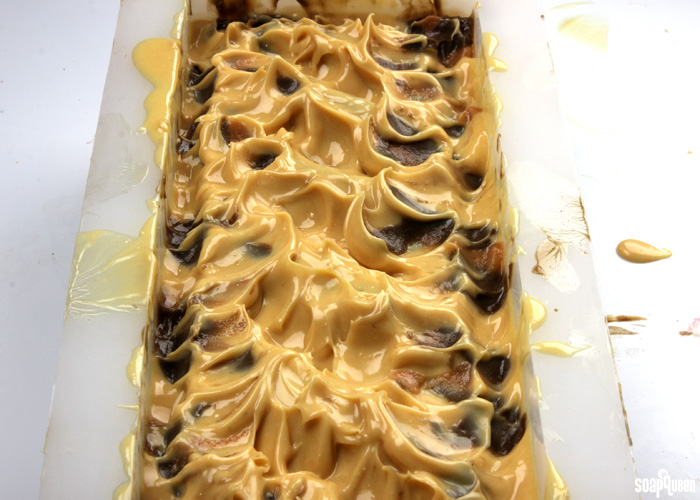
FIFTEEN: Once the last layer has been covered with light tan soap (scrape every last bit out of your bowl!), gently disperse the light tan soap evenly. Then, use your spoon to create peaks and texture. Be careful not to disturb the layers below.
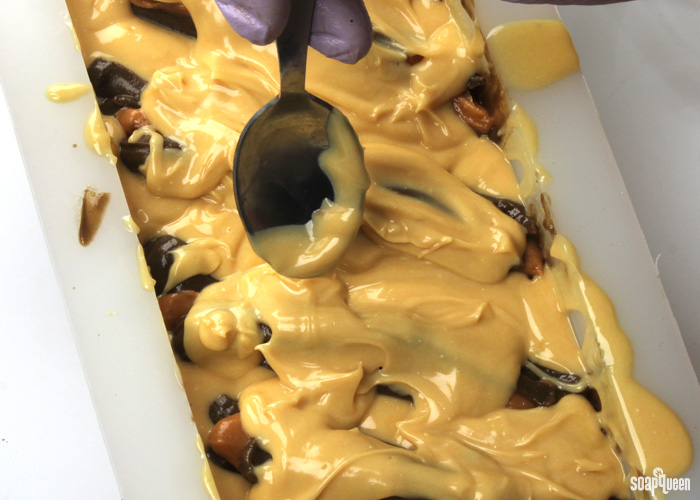 Once you are happy with the texture on top, spray the soap with 99% isopropyl alcohol to help eliminate soda ash. Continue to spray every 15 minutes for the first hour the soap is in the mold. Doing so forms a layer that really helps fight away pesky soda ash. Allow the soap to sit in the mold for 3-4 days. Unmold, cut and allow to cure for 4-6 weeks. Enjoy!
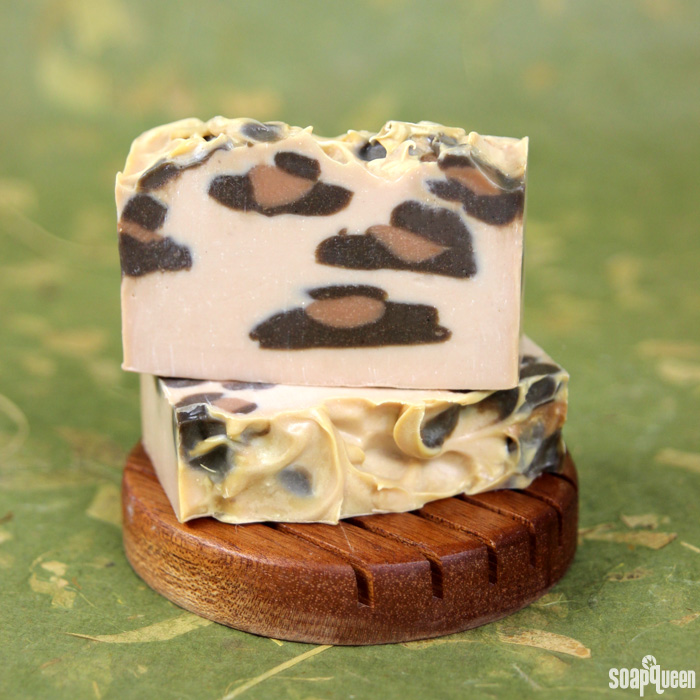 Do you prefer to work with a thin or thick trace? I usually use a thinner trace to make swirls, so a design that requires a thick trace like this is a nice change.
- 10″ Silicone Loaf Mold
- 7.2 oz. Canola Oil
- 2.5 oz. Cocoa Butter
- 7.2 oz. Coconut Oil
- 3.6 oz. Hazelnut Oil
- 5.4 oz. Olive Oil
- 8.3 oz. Palm Oil
- 1.8 oz. Tamanu Oil
- 5 oz. Sodium Hydroxide Lye
- 11.9 Distilled Water
- 1.2 oz. Mayan Gold Fragrance Oil
- 1.2 oz. Black Tea Fragrance Oil
- 5 mL Cinnamon Leaf Essential Oil
- Activated Charcoal
- Cocoa Powder
- Copper Sparkle Mica
- Titanium Dioxide
- Two Disposable Bags
- Slowly and carefully add the lye to the water and gently stir until the lye has fully dissolved and the liquid is clear. Set aside to cool.
- Combine the coconut oil, olive oil, hazelnut oil, tamanu oil, canola oil, palm oil and cocoa butter (remember to fully melt then mix your entire container of palm oil before portioning). Once the lye water and the oils have cooled to 130 degrees or below (and are ideally within 10 degrees of each other), add the lye water to the oils and stick blend until you reach a light trace. If you’d like a harder bar of soap that releases faster from the mold, you can add sodium lactate to the cooled lye water. Use 1 teaspoon of sodium lactate per pound of oils in the recipe. For this recipe, you’d add about 3 tsp. sodium lactate.
- Once you have reached a thin trace, add the fragrance oil blend and use a whisk to thoroughly mix in.
- Split the soap into three containers. The largest container will contain about 4 cups. The second should measure about 400 mL, and the last should contain about 300 mL.
- To the largest container, add 2 teaspoons dispersed Titanium Dioxide and ½ tsp. dispersed Copper Sparkle Mica. Use a whisk to thoroughly mix in the colorant.
- To the 400 mL container, add 3 teaspoons dispersed cocoa powder, ½ teaspoon Copper Sparkle Mica and 1 teaspoon dispersed Activated Charcoal. To the other remaining container, add ½ teaspoon dispersed Copper Sparkle Mica and ½ teaspoon dispersed cocoa powder. Use whisks to thoroughly mix in the colorants.
- Pour a thin layer of the lightest soap into the mold. You only need to pour enough soap to create a thing layer. Tap the mold on the counter to release any bubbles, and set aside.
- You need both darker colored soap to be a nice thick texture. You want the soap to be thick enough to hold it’s shape when squeezed out of the disposable bags. If your soap is already thick, proceed to step nine. If not, use a stick blender to blend the colors until they have reached a thick pudding texture.
- Use a large spoon to transfer the darker colored soap into separate disposable frosting bags. You may want to have empty containers handy to place the bags in when you’re not using them. Use scissors to cut a hole about ½ inch across into each bag.
- Starting in the lower left corner of the mold, squirt the brown soap diagonal across the mold until you reach the other side. Continue to create lines parallel to each other about 2-3 inches apart down the entire length of the mold. I was able to make 5 lines. Depending on how big you made the hole in your disposable bag, you may want to thicken the line with additional passes.
- After you have made your lines with the dark soap, place a smaller line in the center with the medium tan colored soap. You don’t want this to be the same width, this line should be slightly thinner.
- Then, cover the medium tan lines with the dark brown. Don’t worry about the medium tan line being perfectly covered!
- Using a large spoon, place the light colored soap in between each line. Place enough soap in between to make the soap all one height. Tap gently, and begin to cover the lines with the lightly colored soap. Don’t fill the mold up all the way, only add enough light tan soap until the lines are just covered. Use the spoon to even out the layer.
- Repeat the process of making lines with the dark colored soap diagonally down the length of the mold. The lines should go in the opposite direction as the first layer. Then, cover the dark lines with a thinner line of medium tan soap. Cover each line with dark brown soap, then fill in each space with light tan soap, then cover. Repeat this process once more for a total of three layers.
- Once the last layer has been covered with light tan soap (scrape every last bit out of your bowl!), gently disperse the light tan soap evenly. Then, use your spoon to create peaks and texture. Be careful not to disturb the layers below.
- Once you are happy with the texture on top, spray the soap with 99% isopropyl alcohol to help eliminate soda ash. Continue to spray every 15 minutes for the first hour the soap is in the mold. Doing so forms a layer than really helps fight away pesky soda ash. Allow the soap to sit in the mold for 3-4 days. Unmold, cut and allow to cure for 4-6 weeks. Enjoy!


Well! This was a challenge! I just finished putting the soap to “bed” for now. The trace was a nice change to work with but the bags…well…I made a royal mess! I took color bottles and put the colors in there. It worked much better for me but had way too much of the accent colors left over. I got creative for the top because I didn’t want to throw away perfectly good soap. It looks very cool and I hope it’s just as when I cut this bad boy open. I’ll totally make it again. This time, I will know what works better for me and also I’ll change the smell. I wasn’t a fan; everyone else was so I sucked it up. Thanks for this one. It was fun.
That’s awesome Liz, glad you had fun making this soap! If you get a picture of it cut, feel free to share on our Facebook page. 🙂
Bramble Berry Facbeook page: https://www.facebook.com/BrambleBerry/
-Kelsey with Bramble Berry
Hi am wanting to try this awesome looking design! I prefer to use your ready made base and just wanted to check my conversions with you. Should I use 37 oz of base, 2.4 oz & 5 ml of fragrance oil, 11.9 oz distilled water and 5 oz Sodium Hydroxide Lye?
Hi Melissa!
I can definitely help double check those amounts! What base are you using? The reason I ask is because each Quick Mix has different oils, so the lye amount can vary slightly. 🙂
-Kelsey with Bramble Berry
Sunday Night Spotlight: Quick Mixes: http://www.soapqueen.com/bath-and-body-tutorials/tips-and-tricks/sunday-night-spotlight-quick-mixes/
I finally made this today. I had a ton of the light brown (innie) color left over, and not nearly enough of the light/base color so I ended up topping the whole thing with the innie color. I think I also forgot to alter the direction of my stripes. Oh well! I’m pretty new to soaping, and I just kept telling myself “it’s only soap!” And Hiccups aside, this was really fun and challenging to make. I’ve never used frosting bags before – not even for frosting! I can’t wait to see how it turns out. I was super dubious about the fragrance – in the bottles I really didn’t care for any of them, but put together they smell great! I can’t wait to use these bars. Thanks for the fun!
Hi Suzanne!
The great thing about soap is getting to cut it and see the interesting pattern inside! Even if it wasn’t the exact design, it will still look amazing. Plus it’s a ton of fun to make. Also, isn’t that scent blend interesting? The fragrances go so well together. 🙂
-Kelsey with Bramble Berry
What a lovely fuzzy feeling just looking at the soap. Love it. simonsnaturalsoaps.com
So glad you love it Jenny! I’m a big fan too. 🙂
-Kelsey with Bramble Berry
lovely lovely lovely.
Dear Soap Queen.
I live here in the western end of South Africa. I don’t miss a single new adventure that you share with us…what I would as you…as I am from the wild Africa…..we have the big five as our very famous tourist attraction…what are the chance of making some sort of soap for the Elephants and the lions.
just asking.
xxx
Hi Sylvia!
So glad you like the soap! We do have an animal print melt and pour tutorial coming out tomorrow you make like! We’ll also keep an elephant and lion soap in mind. Thanks so much for your suggestion. 🙂
-Kelsey with Bramble Berry
I wish you would make this into a video on youtube as well.
Thanks so much for your suggestion Sharon! We’ll definitely keep that in mind for future Soap Queen TV videos. 🙂
-Kelsey with Bramble Berry
Soap Queen TV: youtube.com/user/soapqueentv
Absolutely in love with the look of this soap, gorgeous! I was wondering.. what other oils can tamanu oil and hazelnut oils be the substituted with? Unfortunately I don have the mentioned ones on hand.
So glad you love the look of the soap Sandra!
For tamanu oil, you can substitute neem or pumpkin seed oil. For hazelnut, you can sub grapeseed oil or apricot kernel oil. Those oils have similar properties. If you don’t have those oils on hand, you can increase the olive oil and canola oil to cover the difference. Just make sure to run your recipe through the Lye Calculator again: https://www.brambleberry.com/Pages/Lye-Calculator.aspx
Read more about substituting oils in your recipe here: http://www.soapqueen.com/bath-and-body-tutorials/tips-and-tricks/how-to-substitute-oil-in-cold-process-recipes/
-Kelsey with Bramble Berry
Pumpkin seed oil: https://www.brambleberry.com/Pumpkin-Seed-Oil-P5894.aspx
Grapeseed oil: https://www.brambleberry.com/Grapeseed-Oil-P6029.aspx
Apricot kernel oil: https://www.brambleberry.com/Apricot-Kernel-Oil-P3206.aspx
Thank you so much for your help. I can’t wait to make this soap as soon as my lye from brambleberry gets here!
Thank you again!
You’re welcome! Have fun soaping. 🙂
-Kelsey with Bramble Berry
This is so cute. My mother-in-law loves anything that has a leopard print. I will make this soap for her as a gift. This will really make her day.
So glad you like the soap Jocelyn! Also, this would make an amazing gift for your mother-in-law. I think she will love it. 🙂
-Kelsey with Bramble Berry
I did a technique similar to this one with a black and white cow pattern. This will be a neat one to try!
It’s a really fun technique, and the final bars look so cool! I bet your soap looks fantastic. 🙂
-Kelsey with Bramble Berry