
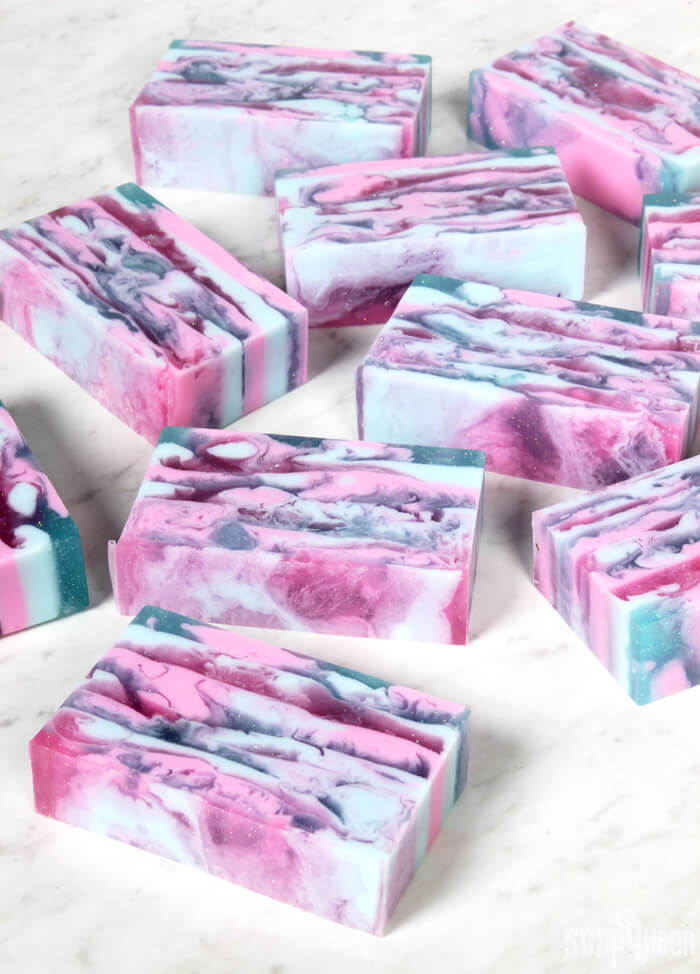
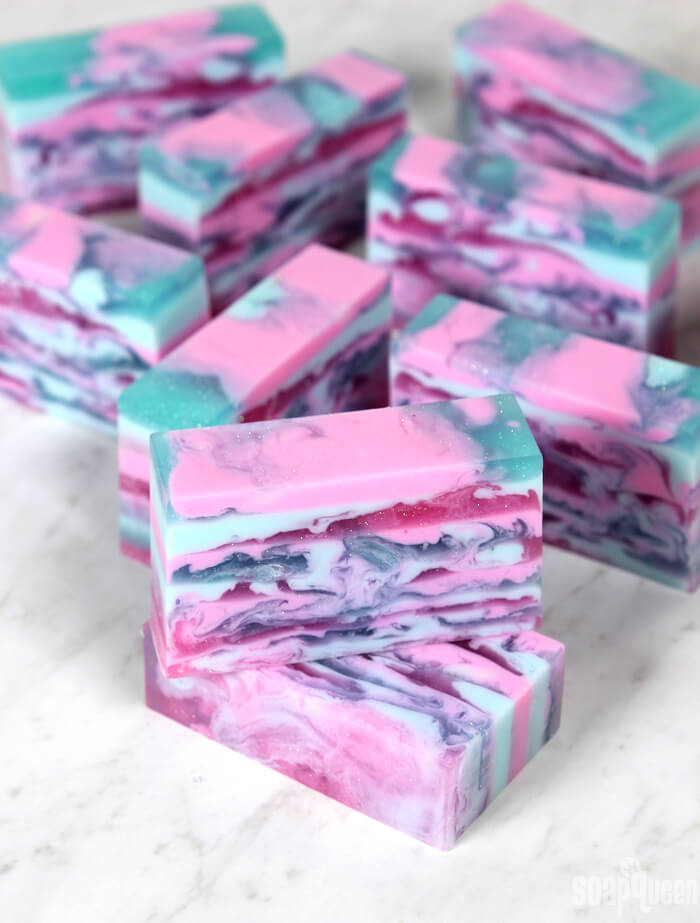
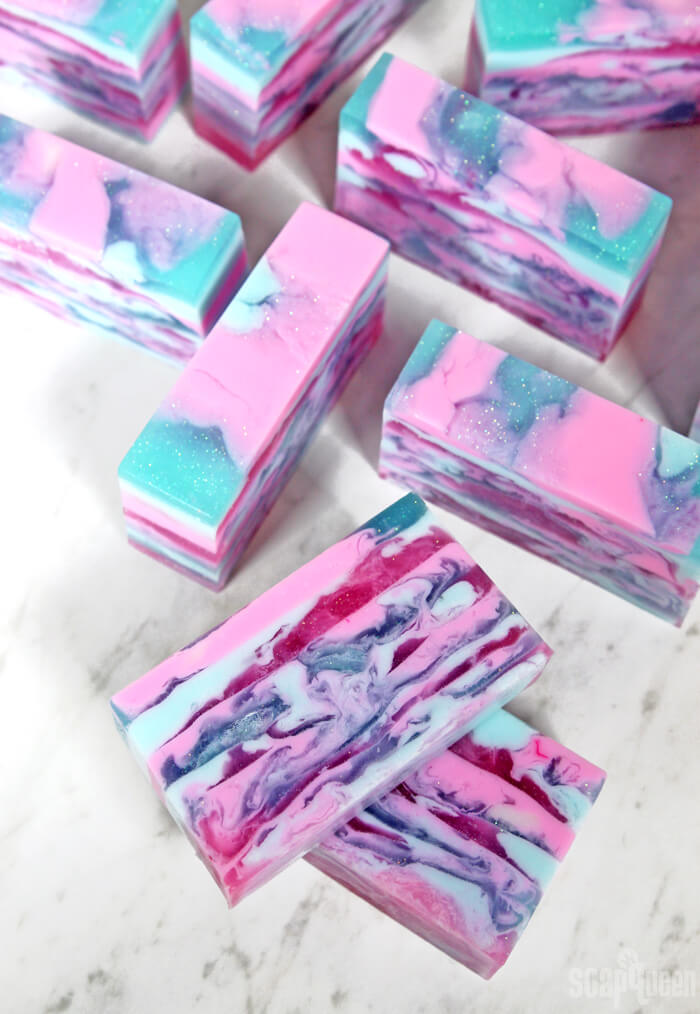
When I think of cotton candy, memories of eating the sticky treat at the fair instantly come to mind. I also think about the dreamy pink and blue pastel shades (Pantone 2016 colors of the year anybody?). The Cotton Candy Fragrance Oil smells just like the real thing. So much so that I had to create soap with cotton candy inspired pink and blue pastel colors.
The pink and blue shades are created by mixing Neon Blue Raspberry Color Block and Electric Bubble Gum Color Block with White Melt and Pour Soap Base. For contrast, I also added the Color Blocks to Clear Melt and Pour Soap Base, along with plenty of glitter. The soap is swirled together while layering for an eye-catching effect. It looks a little space-like, don’t you think? Like a cotton candy galaxy! =)
This melt and pour project isn’t difficult necessarily, but it does require an understanding of how melt and pour soap behaves at different temperatures. If you’ve never swirled melt and pour soap before, see my tips here. I definitely recommend having a thermometer for this project to check temperatures. A spray bottle of 99% isopropyl alcohol is also a must. Without spraying alcohol before each layer, they may not stick together. This project is great for making with a friend! It can be nice to have somebody keeping an eye on melt and pour temperatures, and to help spray the alcohol after each step.
What You’ll Need:
10″ Silicone Loaf Mold
26 oz. Clear Melt and Pour Soap Base
26 oz. White Melt and Pour Soap Base
0.4 oz. Cotton Candy Fragrance Oil
0.4 oz. Vanilla Color Stabilizer
Neon Blue Raspberry Color Block
Electric Bubble Gum Color Block
1/2 tsp. Fine Iridescent Glitter
99% Isopropyl Alcohol in Spray Bottle

Click here to add everything you need for this project to your Bramble Berry shopping cart!

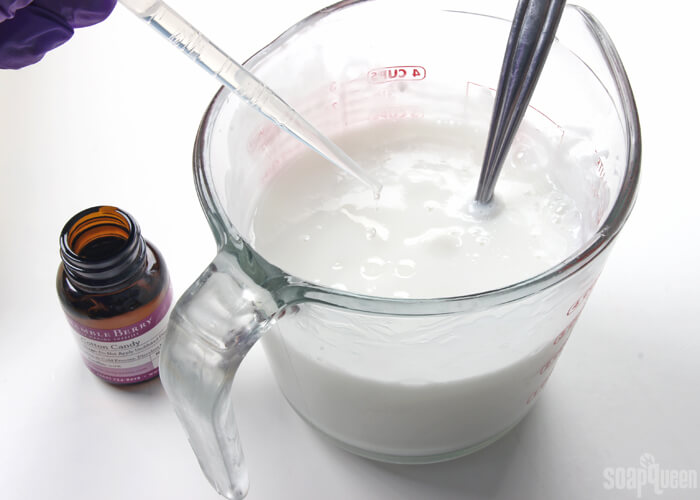
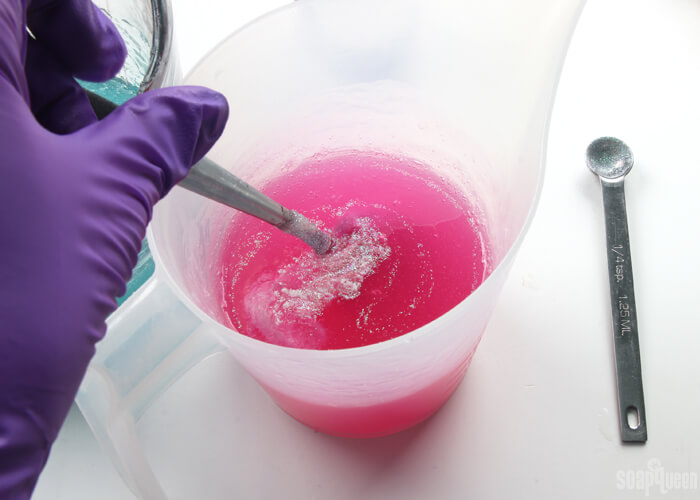
ONE: Chop 26 ounces of White Melt and Pour Soap Base and 26 ounces of Clear Melt and Pour Soap Base into small uniform cubes. Place them in the microwave and melt both containers using 30-60 second bursts. Once melted, add 0.2 ounces of Cotton Candy Fragrance Oil and 0.2 ounces Vanilla Color Stabilizer to both containers and use a spoon to mix in thoroughly.
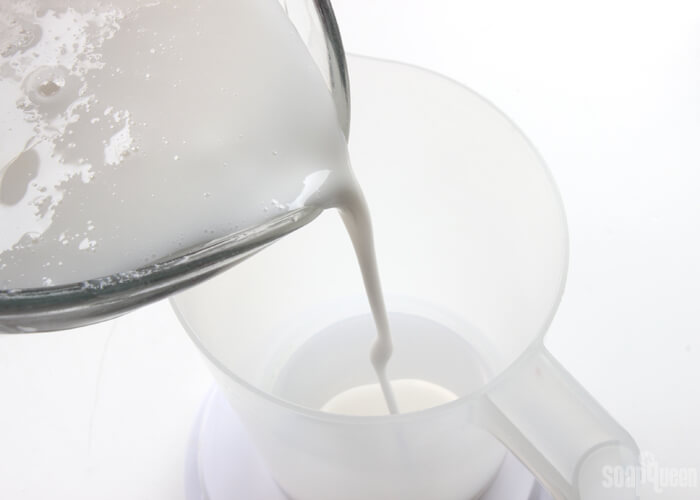
TWO: Split both containers in half so you have two containers of white soap and two containers of clear soap. All containers should weigh about 13 ounces. Add shavings of the Neon Blue Raspberry Color Block to one container of white soap and one container of clear soap. Add shavings of the Electric Bubble Gum Colorant to one container of clear soap and one container of white soap. Use a spoon to mix in the colors. If necessary, place the containers back into the microwave using 10-15 second bursts to fully melt the Color Blocks.
THREE: You now have four colors of soap: pastel pink, hot pink, pastel blue and vibrant blue. Add 1/4 teaspoon of Fine Iridescent Glitter to both containers of clear soap, and use a spoon to thoroughly mix in.
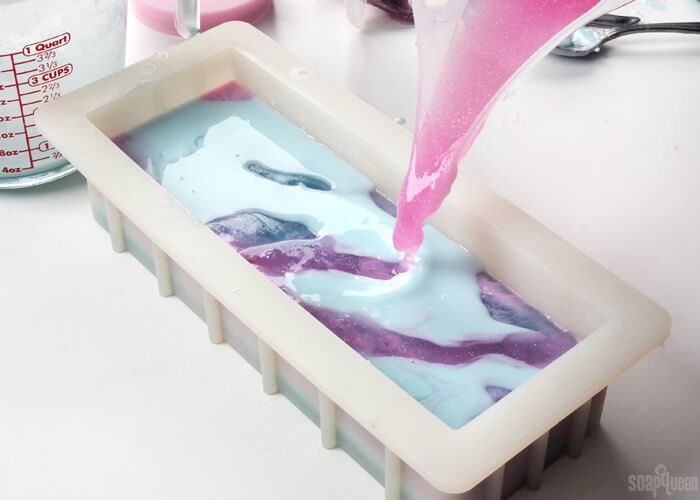
FOUR: It’s time to start pouring and swirling! Check the temperatures of the soap, each container should be about 120-130 ° F. Pour a thin layer of the clear blue soap into the mold, just enough to cover the bottom. Spritz with alcohol to help get rid of bubbles, and pour pastel pink soap on top in random areas and spritz with alcohol. Allow this layer to cool and harden for about 3 minutes. In this time it will develop a thin skin. This will help the soap poured on top stay more separate, and prevent the colors from muddling together.
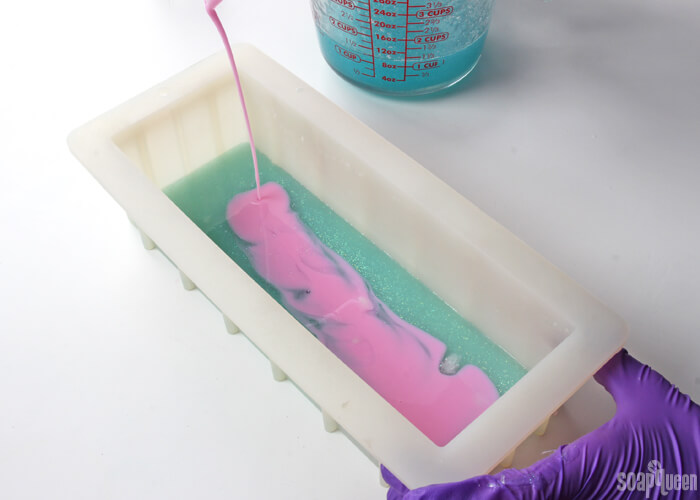
FIVE: If necessary, place the hot pink soap and pastel blue soap back in the microwave until about 125 ° F and fluid. Spritz the soap in the mold with alcohol to help the layers stick together. Pour a thin layer of the pastel blue, spritz with alcohol to get rid of bubbles, then pour hot pink soap in random areas to create a swirl effect. Spritz with alcohol to get rid of bubbles, and allow to cool and harden for 3-4 minutes.

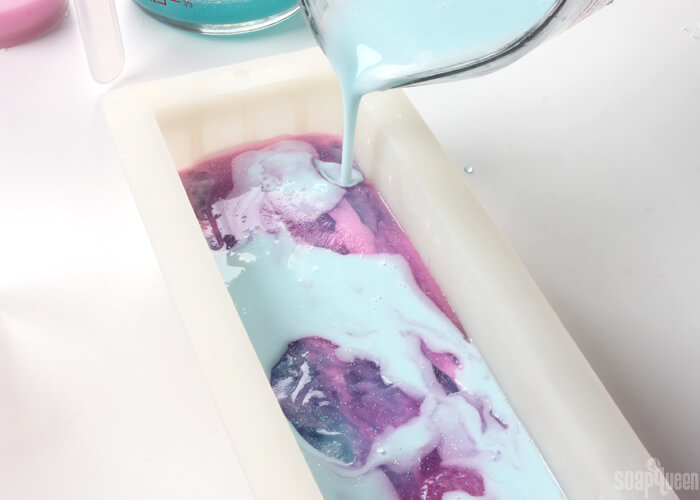
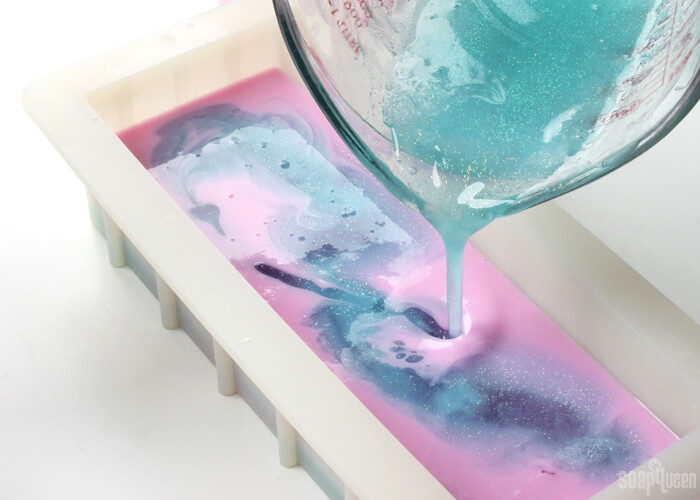
SIX: Repeat this process until all the soap is used up. I recommend always pouring one color made with white soap (the pastel blue and pastel pink) along with one color made with clear soap (vibrant pink and vibrant blue). Pouring these colors together helps make the swirl more eye-catching, and prevents the colors from muddling together.
SEVEN: Once all the soap has been poured into the mold, allow it to fully cool and harden for about 5 hours, or up to overnight. It’s tempting to cut into the soap while it’s still warm, but don’t do it! I have found layers are more likely to separate when I cut into hard, yet still slightly warm melt and pour. Once cut into bars, cover in plastic wrap to help avoid glycerin dew. Enjoy!

Cosmic Cotton Candy Swirl Soap Tutorial
Ingredients
- 10 ″ Silicone Loaf Mold
- 26 oz. Clear Melt and Pour Soap Base
- 26 oz. White Melt and Pour Soap Base
- 0.4 oz. Cotton Candy Fragrance Oil
- 0.4 oz. Vanilla Color Stabilizer
- Neon Blue Raspberry Color Block
- Electric Bubble Gum Color Block
- 1/2 tsp. Fine Iridescent Glitter
- 99 % Isopropyl Alcohol in Spray Bottle
Instructions
- Chop 26 ounces of White Melt and Pour Soap Base and 26 ounces of Clear Melt and Pour Soap Base into small uniform cubes. Place them in the microwave and melt both containers using 30-60 second bursts. Once melted, add 0.2 ounces of Cotton Candy Fragrance Oil and 0.2 ounces Vanilla Color Stabilizer to both containers and use a spoon to mix in thoroughly.
- Split both containers in half, so you have two containers of white soap and two containers of clear soap. All containers should weigh about 13 ounces. Add shavings of the Neon Blue Raspberry Color Block to one container of white soap and one container of clear soap. Add shavings of the Electric Bubble Gum Colorant to one container of clear soap and one container of white soap. Use a spoon to mix in the colors. If necessary, place the containers back into the microwave using 10-15 second bursts to fully melt the Color Blocks.
- You now have four colors of soap: pastel pink, hot pink, pastel blue and vibrant blue. Add 1/4 teaspoon of Fine Iridescent Glitter to both containers of clear soap, and use a spoon to thoroughly mix in.
- Now it’s time to start pouring and swirling! Check the temperatures of the soap, each container should be about 120-130 ° F. Pour a thin layer of the clear blue soap into the mold, just enough to cover the bottom. Spritz with alcohol to help get rid of bubbles, and pour pastel pink soap on top in random areas and spritz with alcohol. Allow this layer to cool and harden for about 3 minutes. In this time it will develop a thin skin. This will help the soap poured on top stay more separate, and prevent the colors from muddling together.
- If necessary, place the hot pink soap and pastel blue soap back in the microwave until about 125 ° F and fluid. Spritz the soap in the mold with alcohol to help the layers stick together. Pour a thin layer of the hot pink soap, spritz with alcohol to get rid of bubbles, then pour pastel blue soap in random areas to create a swirl effect. Spritz with alcohol to get rid of bubbles, and allow to cool and harden for 3-4 minutes.
- Repeat this process until all the soap is used up. I recommend always pouring one color made with white soap (the pastel blue and pastel pink) along with one color made with clear soap (vibrant pink and vibrant blue). Pouring these colors together helps make the swirl more eye-catching, and prevents the colors from muddling together.
- Once all the soap has been poured into the mold, allow it to fully cool and harden for about 5 hours, up to overnight. It’s tempting to cut into the soap while it’s still warm, but don’t do it! I have found layers are more likely to separate when I cut into hard, yet still slightly warm melt and pour. Once cut into bars, cover in plastic wrap to help avoid glycerin dew. Enjoy!
I HAVE A QUESTION
WE GROW LAVENDER AND I TRIED USING MY DRY BUDS IN SOAP & SPRINKLE ON TOP AND THEY TURNED BROWN.
WHAT CAN I DO?
Flowers and other natural plants do eventually turn brown on the soap. You can still use the bars, but it’s something to keep in mind. If you’re not a fan, you can top your soap with other options like micas, salts, poppy seeds, or jojoba beads.
Micas: https://www.brambleberry.com/Micas-C46.aspx
Additives: https://www.brambleberry.com/Exfoliants-C158.aspx
Is there a video tutorial on this? I’d love to see one!
We don’t, but we’ll definitely keep that in mind for future videos. Thanks for the suggestion.
This video has a similar design so you can see the technique in action: https://www.youtube.com/watch?v=4jcf9l5Wc44
Thanks for the video! I will check it out. I will be making this soap as my baby shower favors so I want to make sure they come out great. Since it will be my first time making M&P (ever) I am sure it may take me longer to do things which may result in temps of the soap dropping. If we notice the temps on the soaps is less that recommended, can we just pop it in the microwave again in small bursts to get back to the desired temp?
Absolutely, just pop it back in the microwave for a few seconds to get it fluid again. Those short bursts are important so the soap doesn’t burn: https://soapqueen.com/bath-and-body-tutorials/tips-and-tricks/how-to-avoid-burnt-melt-pour/
Okay perfect! And I will be using the Bulk melt and pour due to the lesser price and the amount I need to order. I hope it still turns out good!
So I tried this soap and the colors came out great, but I noticed some layers not sticking together? May it have been because I did not spray enough alcohol? Also, since this is a lot of layers and waiting 3 minutes in between for some of the layers to harden, I noticed the soap cools down. What do you suggest in order to not keep reheating them? Is it required to wait those 3 minutes for a layer to harden? I used the bulk clear melt and pour and the bulk goat milk melt and pour.
The 99% isopropyl alcohol is the key to getting those layers to stick together. Right before you’re about to pour the next layer, spritz the bottom one with alcohol. Make sure the entire surface is covered. Then, store the soap at room temperature (not in the fridge or freezer). That should help the layers stick.
Learn more about working with layers here: https://soapqueen.com/bath-and-body-tutorials/5-tips-layering-melt-pour/
For the soap now, you can “glue” those layers back together with melt and pour. To do so, melt 1-2 ounces of clear soap on 5 second bursts. When it’s melted, brush a light layer on and gently press the separated soap on top. Let that harden for 1-2 hours.
When you’re working with multiple layers, the soap will harden as it sits. You can just pop the container back in the microwave on 5 second bursts to get it fluid. Watch the soap carefully, if it gets too hot it can dry out.
You can also use a double boiler. It keeps the soap melted the entire time, then you can portion some out to color and pour into the mold.
Thanks for the info! So i can just pop back in for 5 sec burst as many times as long as it doesn’t burn? What should the temp stay at?
Yes, you can put the soap in on 5 second bursts or use a double boiler. Try to keep the soap below 140F or it can burn: https://soapqueen.com/bath-and-body-tutorials/tips-and-tricks/how-to-avoid-burnt-melt-pour/
Hi,
Is isopropyl alcohol essential in soaps? If so, can it be 75%? I would also like to know if I order anything from brambleberry from China will it arrive and if it will how long?
Thanks!
If you’re working with melt and pour layers, 99% isopropyl alcohol is essential. It helps those layers stay together. If you’re making melt and pour or cold process soap, the alcohol isn’t essential but it does help pop bubbles and prevent soda ash. We’ve found 99% is the most effective. Learn more about it here: https://soapqueen.com/bramble-berry-news/sunday-night-spotlight-99-isopropyl-alcohol/
International shipments take about 2 weeks depending on how long the package is in customs. Learn more in our international shipping policies: http://www.brambleberry.com/International-Shipping-Policies.aspx
I have little bottles of soap coloring(they look like food coloring but they are made for soap) would it be okay to use those? If so, how many drops?
Are they from BrambleBerry.com?
No
Because we haven’t worked with those colorants I’m not sure. You’ll want to contact the manufacturer to find out more.
Hi
I like the ridged edges you get with cold press soap. Can you get this effect with melt and pour loaf soap?
Are you wondering about textured tops like this: https://soapqueen.com/bath-and-body-tutorials/beet-cold-process-soap-tutorial/
Or bevelled edges like this: https://soapqueen.com/bath-and-body-tutorials/grapefruit-la-croix-soap-tutorial/
I put cotton candy thru the fragrance calculator and .4 oz seemed very light. Am I missing something, it seems this should be over twice as much for medium strength in the amount of melt and pour this project uses.
Feel free to add more Cotton Candy Fragrance Oil. We scented this on the lighter side, but you can use up to 1.4 oz. for a strong scent: https://www.brambleberry.com/Pages/Fragrance-Calculator.aspx
Can mica be used to color these recepies instead of the color block?
Absolutely. You can add the mica right into the melted soap, or mix it with 99% isopropyl alcohol before adding it to the soap. That helps it mix in a bit more easily. We recommend starting with about 1/8 tsp. of the mica and adding more from there if you like.
Micas: https://www.brambleberry.com/Micas-C46.aspx
Isopropyl Alcohol: https://www.brambleberry.com/99-Isopropyl-Alcohol-16-oz-P5682.aspx
-Kelsey with Bramble Berry
Hello. Just attempted to do this soap. It took me a VERY long time and seemed unneeded to reheat my soaps a lot. Is it safe to say you should have two people to do this project? I know it was suggested, but not required. Also if I had to reheat the soap numerous times will that have an effect? Thanks
Because of all the layers, this soap will take quite a bit of reheating. If soap is reheated a lot, it can eventually burn or overheat. If you notice that, you can add a bit of distilled water or glycerin. That adds more moisture and helps it become more liquidy.You can do it on your own or with a friend, either way works fine! Because it does take awhile, it’s nice to have a friend to chat with while you do it. 🙂
-Kelsey with Bramble Berry
Liquid glycerin: https://www.brambleberry.com/Glycerin-Liquid-P5965.aspx
Hi I was wondering if it would be ok to use goats milk base for the white base and lavender essential oil instead of the cotton candy ? if so is there anything else with in this recipe i would need to change ?
You can definitely use Goat Milk Melt and Pour Base for the white portion! Lavender essential oil will work well too. The lavender usage rate may be slightly different, so I would recommend running this recipe through the Lye Calculator just to be sure: https://www.brambleberry.com/Pages/Lye-Calculator.aspx
The only thing that changes is you don’t need to add the Vanilla Color Stabilizer. 🙂
-Kelsey with Bramble Berry
Goat Milk Melt and Pour: https://www.brambleberry.com/SFIC-Goat-Milk-Melt-And-Pour-Soap-Base-P3184.aspx
Lavender 40/42 Essential Oil: https://www.brambleberry.com/Lavender-4042-Essential-Oil-P3664.aspx
I didn’t know to get the vanilla color stabilizer because it wasn’t on the first list of ingredients. I just started to make it and it calls for some. Do I have to use it in the product or is the substitute for it ? If not, what stores could I find it in?
I’m so sorry the Vanilla Color Stabilizer isn’t in that top list. I’ll get the post updated.
There isn’t a store bought alternative for Vanilla Color Stabilizer. It’s a specific fragrance oil formulated to prevent discoloration. If you have already made the soap, the fragrance oil only causes a mild yellow color, so it will just make the blue and pink a bit more yellow. If you haven’t made it and want to prevent that yellowish color, I would recommend the Vanilla Color Stabilizer. 🙂
-Kelsey with Bramble Berry
Not a big fan of glitter. Can I simply leave it out?
You can definitely leave it out! It is an optional ingredient. The soap will still look lovely without it. 🙂
-Kelsey with Bramble Berry
Thanks
You’re welcome!
I’ve never like cotton candy at all but this soap is totally sweet!
Thanks so much Michael, glad you like it! 🙂
-Kelsey with Bramble Berry
Looks like fun!
It’s a lot of fun to make! Hope you get a chance to try it Judy. 🙂
-Kelsey with Bramble Berry