After you’ve assembled your materials, it’s time to make the flower cut-outs. Remember, you can use these techniques with almost any cookie cutter – not just cute daisies.
Making the Flowers
Step One: Melt the white melt and pour in the microwave on short bursts to ensure a thorough melt without boiling. Since this soap is such a small part of the final bar, there’s no need to scent it. But, if you’re using these soaps on their own (perhaps a cute little spring hostess gift when packaged nicely in an organza bag?), be sure to fragrance them.
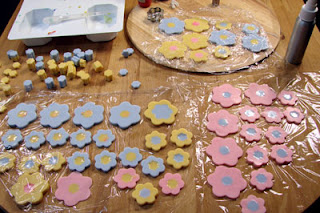
Step Two: Color the soap. In 8 ounces of white soap, I used 4 drops of Non-Bleeding Blue. The Yellow took 4 drops of Liquid Yellow and the Pink took 10 drops of Liquid Pink. Non-Bleeding Liquid Colors are nice because what you see is what you get. There’s no bleeding and little fading in the sunlight. Add one drop of color at a time until you achieve a color you love.

Step Three: Pour into a shallow pan. I love silicone brownie baking pans because the soap pops out easily but you can use anything that is flexible (this means no glass baking pans).
Step Four: When soap is hardened (about 15 minutes), pop the soap out and immediately start to make your cut-out soaps. If the soap is fresh, it will cut easier. Old melt and pour soap tends to evaporate its excess liquid to the air, leaving a hard, “chewy” soap that won’t easily slide a cutter through.

Step Five: Freshly made soap is very moist. It will glue itself to saran wrap and create a self-sealing lock. Before laying your buds down, push out the final cut-out (little flower cuts into the center of big flowers).
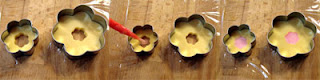
Step Six: Make a small batch of white pastel soap with a contrasting color. This time, it’s okay to heat the base a little warmer than usual. You want the soap to be a little hot to ensure good adhesion to surrounding soap. Draw up the contrasting color into the dropper, double check that your daisies are sealed tightly on the saran wrap and gently fill the centers of your daisy with hot, contrasting colored melt and pour.
Step Seven: Wait until the centers are set. Gently peel off the flowers. Bonus round: exclaim, repeatedly, to anyone within earshot, “Oh my goodness! Look how cute these are! Are they not the cutest little soaps you’ve ever seen?!”
Tomorrow, we’ll cover embedding the soap.
Darius – Thank you for your note. I’d love to do an interview for tricks of the trade and adding color for soap.
I’m headed to your site now to email you …
=)
I love it! The flowers are soooo cute! And you are hilarious – great tip on exclaiming!
Mmmm, reminds me of flower shaped cookies.
I love how creative those are! A perfect spring project while we’re still up to our ears in snow = )
How adorable… you are so creative!
those are such cute flower cut outs.
Oh, those ARE the cutest little soaps I’ve ever seen.
Now to dig out my stacking heart cookie cutters (why oh why didn’t you do this before Valentines Day? *le sob*)
Every month I do ArtWalk, I try to have a little something special for my hostess/sponsor. A bag of daisies and hearts would be perfect! Assuming, of course, I can keep my mother from walking off with em. *grin*
wow wow wow wowow wow.
Those are super nifty!
Hello, great blog!
Would you be interested in doing an interview with us at COLOURlovers.com about adding color to soap and maybe some tricks of the trade?
Cheers,
-D
LOL…you are so funny, Anne-Marie! Right now, while I love this flower soap, it is too much work for me. I’d gladly buy some from you, though. 😉
Yes! Those are the cutest little soaps I’ve ever seen!! 🙂