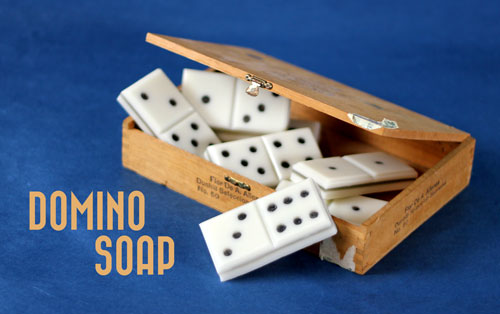
In this episode of Soap Queen TV, I show a fun melt and pour technique for creating soaps that look like over-sized dominoes. I used a luxurious blend of Honey and Goat Milk melt & pour soap to make the perfect ivory color.
To make this soap you will need:
- 18 oz Honey melt & pour soap*
- 11 oz Goat Milk melt & pour soap
- 0.3 oz Tobacco and Bay Leaf Fragrance
- Guest Square Tray Mold
- 1/8 teaspoon Black Oxide Pigment
- 1 Tablespoon Isopropyl Alcohol
Get everything you need to make this soap.
Note the video lists 16 oz of Honey M&P but we actually used 18 oz. using a little less in the final layer won’t ruin your soap, so if you only have 16 oz of honey soap – it will still work!


These domino soaps are so cute! I love how they turned out. Thanks for the video tutorial!
Hi Jenny!
I’m so glad you enjoyed this video tutorial :). It’s a fun project that results in such a cute bar of soap, I hope you give it a try!
-Amanda with Bramble Berry
I was waiting so long for a melt and pour tutorial! This was such a fun idea for spring! I plan on ordering the mold for this soap next month along with the round cutters to make the orange slice soaps you filmed a long time ago! I need to make cheerful spring soaps!
Hi Leanna!
I’m glad you liked this tutorial, we have a few more melt and pour projects up our sleeves, so keep your eyes on the blog :)! The Orange Slice Soap is such a fun spring project, we would love to see photos on our Facebook page if you take pictures!
https://www.facebook.com/BrambleBerry
-Amanda with Bramble Berry
I agree that these are completely adorable. I’m curious as to what the inspiration was for the fragrance type? I think they would make superb gifts!
Hi Dawn!
Aren’t they cute? When we first smelled the Tobacco & Bay Leaf Fragrance Oil, we knew it was going to be a fast favorite, and designed some fun projects around the scent 🙂
-Amanda with Bramble Berry
What adorable soaps. I tried making holes in a recent project, but I didn’t think to put some clear in the bottom first. Thanks for the great suggestion.
I found that without the holes, the black soap (poured in the second layer to fill the holes) just bled out the front of the soap and ended up looking a tinch bit sloppy! =) I hope you get to try the project.
Thanks Anne-Marie, I will definitely give it a try.
Both of these ideas are so great. I can’t wait to try them. Thank you for more melt and pour ideas, haven’t mastered the CP soap making yet. Love the out takes too!
Hi Annie!
I’m so glad you found this project inspiring! This is such a fun project to make, and the end result is simply awesome 🙂 I hope you give it a try!
-Amanda with Bramble Berry
Very cute idea…thanks for all your inspiration.
Hi Joan!
I’m happy to hear you enjoyed this tutorial, it was a lot of fun to make! 🙂
-Amanda with Bramble Berry
So cool! I will have to try this!
Hi Emily!
I hope you do, it’s such a fun and cute project! 🙂
-Amanda with Bramble Berry