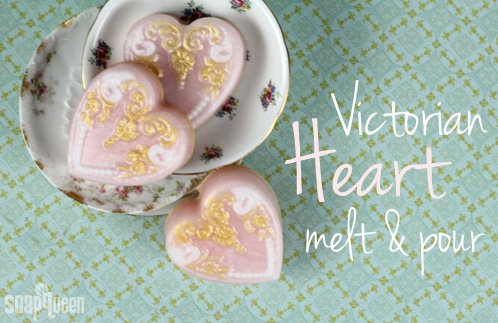
This project uses the Heavy Duty Victorian Heart Mold, and features nourishing Chamomile Extract and the aromatic Chamomile Bergamot Fragrance Oil. This project is great for beginners or anyone looking to practice their melt & pour skills.

What You’ll Need:
35 oz. Clear Melt & Pour Base
10 oz. White Melt & Pour Base
Super Pearly White Color Block
Shimmer Sparkle Gold Color Block
1 tsp. Chamomile Extract
1 oz. Chamomile Bergamot Fragrance Oil
Heavy Duty Victorian Heart Mold
 Click here to add everything you need for this project to your Bramble Berry shopping cart!
ONE: Cut and melt 10 oz. of Clear Melt and Pour base in the microwave on 10 second bursts. Shave off chunks of the Sparkle Gold color block and add .2 oz. of Chamomile Bergamot Fragrance Oil.

TWO: Using the Injector Tool, fill in some of the filigree detail of the mold. Where you color is up to you, but we filled the inner flower and some of the outer detail. Spray with isopropyl alcohol to disperse bubbles and allow to dry for 10 minutes.

Tip: The injector tool will become clogged with hardened soap if you don’t push it out immediately after you’re done. Keep a cup of warm water near by so you can rinse the tool with hot water and keep it from getting clogged in between uses.
THREE: Use the Clean Up Tool to pull out any excess soap.

FOUR: Repeat steps 1 – 3, this time with White Melt and Pour base.

FIVE: Cut and melt 25 oz. of Clear Melt and Pour base in the microwave on 15 second bursts. Fragrance with .6 oz. of Chamomile Bergamot Fragrance Oil and add 1 teaspoon of Chamomile Extract.

SIX: Color the soap with the Super Pearly White and Fired Up Fuchsia Color Blocks. The amount you add is up to you, but to achieve this color we added the entire Super Pearly White Color Block (yes, really!) and a very tiny amount of the Fired Up Fuchsia Color block — no more than a few small shavings. It’s a strong color and it will easily overpower the entire batch if you add too much.

SEVEN: When the soap has cooled to 120 degrees F or below, spray the mold with isopropyl alcohol and then pour. Spray again to disperse bubbles.

Tip: If you have any leftover gold or white soap, remelt it and pour it into the mold. It will give your hearts a little added pop!


Hi, can I use that technique with cold Process Soap? i meant step 5, insted of useing Melt and pour base?
Hi RoRo!
Melt and pour works best for this recipe, as it is specifically made to melt and reform over and over. Microwaving cold process soap creates a spongy, rough soap. It also stays thick, instead of liquidy like melt and pour soap. I would definitely recommend using melt and pour for this recipe.
You can rebatch cold process soap though! That involves grating it into smaller pieces and putting it in a double boiler. You can find out more about rebatch from this video: https://www.youtube.com/watch?v=2YcCV0AWutw
-Kelsey with Bramble Berry
Why does this call for so much gold and white when only an ounce or so is actually used? I’m using the leftover in my silicone block mold so it’s not wasted.
Hi Lillian!
Because small amounts of melt and pour soap can harden up quickly, we found it was easier to make more so we had more time to work with it. You can definitely use less if you like, or pour the leftovers into a separate mold. 🙂
-Kelsey with Bramble Berry
I made this soap with white soap and colored it a light pink & used strawberry & blackberry F.O. Later I thought it would be fun to add some gold to give it look an antique look so I used a small make up brush and lightly brushed some gold mica on the ridges. It looked gorgeous.
Hi Katrin!
Oh that sounds so pretty! Mica painting is a great technique :). If you get some photos of your project, we would love to see them on our Facebook page! 🙂
https://www.facebook.com/BrambleBerry
-Amanda with Bramble Berry