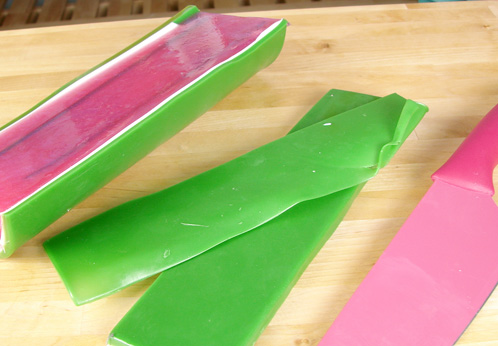
TWO: Now it’s time to make the “rind.” Melt 7 ounce of clear soap base and mix in .7 ounces of liquid glycerin and 6-7 drops of liquid green colorant. Mix well and pour the soap into the tray mold. Spritz with rubbing alcohol to eliminate air bubbles. Let cool.
Hint: The liquid glycerin adds some pliability to the soap so we can bend it with out breaking.
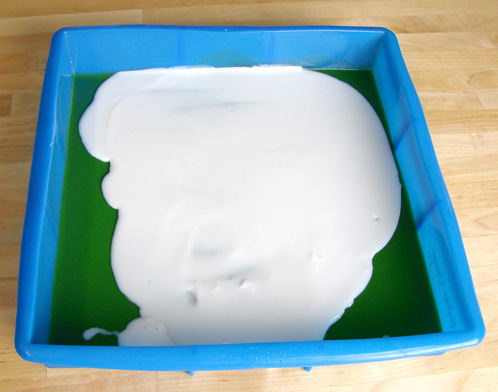
THREE: For the white layer of the rind, melt 3 ounces of white soap base and mix in .3 ounces of liquid glycerin. Let the white soap cool to 125-130 degrees, spritz the cooled green layer of soap and pour the white soap down the middle of your mold.
Tip: I wanted the white section of the rind to be super thin. Three ounces of soap isn’t quite enough to cover the entire bottom of the mold so make sure you pour the soap down the middle of the mold. It’s ok if the sides are not covered in white.
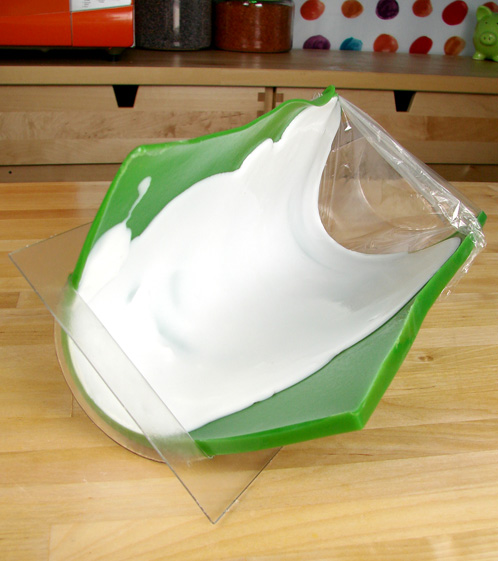
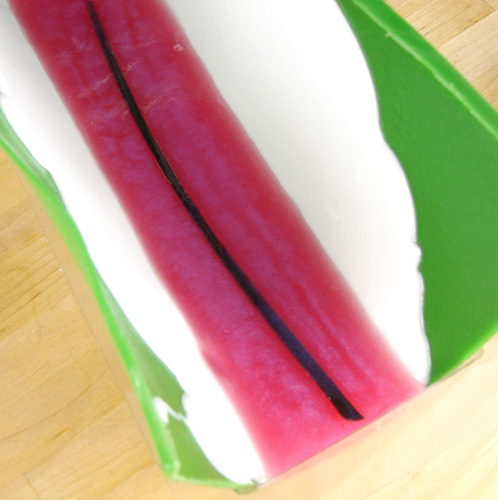
FOUR: It’s show time. Release the green and white soap from the mold, bend it down the middle and place it into the half round log mold. Make sure that the white soap is even on both sides. Scoot the soap to one end of the mold and press it down firmly. Seal the other end with plastic wrap. You can wrap some of the plastic underneath the soap if needed.
Tip: See how my mold is tipping a little bit? You’ll need to find something to prop up the mold. I used two small matching bowls.
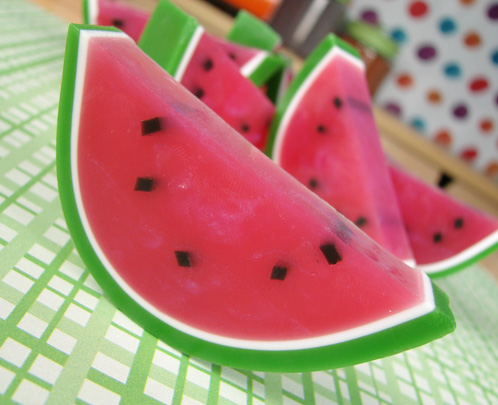

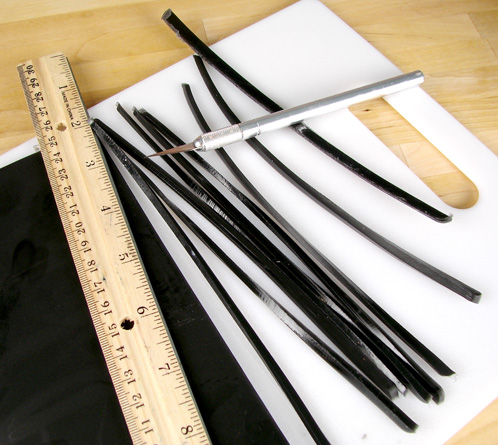
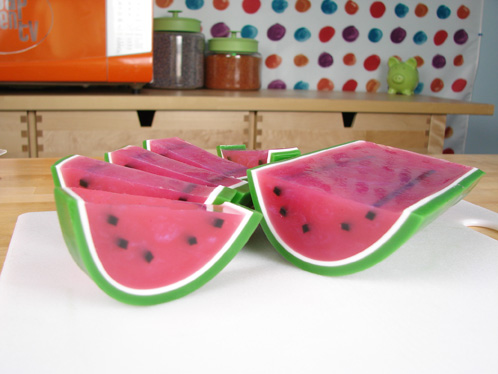

This recipe is great and quite forgiving (or tolerant to improvisation). I am on a limited budget and tried to find ways to use what I had on hand instead of buying them. To my surprise it all worked. I used parchment paper (had foil on the other side, apparently new on the market?) as the square tray by taping the sides up. I used a bread crumb canister with a portion cut out to act as the semi-circular mold. A bonus was that I used the lid (with a portion cut off) to seal the end of the “mold” so nothing leaked out. Lastly I did not have black coloring so I mixed equal parts of the primary colors and to my surprise I came out with black. I made the seed strips in the same parchment paper mold. I am so happy this all worked and so is my soon to be 4 year-old daughter. They are going to be party favors for her party. I have never made M & P soap before and if they came out this nicely for me with all my contraptions, I would anyone can do it. Can’t wait to take a nice look at Bramble Berry for the quality goods!
That sounds like it turned out fabulous Lisa! I am so glad you found a way to make it work for you. I’d love to see pictures of it if you had any, you can share them with us on our Facebook page! =)
https://www.facebook.com/BrambleBerry
-Becky with Bramble Berry
P.S. Your daughters party is going to rock with this amazing soap!
This is amazing! Could you please please please do a video of this?!
Glad you like it! Always listening for new ideas, so we’ll definitely consider making it a video =)
I think I let my green cool too long before I put on the white. Thanks for your help! I just had to redo another one tonight, and so far so good this time 🙂
Cute idea for a shower gift! It’s going to be a hit! My batch made about 10 (depending on how thick you cut the slices). So if you need 70 total, I would recommend about 10 lbs of clear soap base, 2 lbs of white soap base and at least 24 ounces of the fragrance oil (and maybe a little extra of each just in case). The colors should totally last you 7 batches if you hit the “buy it now” icon. Let me know how they turn out! I would love to see pictures!
Just make sure to spritz a good amount of rubbing alcohol right before you pour the white layer on to the green. And try pouring the white layer as soon as the green layer is cool, don’t let too much time pass. You’ll get it =)
How many soaps would this make approximately? I am planning a baby shower for my sister this summer and would love to do little soaps as party favors. We are thinking there will be around 70 people in attendance. How much stuff would I need to buy?
Did anyone else have trouble with the green & white parts of the rind separating? When I started to slice off pieces of melon, the green rind just popped right off! 🙁 Did I use too much white? Not enough alcohol spritzed on?
absolutely amazing. i love the look of this, and will feature you on our blog, finecraftguild.com, over the next few weeks.
meanwhile, if you have other tutorials to share with our readers, feel free to enter our weekly (wednesday) DIY TUTORIAL parties. the current one is here:
http://www.finecraftguild.com/…
Fantastic hint! I LOVE IT! Thank you for sharing….
Excellent!
Hi Anne-Marie!
Beautifully done 🙂 Here’s a tip for the seeds: Take a milkshake straw and pinch down one side to make the seed shape. Close off one end either with plastic wrap or by melting a small amount of mp in a container and standing the end of the straw in it to set up and seal. Fill the straw with black soap. To unmold, simply slice down the side of the straw with an exacto blade remove the seed strip, slice and you have perfectly shaped seeds for your loaves.
Lorie Martin
WOW! You are totally going to be my hero when you get this done for CP soap. I bet you could use a ice cream scoop to ‘scoop out’ the middle of the soap to make the tunnel for the melon to go into …
And you’re not even smelling the soaps; they smell so jolly rancher good….
And now you know =)
I’ve used rice in the past as well. It is awesome for sure. But for some reason, I don’t have any on hand (scratching head). I’m betting I threw it out in a cleaning frenzy, thinking to myself “Why would I have rice here!?” LOL!
Thank you! =)
They are practically edible looking =)
Wow, your method does sound a little complicated but if it worked, that’s awesome! There are lots of ways to get to the same end result in soaping but I’m with you, faster is definitely a good thing. =)
I’m glad we could help. Yay! I hope you have lots of success with your first batch of it.
Playdough is a good idea. I sometimes do that and just forgot about it this time (duh!) =)
I LOVE the idea of your Lime Mojito soap. I am totally going to play with that idea and do the blueberry seeds. The peppermint leaves probably go brown right?
I just saw a really neat idea on our FB page; someone did real dried seeds and they looked adorable in the watermelon soap too.
Make sure to have the soap in the shade. Reds are really prone to bleaching out in the sun. =) But yes, perfect for Farmer’s Markets for sure.
Thank you. I’ve seen some other great MP watermelon soaps on the ‘net so the idea is not original with me but I was excited to figure out an easy way to make them to share =)
The bendy soap really helps to make the watermelon rind perfect. If you’re in a super humid area, it does add a bit to the humidity/sweating issue so keep that in mind.
Thank you! =)
These are so fun!!! I was just thinking about trying to re-create my CP version again next week.
I totally echo everyone here who said that this is an amazing tutorial! It’s making my mouth water! =)
Thanks for the tutorial, Anne-Marie. Great watermelon soaps! I’ve wondered how to do this …
Que maravilla ! Es Impresionante , ha quedado precioso . Muchas gracias Por la explicaciones . Un saludo .
Maria
Nice Soap Anne-Marie! I sit my half round loaf tray into a slightly larger baking tray with a bag of rice poured into it (kept for leveling uneven soap moulds). I nestle the loaf mould into the rice and it doesn’t tip at all. 🙂
A great tutorial Anne Marie, and as always explain what you do very well and easy. I liked it. Thank you.
mmmm!!! Deliciuos!!!!! Can I have a one????
Mariana
Mar D. Jabones
my friend and I did this last summer, but in a more complicated way… we suspended an other half loaf mold about 1/4 inch above our ‘base mold’ and poured in the green and then lifted it after 10ish minutes and put it about 1/8 in above the green and poured in a perlescent white(i forget which mica we used) and after another 10ish minutes we did the pink and seeds like you did. I like your way better, our cardboard supports didn’t like cooperationg, and this is faster. We’ll have to try it.
I HAVE BEEN HOPING FOR DIRECTIONS FOR THIS. THANKS SO MUCH.
I love this idea! 😀
Oh and I forgot you can put blueberry seeds in too.
Playdough might hold the mold well! Next you should make my Lime Mojito Soap. I can elaborate in an email if you wish. Basically it’s Lime and Peppermint EO’s. A nice layer of white shea butter soap then a soft green clear layer with peppermint leaves in it. Smells divine and makes you wanna dance! You can do it in a loaf or half round loaf mold.
Great job and cute idea for the layers and seeds!
Adorable! Cannot wait to try this for Farmer’s Market! Little girls were drooling over my table last week and I need some kidsy type soaps!
WooHoo!
looks great Ann-Marie! i made something similar earlier this month, it was SO fun to make too:D I’m gonna try your added glycerin idea….perfect bendy soap- I like it!
Wow! That is amazingly clever! And so cute!
Oh my, this is just amazing, love it!!!