
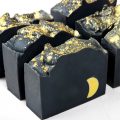
Lidded molds and embed paper are my two latest supply obsessions. I just love how easy it is to put colorful images into soap bars, and the lidded molds make it a snap to make perfectly protected and showcased soaps! So now that it’s fall I get to pair up my favorite supplies with Mexican Folk Art, which is fabulous for colorful Halloween inspirations.
These soaps use Loteria card images (like Mexican bingo), and then we get to bust out the crafty goodness and decorate the mold like a little shrine. Traditionally for Dia de los Muertos families honor their deceased loved ones with favorite goodies and loads of flashy decorations. So pull out your glitter, puffy paint, rhinestones and glue gun, and have fun! These soaps will certainly be too pretty to use! 🙂
Supplies:
8 oz Soapylove Naturally Clear Soap Base
2 oz Soapylove Bright White Soap Base
Soapylove Jewelry Box Colorant Set
Soapylove Candy Jar Fragrance Set
Water Soluble Paper – download and print the Loteria Card images onto the paper using a laser printer
3 Lidded Molds
 Click here to have these items added to your Bramble Berry cart.
Rubbing alcohol in spray bottle, knife and cutting board, microwave, measuring cups
Craft supplies such as glue gun, lace, ribbon, gems, glitter glue, decorative paper, feathers – you name it!

First melt all of the clear soap base in a measuring cup (high heat in microwave for 45 seconds or so). Add a generous sprinkle of the ultrafine glitter from the colorant set. Stir well and pour a thin layer into each mold. Allow to harden.
Meanwhile, cut the Loteria Card images (they are sized to fit the lidded molds). Reheat the soap base if it has formed a skin. Spray hardened soap in molds with alcohol and pour another thin layer of soap on top. Place paper, image side down, into the soap and pour another thin layer of soap on top. Use a chopstick or craft stick to press image down flat. Smooth all corners down. Allow to harden.

Melt the 2 oz of white soap base, allow to cool to 120 degrees. Spray hardened soap in molds with alcohol and pour a thin layer of white into each. Allow to harden.
Reheat remaining clear soap in your cup and add a few drops of Ruby Red colorant. Stir well. Spray white soap with alcohol and pour in red soap to 1/4″ of top of mold (this will make it easier to unmold soap when it’s ready to be used). Allow to harden and snap on lids.

Now you’re ready to give these soaps the royal treatment! Use a glue gun to stick on trims all around the edges (front only so you don’t glue the lid on), glue fun things like gems or buttons to the sides, decorate the front with glitter glue or puff paint, and you can even glue on paper to extend the background for more decorating surfaces! Think of it like decorating a frame. The sky is the limit!! Now you can hang these up like little works of art. These would be awesome for a fall craft fair. Very eye catching!
I hope you like this over-the-top soap treatment. If you try it, please comment here and link to your pictures. I would love to see what you do!
Have fun!
Debbie, Soapylove
P.S. Looking for even more Halloween project inspiration? Check out the Fall ’09 issue of Let’s Get Soapy!
From the posts it seems like paper printed with inkjets do bleed despite curing and spraying with hairspray. Is there ANYTHING that will prevent bleeding when using an inkjet printer?
Thanks!
Hi Paula!
Since this project was done we have reformulated the water soluble paper so it will work with both inkjet and laser printers.
If you print it and then let it dry for 2-3 days before spraying with the hairspray then you should be just fine! If you are worried about it bleeding, I would do a small test batch to make sure what you get is what you want! =)
-Becky with Bramble Berry
Again I’m confused by the suggestion to use a laser printer. I thought you needed an inkjet printer. All of the print shops near me will not print onto water soluable paper for me… So I’m just trying to make sure b/c I bought an inkjet printer just for this kind of project and I’m wondering if I should’ve gotten a laser printer instead…
Hi Missha!
It looks as if Amber was able to answer your question on another post, but like she said when we first did water soluble paper project, it was only safe in use in an inkjet printer. Since that time, the way it is made has changed and you can use it in an inkjet or laser printer. =)
-Becky with Bramble Berry
Thanks Anne-Marie , I’ll try again!
Yes! The Crafty Chica heavily inspired this project! 🙂
Thanks so much for saying that! If Anne Marie is the Soap Queen maybe I’m the Soap Prime Minister? LOL!
Wow, this is really fabulous, Debbie. You’re truly the queen of M&P! 🙂 xoxo
If you print with a laser printer, it won’t dissolve =) And the cooler you pour, the less blurring and dissolving you will get. When you pour too hot, the soap acts like water almost and breaks things up.
Oooh… so WSP won’t bleed AT ALL if printed with a laser printer? I thought I heard somewhere that you weren’t supposed to use it in a laser printer because it would gum it up or something equally as bad. I only have problems with colors bleeding but anything I print in black on the WSP stays crisp for what seems like forever (or as long as I’ve ever seen it, at least).
Ooh, had to reply to my own comment, Debbie, that method of burnishing is great. I think I’ll have near perfect soaps! I was really afraid the paper would melt if my soap was too wet, but it seems to have worked wonderfully. I’m very excited. I’ll blog more pics when they are unmoulded.
Thank you soooo much for this “Spray hardened soap in molds with alcohol and pour another thin layer of soap on top. Place paper, image side down, into the soap and pour another thin layer of soap on top. Use a chopstick or craft stick to press image down flat. Smooth all corners down. Allow to harden.” That will help with the little “fog and cloud” problem I have developped with my soaps I tried yesterday. First time. Very excited, about to blog about it! That project me gusta mucho (that’s about as much Spanish as I know – I hope I didn’t say anything rude!!)
I still can not use this paper, it blurs a lot! Dissolves as soon as I put the glycerine on top. What am I doing wrong?
I still can not use this paper, it blurs a lot! Dissolves as soon as I put the glycerine on top. What am I doing wrong?
Thank you! All the credit goes to Debbie from SoapyLove.com She found all the art. She is soooo creative.
Hi Jean,
Yes! you are correct. If you print with a laser printer you don’t have to worry about curing or setting with hairspray, it never bleeds.
Am I correct in thinking that the images on the paper will not bleed if you use a laser printer? I tried using an inkjet printer and setting the ink with hairspray in the past (as suggested by AM in an older tutorial), but the ink bled after a few weeks. Would love to have a solution for that–these look great!
Anne-Marie these soaps are wonderful!!! I like the art you have done around them. I love them. Thumbs up!!!
I love Crafty Chica! Everything is better with glitter.
While I’d love to take the credit for this project – it was designed and photographed by Debbie from Soapylove. Isn’t she amazing?
These are amazing!
Wow! Such a cool idea! You are so creative AM!!
Cool !! Look like Crafty Chica Stuff ! …Me gusta! 🙂