 Step # 24-25This green stock color was the right scent but too small in amount and too dark for the job; it needed more soap.
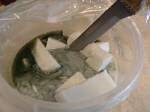
 Step # 26-27 After adding a sufficient amount of soap melting and mixing well more pigment and fragrance was added ’til the color and scent were perfect. Because it’s easy to add too much colorant I often drip the colorant on my mixing tool, that way I can pull it out and rinse it off if it looks like I might be adding too much color.
 Step # 28-29 Once you are happy with the color/scent for the base of your soap, mist your mold of layers already set up and pour in your green base. Larger volumes of soap will retain heat and can melt your earlier layers. Dip your pinkie into the base (green here) and if you can hold it in without feeling discomfort it’s ready to pour (after you mist).
 Step # 30-31 As soon as you fill your tray of molds mist one last time to dissolve any bubbles that rise to the surface.

Step # 32-33 After the soap is hard to the touch (2 hours) you can peek at the finished look of your soaps while still in the mold. After they have cooled overnight pop them out and enjoy!
oooh, those soaps are so beautiful! i think i may have to try them real soon.
The mold is delightful, isn’t it? The Mini Guest Molds do make a nicely sized bar of soap for guest soaps.
I love these, and I love that mold! It can be elegant or cute depending on the technique and colors you use.
Thanks again, Anne-Marie! It’s always great to see a new tutorial here on your blog. PJ does include a detailed instruction sheet with each M&P toolkit, but it helps to see how it’s done.:)