Experimenting with color in cold process soap is counfoundingly fun. There are many different colorant options, like pigments, LabColors and micas. One of my favorite parts of soapmaking is mixing various colorants together to create unique shades. Conversely, one of the toughest colors to achieve in cold process soap is red. Most colorants end up looking a little bit pink rather than a true, fire engine red. To find that “perfect red,” I did a lot of mixing and blending until I found that perfect shade. You can see my first round of testing on Instagram here; while all these red shades look great…they just weren’t quite perfect.
One of the reasons why it’s so hard to achieve a red color is because cold process soap batter is white, or cream colored. When you think about basic color theory, it makes sense; adding any color to a white base results in a more pastel shade. When you add colorant to cold process soap batter, it usually lightens up. To darken the color, you can add more colorant to the batter. Adding a red colorant to white soap base often lightens the colorant to a pink shade. To darken, you can add more colorant. Usually, once you add enough colorant to achieve a true red, the soap may have colored bubbles.
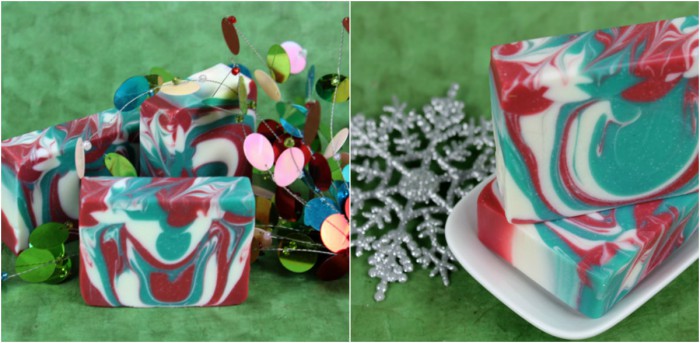 The CPOP Swirls tutorial features a classic red shade which is made brighter with a warm gel phase.
Because red is powerful primary color, it’s sad to write it off completely! In my soaping experience I’ve found that a mixture of one part Merlot Sparkle Mica to 2 parts Electric Bubble Gum Colorant creates a nice red hue. You can see an example of this color in the CPOP Swirls tutorial. In this project, the color is also affected by a hot extended gel phase. To learn more about how color is affected by gel phase, check out this blog post.
It’s important to keep in mind that with any color (and especially for red!) the hue may change slightly depending on several factors. One of these factors is the recipe. For example, if your recipe contains a large amount of olive oil, the batter will become more yellow. Any color that you add to the yellow base will have a slightly different hue than a soap with a cream or white base. Our recipe was 30% palm oil, 30% coconut oil, 30% sweet almond oil and 10% avocado oil. We used oils with more neutral hues to get a true red color.
Another factor is how the colorants are dispersed. I like to disperse my cold process soap colorants in a lightweight liquid oil at a ratio of 1 tablespoon oil to 1 teaspoon colorant. I find this makes the colorants easier to mix in. To learn how to disperse your cold process colorants, watch this Soap Queen TV video. If you disperse your colorants at a different ratio, you may need to add different amounts of dispersed colorants to your soap than I do to achieve the same color.
The last factor to keep in mind is temperature. The color of your cold process soap is greatly affected by gel phase. “Gelling” and “gel phasing” in cold process soap refers to a part of the saponification (soapmaking) process where the soap gets warm and gelatinous – up to 180 degrees. When cold process soap goes through gel phase and becomes hot, the colors become more vibrant. This is especially true for LabColors, learn more here.
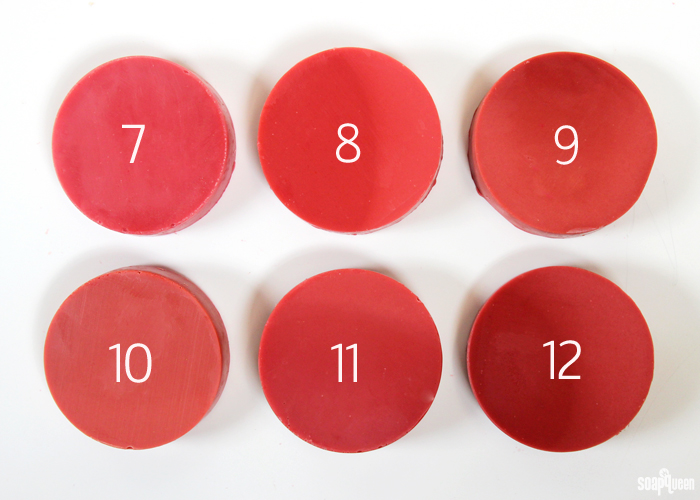
Okay…now that all that is out of the way, let’s get to my red blends! Many of these blends turned out to be more of a berry shade, but I still wanted to share them with you because they are beautiful colors. There were also a few that were too pink, and too dark. Check out all my color swatches below. These shades were created with various combinations of Electric Bubble Gum Colorant, Merlot Sparkle Mica, Fizzy Lemonade Colorant, Tangerine Wow! Colorant and Brick Red Oxide. The color blends refers to the amount of color added per pound of soap. All of the colorants were mixed at a rate 1 teaspoon of color to 1 tablespoon of sweet almond oil. The measurements are dispersed colorant amounts. Yes…there is quite a bit of color in these shades. Some may lather color. All soaps went through gel phase.
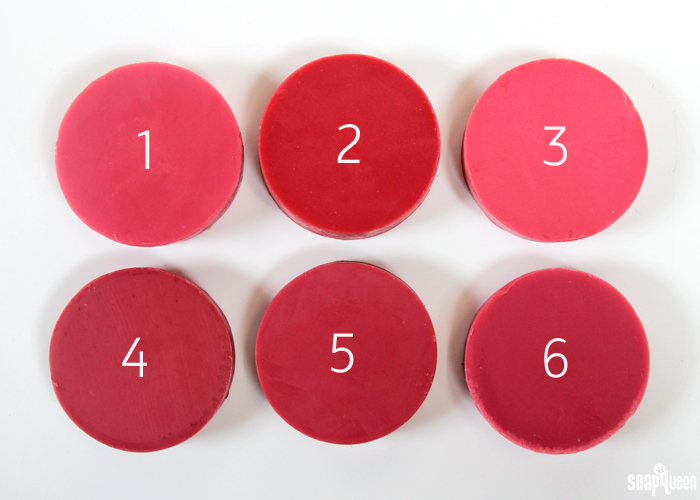
Group A (Berry Tones) Shown above:
1.) 1/2 tsp. Electric Bubble Gum Colorant + 1/2 tsp. Merlot Sparkle Mica + 1 tsp. Tangerine Wow! Colorant + 1 tsp. Fizzy Lemonade Colorant
2.) 4 tsp. Electric Bubble Gum Colorant + 1 tsp. Merlot Sparkle Mica + 2 tsp. Tangerine Wow! Colorant + 2 tsp. Fizzy Lemonade Colorant
3.) 3/4 tsp. Electric Bubble Gum Colorant + 1/2 tsp. Merlot Sparkle Mica + 1/2 tsp. Tangerine Wow! Colorant+ 2 tsp. Fizzy Lemonade Colorant
4.) 2 tsp. Electric Bubble Gum Colorant + 1 tsp. Fizzy Lemonade Colorant + 1 tsp. Tangerine Wow! Colorant + 1/2 tsp. Brick Red Oxide
5.) 2 tsp. Electric Bubble Gum Colorant + 1 tsp. Merlot Sparkle Mica + 1 tsp. Tangerine Wow! Colorant + 1/4 tsp. Brick Red Oxide
6.) 2 tsp. Electric Bubble Gum Colorant + 1 tsp. Merlot Sparkle Mica + 1/2 tsp. Tangerine Wow! Colorant + 1/2 tsp. Fizzy Lemonade Colorant
Group B (Orange Tones) Shown above:
7.) 1 1/2 tsp. Electric Bubble Gum Colorant + 1/2 tsp. Merlot Sparkle Mica + 1 tsp. Tangerine Wow! Colorant + 2 tsp. Fizzy Lemonade Colorant
8.) 3 tsp. Electric Bubble Gum Colorant + 1 tsp. Merlot Sparkle Mica + 2 tsp. Tangerine Wow! Colorant + 4 tsp. Fizzy Lemonade Colorant
9.) 2 tsp. Electric Bubble Gum Colorant + 2 tsp. Merlot Sparkle Mica + 2 tsp. Tangerine Wow! Colorant + 4 tsp. Fizzy Lemonade Colorant
10.) 2 tsp. Electric Bubble Gum Colorant+ 1 tsp. Merlot Sparkle Mica + 1 tsp. Tangerine Wow! Colorant + 1 tsp. Fizzy Lemonade Colorant
11.) 2 tsp. Electric Bubble Gum Colorant + 1 tsp. Merlot Sparkle Mica + 1 tsp. Tangerine Wow! Colorant + 2 tsp. Fizzy Lemonade Colorant
12.) 2 tsp. Merlot Sparkle Mica + 4 tsp. Tangerine Wow! Colorant
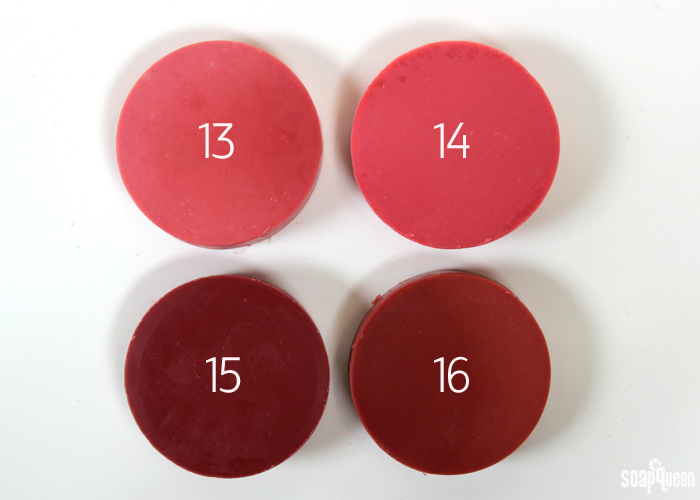
Group C (Too Pink & Too Dark) Shown Above:
13.) 1 tsp. Electric Bubble Gum Colorant + 1 tsp. Merlot Sparkle Mica + 3 tsp. Tangerine Wow! Colorant
14.) 2 tsp. Electric Bubble Gum Colorant + 1/2 tsp. Merlot Sparkle Mica + 1 tsp. Tangerine Wow! Colorant+ 2 tsp. Fizzy Lemonade Colorant
15.) 2 tsp. Electric Bubble Gum Colorant + 1 tsp. Brick Red Oxide + 1 tsp. Fizzy Lemonade Colorant
16.) 1 tsp. Electric Bubble Gum Colorant + 2 tsp. Merlot Sparkle Mica + 2 tsp. Tangerine Wow !Colorant + 3 tsp. Fizzy Lemonade Colorant
Do you have a favorite? My top three choices are below! I also threw in a spatula that is a bright, fire engine red for reference. Personally, my top choice is #8! Number 2 appears to be slightly more “berry” while number 9 is just slightly lighter. I’m so excited with #8…I think it looks amazing!
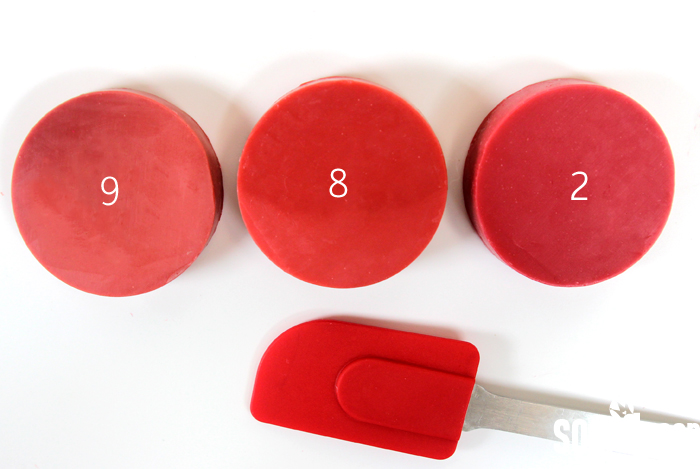
Favorites (Shown Above):
9.) 2 tsp. Electric Bubble Gum Colorant + 2 tsp. Merlot Sparkle Mica + 2 tsp. Tangerine Wow! Colorant + 4 tsp. Fizzy Lemonade Colorant
8.) 3 tsp. Electric Bubble Gum Colorant + 1 tsp. Merlot Sparkle Mica + 2 tsp. Tangerine Wow! Colorant + 4 tsp. Fizzy Lemonade Colorant
2.) 4 tsp. Electric Bubble Gum Colorant + 1 tsp. Merlot Sparkle Mica + 2 tsp. Tangerine Wow! Colorant + 2 tsp. Fizzy Lemonade Colorant
Have you found your perfect blend of red in cold process? I would love to hear if you’re willing to share =)



I recently tried magenta mica. I ended up with black spots in my soap but only where I had the mica. I was wondering if you had some suggestions on what caused it?
I make cows milk soap, cold process. Other ingredients are lard, coconut, olive and soy.
After mixing oils and milk/lye solution together, I pulled small portion to the side and added scent (cherry almond) and colorant. I blended that and didn’t have clumps. I then added back to half my total. I poured I scented into mold and then poured in scented portion and swirled. I use an acrylic mold. I then put the whole thing in the freezer for a couple hours. I pulled out and let cure for a couple more than willing to attach picture if I could figure out how.
I’m not quite sure why that happened. If you used the Cherry Almond from Bramble Berry, it does discolor light brown but shouldn’t go black. Do you have a picture of the spots? That would be really helpful. You can send those to me on Facebook: https://www.facebook.com/BrambleBerry/
-Kelsey with Bramble Berry
Used one of the red recipes (8) to make red for a red-white-and-blue swirl in hot process, Swirl Quick Mix recipe. It didn’t look quite red enough, so we dumped the rest of the merlot mica (2 tsp) in and a touch of black oxide. It turned out pretty nice!
That’s awesome, glad to hear your red turned out nicely! 🙂
-Kelsey with Bramble Berry
This post is really inspiring me to try adding color to my soaps, but I only hot process at this point. Any tips for impatient soapers like me?
You can definitely use these color combinations in hot process soap! You may need to use just a bit less. I would recommend mixing your colors at a rate of 1 teaspoon powder into 1 tablespoon lightweight oil. Then, when the soap is finished cooking, add the color in parts. A good “part” would be 1/4 teaspoon. So if the ratio of color was 3:2:1, you can start with 3/4 teaspoon, 1/2 teaspoon and 1/4 teaspoon. 🙂
Learn more about adding color to hot process soap in this video: https://www.youtube.com/watch?v=mxTXwxbpzLM
-Kelsey with Bramble Berry
I am struggling to get a nice red burgundy color for my Merlot soap. I gave tried a combo of Madder root and red Brazilian clay but the soap cures into a brownish hue. What natural colorant or combo would you suggest to change this brown to burgundy-ish?
Natural colorants can be tricky when it comes to red. They tend to fade or morph as the soap cures. I would recommend using the madder root and gelling the soap (if you’re not already!) Gelling can help brighten the colors up a bit and help them fade more reddish. 🙂
We did that for the red in this natural colorant tutorial: https://www.soapqueen.com/bath-and-body-tutorials/natural-colorant-rainbow-cold-process-soap/
Learn more about gel phase here: http://www.soapqueen.com/bath-and-body-tutorials/tips-and-tricks/gel-phase/
-Kelsey with Bramble Berry
Have you thought about offering a sample pack of the colorants used for making red? At $6 for most colorants listed, it can get costly to try out new things but a sample pack would be great!
Hi Jen!
Thanks so much for your suggestion, that’s a great idea! I forwarded it to our research and development department. 🙂
-Kelsey with Bramble Berry
I like that idea Jen!
Thank you for the great article. Would you be kind enough to update the article to point out what soap base you made the color samples from?
I just made a “Red Zebra” soap using #8, with the following Oils:
Castor Oil 20%
Coconut Oil 20%
Palm Oil 33%
Shea Butter 7%
Rice Bran 20%
This turned out darker, more “brick red” with brown tones in it than it appears in the blog. My theory is that the soap base has influenced the result (yes, the soap was gelled). After this trial, I appreciate the importance of your comments on dispersing the colorants separately and adjusting along the way. It seems that except for soap bases that darken over time, this is the best method to get what you’re looking for. In that regard I will say that the dispersed colorants (in proportions of blend #8) matched the resultant soap quite well. I could have adjusted at that point, however, I was unsure as to whether the color was going to change once made in gelled CP soap. I would attach a picture but doesn’t seem like that is possible in this area of your site.
Hi Mike!
Absolutely! The recipe we used was:
Palm Oil 30%
Coconut Oil 30%
Sweet Almond Oil 30%
Avocado Oil 10%
We’ll get the blog updated with that recipe. Thanks so much for your suggestion!
Our recipe uses oils that are a bit more neutral in color. If your recipe has darker oils, it will affect the red color. For instance, rice bran oil is rather yellow, so it will affect that color slightly. Other factors, like the shade of the fragrance oil, will affect the color as well. Some fragrance oils have a slightly yellow tone to them. It may take a bit of tweaking to get the perfect red for your recipe! Taking lots of detailed notes really help. Then, once you find that perfect red, you can use it for future batches. 🙂
-Kelsey with Bramble Berry
Thank you!
I am about to make Red again, but with a soap base that is more amenable to swirling. But this time, I will play with the dispersed colorants beforehand. My plan is to mix the lighter colorants with a TBSP per tsp of the warm oils of the soap so the color is right. Then, I am hoping that the amount of Merlot Mica will be the “knob” I can adjust until my red is bright red, perhaps resembling #8, and then stop. We will see. Any advice beforehand appreciated.
By the way, the FO I used was Grapefruit Bellini.
If you guys can support photos it would facilitate discussions!
Thanks again.
Mike
Hi Mike!
That sounds like a great plan! Let us know how that batch turns out. Also, you can share photos on our Facebook page! We’d love to see them. 🙂
Bramble Berry Facebook: https://www.facebook.com/BrambleBerry/
-Kelsey with Bramble Berry
Done! Used #8 again, but this time dispersed just the Yellow (Fizzy Lemonade), Pink (Electric Bubblegum), and Orange (Tangerine Wow!) to start. I then added the Merlot in small increments until the Red was to my liking. Specifically, I was trying to lighten the Red as the #8 turned out too dark for my liking. This technique worked wonderfully. The result is a much brighter, cheerful Red – without Orange/Brown tones or Berry. I will post a picture on FB later. The proportions that were used were:
Colorant Original No 8 My Adjustments
Fizzy Lemonade 4 4
Electric Bubblegum 3 3
Tangerine Wow! 2 2
Merlot Mica 1 0.5
So, as a general help to folks – the specific formula may not be of great interest but the technique of dispersing the first three, and carefully adding in the Merlot in small increments (dispersing with a mini-mixer as you go) may be helpful. This worked very nicely and the resultant soap color matched the dispersion quite well. It is worthy of note that the dispersion oil is a TBSP of the soap oils per tsp of colorant – approximately, and this allows you to take the blended soap oil color into account (to the degree it doesn’t change with age). I warmed the dispersion oil to ensure it stayed in the 100 deg F range so it is above the melting point of all the constituent oils.
Note that the one you hold out to use as the adjustment “knob” is the darkest color – and thus this technique should apply to other blended colorants as well.
Thanks for your great article in the first place – excellent. Hopefully this thread can help others if they end up wanting to adjust the final color of your formula a bit.
My wife and I have been making soap for nearly three years and have never figured out how to do color. We almost never get what we’re aiming for. Duh! We’ve been reading “The ‘Perfect Red’ ” and watching Soap Queen videos for the past couple days and I think we finally get it.
The “1 tsp per pound” of soap doesn’t mean one teaspoon of powdered colorant per pound of soap. It means 1 tsp of the previously mixed colorant with carrier oil. Or “dispersed” colorant.
So if we have this right, we mix separate containers of Merlot, Lemonade, Tangerine and Bubble Gum, each based on 1 tsp powdered colorant to 1 Tbs sweet almond oil.
To achieve the color in No. 8, then, from the above previously mixed colors, we take 3 tsp Bubble Gum, 1 tsp Merlot, 2 tsp Tangerine and 4 tsp Lemonade and mix them together.
Then, to color our soap, if we’re making a 3.5-lb batch, we’d add 3.5 tsp from the No 8 “recipe” of the four colors mixed together. Or if No. 8 were one of three colors in a 3.5-lb batch, we’d add only 1.16 tsp of the four mixed colors.
Is that correct?
Hi Bob!
To begin with, I would recommend dispersing each color separately. So, you’d have 1 teaspoon of colorant mixed into 1 tablespoon of oil for each color. Then, you can add those recommended amounts separately to your 3.5 pounds of soap. The reason for that is to account for any recipe variation. For instance, if you’re using a darker olive oil, or a fragrance with a tint to it, you can adjust your amounts slightly.
If you’re using the same recipe and fragrance oil, you can definitely mix all those colors together for future uses! I would just recommend giving the separate colors a try so you can ensure you get your perfect red. 🙂
Also, the color amounts above were in a 1 pound batch. Because the 3.5 pound batch is larger, you may need to add more of each color to get the red pictured above.
Dispersing your colors is so nice because it helps prevent clumping and speckling. We love doing it. Learn more about preparing your colorants here: http://www.soapqueen.com/bath-and-body-tutorials/tips-and-tricks/learn-prepare-colorants-cold-process-soap-making/
Let me know if that makes sense, or if you have any other questions! 🙂
-Kelsey with Bramble Berry
Thanks, Kelsey, you explained it as I finally understand it. Just received my BB order and mixed up nine colors so they’ll be ready the next time we make soap. Looking fwd to the colors turning out right for once!
You’re welcome Bob! Thanks so much for your order, we really appreciate it. Definitely let us know how it goes! We’d love to see your beautiful red soap on our Facebook page. 🙂
Bramble Berry Facebook: https://www.facebook.com/BrambleBerry/
-Kelsey with Bramble Berry
What natural colorant do you recommend for red in cold process soap? Moroccan red clay doesn’t come out bright red most times .
Hi Sarah!
You may like madder root powder! It creates a lovely natural red, especially when gelled. Read all about madder root and how to work with it here: http://www.soapqueen.com/bath-and-body-tutorials/tips-and-tricks/using-madder-root-powder-color-soap/
You can also try Dark Red Brazilian Clay! You can add it on its own, or maybe try mixing it with the madder root to get a color you like. 🙂
Read more about working with clays in cold process soap here: http://www.soapqueen.com/bramble-berry-news/sunday-night-spotlight-brazilian-clay/
-Kelsey with Bramble Berry
Thank you so much for sharing this. Very helpful!!
You’re welcome Sara! Glad this post was helpful for you. 🙂
-Kelsey with Bramble Berry
I still say that now that you have the formula down, you should pre-mix it for sale – you could even have a few different tones available.
Thanks for the great suggestion! I passed that along to our research and development department. 🙂
-Kelsey with Bramble Berry
This post is awesome! It is the most frequent question I get, how do you get your reds? This post with all the details and color samples is perfect!
Thank you Margaret, so glad you like the post! We were excited to share our results. 🙂
-Kelsey with Bramble Berry
My favorites are 2, 8 and 12.
Thanks for the idea to mix in some yellow or orange in. I never thought of that!!
You’re welcome Martina! Glad you found that helpful. Also, agreed – I just love 8. 🙂
-Kelsey with Bramble Berry
Thank you very much for this post. Especially all the details in it. I have been experimenting with amounts of colorants and mixing with red mica or oxide a few months ago to prepare for making gifts for Christmas. I would never have thought of adding more yellow or orange actually.
With kind regards,
Annemieke
You are very welcome! A bit of yellow and orange can really help bright out the bright red notes. Have fun making beautifully red gifts. 🙂
-Kelsey with Bramble Berry
Love this! A timely post too 🙂
Thank you Linda, so glad you love it! We wanted to find a lovely holiday red. 🙂
-Kelsey with Bramble Berry
I just shouted out loud because this is so amazing! I’ve been looking for a comparison like this since I started soaping. 😍😍😍
That’s awesome, so glad you like this post Mokhe! Thank you for your sweet comment. That means a lot to us we could make you shout out loud! 🙂
-Kelsey with Bramble Berry
This is really neat. I saw the test on Instagram. Funny how the spatula makes a difference in what we perceive as the color red. I like 8 but 2 is my favorite for a red color. Thank you so much for working on this. I have to try it in my cupcakes.
You’re welcome Louise, so glad you like the post! I like 8 a lot too. Also, isn’t that spatula interesting? It’s a nice reference point, as on their own the soaps can look slightly different. Let us know how your cupcakes work!
-Kelsey with Bramble Berry
This is such a great post – thank you! They all look really great and a number of them look red. But the red spatula really helps identify the red red one. I have always used the BB formula of merlot mica and electric bubble gum. When I’m making a red I usually will whiten my soap with titanium dioxide first and then color with red, sometimes I’ll add a fraction of a tsp of brick oxide as well. Just depends on if I need to darken it up a bit from pink or not. This post goes in my reference book for sure!
And PS – mixing your own colors is so much less expensive than buying some of the custom ones out there for purchase.
You’re welcome Michael, so glad you like this post! Lightening the batch with titanium dioxide is a great idea. That way your red won’t have a yellowish tinge to it. 🙂
-Kelsey with Bramble Berry
Sunday Night Spotlight: Titanium Dioxide: http://www.soapqueen.com/bath-and-body-tutorials/tips-and-tricks/sunday-night-spotlight-titanium-dioxide/