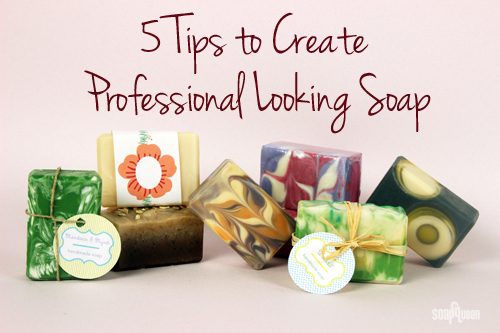
 When making soap to sell or give as a gift, it needs to look polished and professional . Unfortunately, not every batch comes straight out of the mold this way! Whether the soap has a bit of soda ash or uneven edges, there are several tricks to making each and every bar picture perfect. Here are my top five finishing touches to create soap that looks professional and finished.
1. Steam Your Soap
Soda ash occurs on soap due to the natural process of unsaponified lye reacting with carbon dioxide in the air. The result is a thin white layer on the top of the soap. While perfectly safe to use, soda ash can be considered an aesthetic issue. To learn more about soda ash and how to prevent it, click here.
Steaming soap is one of the more effective ways to remove soda ash, especially when the soda ash is deep within the bar. As you can see from the soaps below, steaming makes a huge difference!
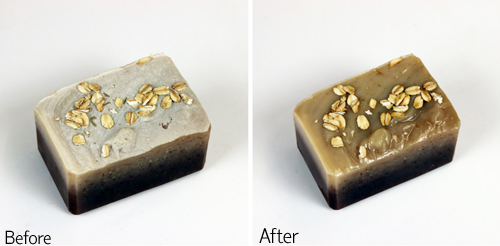
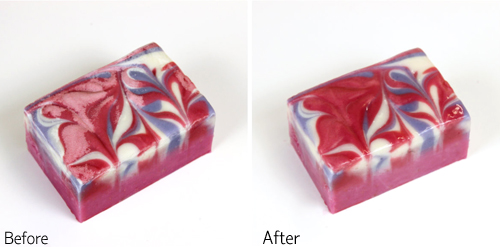
In the Instagram video below, you can see that steaming your soap is incredibly easy. You can steam soap before or after it has been cut. Simply hold the steamer directly over the top of the soap, and move the steamer around for several seconds. You can see the soda ash disappear before your eyes! The soap may become soft, so it’s best to place the soap on a hard surface while steaming and allow to dry before moving.
The Black, White and Gold All Over Soap gets a “steam treatment” to get rid of a thin layer of soda ash.
2. Wash Your Soap
Yes, you heard that right…you can wash your soap! This is a great alternative to steaming if you do not have a steamer available. Wrap a nylon around your finger, and run your finger under cold water. Gently scrub away the soda ash using the nylon and water. You can also run a paper towel under cold water, and use the paper towel to gently “wash” away the soda ash.
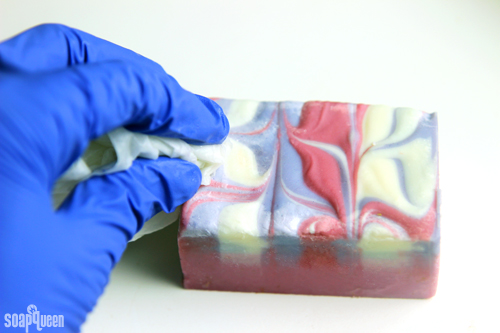 Choosing between steaming and washing will depend on the style of soap. For example, it would be difficult to wash a bar with a texture top, such as the Juicy Orange and Sweet Rose Soap. Steaming would work much better!
3. Bevelling Your Soap
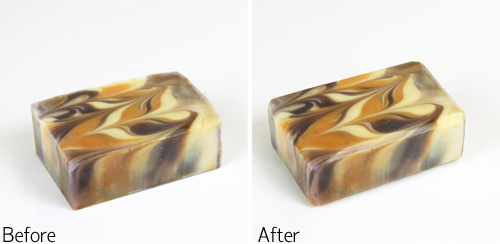
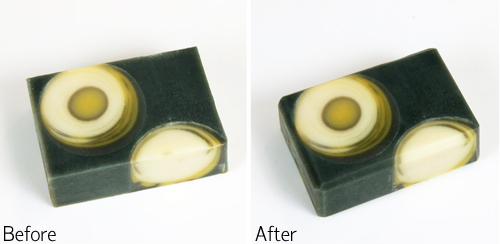
Using a beveller creates smooth edges on the soap, helping it to look crisp and clean. Simply slide the bar of soap across the blade in the center of the beveller. Doing so shaves off the corner, producing a small flat edge. Click play on the video below to see the Soap Beveller/Shaver in action!
It is best to use the beveller after the soap has been cut and has cured for about a week. If the soap is too soft, the edges will not be clean. If the soap is extremely hard, running the soap across the blade smoothly becomes more difficult. Some soapers like to save the shavings to incorporate into other soapy projects. They would work great for the technique used in the Cherry Blossom Glitter Cold Process tutorial!
While the beveller does not drastically change the soap like steaming or washing, the before and after examples below show how a subtle change can make a huge difference!
4. Shrink Wrap Your Soap
Packaging your soap is an easy way to create a professional look. There are countless ways to package your soap, and deciding on what method may depend on your own style/branding, the bar of soap, and how protective you’d like the packaging to be.
One option is to shrink wrap your soap using Shrink Wrap Soap Bands. Simply slide the soap into the band, apply heat from a heat gun, and the bands shrink down to fit your soap. They work great for soap created in Birchwood Molds (9 Bar, 18 Bar and 36 Bar), 10″ Silicone Loaf Mold and wooden loaf molds. Not only do they create a polished look, they protect your soap!
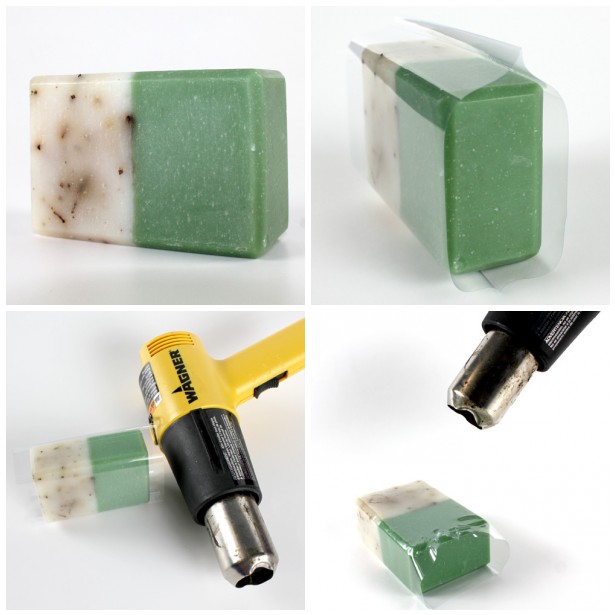 For bars of all shapes, it’s possible to use plastic wrap from the grocery store to shrink wrap soap. This packaging Soap Queen TV Episode shows you how! Other easy and professional looking packaging options include using soap boxes, organza bags, jute bags or wrapping paper! For even more packaging inspiration, check out the Make it Monday: Packaging album on Facebook.
5. Label Your Soap
Adding a sleek and polished label not only tells recipients about the soap, a label instantly makes a bar look professional and gift-worthy. Labels can come in the form of cigar bands or hanging tags. Bramble Berry has numerous downloadable templates to make adding labels to a wide array of products extremely simple. If you’re looking for information on how to label ingredients for cold process soap, this post has you covered.
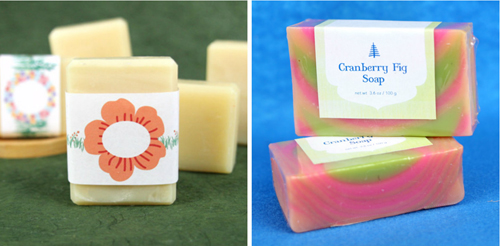 (Above, left to right) The Summer Cigar Bands completely transform the simple soap created using the Beginner’s Cold Process Kit. The colorful Funnel Pour Soap looks polished with both shrink wrap and soap labels.
 Labeling your soap is a lot of fun, because there are so many creative labeling possibilities. One classic option is to use a ribbon, piece of yarn, or twine to tie a hanging label onto your soap. The result is clean, polished and super cute.
What is your favorite way to create a polished and professional bar of soap? I’d love to hear your tips and tricks!

please. l have two question to ask one is what happen to my soap i use same lye in making soap i poured it in diffetent set the second set became harder than the firs set
2 how can i do a soap with multiple color like yours
thank you
I can definitely help you out! What oils did you use in your recipes? How hot were the lye and water? Also, what fragrance and color were you using?
To do multiple colors, you can pour the soap into separate containers after they’ve reached trace. Then, color each container and pour the soap into the mold! You can see that process in the Silky Berry Cold Process Soap video: https://www.youtube.com/watch?v=Ea-UXZMXM1I
What sort of design do you want to do with your colors? Let me know and I can recommend a tutorial. 🙂
-Kelsey with Bramble Berry
like drowing a flower like grain flower on my soap
on thr oil i use pko and all of the sopa measurement were d same
i didn allow soak the caustic for cimplete 24hs all
Thanks so much! How much oil, lye and water are you using in your recipe? Thank you. 🙂
Also, we have several tutorials where you draw on flowers! I’ll link those below.
How to Make Soap Frosting: https://www.soapqueen.com/bath-and-body-tutorials/cold-process-soap/make-soap-frosting-soap-queen-tv/
Vibrant Mehndi Cold Process Soap: https://www.soapqueen.com/bath-and-body-tutorials/cold-process-soap/mehndi-soap/
-Kelsey with Bramble Berry
please if i want to add egg to my soap how can i do that shoul i add the egg to the lye before adding the oil or how can i do it for the egg to add nutrient or vitminne c to my soap
two pls what is the important of beewax to human if adding it in bathing soap
and how can i do a soap that smothen the body when use to bath and what kind of ingredient can be use for thant thanks
please what can i add to my lye to be srong if it is less than 255 in the hydrometer for thr soap to be hard
To add an egg to your soap, we recommend taking some of the liquid oil in your batch and heating it gently. Then, add the egg and stir well before adding that back to the soap at thin trace. You may want to strain it in case there are any bits of egg that hardened. The warm oil will help prevent the egg from scrambling.
Beeswax helps harden your soap and also adds a bit of shine. We recommend it at 8% or less in the recipe. To keep it melted the whole time, you will need to soap around 180F. This post talks more about working with beeswax: https://www.soapqueen.com/bath-and-body-tutorials/cold-process-soap/beeswax-spoon-plop/
If you want a nice smooth bar, you can add moisturizing oils like avocado, sweet almond and shea butter! Read more about those oils and how much to add to your recipe here: http://www.soapqueen.com/bath-and-body-tutorials/tips-and-tricks/free-beginners-guide-to-soapmaking-common-soapmaking-oils/
Also, for firm bars, hard oils like coconut and palm up to 33% work well. 🙂
-Kelsey with Bramble Berry
how or what is the sign that palm oil is ready to be use in making bathing soap i use palm oil to make soap i discuver that the fragrance i added to the soap was not working instead the odour of the oil and the color i add to the soap was not working instead that of the oil and the soap in a bowl the uper solify while the under was water pls what can be the posible cause
Is that soap separating? What temperatures were your oils and water at?
-Kelsey with Bramble Berry
please what could be the cause that my soap scrash somebody on face wen use to bath
Did you add any exfoliants to the recipe, like salt or coffee grounds?
-Kelsey with Bramble Berry
Wow, these are some really amazing tips about making your homemade soaps look professional. I liked yout tip about rounding the edges of the bars. That does seem like a simple way to make them look nice. That might also be something to look for when buying handmade soaps as well. After all, that shows that the person who made it cares about what they created.
So glad you like the tips Emily! Sometimes simple finishing touches can make a big difference in the final bar. 🙂
-Kelsey with Bramble Berry
I have washed many a soaps. I use the nylons method sometimes but for textured tops, a very soft toothbrush works extremely well!
I should add – a textured top without any botanicals or other stuff 🙂 Probably can’t do this with your Juicy Orange and Sweet Rose Soap!
Oh the toothbrush is such an amazing idea Melissa! I’m going to give that a try. 🙂
-Kelsey with Bramble Berry
Hi! About the steaming method when its the best to steam your soap?? Right after you unmold your soap?? Or about after two weeks during cure period?
Hi there!
We like to steam the soap after it’s been unmolded for about a week. That ensures the soap is mostly finished saponifying so the soda ash won’t reappear. It makes the bars look really nice and professional. 🙂
-Kelsey with Bramble Berry
Thank you!!! You are so helpful!!!
You’re welcome! 🙂
Are there alternatives to using a plastic wrap?
I try to avoid plastic as much as possible because of the environment 🙂
Thank you!
Hi Els!
You can use recycled paper to wrap your soap! It looks really cute. You can also use newspaper, recycled cardboard boxes, etc. 🙂
Get more packaging inspiration here: https://www.soapqueen.com/bath-and-body-tutorials/tips-and-tricks/packaging-inspiration-with-heathoriginal/
-Kelsey with Bramble Berry
Watched the video of bevelling the soap bars and say I just use a good potato peeler. It’s very inexpensive and looks to do the same thing. Is it ok to keep using that or do I need to invest in a beveler?
If a potato peeler works well for you, that’s just fine to use! You can use whatever does the job, whether it’s a beveler or potato peeler. 🙂
-Kelsey with Bramble Berry
hi Kelsey.. I wanna ask, why my soap bar bend after curing period?
Hi James!
I believe we got this figured out on the Bramble Berry Facebook page! I’ll post my response below just in case. 🙂
I just ran your recipe through our Lye Calculator, and I noticed we call for 409 mL of water, but your recipe calls for 750 mL. I’m wondering if the extra water is making the soap a bit soft. If that’s the case, it will need a couple extra weeks to cure. Eventually, the water should evaporate and the bars will harden.
Lye Calculator: https://www.brambleberry.com/Pages/Lye-Calculator.aspx
Also, superfat is the amount of oil in the soap that wasn’t used up by the lye. It’s freefloating oil that adds some luxury to your batch. We like to superfat right around 5% typically. Read more about superfatting soap here: http://www.soapqueen.com/bath-and-body-tutorials/cold-process-soap/superfatting-soap-an-explanation-2/
For 100% coconut oil soaps, we like to superfat around 20%. At higher than 33%, coconut oil can be a bit drying on the skin. This 100% coconut oil recipe is superfatted at 20% and feels great on the skin: http://www.soapqueen.com/bath-and-body-tutorials/cold-process-soap/defying-the-rules-of-soapmaking-100-coconut-oil-soap-with-aloe-vera-and-a-mantra-swirl/
-Kelsey with Bramble Berry
i use the lots of lather quick mix from bramble berry and i always have soda ash 🙁 can i added besswax to the mix ?
Hi Zena!
Oh no, I’m sorry about that! A number of factors can cause soda ash, including temperature. You may try soaping at higher temperatures (at least 100F) or water discounting 10%. It can also help to insulate your soap, which helps it go through gel phase!
Read more about preventing soda ash here: http://www.soapqueen.com/bath-and-body-tutorials/tips-and-tricks/explaining-and-preventing-soda-ash/
And insulating your soap here: http://www.soapqueen.com/bath-and-body-tutorials/tips-and-tricks/when-to-insulate-handmade-soap/
You can add beeswax to the Lots of Lather Mix, but it’s a bit tricky. The mix has already been formulated so all you have to do is plug in the oil amount to get the lye and liquid. If you add another oil, you’ll need to calculate the lye and liquid amount separately. For instance, if you add 2 ounces of beeswax, you’ll need to plug that into the Lye Calculator and add an additional .1 ounces of lye and .7 ounces of liquid. You’ll also need to soap at higher temperatures (around 160F) to keep the beeswax from solidifying.
Lye Calculator: https://www.brambleberry.com/Pages/Lye-Calculator.aspx
I would recommend trying higher temperatures, water discounting and insulating first. If you’re still noticing soda ash, you can give that beeswax a try. 🙂
-Kelsey with Bramble Berry
Hi,
Please I need a very good recipe for bathing soap for babies and also how to use red palm oil for soap.
Thank you
Hi Crownsford!
We have an awesome recipe for Buttermilk Bastille Baby Bars you may like! It is made with gentle ingredients like olive oil and buttermilk, which is perfect for sensitive baby skin. You can find the recipe and a video on how to make that recipe here: http://www.soapqueen.com/bath-and-body-tutorials/cold-process-soap/buttermilk-bastille-baby-bar-on-soap-queen-tv/
Also, we haven’t done a lot of experimenting with red palm oil, so I’m not 100% sure how to use it! If that palm oil is solid at room temperature, I would imagine it could be used like palm oil! You can use palm oil up to 30% in your recipes. It adds great firmness. 🙂
Read more in the Free Beginner’s Guide to Soapmaking: Common Soapmaking Oils: http://www.soapqueen.com/bath-and-body-tutorials/tips-and-tricks/free-beginners-guide-to-soapmaking-common-soapmaking-oils/
-Kelsey with Bramble Berry
Hi, I’ve been soaping with red palm oil for awhile, and it’s one of my favorite oils. I use it as a natural color as well. For a light yellow, I substitute one ounce of my palm oil for the red palm. For more of a golden true yellow, I do half. For a deep orange I do all palm oil for my oil. It is fantastic for your skin too, and even better for you than regular palm oil. Good luck!
Thanks so much for the great tips Kirsten! 🙂
-Kelsey with Bramble Berry
I steamed a few of my soaps that really needed it (most don’t), but I find that it doesn’t help much in removing ash. Barely a little. When first steamed it looks great, no ash and shiny wet, but as soon as it dries again, it looks ashy again. Maybe not quite as much as before, but the difference is barely noticeable. Just like in your pictures above, that’s how it looks right after its steamed, but it doesn’t stay that way after it dries again.
And the same in scrubbing it off. If I literally USE it in the sink once, that helps. But of course I wouldn’t do that with the soaps for other people. And they are mostly very decorative, so that wouldn’t work anyway.
I also don’t bevel my soaps, as I don’t see the point in wasting soap, and the first wash will round the edges anyway.
And I do shrink wrap too, and they really look nice and professional. I like that they are protected and people can smell them. I use Avery square sticker as a label on one side. Everything fits on it and it looks nice and neat, and the design still shows around it and on the back.
Hi Martina!
We steam our soaps all the time and generally have great results! If you notice that the soda ash is coming back, it can mean that it is fairly deep and not just on top of your bars. To help prevent soda ash from forming, you can discount your water 10%. It also helps to soap warmer (100F or above) and pour at thicker trace. You can read more tips in the Explaining and Preventing Soda Ash post: http://www.soapqueen.com/bath-and-body-tutorials/tips-and-tricks/explaining-and-preventing-soda-ash/
Beveling your soaps is definitely optional. I think the bars look great either way. 🙂
While beveling does create scraps, they don’t have to go to waste! You can find ideas on how to use them in the How to Use Leftover Soap Scraps post: http://www.soapqueen.com/bath-and-body-tutorials/tips-and-tricks/use-leftover-soap-scraps/
Also, I agree, I love the way shrink wrapped soaps look. 🙂
-Kelsey with Bramble Berry
I have been told many times how professional my soap looks because of the shrink wrap. It’s also less labor intensive than handmade boxes or other type packaging. I appreciate the beveled and unbeveled pictures. The difference is subtle and I agree that it looks nice. It is not something that I do for my own soaps though. I want every scrap of soap for use and it seems like a lot of work for a subtle change. I think it is totally a matter of taste though, and your photos can help people decide if the look is worth it or not to them 🙂
Hi Margaret!
It’s amazing what a difference small details make. 🙂
-Kelsey with Bramble Berry
Thanks for the great ideas! And your shrink wrap bands are on sale this month! I LOVE your monthly specials!
I am wondering though, if you’re going for a rustic look to your soaps, would it be better to not bevel the edges?
Hi Olivia!
So glad you like the post!
As for bevelling, it’s personal preference. If you like the look of the soap without bevelled edges, that’s what you should go with. 🙂
-Kelsey with Bramble Berry
Is it okay to shrink wrap cold process soap? I thought that was strictly for melt and pour soaps.
Hi Nancy!
It is! The trick is to let your soap cure for 4-6 weeks before shrink wrapping them. That way they get plenty of air, and will be nice and mild and last longer in the shower. 🙂
-Kelsey with Bramble Berry
I had been wondering this same thing! 🙂 As an add on question…does shrink wrap add a BENEFIT to CP soap so it doesn’t over-dry or anything?
Hi Karie!
Many people love using shrink wrap because the design shows through the clear plastic, and people can still smell it on the open ends. It can also protect it from dust and other debris. 🙂
Shrink Wrap Soap Bands: https://www.brambleberry.com/Shrink-Wrap-Soap-Bands-200-wraps-P4975.aspx
Cold process soap is fairly sturdy. Even just wrapped in a cigar band, it shouldn’t dry out too much!
-Kelsey with Bramble Berry
Silvia,
I have steamed my soaps after cutting. In fact sometimes I do not do the steaming until the end of the cure. This way I can decide if the ash adds to the design or takes away from it.
I think beveling the bars is a great way to make soap look professional. I just use a vegetable peeler as I make only small amounts of soap at one time.
Hi Susie!
That’s a great idea, thank you for sharing! 🙂
-Kelsey with Bramble Berry
Hi.. I would like to ask if i can still steam it after cutting, but like 3 days or a week after? I never see ash when i cut, its always after a couple of days at least.
Thanks a lot! : )
Happy Soaping!
Hi Silvia!
Absolutely! You can steam your soap whenever you see soda ash form. 🙂
-Kelsey with Bramble Berry
Ash doesn’t usually bother me. In fact, unless it’s extreme, I think it adds to the design of the soap because it usually follows along with the swirls. However, I refuse to wash or steam my soap because there have been experiments that suggest that wetting soap can lead to DOS more quickly. In the lather lovers swap, the participants noticed that the used soaps had developed DOS after a year whereas the unused soaps had not.
Hi Hunter!
We typically steam all our soaps, and haven’t had a problem with DOS forming more quickly.
If your soap is surrounded by moisture it can cause DOS to form more quickly. After we steam it, we let it sit in a cool, dry area on a rack so it gets plenty of air and little moisture. 🙂
-Kelsey with Bramble Berry
I like to just use crinkle paper as a band around my soap then stick my logo on one side and the ingredients label on the other. I’ve never had any luck with steam or other methods to get rid of soda ash. I spray with alcohol while it saponifies and hope for the best. But I usually plane and bevel my soap anyway so the only sure fire method is to plane it off. Then I like to dip my soap in a bowl of distilled water and let it dry. The soap has a nice glossy sheen to it.
Hi Michael!
That sounds like a great finishing touch for your soap. Thanks for sharing your tips! 🙂
-Kelsey with Bramble Berry
what does plane mean?
Hi Ellie!
Planing the soap involves running it over a flat surface with a sharp blade. That makes the edges nice and smooth, and helps get rid of soda ash. 🙂
-Kelsey with Bramble Berry