Anne-Marie Note: Like the way guest blogger Erin thinks? She’s teaching Scrubs 101 and 201 at the 2012 Soap Weekend Intensive. The link hasn’t been made public yet so shhhh, you’ve got a head start. Only 19 spots are available – don’t miss out and sign up for Soap Weekend Intensive in June 2012 HERE!
 Part of my graphic design training was creating package design, and making custom box dies was always one of my favorite tasks! It requires you to see a three dimensional object deconstructed into two dimensions and I think it is a fun brain exercise. I bought an eyelet setter a while ago and one of my first thoughts was how to make a soap box that could be tied together without the use of glue. This is one of my simple designs for a 2 inch by 3 inch by 1 inch bar of soap. The eyelets make clean holes to lace ribbon, and add a nice finished design element to the box. You can download the template for this box here and follow the simple instructions to put it together! ~Erin Pikor
Materials:
• Letter size (8.5 inch by 11 inch) piece of thick paper or cardstock
• Instant eyelet setter with 1/16th inch hole punch and 1/16th inch eyelet setter attachments
• Setting Mat or Cutting Board
• 1/8 inch Quicklets™ Eyelets in color of your choice
• 18 inches of Ribbon in color of your choice
• Scissors
• Rotary trimmer with scoring blade or any scoring blade and a ruler.
• 2 inch by 3 inch by 1 inch bar of soap
Directions:
1) Download the template and print it onto the Letter size sheet of paper. If you are using paper with a design on one side be sure to print the template on the blank side of the paper.
 2) Cut out the design on the solid lines and score on the dotted lines. Save the scraps!

 3) Punch out the grey circles using the hole punch attachment on your eyelet setter. Be sure to puch the holes over your setting mat or on a cutting board.
 4) Insert the eyelets through the punched holes on the reverse side of your paper – that is the side that does not have the printed template.
 5) Set your eyelets with the eyelet setter attachment. Again, do this over the setting mat or cutting board.
 6) String your ribbon through the eyelets weaving in and out like a simple sewing stitch. The ribbon should be strung through the box so that it is coming out of the holes on the ends. Also, the ribbon sticking out on each side should be equal lengths so you have ribbon to tie into a bow.

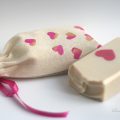
 7) Place your soap inside the box and fold the box up around the soap. The flaps should be on the inside of the box. If you want to you can glue the flaps to the inside of the box but it isn’t necessary.

 If you want to glue the flaps do it before you place the soap in the box. Let the glue dry completely.
 8 ) Tie the ribbon into a bow so that it is taught and you are done! Add a tag to describing the soap or the event if you are making them as favors!
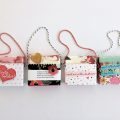
 Here is an example of some other boxes using the same template. I printed on the boxes and in the second box, left out some of the punched holes for more room on the front for printing text or to apply a label.

 You can wrap small guest size soaps with the scraps or use them to punch out tags.


here is the new link http://www.scribd.com/doc/121405277/2×3-soap-box-template
Thanks for the update on the link, Erin! 🙂 I’ll get it changed in the post. 🙂
-Becky with Bramble Berry
Hi Marilyn, scribd must now be a pay site only – i have not been there in a while. Send me an email at [email protected] and I would be happy to send you the template! In the mean time I will try to find a new site to download and update the link.
Best,
I am unable to print the template without paying for a subscription. This is the message/screen I get http://www.scribd.com/archive/plans?doc=57219588&platform=web&signup_type=archive
Is there any way to get this template without subscribing? Thank you,
Erin was able to get you the new link! Here it is:
http://www.scribd.com/doc/121405277/2×3-soap-box-template
I hope that helps! 🙂
-Becky with Bramble Berry
Great work! Where did you get the card stock used in this project? I love the cream with grey speckles.
Hi Natalie!
You can find similar heavy cardstock at your local craft or scrapbook stores.
-Becky with Bramble Berry
just love it!!!!!!!
Glad you like it! 🙂
Is there anyway to download the template without having to pay for a subscription?
You should not have to pay for a subscription unless terms of the site have changed. Can you direct me to the page where it is asking you to pay so I can take a look? Thanks!
Erin, I have kind of an off-topic (and possibly dumb!) question for you: What kind of soap mold did you use to create that bar of soap that seems to fit so perfectly in this box (3 x 2 x 1)?
LOVE THIS! What a great way to package up a wedding favor! Definitely want to try this!
Thanks so much for sharing.
Erin is sooooo talented. Don’t you love those grommets? =)
Just to clarify – to get the template do not click on any of the photos, click on the word “here” in the last line of the paragraph above the materials list – it will take you to this link: http://www.scribd.com/doc/57219588/2×3-Soap-Box
i dont see how to dowlode the template, the first pic is just a red X?
Hi Pam – in the paragraph below the first picture – click on the word “here” in the last line, or go to this link:
http://www.scribd.com/doc/57219588/2×3-Soap-Box
🙂
thank you!
Love the boxes Erin!! I am going to have to attempt these after a trip to my local art store.
Thanks Linda! I printed the words on the boxes – I didn’t include how to print since it was a bit tricky to explain but stamping them is a great idea!
Erin, I love your packaging!! Did you use rubber stamps for the wording that you used on your boxes? I have admired your work for a long time and really think your tutorial was great. Thanks.
Love this. I am not very crafty but may just give this a go. Thanks
Odette, you are totally crafty! I’ll be you could make these =)
Courtney from Bramble Berry
a nice packaging…Thanks for sharing the tutorial!!
Wow. Even with the instructions it looks tricky (for me) but the results are more than worth the effort. These are stunning Erin, thank you for sharing your tutorial.
There are a lot of steps to this project but the end result is definitely worth the effort! Erin is so talented!
Courtney from Bramble Berry
Great post- love it!
Okay, this is off topic, but how did you get such a deep, clean stamp on the soap?
When I’ve tried stamping my soap, either 1) some soap sticks to the stamp and lifts off with when I pull the stamp away, or 2) the whole bar distorts when I press down, bowing outward around the stamp, or 3) soap squishes up around the design, making all the edges look messy. After several rounds of trials I just gave up!
I stamped it a little too deep actually – you can see the square edge of the stamp. The trick is really to figure out what stage of cure you should stamp your soap. If soap is sticking to the stamp the soap is too fresh. If the soap is bowing out it is too hard. For me the best time to stamp my soap is after 2 weeks of cure a little less if it is really dry out.
Thanks for your help! I’ll give it another try. I just soap as a hobby and give most of it away, so being able to stamp my name (or the fragrance) into the bars would save me a lot of hassle in packaging and labeling something I don’t even make money from. 🙂
Awww! This is wonderful!!! I love it!
Oh wow, I LOOOOOVE this idea! I might just have to try this sometime! Thanks for sharing Erin! 🙂
I love this tutorial..Thanks for sharing Erin!