Our latest pride and joy mold is finally here!
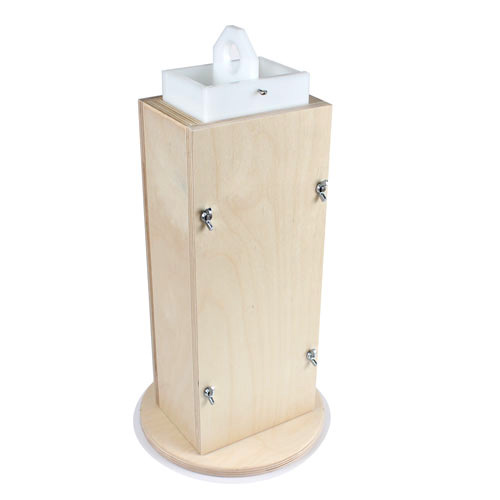
Introducing the Vertical Wood Mold (tutorial coming soon):
Vertical Wood Mold: Made with the same care and craftsmanship as our wildly popular Baltic Birch Molds, these exquisite molds are hand crafted here in Bellingham, Washington. The vertical style allows for unique and creative swirling and layering techniques that will wow your friends and customers.
We have been so enjoying how innovative soap looks with the vertical technique. Fully lined with heat resistant, food grade plastic, this soap mold needs no lining (but does require patience of else you can rip the soap sides getting those liners off!).
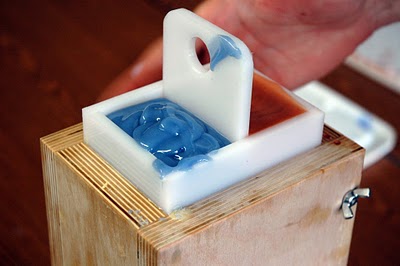
Built in divider for perfect layers
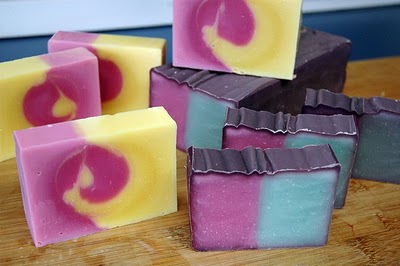
Finished soap made in this mold by Kat at Otion.


![corner3[1]](https://www.soapqueen.com/wp-content/uploads/2014/05/corner31-120x120.jpg)
![m&p20Color20wall1[1]](https://www.soapqueen.com/wp-content/uploads/2014/05/mp20Color20wall11-120x120.jpg)
![FO[1]](https://www.soapqueen.com/wp-content/uploads/2014/03/FO1-120x120.jpg)

I’m having a lot of fun with this–I did a half-coffee half-orange-calendula that turned out great. The last couple of runs have stuck, though. I couldn’t swirl off the sides because they were just plain stuck. So of course they took a chunk with them. Argh. I usually wait 24 hours to unmold, but in one description, you said 48-72 hours. Maybe I should just be patient?
Wait longer – that will help AND consider Sodium Lactate https://www.brambleberry.com/Sodium-Lactate-P5127.aspx at 1 tsp per pound of oils (add it to the lye water mixture). It really helps with the hardness and the shininess of the bars.
I was looking at the picture and see that the center divider has a groove to slide into to separate the colors. Is it possible using the divider to pour a larger amount in one side and less in the other side? Or is a 50/50 only? Either way – I WANT THIS!!!
Hm … yes, if you can find a way to brace the center divider on a block of soap or something. There is a groove cut in the bottom of the plastic so you’ll want to flip the bottom plastic over so it’s on the flat side and the ‘prop’ the divider up in the area that you want. You might consider trying to make your own “groove” with little mini blocks (of soap probably). The bottom soap will not look like the other ones in the loaf but that should do the trick.
Yes, the mold is super cool. I love to use it.
Yes, we are totally going to do at least 2 more advanced techniques with the
mold. I am super excited about the possibilities with the mold but it does
take some elbow grease to unmold – that’s for sure! =)
I got my newsletter today with the darling soap using this mold. OMG is right, I want one now. I will have to get one by the end of the week. The tutorial in the newsletter is great. I hope you will have one for making the swirls. Just awesome.
I just made a batch in it today. I made it pretty hard so I’m hoping to pull out and cut tomorrow. 🙂
Happy Soaping!
Anne-Marie
http://www.brambleberry.com
Blog: http://www.soapqueen.com
I ordered one as soon as I saw that you posted the info on Twitter. I can’t wait till it arrives. TY so much. Can’t wait to do my 1st batch.
I can’t wait to see the tutorial – those look amazing!
Hi Heather,
There are a couple options. But first, I always waited at least 24 hours to unmold the soap. You could always wait longer (and should with some recipes depending on how hard they are). Because of the way the mold is assembled, lining would be extremely tricky.
I just slide the liners off. So, please the soap on the side of the table and slide … just slide. =) No pulling or else they can (and will tear).
Then, let the soap sit for a few days because the colors streak if you cut into too small of a bar.
If you had trouble unmolding, you could always grease the sides with a little mineral oil first but we didn’t find the need to do that with our multiple test batches when perfecting the design =)
I can’t wait to hear what you think of the mold!
I know we’ll be doing a SoapQueen.com blog tutorial on using it ASAP but a video would definitely be even better! =)
Anne-Marie, Anne-Marie, Anne-Marie – your brillance is showing again! I cannot wait to get my hands on this one. I have this fantastic idea, but had absolutely NO IDEA how to make it happy. It would be awesome if you could do a SoapQueen video showing this one.
I’m with Patrice…O-M-G! Totally getting one!
I am sooo interested in one of these molds. I have only two questions about it… how long did it take to set before it was unmolded? And how do you remove the soap without the sides sticking to the soap???!!! I tried a mold that was suppose to be stickless like that and it was a disaster! Pulled my soap completely apart. I can only dream of a soap mold I can use liner free with CP soap
YAY! I have a grin from ear to ear … thank you. We had so much fun designing it and playing with it and refining the mold. And, I have some SUPER fun tutorial ideas to do with it as well =)
He he … it’s so easy when you have the right tools! =)
A-ha! I noticed that magenta and yellow soap a while back (on FB, maybe?) and was racking my brain trying to think how I could replicate it. Now I know! 🙂
O-M-G! I am so getting this one. How clever and not to mention practical and time-saving:D