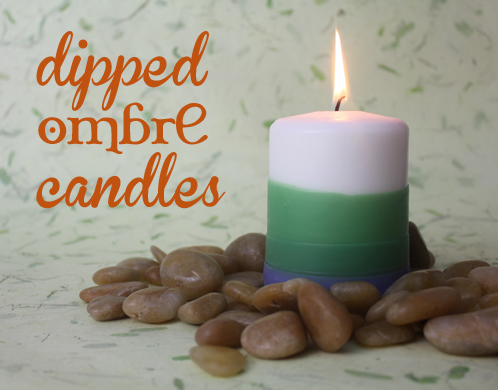
The other day I happened upon a random assortment of unscented candles that I had been saving for…something. Today was the day for that something! Using our wax dye blocks and fragrance from our NEW Candle and Soap fragrance line, I spruced up these otherwise basic candles and was even able to add a little bit of scent.
Search Results for: candle
Did Someone Say Free Candle Wax?
How long have you wanted to make candles but have never tried? We have the perfect opportunity for you to get started. Check Bramble Berry’s brand new candle fragrances that are totally skin safe so you can use them in soaps too (double whammy)! Browse the yummy new candle fragrances HERE. But that’s not the only exciting news that we have to share today.
Eco Chic Candles
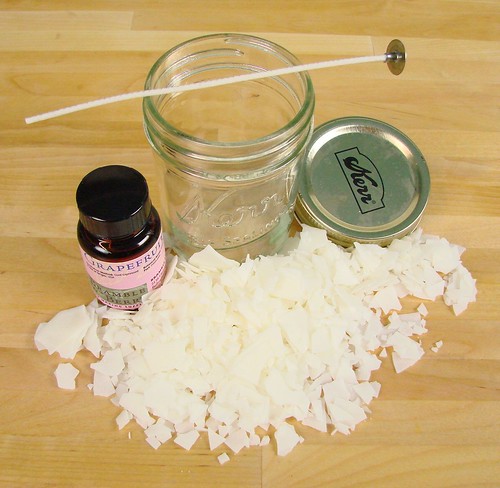
Get back to the basics by using natural products like Bramble Berry’s new Naturewax. It is skin safe, 100% vegetable based and made from soy which is an environmentally friendly renewable resource. Reuse your old canning jars, mason jars or baby food containers for a variety of eco-friendly container candles.
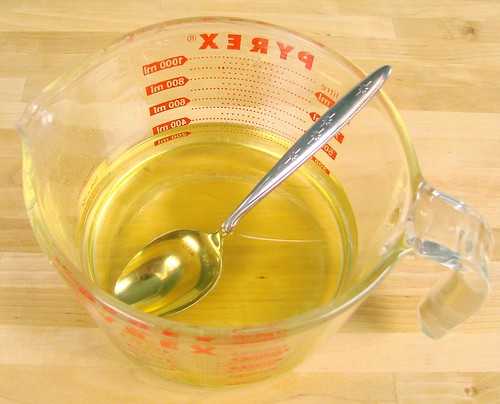
ONE: Melt the Naturewax wax in the microwave in a heat safe container. Make sure to melt it in 1 minute bursts, stirring in between with a spoon. Normally we recommend a double boiler for wax melting but his particular wax has a melt point of 125°F so it melts nicely in the microwave. Also, for paraffin based waxes, I always recommend specialty candle containers. Again, because of the super low melt point, they are not needed for this Naturewax based project. For more tips on candle making, check out the Soap Queen TV Episode on Travel Candles.
TWO: Fill one jar with melted wax, leaving at least 1/2″ from the top of the jar. Mix in your essential oil blend (we used 5 ml Orange EO, 4 ml Grapefruit EO, 3 ml Lime EO). Blend well. Note: we used a 4 oz. baby food jar and found it held 3.2 oz. (by weight) of Soy Wax.
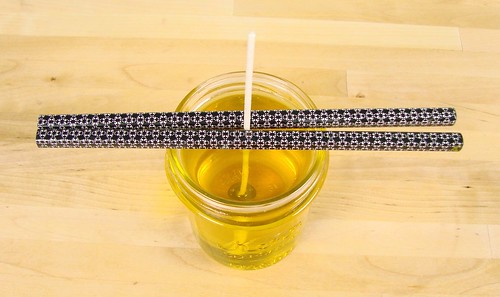
THREE: Dip the base of the wick into the melted wax and center on the bottom of the container.
TIP: If you’re having problems with leaning wicks, make sure that your wick can stand on “dry land” before putting it in your wax, bending the wick if necessary. Once the wick is centered in the candle, place 2 pencils horizontally on the jar on each side of the wick. This will give the wick a little support as you pour the wax and the candle cools.
2009 Christmas Kits: Candles
Have you heard about our 2009 Christmas Kits? They’re this years simple solution for making coordinated gift ensembles! Choose from two different fragrance combinations (sweet or spice) to make candles, lotions and salt scrubs for your friends, family and co-workers. If you missed the blog yesterday, I posted a salt scrub recipe that you can make with this kit! Check it out.
 In a double boiler, melt 16 oz of White Beeswax. Once fully melted, turn off the burner, add 1 ounce of Fragrance Oil and mix well. Then, carefully fill each candle tin with wax (we suggest slowly pouring from your pot or using a ladle). Once you’ve filled your candle tins, place a candle wick in the center of each tin. Let the candles cool for 4-6 hours. Then trim the wicks to ½ inch, apply the neatly labeled lid, and present your creation to a worthy recipient!
 Variation: If you want your candles to be a color other than ivory white, check out all of the candle colorants here. Get one of those colors plus the kit and you’ve got yourself a variation. Or, pick up an ounce of a great blender to give yourself even more options for the perfect stocking stuffer. What blends with Clementine Cupcake or Chipotle Caramel? Dark Rich Chocolate, Turkish Mocha, Arabian Spice, Blackberry Spice, Christmas Spice, Orange Spice, Orange Mocha or Pumpkin Spice are all great blenders! And Mandarin Myrrh & Wassail can both easily blend with Berry Wine, Chocolate Espresso, Dark Rich Chocolate, Rise ‘n’ Shine, Amber, Black Tea or Black Amber & Lavender.
 Tip: If you’re having problems with leaning wicks, dip the base of the wick in the melted wax and center on the bottom of the tin. Then place 2 pencils horizontally on the tin, on each side of the wick. This will give the wick a little support as you pour the wax and the candle cools. For more helpful candle making tips, check out Soap Queen TV’s episode on Holiday Travel Candles.
Soap Queen TV: Holiday Candle Travel Tins
Grab some hot cocoa, get comfortable and prepare yourself for some candle making fun! In the final episode of my Holiday Series I show you how to make cute little travel candles perfect for the gift giving season.
When filming this episode I tried to include as much helpful information as possible, which resulted in a nearly 13 minute long video (hence the get comfy recommendation). I demonstrate how to use our liquid candle dyes and wax dye blocks as well as show many common candle problems and how to fix them. Although I mention it in the video, I really want to emphasize how important it is to use heat safe containers both for your mixing container and for the final candle container. I love keeping a few of these travel candles on hand for last minute hostess gifts or ‘just because’ gifts to give through out the Holidays.
Download the free PDF label template here to print out and make labels just like the ones in the video.
Soap Queen TV Special Edition: Holiday Travel Candles from Soap Queen on Vimeo.
To make 4 candles you will need:
16 oz Soy Container Wax (C-3)
1 oz Cinnamon Stick Candle Fragrance
Few drops Hunter Green Liquid Candle Dye
or a few shavings of Red Wax Dye Block
4 Candle Tins
4 WU-250 wicks
8 Pencils
Double Boiler
Heat Safe Container
Grumpy Girl Candle & Bath Company
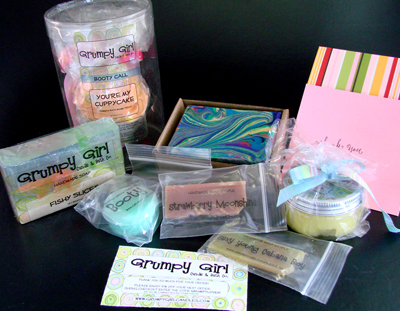 Seems like everyone is singing the praises of Grumpy Girl these days. And after I received my purchase from their shop, I can see why! In addition to the gorgeously packaged products, they sent free samples and a really sweet thank-you card. They have an online shop (free shipping this Friday!) and a very popular shop on Etsy.
 Their Cuppy Cake Bath Bombs are packaged so well that they really do look like the picture on their website when you get them! Ours was scented with their Booty Call blend – an intoxicating blend of almond, honey & brown sugar. Her frosting skills are definitely better than mine.
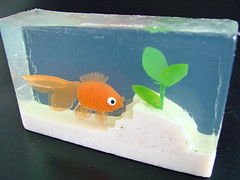 These totally fascinating soap slices are part of their Cranky Kid line. Everyone I showed this bar to was totally entranced. You can help but to look at it from every angle trying to figure out how it’s done. I like the creativity; it’s a nice take on the “fish in a bag” approach that has been popular for a few years.
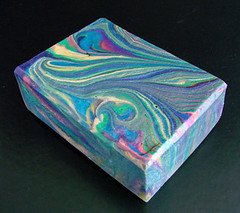 This bar was scented with their appropriately named Acid Trip fragrance blend – a mix of Patchouli, Orange and Lemongrass. The talent to do a swirl like this takes my breath away. Working with so many colors, and such a thin trace … wow. The soap is a true work of art.
If you’re looking for a gift that won’t disappoint this Christmas, you can’t go wrong with Grumpy Girl Candle and Bath Company.
Bakima’s Summer Candle
 Here is another project pioneered by Bakima, the intern-turned-paid-employee. We’re lucky she still has time to play with fun projects.

Ingredients:
Catnip Essential Oil
1lb Candle Wax
450 Wick (for smaller flame) or 250 Wick (for larger flame- *NOTE* this size will have a shorter burn life than the 450 size)
Pyrex container
about 6 or 7 votive glass candle jars (These would make really cute gift sized candles! Dress ’em up with a bow and a fake little plastic bug and they’d be adorable!)
Spoon (that you won’t eat with again)
Directions:
One – Melt down the candle wax in 30 second installments, taking out the heat safe (Pyrex) container and stirring the wax between microwave bursts. You can also melt the wax down in a double boiler.
Two – Add 1 oz of essential oil per pound of wax (1 oz if you’re sticking to the same recipe as above or multiply as needed).
Two and a half – Dip the bottom end of the wick in the wax and place it in the center of the jar to secure it in place
Three – Pour in your melted wax, leaving about a third of the wax left over in the heat safe container.
Four – Once the wax has settled and is close to solid, reheat the leftover wax and pour a thin layer over the top of the wax. This is to fill in the sunken top of the wax, which settles into the center after the first pour. Use a contrasting color for a nice effect
Five – Let dry, trim your wick to about 3/4 of an inch and enjoy your summer evenings, skeeter free.
Candles in a Cupcake

 Thank you SoapyElephant for this cute Cupcake bag and Candle! It is totally handmade and colorful. You can buy your own here for the ultra affordable price of $12. Get ’em fast before Michelle gets carpal tunnel syndrome.
Thank you for the kind and generous gift.
Massage Candles – Final Thoughts and Round Up
Day One – Introduction to Massage Candles
Day Two – The Fine Print
Day Three – Ingredients & Melting
Day Four – Pouring & Wick Setting
 I hope you’ve enjoyed the Massage Candle Tutorial this week.
The final recipe below is the easiest recipe to make but also the least good in terms of performance during a massage. It doesn’t provide as much “slip” as the more oily, complex recipe from Day Two.
Items needed:
Candle Tin
Wick (We like the WU 250 or the CD20)
Skin Safe Fragrance
Container Soy Wax (Naturewax C3)
Liquid Vegetable Oil (like Apricot Kernal Oil or Sweet Almond Oil or Jojoba oil or Olive Oil)
3 ounces Soy Wax
1 ounce Liquid Oil
.25 ounce Fragrance
1. Measure out 3 ounces of Soy Wax and 1 ounce of Liquid Vegetable Oil. We tested Apricot Kernel Oil, Sweet Almond Oil, Jojoba and Olive Oil. My personal favorites were the Olive Oil and Apricot Kernel Oil.
2. Melt the Soy Wax and your choice of Liquid Oil in the microwave at short 45 second bursts in a heat safe container, like a Pyrex.
3. Add the fragrance or essential oil. This recipe is particularly good to do a delicate fragrance or essential oil since there is no sweet smelling cocoa butter to interfere with the sophisticated notes.
 4. Stir and wait. The ideal temperature to pour this mixture is right before the wax oil mixture is about to set up. The cooler that the candle is poured, the more smooth your final product will be. Candles poured too warm have a tendency to crater or have pitted surfaces.
5. Center the wick and wait for the candle to harden. Once it’s solid, trim the wick, burn the candle and try a nice warm massage.
If you make these for yourself, friends or family – please let us know how they worked for you.
Massage Candles – Pouring and Wick Setting
When you pour your massage candles, you’ll want the wax to be a cool temperature, almost slushy. If you don’t pour the Container Wax Lotion Bar Hybrid cool enough, you will end up with pitted candles. Pitted candles work just fine – they just don’t look so great. If you end up with an uneven surface or cratered look on your candle, just zap the top of the candle with a heat gun to remelt the top layer of the candle to ensure a smooth look.
For these candles, I prefer the WU250 wick over the 450. I find that the wax pool is much better with the 250. A large wax pool is a necessity for Massage Candles.
Pour the Wax Oil combination and center the wick. The wick has a tendency to flop over. You can easily prop up the wick in between two pens or chopstick.
Unlike yesterday’s recipe, which was a little oilier, today’s recipe is somewhat waxy and harder. It would do well as a travel candle or in warmer climates. The recipe below uses a larger portion of soy wax and absorbs into the skin more slowly than yesterday’s recipe.
For this Massage Candle, you will need:
1 oz. of Avocado Oil
2.5 ounces of NatureWax C-3 (container) Soy Wax
.75 oz. Cocoa Butter
.75 oz. Shea Butter
Skin Safe Fragrance
Candle Tin
Wick
Pyrex Container
Spoon
Hint: If you don’t have Avocado Oil (or just don’t like it), you can substitute another liquid oil such as Sweet Almond Oil or Olive Oil for the Avocado Oil.
Check back tomorrow for the final recipe.
Day One – Introduction
Day Two – The Fine Print
Day Three – The First Recipe
Massage Candles – Ingredients & Melting
Making Massage Candles is similar to making a lotion bar. It’s a certain ratio of fats, waxes and oils. This creates a lotion candle hybrid that supports the flame of a candle.
In our experiments, we designed three recipes that all burned well and created a nice massage product.
Today’s recipe is the least hard and most oily of the three recipes. It would do best in cooler climates or if you like a massage oil that melts into the skin faster.
You will need:
Spoon
Heat Safe Container (Pyrex)
Skin Safe Fragrance oil
C-3 Naturewax Container Blend
Cocoa Butter (natural or deodorized)
Shea Butter
Avocado Oil
Wick
Candle Container (we used the Bramble Berry Candle tins which are just $.40 at their bulk price)
Recipe:
1 part C-3 Naturewax
1 part Cocoa Butter
1 part Avocado Oil
1.25 parts Shea Butter
In ounces, this looks like:
1 ounce C-3 Naturewax (Soy)
1 ounce Cocoa Butter
1 ounce Avocado Oil
1.25 ounces Shea Butter
Fragrance: .25 ounces
ONE: Add 1 ounce of Naturewax and 1 oz of Avocado Oil and 1 oz. of Cocoa Butter to heat safe container.
TWO: Melt in short 45 second bursts in the microwave, stirring between each microwave burst
THREE: Once fully melted, add the Shea Butter to the heated oils and wax. Hint: smaller chunks of Shea Butter melt more quickly than one big chunk.
FOUR: Once the Shea Butter has fully melted, add the skin safe fragrance. Stir in well.
FIVE: Keep stirring until the wax is cool and getting slushy (slightly opaque and appears to be minutes away from setting up). This ensures that the entire batch stays smooth and does not separate in the containers.
Check in tomorrow for a second recipe and also information about wick choice and pouring.
Previous posts on Massage Candles
Day One – Massage Candle Introduction
Day Two – Massage Candle Fine Print
Massage Candles – The Fine Print – Day Two
 As discussed yesterday, the reason massage wax candles work is because soy wax has a very low melt point. This means that you can pour the melted wax directly from the candle onto your hand with comfort. The wax is not much warmer than bathwater. Of course, just to be on the extra safe side, always pour the wax into your hand and not directly into the small of someone’s back.
We tried many recipes before coming up with the three that we’ll go over in the next few days. But first, some basic safety and starter tips.
Safety Considerations:
Ingredients Listing – Since these are meant to use on the body, they fall under normal labeling rules with skin products. Full ingredients must be listed using either common names or INCI names. Ounces and place of manufacture must be listed.
Skin-Safe Ingredients– You cannot use candle fragrance or color for massage candles. All items used must be skin safe. Bramble Berry Container Soy Wax is skin-safe and can be used for massage products. Not all soy candle wax is safe for use on skin so be sure to double check with your vendor if you’re not using a Bramble Berry wax. The skin safety requirements mean that you can only use colors approved for burning (no micas, no Labcolors) and for skin. That leaves only a few color options and really, do you want to have a colored massage anyways?
In order to start this project, you will need NatureWax C-3 blend (all natural soy skin safe wax), a skin and candle safe fragrance (all of the Bramble Berry soap fragrances can be used in soy candles), a tin or candle container and an appropriately sized wick. The only equipment needed is just a Pyrex container and a spoon.
Tomorrow, we’ll go over the first easy recipe. It only contains four ingredients so it’s the easiest of the recipes to make.
Candle Glass Containers

The most screamin’ deal *ever* – these adorable little candle containers are just $6. 00 for a full case of 24. These are the same glass containers from the sad candle experiment and the more successful beeswax project. We got incredibly lucky and bought them as a one-time deal from a candle company who discontinued their container line.
They hold 10 to 16 ounces of candle wax. I found that it took a full 16 oz. of beeswax to fill the candle glass but slightly less of the Soy Wax.
Buy them here (and buy them fast because they’re not a permanent addition to our line).
Also, an opportunity to improve your business: Seth Godin has a wonderful audio posted on his site hereabout marketing in 2008. If you’re busy cooking, soaping or just answering email, it’s worth streaming for the hour program.
Massage Candles – Intro – Day One
What’s a Massage Candle? It is NOT pouring burning hot wax all over your body. Taking a wild guess, this probably doesn’t sound relaxing to most of us. A massage candle is a blend of skin safe waxes, oils and a bit of fragrance that melts at a very low temperature, making it an enjoyable alternative to cold massage oils.
Massage Candles started growing in popularity in 2006 with the rise of soy wax as a mainstream paraffin wax alternative. The Massage Candle pictured at the right is one of the more economical brands on the market, selling for $10. Pricing for these unique candles goes up to $40 depending on the claims made and essential oils used. Alternate names in use for these burning amusements are Lotion Candles, Body Wax and Body Candles. Other uses for Massage Candles are a cuticle oil or an all-purpose heavy duty lotion for elbows, knees and feet.
The wax for making Massage Candles needs to be all-natural soy wax. The secret to making a Massage Melt Candle work is the low melt point of this wax.
What is a melt point? It’s the temperature at which the solid wax becomes liquid when exposed to a heat source (normally a flame).
Soy wax melts at a lower temperature than paraffin wax, making it a fit for this romantic gift. The instructions are simple: light the candle, wait 30 to 45 minutes so there is a wax pool to draw from, blow out the candle, pour the warm wax in your hand and, begin the massage.
This week on the Soap Queen blog will discuss over massage candles. We’ll make them, design some recipes and also give hints for designing your own recipes.
