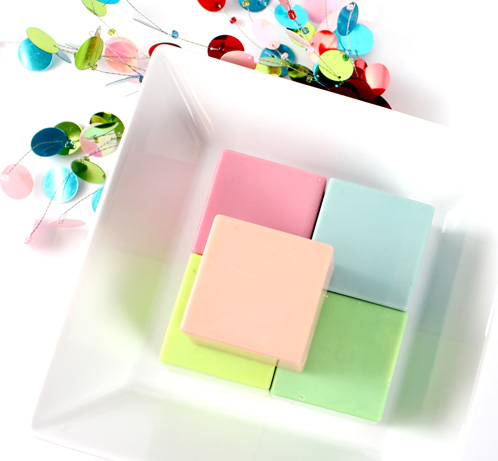
I am still so in love with our new cube mold! For this project, I wanted to create a seasonal feel using non-traditional colors and an unexpected yet comforting scent blend. What a great way to welcome the colder months.
Tutorials on soapmaking, bath fizzies, lotions and more
Filed Under: Cold Process Soap
I am still so in love with our new cube mold! For this project, I wanted to create a seasonal feel using non-traditional colors and an unexpected yet comforting scent blend. What a great way to welcome the colder months.

Filed Under: Cold Process Soap
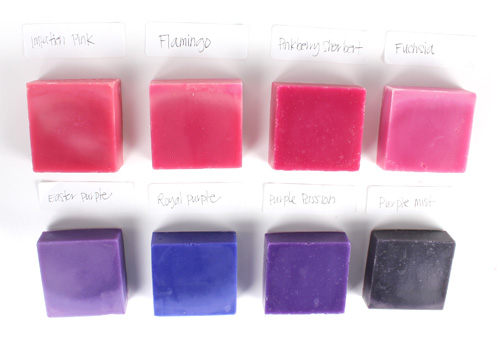
We had a blast playing with pinks, purples, greens, blues and oranges in the LabColor range and thought you might want to see what we came up with (since colorant usage rate is a common question in customer service). We used the Bramble Berry LabColors in 4 ounces of unscented cold process soap using the 12 bar square silicone mold. Check out the usage rates below to get these exact same colors. For dilution rate, we did large size of Labcolor in 8 ounces of *distilled* water. Can you tell where the gel phase is in the soaps below? I sure can! It’s the brighter middle parts of the soaps.
Filed Under: Cold Process Soap
This free flowing, lava like design inspired the name for this project. Magma Soap is an intricate project with so many possibilities. I’ve combined melt and pour soap with cold process soap to create a uniquely fascinating bar.

Filed Under: Cold Process Soap
If you have never made cold process soap before, I strongly suggest getting a couple of basic recipes under your belt before diving in. Check out Soap Queen TV on Cold Process if you want to get started with cold process. It’s a 4 part series that will take you through the basics (and be sure to watch the episode on Lye Safety). If you’re a book worm, Bramble Berry also has some helpful reading on the cold process technique.
Filed Under: Bramble Berry News
Today is the day we find out the NEW floral fragrances for Spring 2011. Me and my fabulous team get to read the surveys filled out by our hard working/testing S.O.A.P. team. Thank you for all of your hard work ladies! Click on the links below to check out all of their fabulous blogs. I love my job!
Filed Under: Cold Process Soap
I’ve long been fascinated with how to make Labcolor’s inherent bleeding qualities work in a bar of soap. It does a great tie-dye look and the swirls are romantic and ephemeral. But, the idea of a sunset or a rainbow really drew me in. I started with a simple but sophisticated color graduation. It’s a very easy concept in theory but in practice, takes precision and weighing … and patience.
My husband and I are using this bar in our shower at home right now at home and it has fantastic lather and a great balance of bubbles with moisture and creaminess. Coupled with the absolutely exquisite scent and sophisticated color, it’s one of my favorite recipes I’ve made in a while. Read through all the instructions; it requires prep and precision.
Get everything you need with the click of a button.
Filed Under: Cold Process Soap
Two days ahead of time, make your cranberry embeds This is an unscented batch of soft soap that is almost play dough like in its consistency. The batch is a small 45 oz. size and is meant to fit into our Silicone Pans.
Wearing full safety gear and following basic CP principles (unsure about CP soap? Watch the FREE SoapQueen.TV tutorials on CP soap here), make your soap.
Add Burgundy Oxide and Merlot mica at thin trace and stick blend in. If you want to ensure no clumps at all, pre-mix color with 2 tsp of oil. Pour your soap and do not insulate. To keep the soap softer and more pliable, not going through gel phase is essential.
After the soap has set-up for just one day, use a melon baller, a cookie dough batter tool or just cut into squares and round off the corners and form with your hands. If the soap is too sticky, mix a little flour with Merlot Mica and apply to your hands to keep your hands from getting sticking to the soap.
Next make layers 1, 2 and 3: Get your soap to thin trace then, separate it into three batches. This recipe is designed to give a good amount of working time for multiple swirls and layers.
Green Soap: 20 oz soap batter with Emerald Labcolor and Green Chrome Oxide. Add approximately 1 oz fragrance.
White Soap Mix: 20 oz soap batter with Super Pearly White. Add approximately 1 oz fragrance.
Black Soap Mix: 12 oz soap batter with Black Iron Oxide and Vintage Gray Mica. Add approximately 3/4 oz fragrance.
Add the fragrance right before you pour so that if your fragrance accelerates trace you will still have time to embed your cranberry inclusions.
Fragrance the white layer of soap. Pour a thin layer of white soap over the black/green mixture. Add the Cranberry Inclusions, two by two, spacing evenly along projected bar cut lines. Pour the rest of the white soap.
Spoon or pour the remainder of the black and green swirl over the Cranberry Inclusions/White layer.
For the last layer: Split the batch into two containers.
Red Soap: 7 oz soap batter blended with Burgundy Oxide and Merlot Mica. Approximately 1/2 oz fragrance blend.
Uncolored Soap: 11 oz soap batter with approximately 3/4 oz fragrance oil.
Swirl the colored soap and white soap together. Pour over the Green/Black layer.
Insulate well and allow to harden for a minimum of 2 days before cutting. To ensure your soap is mild and hard, be sure to make your soap by November 15th so it can dry for a full 4-6 weeks before the big day!
Filed Under: Cold Process Soap
Filed Under: Cold Process Soap
Filed Under: Personal Ramblings
I hope your Memorial Day was fantastic – and that sometime today, you found a moment in silence to reflect on why Memorial Day matters to you or better yet, thanked a service person for their sacrifice on behalf of our Country.
The SoapQueen.TV crew and I took advantage of the week day off to shoot two new episodes of SoapQueen.TV. It was a luxury because normally we shoot on the weekend.
This is our Director Ron. He looks happy with me at this moment (phew!). We’re in dress rehearsal (thus no apron and the messy table). Besides our script writing sessions and script read through, we also go through all the steps before shooting the ‘aloud voice’ part of filming. It helps us find the best shots for the final cut.
Filed Under: Cold Process Soap
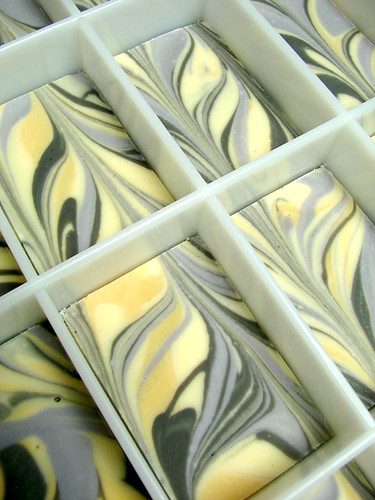
I was so excited to get to work today to see the swirls I made up last night. The batch did not go through gel phase (my soap studio was kind of cool last night) so you can see that the colors have diminished in intensity and hue. But, I still am excited about them and love the look. I am a bit impatient so I think I’ll freeze the batch solid to see if I can get the soap out a day or two earlier than if I let it air dry naturally.
This is the recipe I used (screenshot from the iPhone Soapmaking App):
PS: See the little soaps off to the right hand side of the big loaf? That’s the project I’m working on for tomorrow’s blog post. It’s down to the wire to create the cutest soap project I can for your Easter soaps! =)
Filed Under: Tips & Tricks
On the Teach Soap Forum recently, we had a big discussion on how to work with Royal Blue LabColor in Cold Process Soap. In general, LabColors turn brighter in cold process soap as the soap sets up and cures, especially if your soap gels. For example, the Royal Blue LabColor is a disappointing grayish color when it is first mixed into the soap, even at a high percentage. After 24 hours, it slowly turns a bright vibrant blueish purple. Because of this, many people have a tendency to over color their soap and end up with colors that are more vivid than they originally intended.
If you have added the proper percentage of LabColors (and maybe even a little more!) and the color is still not popping, STOP while you are ahead. Insulate your soap to ensure a nice, cozy gel phase and note the color after 24 hours.
Just after pouring Royal Blue LabColor colored soap. Check out that grey green gross color.
After 24 hours in the mold. See the brighter areas where the soap went through gel phase in the middle? The ‘white’ on top is glitter that I sprinkled liberally on the soap for an extra magical look. Sadly, the glitter doesn’t photograph great.
To see if small batches that never went through gel phase would also turn, I did a couple teensy 1 ounce test pucks. Notice how the soap on the tippy top of the soap never went a blue color? It’s either the soda ash affecting the final color or the lack of heat that retarded the final color turn. To get the bright blue color (top layer below – and in the soap above), I used 2 tablespoon diluted Royal Blue Labcolor (Small bottle [10 ml] of LabColor diluted in 4-8 ounces of water) per 16 ounces of soap soap (oil/water/lye total). This makes such a bright blue color that I recommend using close to 1 tablespoon diluted Royal Blue Labcolor per pound of soap to ensure no soapy blue bubbles.
This one is really interesting to me. It is the Pool Blue LabColor (middle layer on the left, bottom layer on the right). Look at what happens when you change the addition rate just slightly. The shade of blue is the same but the hue is much darker, deeper and brighter just by upping the usage rates. Curious about LabColors? Here is more information on how to dilute the concentrated colors and use them to get every color imaginable.
The best soap supplies on the internet are found at Bramble Berry. Click here to browse Bramble Berry.
Have a question about this blog post? Come join us at Bramble Berry’s Facebook page and we can help you out with any of your soapy questions!
Filed Under: Cold Process Soap

I made a new Coconut Milk Batch today and switched out two variables:
1. Temperature
2. Fragrance

As cold process soapers know, fragrance makes a huge difference in how your soap performs. At Bramble Berry, we test each and every fragrance three times before adding it to our line. At least one of these tests is a larger batch. Sometimes, what happens in a small batch isn’t how a fragrance reacts in a large batch. The Orange Blossom I tested in the Coconut Milk Soap Volcano had performed admirably in one large batch already and done well in a small batch as well. But, when I tossed in the added stressors of a hot milk batch, well … that was enough to throw the Coconut Milk Soap over the edge.
This batch, I paid attention to the temperatures. When I mixed, my soap was a warm 137 degrees which was still too hot for my liking. The big change was the fragrance switch. I made this soap with Buttercream & Snickerdoodle (2 parts) mixed with Relaxing (1 part). I did 100% Coconut Milk in place of the water and reacted the lye with the Coconut Milk.
The soap did great. It traced quickly and had a wonderful texture once the stick blender had worked its magic. I fragranced the majority of the soap, leaving a bit out for a white swirl to provide texture and contrast to the soon-to-be-brown soap (thanks to the Vanilla in the two fragrances I chose).
I split the batch three ways: 1 log mold, 1 Pumpkin Mold (to test release with this hard CP soap) and 1 Flexy Fast mold.
The non-fragranced soap stayed a cool 103 degrees in the mold.
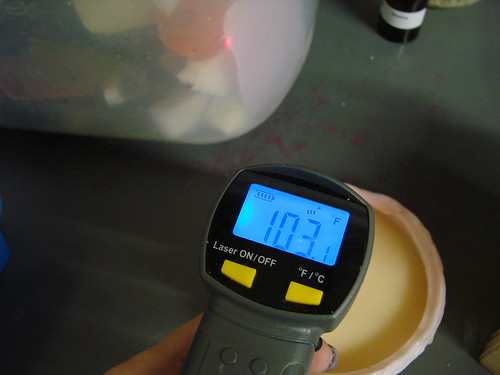
The fragranced pumpkin soap got nice and warm, up to 159 degrees while starting gel phase.

The loaf mold stayed a similar temperature at 153 degrees. It did start to expand with all of the heat produced during gel phase and cracked the top of the soap.

The soap in the loaf did not get as warm as the 100% fragranced individual soap because the loaf soap had swirls of cooler, non-fragranced soap running throughout. The crack started small, when the soap was around 140.
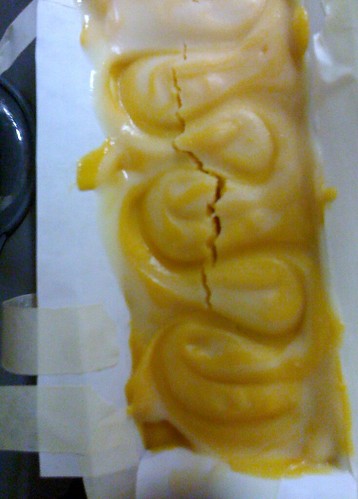
After the soap hit over 150 degrees, the crack started widening and pushing outwards and up. It never got taller or wider than this. Heated soap expands. Since the top layer of soap was cool and more hard than the gelling middle, it gave way to the expanding soap by cracking.
 I’ll take photos of the final soap in the next week to share with you. I feel confident that if I lowered my temperatures to 120 and used frozen coconut milk that the soap wouldn’t have cracked. Cracked or not, the soap is one luxurious bar with 75% Coconut, 25% Cocoa Butter and Coconut Milk in place of water. I can hardly wait for the 6 week cure time to use it!
Filed Under: Cold Process Soap


