Tutorials on soapmaking, bath fizzies, lotions and more
Filed Under: Melt & Pour Soap
Filed Under: Melt & Pour Soap
Ingredients
2 lbs Shaving M&P Soap
Energy Fragrance Oil
Guest Rectangle Slab Mold
Opalescent Green
Merlot Mica
Copper Sparkle
Luster Black
Heavy Metal Gold Mica
Tools
Microwave safe container
5 small bowls or mugs for soap
Spray bottle of rubbing alcohol
Stir stick or spoon
Filed Under: Melt & Pour Soap
 Here’s what you’ll need:
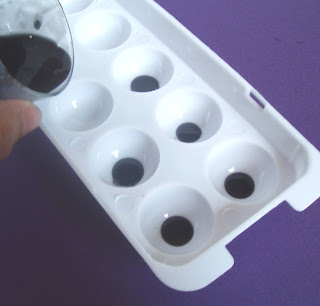 Step One: Melt 1 ounce of clear melt and pour and add 1-2 drops of liquid black colorant. Pour a dime sized drop into bottom half of the sphere mold (we used a little dropper). Spritz to get rid of the air bubbles and let cool.
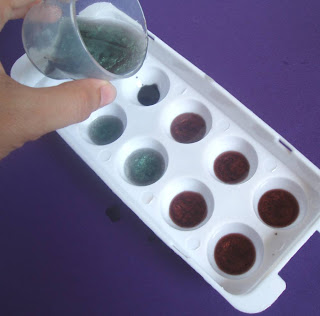 Step Two: Melt 2-3 ounces of clear melt and pour soap and add the Cappuccino or Blue Green Mica (or whatever color you want your corneas to be). Spritz the first layer of soap before pouring your second colored layer. Pour to the size of a quarter, spritz with alcohol and let cool.
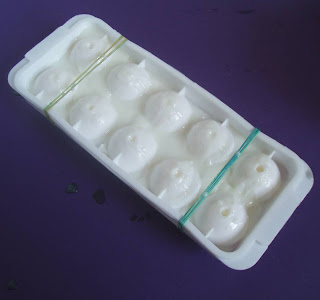 Step Three (crossing T’s and dotting the Eye’s): Now it’s time to add your fragrance of choice and pour the last layer. Spray your soap with rubbing alcohol and put the top half of the mold back on and secure it rightly with a rubber band on each end. Melt about 3-4 ounces of white soap base and add your fragrance oil. Pour the soap through the tiny holes in the mold or use a syringe if necessary (we used the syringe from PJ’s Soap Kit). If the holes are too small for your liking, you can drill them out with a drill to widen them.
Filed Under: Business Musings
Kristy: I would say it would be the floral musk that will be coming up on Etsy soon. It looks like a birthday cake, lol.
Anne-Marie: What type of things do you outsource? Or is it a one woman operation?
Kristy: I’m a one woman show.
Anne-Marie: What is the best advice you can give to someone who dreams about starting their own business?
Kristy: Test, test, test. People can get hurt if you don’t test your soaps long enough or do enough research on it before selling. Also, don’t expect people to handout everything to you, you learn more by doing things yourself. I made a lot of soap before I got it right. I had a lot of wonderful people on the forums help me with questions, but I had to learn things on my own too. Start out slow, not gung ho. You can go overboard and buy too many things you will end up selling later because you didn’t use it. Then you lose money.
Anne-Marie: What’s your favorite Bramble Berry product?
Kristy: I would say my favorite product is the Lavender Chamomile Huggies Fragrance Oil, which I wish were in smaller batches. I also love the Oatmeal, Milk and Honey and Cherry Almond fragrance oils. They are the best! Omg, and the Chocolate Espresso! I love making tarts with this.
Anne-Marie: Anything we missed? Is there anything else you want Soap Queen reader’s to know about you?
Kristy: I always like to try to make something once. It might take me a while to get it right but once I do, I’m happy. I like to make liquid soap for our personal use and family members. I like to make transparent soap too. I have a tutorial on Miller’s Soap website for transparent soap if anyone wants to try it. It’s very rewarding to make soap you can actually see through. Don’t’ let the alcohol scare you. I also make lotion, lotion bars, and lip balms.
Anne-Marie: Thanks for chatting with us, Kristy!
Filed Under: Melt & Pour Soap
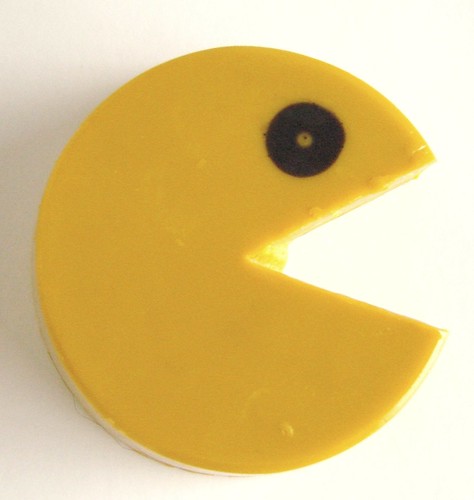
Let’s make Pac-Man come to life*…
Step 1: Melt about 1 ounce of clear melt and pour soap. Add 1 drop of liquid black colorant. Then use a dropper to drop a dime size of black soap into each cavity of the mold (this will be Pac-Man’s eye). Let soap cool.
Step 2: Melt about 14 ounces of white melt and pour soap, add your liquid yellow colorant and your kumquat fragrance oil. Mix well. Spritz the black layer of soap in your mold with rubbing alcohol and pour your yellow layer. Spritz with rubbing alcohol to get rid of any air bubbles.
Tip: Make sure your yellow soap is no hotter than 120 degrees when you pour (any hotter will melt the black layer soap).
Fragrance Tip: We recommend 1/4-1/2 ounce of fragrance oil per pound of melt and pour soap base.
Step 3: Once the soap has cooled completely, pop the soap out of the mold. Then cut out Pac-Man’s triangle mouth using a knife or soap cutter.
Filed Under: Melt & Pour Soap
Layer 1: Melt 1 lb of white soap base and add .5 oz of fragrance oil. Mix in a couple drops of Non-Bleeding Red colorant (you should have a nice pink color). Pour the entire pound of melted soap base into your loaf mold and spritz with rubbing alcohol to eliminate any bubbles. Let cool completely (roughly 30-40 minutes).
Layer 2: Melt 1 lb of clear soap base and add .5 oz of fragrance oil. This is going to be the clear layer that showcases the little hamsters
Once the pink layer has cooled, spritz the soap with rubbing alcohol to make sure the layers will adhere. Then, liberally spritz the hamsters with rubbing alcohol and align them on top of the soap like little soldiers. I sat them down on their little bums, but you can arrange them however you want.
Once the clear soap has cooled to 120 degrees, pour your second layer gently over the hamsters. I did have one “floater” but easily pressed it back down into the soap. Let this layer cool completely (roughly 30-40 minutes).
Layer 3: Melt 1 lb of white soap base and add .5 oz of fragrance oil. Then mix in a couple drops of Liquid Blue Colorant. Liberally spritz the clear layer with rubbing alcohol and pour your last layer (remember to cool your soap to 120 degrees before pouring).
Optional: To get a textured top layer, stir the blue layer of soap until it cools.
Finishing Touches: Wait at least 8-12 hours before releasing soap from the mold. I know it will be hard to wait that long to free your little hamsters but trust me; you will have cuter soap in the long run! I cut my soap by hand with a soap cutter. You could also use a soap cutter like THIS for a little more accuracy. GOOD LUCK! No matter how even your cut is, no one will notice since the cutness factor of the hamsters is off the charts.
Filed Under: Melt & Pour Soap
Can you believe it’s Thursday already? Time for another fun episode of Soap Queen TV!
This week’s episode takes embedding to the next level. I make a fun and bubbly soap using a unique ice cube tray and fun colors like teal, pink and yellow.
Note: The Ice Tubes mold was discontinued. The 4-in-1 Mini Cylinder Silicone Mold would work great for this tutorial!
Soap Queen TV Episode 13: Embedding Layers from Soap Queen on Vimeo.
Here’s what you’ll need for this project:
Clear Melt and Pour
Pomegranate and Black Currant Fragrance Oil
Non-Bleeding Liquid Red
Liquid Blue
Liquid Yellow
Hydrated Chrome Green
Super Pearly White Mica
Plastic Loaf Mold
4-in-1 Mini Cylinder Silicone Mold
Spray bottle with rubbing alcohol
Heat safe container for melting soap
Stir stick or spoon
Filed Under: Melt & Pour Soap
Yes, it’s that time once again! Soap Queen TV is here.
This week’s episode is all about layers. I make a very boldly colored soap to show how you can take a plain mold and spice it up.
Soap Queen TV Episode 12: Basic Layers from Soap Queen on Vimeo.
Here’s a link to the bleeding colors post I mentioned.
And here’s what you’ll need to make this project:
Clear melt & pour soap base
Liquid red oxide
Liquid black oxide
Liquid green oxide
Sparkle gold mica
Mango Peach Salsa fragrance
Loaf mold
Basic shapes mold
Spray bottle with rubbing alcohol
Heat safe container for melting soap
stir stick or spoon
Filed Under: Melt & Pour Soap
In this episode, I demonstrate a variation on the silhouette soap project taught by Soapylove at last year’s Soap Weekend Intensive. By the way, we just had a cancellation and there are 2 places open for this year’s Soap Weekend Intensive coming up next weekend!
Soap Queen TV Episode 10: Wedding Favors from Soap Queen on Vimeo.
Here’s what you’ll need:
Clear melt & pour soap base
Merlot mica
Light Gold mica
Champagne fragrance
4 in 1 Basic Shapes mold
Craft knife (like and exacto)
Spray bottle with rubbing alcohol
Heat safe container
Stir stick or spoon
Filed Under: Melt & Pour Soap
 Click here to be taken to Part A of these instructions.
1. Pull out a piece of saran wrap long enough to hold all of your citrus slices. Carefully position your “rind” soap on the saran wrap. Pull the wrap tight to make sure there are no wrinkles under the “rind”. Do the best you can – the wrap never quite gets straightened or perfect.
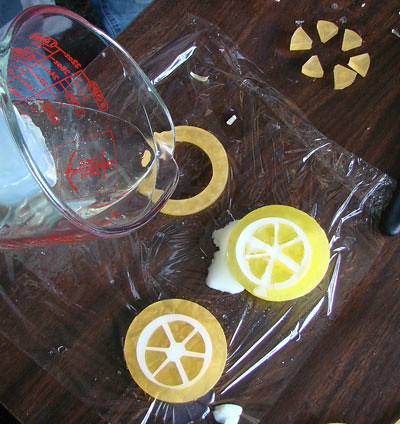
2. Spritz the “rind” and inside of the rind (onto the plastic wrap) with rubbing alcohol. Pour a thin layer of clear soap into the rind.
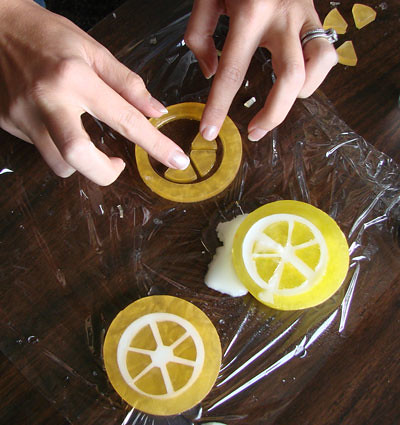
3. Spritz the thin layer of clear soap with rubbing alcohol. Place the “slices” into the clear layer of soap, before it hardens. Wiggle them into the perfect positioning. Have your paring knife handy just in case you need to slice off a too-large slice piece to ensure evenly spaced out soap.
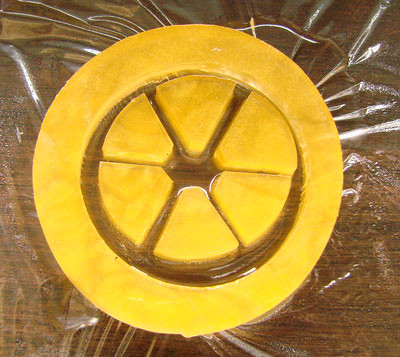
4. Spray the entire set up with alcohol. Alcohol is your friend in this case. It helps with adhesion of the soap pieces.
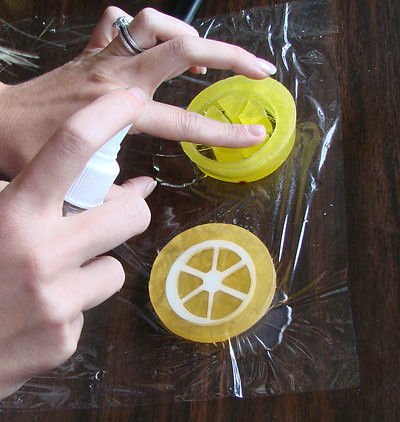 5. Allow this clear layer to harden up prior to the next step. This usually takes 3 to 5 minutes at the most. If you do not allow your clear layer to harden up, the Lemon Slice below is a good example of what happens – the white soap will leak out the sides of the slice.
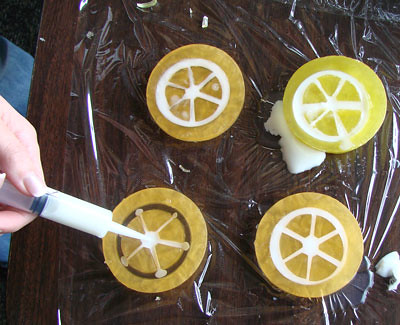
6. Melt White melt and pour soap in the microwave, double boiler or whatever method you prefer. Make sure the white soap is not steaming or else it will melt your slices. For the Bramble Berry House Bases, 120 to 130 degrees is the best option for the overpour.
7. Spritz with alcohol. Using either a steady hand, you can pour directly into the middle of the soap slices from your heat safe container. The Melt & Pour Injector Tool is fabulous for this because it allows precision targeting with the white soap base. Using the Injector is my preferred method for this soap. It has less mess and trimming to work with after the soap hardens.
8. Give one final spritz and you’re all done. Allow the soap to harden. Peel the soap off the plastic, cut into slices or wrap whole.
Voila – you’re done! Realistic Citrus Slices that are easy and fun to make.
Filed Under: Melt & Pour Soap
 Project designed & written by Debbie from SoapyLove. Check out her blog here, her soaplab site here & her soapy ezine here.
To make this realistic toy car, first I bought a die cast metal toy car at Rite Aid. It had open windows so I had to make new plastic windows (cut from some packaging) and taped them in. I pushed a whole bunch of play-doh and packing peanuts inside the car to make sure the windows wouldn’t just push in when I made my mold.
I got some silicone molding clay to make the mold, pressing into the wheel wells and a little under the car. You can use something from a craft store or get the Flexy Fast Molding Putty from Bramble Berry (if you got a copy of any of my eZines, there’s a coupon in the back for BB! ![]() ).
).
Then I poured white soap to fill the roof. I unmolded it and cut it into stripes for the final roof.
I mixed my minty body color by combining 3/4 clear soap and 1/4 white, then green shimmery mica and BrambleBerry’s iridescent glitter, scented with 1/4 teaspoon of Apple fragrance. I poured a bit into the roof then placed in my white stripes. I let it harden.
Then I made clear soap mixed with BrambleBerry’s silver mica for the windows. I poured this in until the windows were filled up (spraying my roof layer with alcohol of course!).
After that was hard, I topped off my mold with minty soap and let harden.
I unmolded the whole car, then used a sharp knife to cut out the wheels. I put the car back in the mold and made some dark grey soap, and filled the wheel areas with that. Let cool, unmold, yadda yadda.
I used an exacto knife to trim up my soap car since it had some lumps and bumps.
Now it was time for painting the details. I mixed the silver mica with a touch of black oxide to make metallic silver. I stirred in a few drops of liquid glycerin to make a paint consistency. I painted on my details with a little brush. I used white colorant for the license plate. All painted areas dried in my window for 2 hours. I used a pen to etch in my license plate (SOPYLUV). ![]()
Oh – I misted my soap with rubbing alcohol right before taking the picture to get that shiny wet look.
Voila! It took me 3 cars to figure out what worked and what didn’t.
What didn’t work:
Filed Under: Melt & Pour Soap
This week I’m teaching one of my favorite projects – candy soap! You may recognize these from my project last year. I think that the video really helps the project to come to life and make more sense.
Soap Queen TV Episode 8: Candy Soap from Soap Queen on Vimeo.
Ingredients:
Clear melt & pour base
White melt & pour base
Hello Sweet Thang! fragrance
Vanilla Color Stabilizer
Red-Blue Mica
Tools:
Round soap mold
Utility knife (like an exact-o)
Spray bottle with rubbing alcohol
Spoon
Droppers
Heat safe containers
Filed Under: Melt & Pour Soap
Step 1: Melt about 16 oz of clear melt and pour soap base. Stir in 1/2 oz of Lavender 40/42 essential oil and about 1/2 tablespoon of light gold mica. Pour soap into your brownie pan or loaf mold. Spritz with rubbing alcohol to eliminate any bubbles.
Tip: To avoid spots and speckles, mix your oxide with a little rubbing alcohol before adding it to the soap base. SoapQueenTV Episode #2 covers mixing oxides (minute 4:00) & using lavender herbs in soap (4:30).
Step 3: For the second layer, melt another 16 oz of clear melt and pour soap base. Mix in 1/2 oz of Lavender 40/42 essential oil and 1/2 tablespoon of ultramarine violet oxide. Spritz the first soap layer with rubbing alcohol to help the two layers adhere. Pour the second layer and spritz again with rubbing alcohol to eliminate bubbles. Let second layer cool.
Step 4: For the third layer, melt 16 oz of white melt and pour soap base. Mix in 1/2 oz Lavender 40/42 essential oil and 1/2 tablespoon of light gold mica. Spritz the second soap layer with rubbing alcohol to help the two layers adhere. Pour the third layer and spritz again with rubbing alcohol to eliminate bubbles.
Step 5: For the fourth and final layer, melt 8 oz of clear melt and pour soap base (we want this layer to be a little thinner than the other layers to really showcase the lavender buds). Mix in 1/4 oz Lavender 40/42 essential oil and between 1/4 – 1/2 cup of lavender buds. Again, spritz the third soap layer with rubbing alcohol to help the two layers adhere. Pour your fourth layer and spritz again with rubbing alcohol to eliminate bubbles. Let cool completely before cutting.
Step 5: Cut these lavender beauties in any shape or size you want. We cut ours with a crinkle cutter and finished them off by putting them in lavender organza bags. Make these as fresh as possible, right before the wedding, because Lavender buds do go brown in soap (eventually). Episode #2 of SoapQueenTV has a shot of an aged Lavender soap around minute 4:47.
Filed Under: Melt & Pour Soap
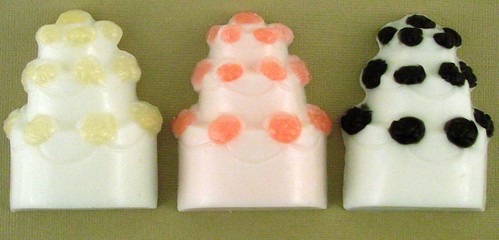
Step 1: Melt 4 oz of clear melt and pour soap base. Add a pinch of light gold mica (or whatever colorant you’re using) and mix together. With your injector tool (droppers will work), fill each little flower on the wedding cake mold with your colored soap. Let the flowers cool.
Tip: When using oxides, to avoid spots and speckles, mix your powdered colorant with a little rubbing alcohol before adding it to the soap base.
Step 2: Melt approximately 8-10 oz of white melt and pour soap base. Mix in ¼ oz White Tea and Ginger fragrance oil and 1/2 tablespoon oflight gold mica (adding the mica is optional, it will give the wedding cake a slight shimmer).
Step 3: Let your soap cool to 120 degrees before pouring your second layer. Spritz the flowers with rubbing alcohol before pouring the second layer to make sure the layers will adhere. Pour your second layer and spritz again with rubbing alcohol to eliminate bubbles. Let the soaps cool for 4-6 hours before popping out of the molds.
Note: If the soap does not cool to 120 degrees, it will melt your flowers in the mold. This would be a shame since getting the flowers perfect takes a bit of effort. So make sure to control the temperature of your soap by heating in 30 second intervals in the microwave.
Hint: For the Pink Wedding Cake Soaps, use the liquid non-bleeding red in the clear soap base for the flowers and the non-bleeding red in the white soap base for the cake. You will only need 1 drop. A little goes a long way when using the non-bleeding red!