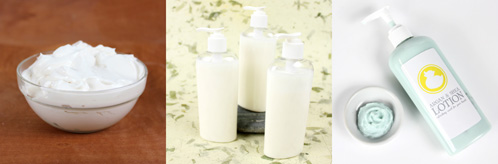
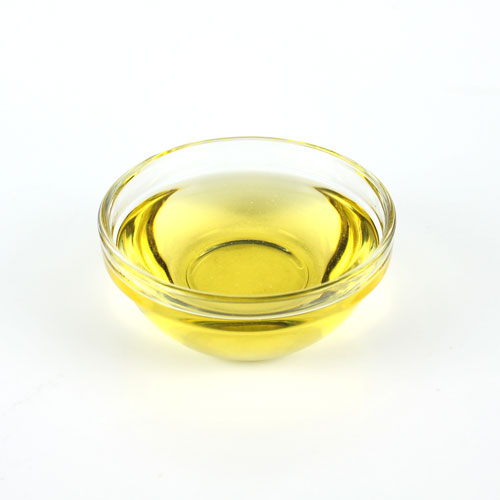
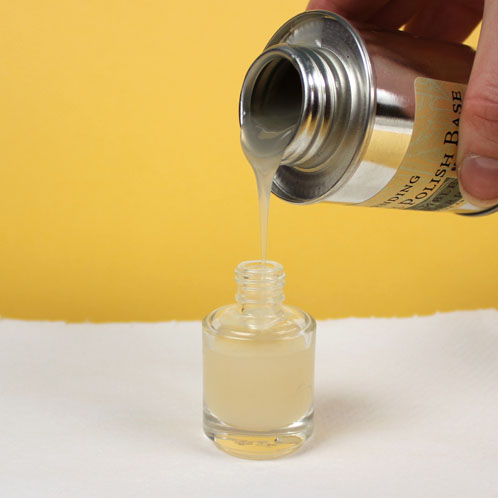
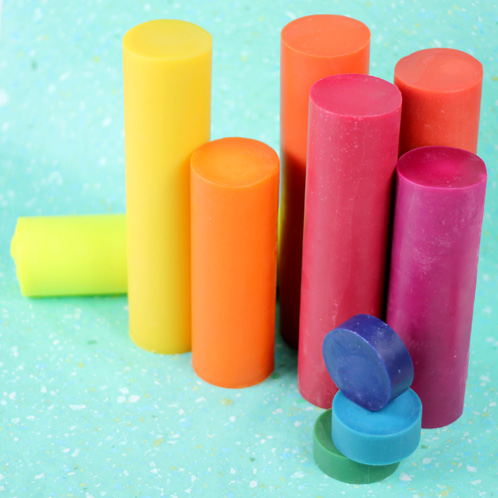
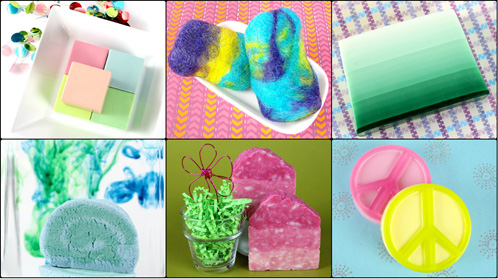
As a quick and easy gift or for a crafty night in, homemade nail polish can’t be beat! I also have it on good authority that nail polish parties are the hot ticket at Otion. We have rigorously tested our Suspending Nail Polish Base to make sure it can suspend all sizes of glitters, and we’ve found the best usage rate is 5 – 7.5% (max) for the glitter. If you add more than that, it won’t matter how lovely and light the glitter is … it’ll still sink. Our nail polish base is also formaldehyde, toluene and DBP free.
Search Results for: colorants
Facebook Photo of the Week (November 30th ~ December 6th)
Welcome to the end of another week! We started the first Monday back from the Thanksgiving break with an interview with one of our favorite soapers, Andrea from Soap4Squares. Then, we shared a scrub to buff away that wintery dry skin with our Rough Patches Wash Tutorial. Walnut shells are a super gentle exfoliant, and they’re quickly becoming one of our favorite additives. In fact, we used them again to mimic sand in our Stormy Seas Cold Process soap! Finally, we posted a quick vid on how to properly prep colorants for cold process soaping. If you’re new to cold process, it’s a great skill to learn!
Speaking of color, this week’s Facebook Photo of the Week includes plenty of color. The gold top really makes the fuchsia embeds pop!
Rainbow Squirty Swirls – The Most Popular Soap Ever?
We hope that everyone had a fantastic holiday yesterday — we sure did, and today we’ve got a very special cold process recipe for you. If Instagram ‘likes’ equal popularity, this Rainbow Squirty Swirls soap may be our most popular soap yet (see for yourself — more than 120 ‘likes,’ wow)! This tutorial uses the same technique as the Squirty Swirls recipe in the Soap Crafting book, and it’s an easy process that results in beautiful soap every time.
One thing to note about this recipe is that it can take 10 – 15 minutes to squirt all the soap into the mold, so it’s important to use a slow-moving recipe and a fragrance you know won’t accelerate trace. In this case, we used our new Amazon Lily & Rain Fragrance Oil, which performed beautifully and gave our rainbow soap a little tropical flair.
Facebook Photo of the Week (November 8th ~ November 15th)
What a week! I hope you had a chance to take advantage of our #Givember sales and coupons. In fact, thanks to you, Givember has been so successful that we’re working overtime to get your order to you in the high-quality manner you’ve come to expect from Bramble Berry. It may take us a few more days, but it’s worth the wait!
To give you even more ways to interact with us, this week we rolled out the brand new Bramble Berry Help Desk Feature. Have a question? You can now chat with a live customer service person to get your issue resolved immediately! To learn more about this new tool, check out the blog post.
Have you gotten your order yet? Every order this month will include a sample of the delightfully sweet Cranberry Chutney Fragrance Oil. We’re hosting another Make It Month featuring the fragrance, so be sure to check out this post for all the details!
For now, are you ready to get up close and personal with the photo of the week?
Soapy Social Media Roundup
Winter seems to have hit us early on this very chilly and blustery Friday. We had an awesome office-wide pumpkin carving contest last week (scroll down to see our “scary” winner), and took Jamisen out for a Halloween party as well (with a bucket full of goodies by the end of the evening, Jamisen was much happier than he was in this photo!).
In other news, we’re smackdab in the middle of Givember 2013! If you’re not familiar, head over to this post to read all about how you can access 25 unique tutorials as well as get in on some super special deals and coupons. These are my favorite soapy social media things from the past couple of weeks:
Pins:
Clockwise:
- This Coconut Lime Soap so totally makes me miss summer. Plus I love the very rustic-looking top. This would be perfect for a beach house by the seaside!
- How cool are these little mini soap jewels? What a fun projects to try on a very blustery November day like today, and plus they remind me of our Geode Soap tutorial from awhile back.
- I want this chair in my office! Such a good vintage find, and the colored stripes are subtle yet super fun. The price might be a bit out of my office decoration budget though!
- I’m always game for easy kids projects, and these colored wooden blocks are no exception! Great for learning colors and building forts =)
- If you haven’t gathered by now, I have such a weak spot for macarons! These lemon macarons with salted honey and thyme buttercream sound absolutely gourmet.
- So it may be fairly flashy, but I am in love with this rainbow glitter watch from Kate Spade. It’s playful but still very elegant! Might have to add it to my Christmas wishlist.
Sunday Night Spotlight: Merlot Sparkle Mica
Add a touch of sophistication to your Christmas reds by using Merlot Sparkle Mica. Not only does this mica show up brilliantly in melt & pour soap, it holds color exceptionally well in cold process soap.
French Curl Cold Process Tutorial
We are so excited about our new swirl tools that we went on a bit of a soaping spree with them (and by ‘spree‘, I mean I made well over 90 pounds of soap in three weeks with them just to try out new techniques). We started with the Frog Foot, continued with the Butterfly Swirl and now we’re bringing you this fabulous French Curl. Inspired by a paper marbling technique, this pattern translates beautifully in soap. This soap also has scent blend reminiscent of a gourmet meal: a savory blend of Litsea, Black Pepper and Basil essential oil is a sprightly, uplifting somewhat masculine scent.
Back and Better than Ever: LabColors
After a brief hiatus, Bramble Berry LabColors are back and better than ever!
LabColors will be easier to use (see the first picture in this post for an example of spots from clumpy color), and you’ll have vibrant colorants that will show up beautifully in your products. We’re also changing the preservative to Optiphen ND, so don’t forget to update your product ingredient lists!
To keep things simple, the sizes of our LabColors will also change. Our new recommended dilution rates for LabColor use in both cold process and melt and pour soap are below:
Small dilutes into 4 to 8 ounces of water
Large dilutes into 8 to 16 ounces of water
Jumbo dilutes into 50 to 100 ounces of water
Despite the changes, the way you dilute LabColors is still the same. For a complete guide to diluting LabColor, refer to this blog post.
You may notice a large variation in how much water we recommend adding for each size. This is because if you plan on using the LabColors in cold process soaps, you’ll want to dilute the color on the lower end of the recommended spectrum to produce a more concentrated color. In our experience, we’ve found that diluting the small sized bottle in 4 oz. of water produces the best result. It produces a strong, vibrant color without affecting the texture of the soap. That being said, you can experiment with the dilution rates we’ve listed above to achieve a specific shade of color.
Note: Remember to pour your LabColor into a heat-safe container or glass bowl to warm it up, as the plastic bottle can melt in the microwave. If you’re using a plastic bottle, you can warm your color up in a hot water bath.
Now that we’ve filled you in on the LabColor news, read on for a quick primer on everything LabColor related!
What are LabColors?
LabColors are super concentrated liquid dyes. Keep in mind that because LabColors are FD&C dyes, they will bleed in soap. However, LabColors can give you such bright, intense hues that you will want to use them in every batch! Click here to learn more about LabColors and for a quick start guide.
First Row: Azure Blue, Canary, Cimmeron
Middle Row: Grape, Flamingo, Citrus Green
Bottom Row: Gulf Stream, Hyacinth, Java Beans
What is the best usage rate for LabColors?
We have conducted extensive testing to give you precise usage rates for using LabColors in your projects. These usage rates give your soap a vibrant color without producing a colored lather, which can stain.
For 10 of the 12 basic high pH LabColors, we recommend diluting the small size of LabColor in 4 oz. of water, and then following a usage rate of 8 mL of diluted color per pound of soap (this is the total amount of soap you are making, not just the amount of oil in the recipe). These 10 colors are:
For the remaining two colors, Lime and Royal Purple, the usage rate is 4 mL per pound of soap. These colors are more likely to produce a colored lather in finished soaps, and so it’s particularly important to not over-color your products with these two colors.
In melt & pour, LabColors are a what-you-see-is-what-you-get colorant, and we typically recommend using 1/2 teaspoon (about 2.5 mL) of diluted LabColor (the small-sized bottle in 8 oz. of water) per pound of melt and pour soap. To achieve specific colors in melt and pour through blending LabColors, see our Color Mixing Guide, which are available as a hard copy or in digital format.
As an added bonus, we’re providing a helpful chart so you’ll know exactly which LabColor size to purchase based on how much soap you plan to make:
LabColor Size | Amount of Diluted LabColor (for CP) | Amount of Soap – Light Tint | Amount of Soap – Deep Tint |
small | 4 ounces | 59 pounds | 15 pounds |
large | 8 ounces | 118 pounds | 30 pounds |
jumbo | 50 ounces | 737 pounds | 184 pounds |
Blending Colors
The high pH colors are specially formulated for cold process soap, but they can also be used in melt and pour projects. Keep in mind, the same LabColor may look completely different when used in cold process soap and melt and pour, which is why it is particularly important to only use high pH colors — that won’t morph or discolor — in cold process recipes. We’re giving you the usage rate for the basic 12 colors because you can blend them into hundreds — if not thousands — of other colors by following the ratios listed on our Color Mixing Guide Sheets (you can also buy a digital version of this guide here).
Top Row: Green Wreath, Purple Mist, Berry Red
Middle Row: Vibrant Orange, Lime, Seafoam
Bottom Row: Ivy Mist, Watermelon, Sage
When can I use LabColors?
If you are making cold process soap, take a look at our high pH LabColors that are specifically formulated for all those fun from scratch soapy products. If you aren’t into making cold process soap quite yet, we also have a set of low pH LabColors that can be used in your M&P soaps and pre-made liquid soaps.
First Row: Lemon, Mauve, Green Apple
Middle Row: Eucalyptus, Soft Orange, Impatien Pink
Bottom Row: Tulip, Royal Blue, Periwinkle
For some fun projects using LabColors (including bath salts, soaps and more), check out the mosaic below. You can use the LabColors in so many different ways and we can’t wait to see what you come with. If you have used our LabColors, be sure to share photos of your creations with us on Bramble Berry’s Facebook page.
Top Row: Holiday Soap Cubes, All’s Wool That Ends Wool & Green Machine Melt and Pour Tutorial
Bottom Row: How To Make Solid Bubble Bath, Ombre Rebatch Layers & Peace, Love and Soap
We’d love to know what your favorite LabColors are! If you have a tint or shade of color you’d like to see, let us know in the comments below. For a complete list of Bramble Berry LabColors by hue, check out this comprehensive list:
Reds & Pinks: Berry Red, Black Cherry, Brick, Bright Cherry, Countryside Pink, Flamingo Pink, Fuchsia, Magenta, Melon Red, Impatien Pink, Pinkberry Sherbert, Razzberry, Red, Red Velvet, Rio Rose, Santa Red, Tropical Hot Pink, Tropical Red, Tulip, Watermelon, Wineberry Mist, Pinked Mauve, Countryside Amethyst, Pinked Grape, Countryside Mauve
Oranges: Apricot, Countryside Orange, Peach, Orange Sherbert, Orange, Soft Orange, Tangerine, Tropical Orange, Vibrant Orange, Winter Orange,, Mango Sherbert, Cimmeron,
Yellows: Canary, Countryside Sunny Yellow, Countryside Wheat, Lemon, Lemon Sherbert, Sunflower, Tropical Yellow, Marigold
Greens: Citrus Green, Countryside Mint Leaf, Emerald, Eucalyptus Mist, Forest Mist, Green Apple, Lime Sherbert, Ivy Mist, Gulf Stream, Green Wreath, Sage Mist, Seafoam, Soft Jade, Tropical Green, Lime, Java Beans
Blues: Azure Blue, Aqua, Blue Green, Blue Mix, Brilliant Blue, , Countryside Blue Dust, Countryside Blue, Countryside Peacock, Countryside Slate Blue, Countryside Oceana, Pool Blue, Navy, Royal Blue, Sapphire, Sky At Dusk, Sky Blue, Countryside Teal, Teal
Purples: Countryside Plum, Countryside Purple, Easter Purple, Dark Purple, Grape, Lavender High, Lilac, Hyacinth Low, Hyacinth High, Periwinkle, Purple Mist, Purple Passion, Royal Purple, Tropical Purple, Mauve Mist
Browns & Blacks: Vanilla, True Black, Oyster Mist
Sunday Night Spotlight: Brazilian Clay
Shorter days and longer nights don’t have to be a bad thing — hopefully that means more time to spend with family and maybe even more time to soap! If you’re looking for some stunning natural colorants that can be used in both cold process and melt & pour recipes, you will be interested in these new colorants that have been added to the Bramble Berry line: Brazilian Clays. Our Brazilian Clays are versatile, natural, beautiful and non-bleeding.
These clays are naturally colored and do not contain any artificial dyes or pigments. The various shades are actually achieved by variations in the minerals found in the soil in the different regions of Brazil. Bramble Berry carries five different natural clays — Natural Brazilian, Purple, Yellow, Pink and Dark Red.You can buy each color individually, or buy all five at once in our Brazilian Clay Sampler.
The clays are stable in cold process soaps and make a great addition to any clay mask or cream. Clays can be a bit tricky if you haven’t used them before, and you’ll need some additional preparation before using them in your cold-process soaps. Clays are incredibly absorbent and tend to accelerate trace when added dry. They can also cause cracking if they aren’t dispersed first. To prevent this, disperse your clays in distilled water using a mini-mixer. You can use a ratio of 1 teaspoon of clay to 1 tablespoon of water per color. Make sure that the clay is completely saturated with water before mixing or you might end up with a messy cloud of clay.
If you are making melt & pour and want to add any of Bramble Berry’s clays without clumping or settling, we suggest dispersing the clay in a small amount of rubbing alcohol before adding it to your batch. We recommend a dispersion ratio of 2 teaspoons of clay to 1 tablespoon of alcohol. To learn more about natural colorants in melt & pour, check out this blog post.
Below are some fun tutorials that include our Brazilian Clays. If you get a chance to try out the different colors (Natural, Purple, Yellow, Pink, & Dark Red), we’d love for you to leave us a review on the product’s page or share a picture with us on Bramble Berry’s Facebook page. Happy soaping!
Top Left – Clockwise: Cute as a Button, Under Your Spell – Melt and Pour Clay Tutorial, Tiger Stripe “Hanger” Swirl Tutorial, In-The-Pot Swirl & Hot Process Series: Oven Process Layers
Indigo Spoon Plop Soap Cold Process Tutorial
For this recipe, we went all natural: earth colorants and a soothing blend of rosemary, lavender and eucalyptus essential oils make this soap a raw beauty. We were very excited to incorporate our brand new natural Indigo Powder colorant into this soap and it turned a beautiful blue-grey in the finished product. Handmade soap with indigo provides a great contrast to the Paprika, which turned a lovely orange, and the Safflower Powder, which turned a soft yellow. The spoon plop is also an easy technique that yields intriguing results every time.
What You’ll Need:
11 oz. Coconut Oil
2.2 oz. Mango Butter
13.2 oz. Olive Oil
11 oz. Palm Oil
6.6 oz. Sweet Almond Oil
6.1 oz. Sodium Hydroxide
14.5 oz. distilled water
1.1 oz. Rosemary Essential Oil
1.1 oz. Eucalyptus Essential Oil
.6 oz. 40/42 Lavender Essential Oil
Click here to add everything you need for this project to your Bramble Berry shopping cart!
If you’ve never made Cold Process soap before, stop here! I highly recommend checking out our FREE four part SoapQueen.tv series on Cold Process Soapmaking, especially the episode on lye safety. And if you’d rather do some reading, Bramble Berry carries a wide range of books on the topic, including my newest book, Soap Crafting. You can also checkout the digital downloads for that instant gratification factor.
SAFETY FIRST: Suit up for safe handling practices! That means goggles, gloves and long sleeves. Make sure kids, pets, and other distractions and tripping hazards are out of the house or don’t have access to your soaping space. Always soap in a well-ventilated area.
COLOR PREP: Disperse 1 teaspoon all colorants into 1 tablespoon of liquid oil (we like Sweet Almond or Sunflower). Prepping your colors in the beginning will allow you to work quickly and give you more time to work with your soap. Use the mini mixer to get all those clumps worked out smoothly.
FRAGRANCE PREP: In a glass container, combine the Rosemary, Eucalyptus and 40/42 Lavender Essential Oils. Set aside.
ONE: Slowly and carefully add the lye to the water, and stir until clear. Set aside to cool. If you’d like a harder bar of soap, you can add Sodium Lactate to the cooled lye water. Use 1 teaspoon of Sodium Lactate per pound of oils in the recipe.
TWO: Then, melt and combine the Coconut Oil, Mango Butter, Olive Oil, Palm Oil and Sweet Almond Oil in a large glass container. Once the lye water and the oils have cooled to 130 degrees or below (and are ideally within 10 degrees of each other), add the lye water to the oils and stick blend until thin trace.
THREE: Equally split the batter into three containers.
FOUR: Add one colorant per container in the following measurements:
- 3 teaspoons dispersed Indigo Powder
- 3 teaspoons dispersed Paprika
- 3 teaspoons dispersed Safflower Powder + 1 teaspoon Titanium Dioxide
Mix in the colorants using a wire whisk or spoon.
FIVE: Split the essential oil blend equally between the three containers and stir in with a wire whisk or spoon.
SIX: Use a large spoon (we like our Round Silicone Spoon) to plop spoonfuls of color into the mold. Repeat this process with each color, keeping the same color order, until you have about 1/5 of the soap remaining in the cups.
SEVEN: Using the remaining soap in the cups, pour lines of soap horizontally into the mold.
EIGHT: Insert a chopstick or dowel about 1/4″ into the soap and make a vertical zig-zag pattern down the length of the mold for that finishing touch swirl.
NINE: Using your chopstick or dowel again, make a series of small loops down the length of the soap. Once you’ve gone from one end of the soap to the other, make small loops back down the length of the mold. When you reach the end of the mold, create one big loop that carries you into the next row, and do a reverse loop back across the mold again. You may recognize this swirling technique from the Elemental Swirl.
Spray the entire top with 91% Isopropyl Alcohol to reduce soda ash. It is particularly important to insulate this soap for 24 hours because gel phase will help bring out a nice, vibrant color in the Indigo. Unmold after 3-4 days and allow to cure for 4-6 weeks. Enjoy!
LabColor Makeover
Vibrant, reliable and fun to use, LabColors are super concentrated dyes that are fantastic soapy colorants. LabColors are an excellent choice for coloring your melt & pour and cold process soaps.
We’re making some minor changes to our LabColor line, but have no fear — we’ve reformulated them to make them easier to use than ever. To get everything packaged and ready to ship out, we’re temporarily taking all LabColors out of stock today, Thursday, October 24th. You will not be able to purchase LabColors at this time. However, when LabColors come back in stock on Monday, October 28, you’ll simply log in to your Bramble Berry account and place an order for LabColor like normal.
Check the Soap Queen blog on Monday, October 28 to learn more about how to use the new and improved LabColors!
Sunday Night Spotlight: Hemp Seed Oil
Every month we make dozens of batches of cold process soap with various fixed oils, colorants and fragrances. With such array of ingredients to choose from, some tend to get lost in the crowd. Tonight we’d like to showcase an oil that is perhaps the best kept secret in soapmaking — Hemp Seed Oil. This oil can be used in everything from cold process soap to lotions & cremes. It has fabulous skin-loving properties and creates an excellent lather, and it’s a great addition to any soapy creation. This is one oil that will set your products apart from the crowd!
Our Unrefined Hemp Seed Oil (front) is much darker than it’s refined (back) counterpart. Take this into account when formulating your CP recipes!
Bramble Berry carries two different kinds of Hemp Seed Oil: natural (or unrefined) and refined. Both oils work fabulously in cold process recipes. The main difference between the two is the color and the smell. The natural Hemp Seed Oil is more viscous and has a much darker color as well as a distinct, nutty smell. The refined Hemp Oil, on the other hand, is an excellent vehicle for providing essential fatty acids to your skin. Since it’s such a light colored oil, it’s also a good choice if you want to preserve your colors and avoid any unexpected discoloration.
In addition to creating ample suds, Hemp Oil contains high levels of unsaturated fats, which give it great moisturizing properties. We suggest using both types of Hemp Oil in cold process recipes at 20% or less. If you are adding it to a body butter or lotion, you can go as high as 50%. Hemp Oil has a shelf life of about 9 months (longer if frozen), so it’s best to use it soon after purchasing.
Check out the following tutorials to see how we’ve used Hemp Seed Oil:
Whipped Belly Butter (left), Hot Process Oven Process Layers (top) & Cucumber Oak Mantra Swirl (bottom)
As an added bonus, Refined Hemp Seed Oil is 20% off this month! What will you make with your Hemp Seed Oil?
Holly Berry Cold Process Soap
We’re continuing our Christmas-y cold process kick because of the 4-6 week cure time required for cold process recipes. On Tuesday we showed you the absolutely delectable Holiday Cookie Bar recipe and today we’re introducing the festive Holly Berry design. For this project we used squirt bottles to make fun holly leaf designs on top of a two color in-the-pot-swirl, and then we garnished it with real cranberry seeds to mimic plump holly berries. We fragranced with Fresh Snow Fragrance Oil, which performed beautifully in our recipe and smells airy and clean — just like freshly fallen snow!
What You’ll Need:
Silicone Square Tray Mold
2 oz. Avocado Butter
8 oz. Coconut Oil
10 oz. Olive Oil
8 oz. Palm Oil
2 oz. Palm Kernel Flakes
6 oz. Rice Bran Oil
4 oz. Sweet Almond Oil
5.5 oz. Sodium Hydroxide
13.2 oz. distilled water
Cranberry Seeds
Hydrated Chrome Green
Titanium Dioxide
Merlot Sparkle Mica
Electric Bubblegum
Super Pearly White
Activated Charcoal
1.8 oz. Fresh Snow Fragrance Oil
Click here to add everything you need for this project to your Bramble Berry shopping cart!
If you’ve never made Cold Process soap before, stop here! I highly recommend checking out our FREE four part SoapQueen.tv series on Cold Process Soapmaking, especially the episode on lye safety. And if you’d rather do some reading, Bramble Berry carries a wide range of books on the topic, including my newest book, Soap Crafting. You can also checkout the digital downloads for that instant gratification factor.
SAFETY FIRST: Suit up for safe handling practices! That means goggles, gloves and long sleeves. Make sure kids, pets, and other distractions and tripping hazards are out of the house or don’t have access to your soaping space. Always soap in a well-ventilated area.
COLOR PREP: To ensure that the Titanium Dioxide blends smoothly into the soap batter, we recommend micronizing it before dispersing it in oil. Please note this is an optional tip but it does help with the titanium dioxide clumping in the soap =) To micronize colorant, simply use a coffee grinder to blend the colorant to break up any clumps of color and prevent streaks of white from showing in the final soap. We like to use a coffee grinder that has a removable, stainless steel mixing area for easy cleaning. Disperse 1 teaspoon all colorants except the Super Pearly White into 1 tablespoon of liquid oil (we like Sweet Almond or Sunflower). Make a double batch of the Super Pearly White by mixing two teaspoons of colorant into 2 tablespoons of oil. Prepping your colors in the beginning will allow you to work quickly and give you more time to work with your soap. Use the mini mixer to get all those clumps worked out smoothly.
ONE: Slowly and carefully add the lye to the water, and stir until clear. Set aside to cool. If you’d like a harder bar of soap that lasts longer in the shower, you can add Sodium Lactate to the cooled lye water. Use 1 teaspoon of Sodium Lactate per pound of oils in the recipe.
TWO: Begin by melting down the Palm Kernel Flakes in the microwave on 30 second bursts. Then, combine the melted Palm Kernel Flakes with the melted Avocado Butter, Coconut Oil, Olive Oil, Palm Oil, Rice Bran Oil and Sweet Almond Oil in a large glass container. Once the lye water and the oils have cooled to 130 degrees or below (and are ideally within 10 degrees of each other), add the lye water to the oils and stick blend until thin trace.
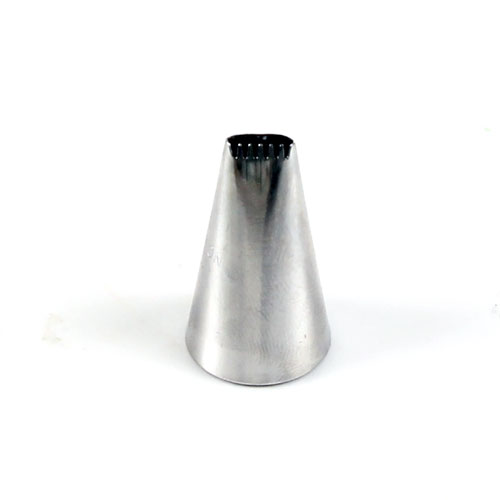
THREE: Pour approximately 2 – 3 oz. of soap batter into a condiment bottle and color with 1 teaspoon of dispersed Hydrated Chrome Green. Plug the tip with your finger and then shake vigorously. Release your finger with the tip pointing away from your face and then set aside.
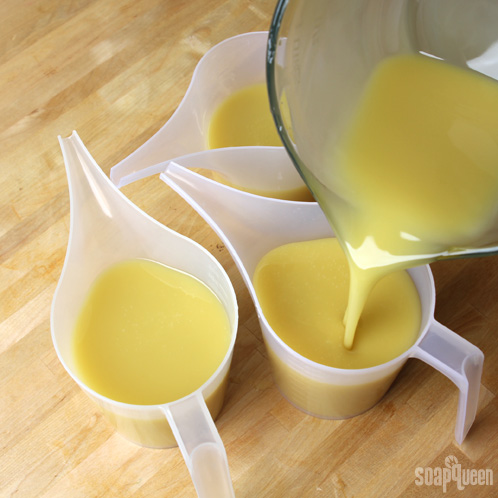
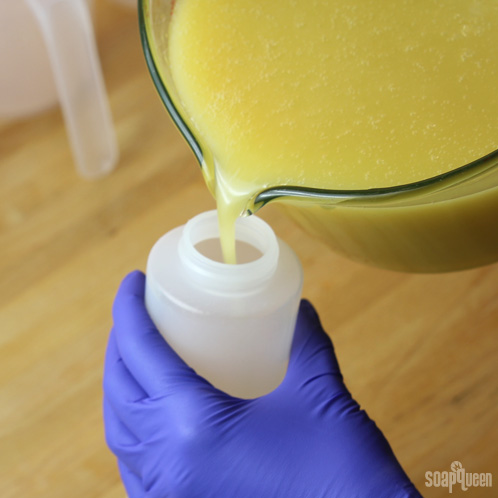
FOUR: In two additional containers, pour off about 2 cups each. You should have about 4 cups left in the original container.
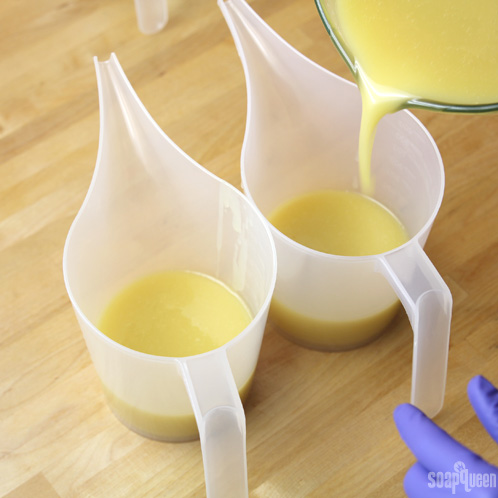
FIVE: Add the following colorants to the three containers:
- 2 teaspoons dispersed Super Pearly White in the original container.
- 3 teaspoons dispersed Merlot Sparkle Mica and 1/2 teaspoon Electric Bubblegum in one of the 2-cup containers.
- 3 teaspoons dispersed Super Pearly White and 1/4 teaspoon dispersed Activated Charcoal in the remaining 2-cup container.
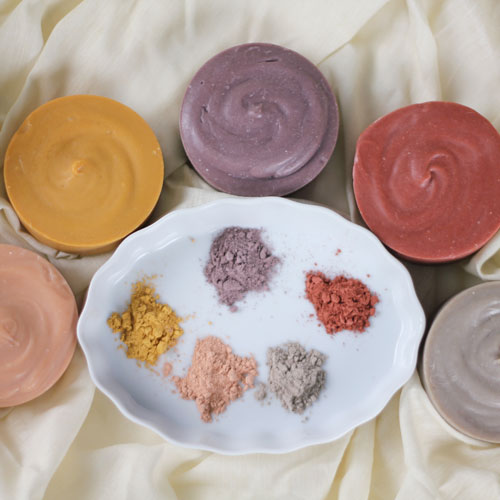
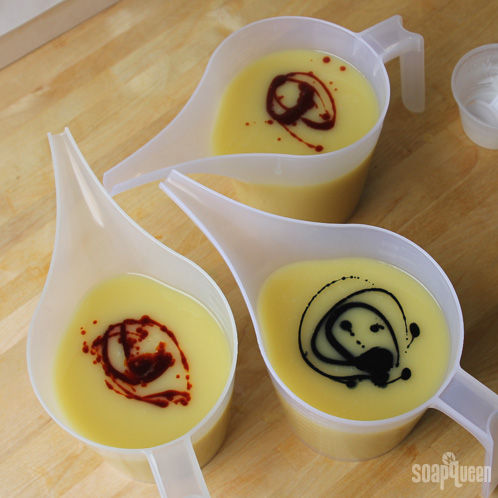
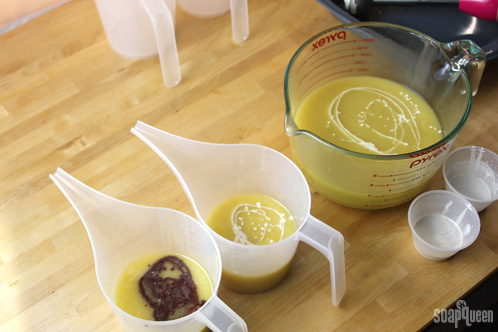
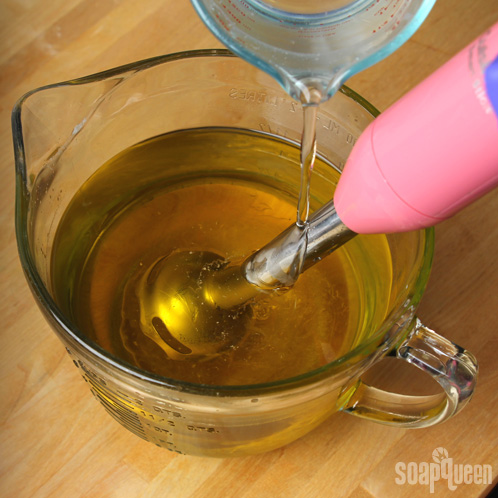
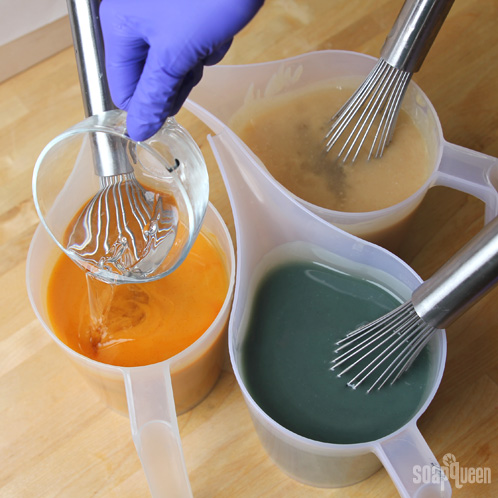
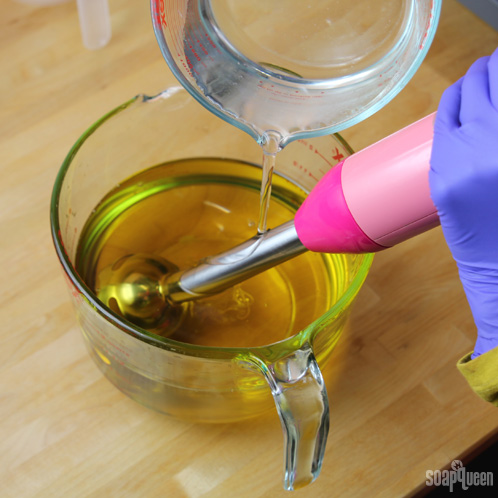
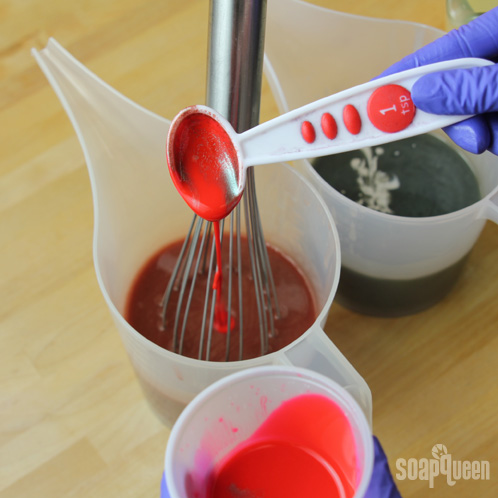
SIX: Using a wire whisk or spoon, split the fragrance equally among the 3 containers.
SEVEN:For the in-the-pot swirl, start by pouring the grey colored soap into the Titanium Dioxide colored soap in 4 places: 12:00 o’clock, 4:00 o’clock, 8:00 o’clock, and center. Repeat with the Merlot Sparkle Mica. Pour from a high point so that the soap penetrates the entire depth of the soap in the pot, which will create a swirl throughout the soap.
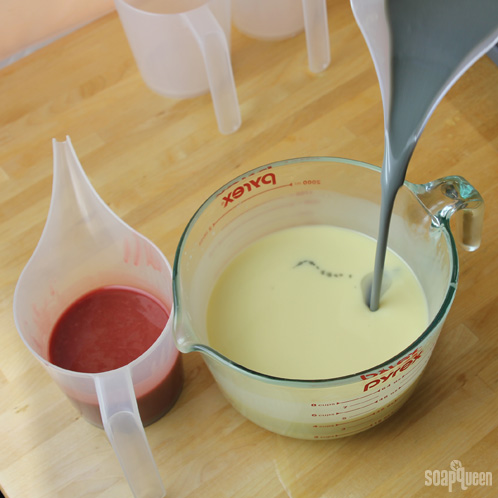
EIGHT: Using a spatula, chopstick or dowel, swirl the soap by running the tool through each of the entry points once. Only once! You want to swirl but not mix the soap.
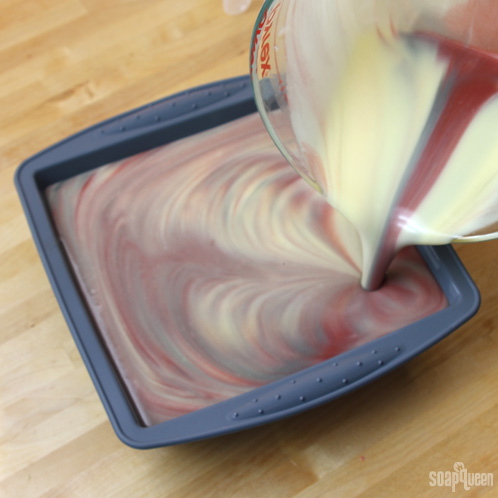
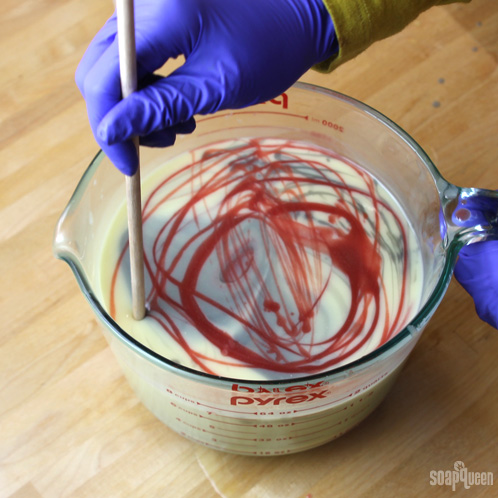
NINE: After you’ve swirled the soap, slowly pour the batter into the mold. We started pouring in the upper left hand corner and moved diagonally to the bottom right hand corner.
We’ve even got a video of this pour too!
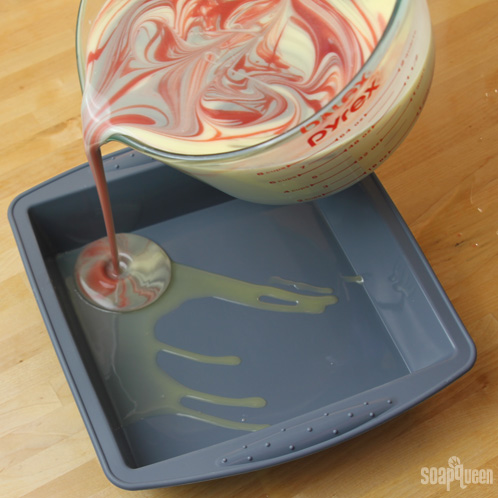
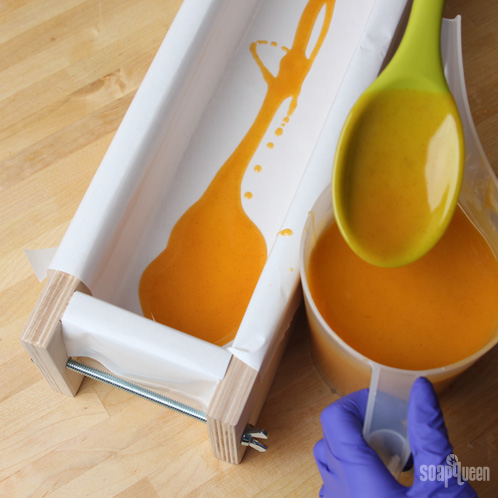
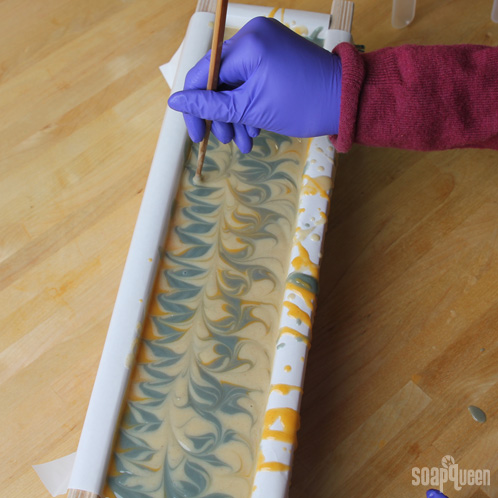
TEN: Now use the condiment bottle to “draw” holly leaf designs on the surface of the soap. We free-handed our designs, so have fun with this part!
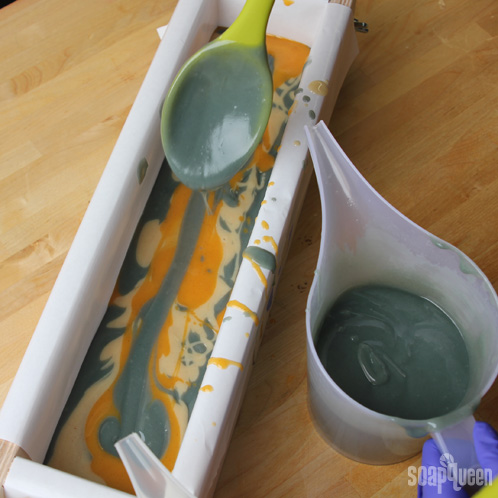
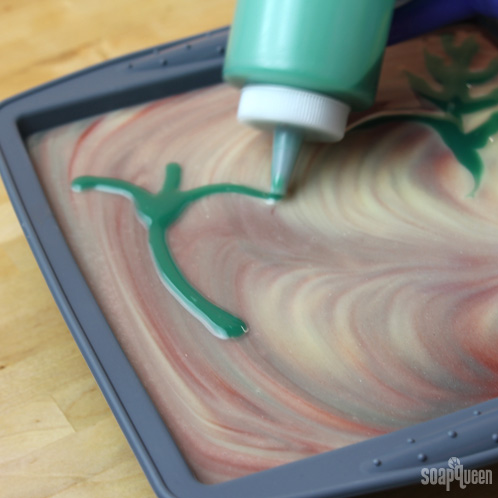
ELEVEN: Once you’re satisfied with your leaves, pour the Cranberry Seeds as berries. In order to get little round berries that were relatively the same shape, we poured the seeds through an 8 oz. Funnel.
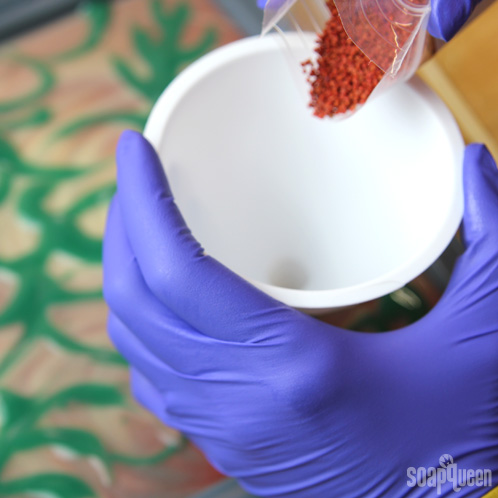
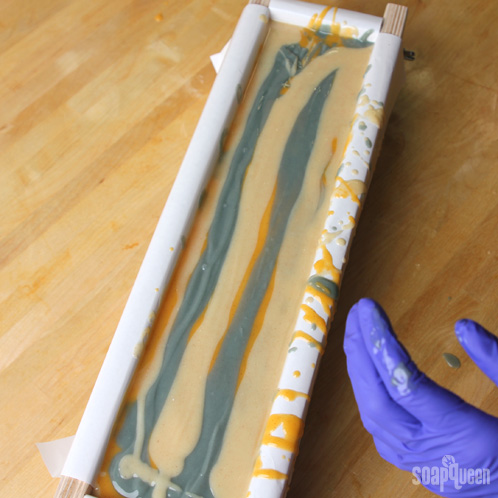
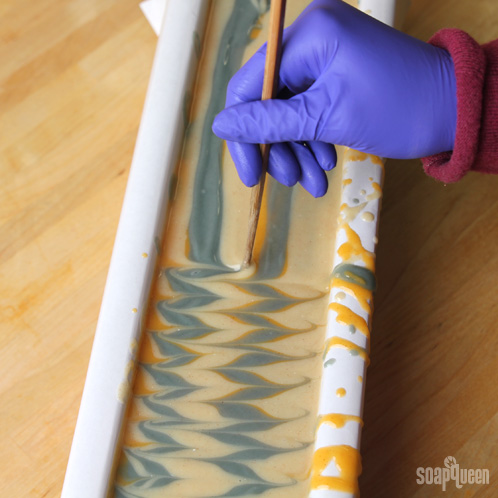
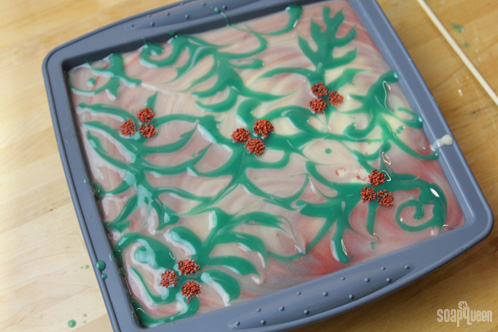
TWELVE: We recommend keeping a chopstick or pair of tweezers on hand to clean up any stray seeds. That will help you keep your “berries” looking like berries and not scattered bunches of seeds!
Spray the entire top with 91% Isopropyl Alcohol to help prevent soda ash. Cover and insulate for 24 hours and unmold after 3-4 days. Allow to cure for 4-6 weeks and enjoy!
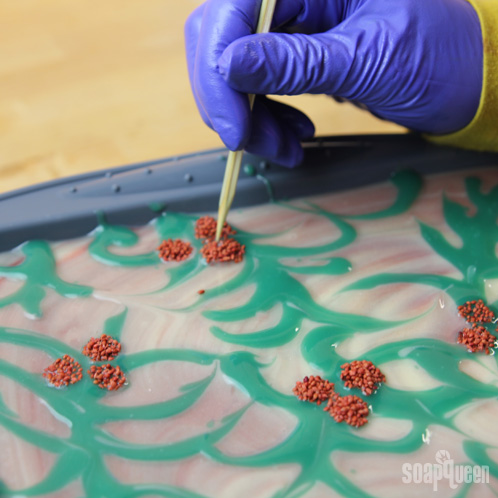
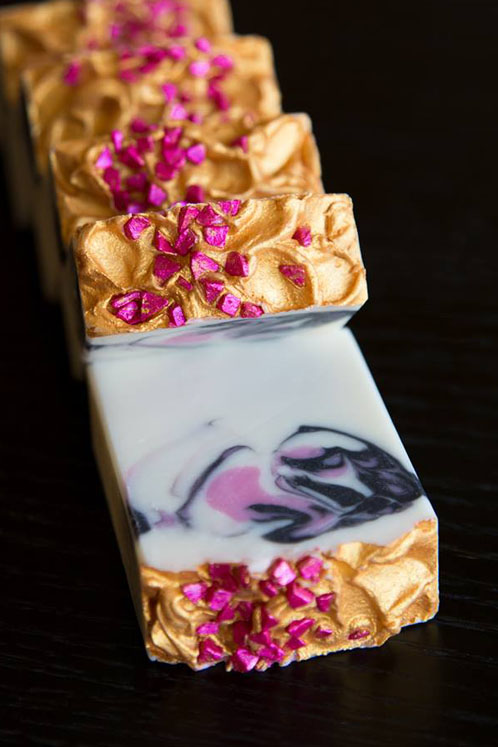
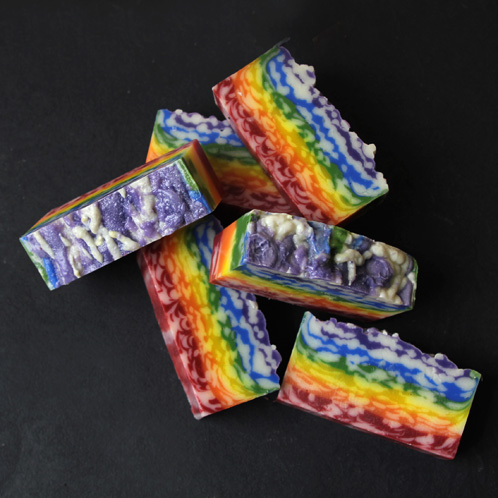
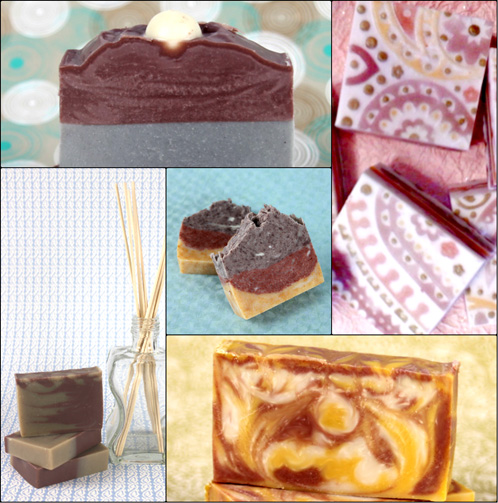
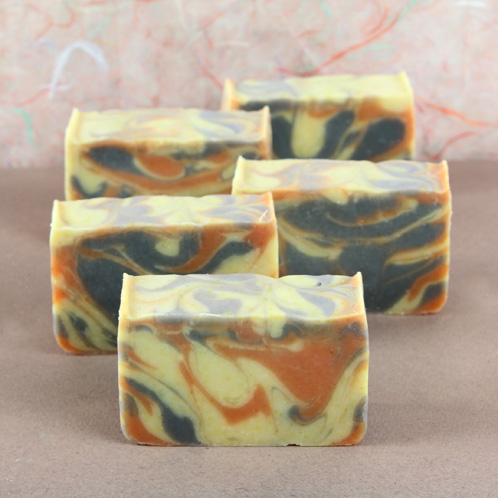
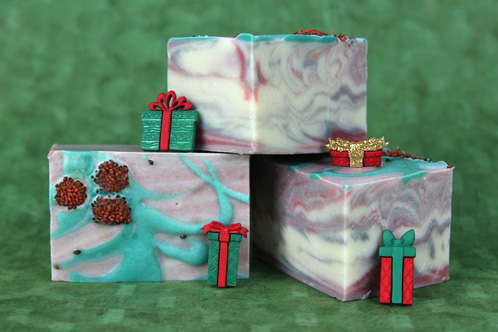
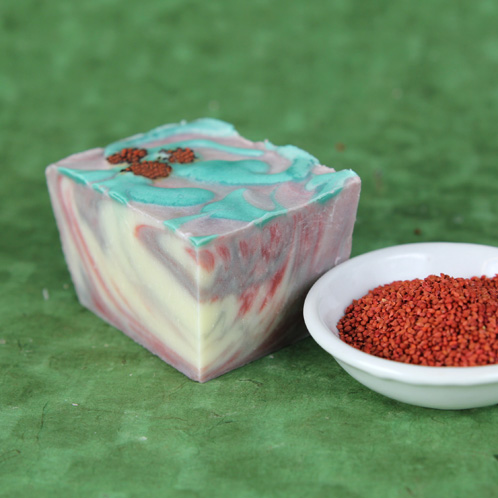
Bonus: Check out the cut of this soap below!
- Silicone Square Tray Mold
- 2 oz. Avocado Butter
- 8 oz. Coconut Oil
- 10 oz. Olive Oil
- 8 oz. Palm Oil
- 2 oz. Palm Kernel Flakes
- 6 oz. Rice Bran Oil
- 4 oz. Sweet Almond Oil
- 5.5 oz. Sodium Hydroxide
- 13.2 oz. distilled water
- Cranberry Seeds
- Hydrated Chrome Green
- Titanium Dioxide
- Merlot Sparkle Mica.
- Electric Bubblegum
- Super Pearly White
- Activated Charcoal
- 1.8 oz. Fresh Snow Fragrance Oil
- SAFETY FIRST: Suit up for safe handling practices! That means goggles, gloves and long sleeves. Make sure kids, pets, and other distractions and tripping hazards are out of the house or don’t have access to your soaping space. Always soap in a well-ventilated area.
- COLOR PREP: To ensure that the Titanium Dioxide blends smoothly into the soap batter, we recommend micronizing it before dispersing it in oil. Please note this is an optional tip but it does help with the titanium dioxide clumping in the soap =) To micronize colorant, simply use a coffee grinder to blend the colorant to break up any clumps of color and prevent streaks of white from showing in the final soap. We like to use a coffee grinder that has a removable, stainless steel mixing area for easy cleaning. Disperse 1 teaspoon all colorants except the Super Pearly White into 1 tablespoon of liquid oil (we like Sweet Almond or Sunflower). Make a double batch of the Super Pearly White by mixing two teaspoons of colorant into 2 tablespoons of oil. Prepping your colors in the beginning will allow you to work quickly and give you more time to work with your soap. Use the mini mixer to get all those clumps worked out smoothly.
- Slowly and carefully add the lye to the water, and stir until clear. Set aside to cool. If you’d like a harder bar of soap that lasts longer in the shower, you can add Sodium Lactate to the cooled lye water. Use 1 teaspoon of Sodium Lactate per pound of oils in the recipe.
- Begin by melting down the Palm Kernel Flakes in the microwave on 30 second bursts. Then, combine the melted Palm Kernel Flakes with the melted Avocado Butter, Coconut Oil, Olive Oil, Palm Oil, Rice Bran Oil and Sweet Almond Oil in a large glass container. Once the lye water and the oils have cooled to 130 degrees or below (and are ideally within 10 degrees of each other), add the lye water to the oils and stick blend until thin trace.
- Pour approximately 2 – 3 oz. of soap batter into a condiment bottle and color with 1 teaspoon of dispersed Hydrated Chrome Green. Plug the tip with your finger and then shake vigorously. Release your finger with the tip pointing away from your face and then set aside.
- In two additional containers, pour off about 2 cups each. You should have about 4 cups left in the original container.
- Add the following colorants to the three containers:
2 teaspoons dispersed Super Pearly White in the original container.
3 teaspoons dispersed Merlot Sparkle Mica and ½ teaspoon Electric Bubblegum in one of the 2-cup containers.
3 teaspoons dispersed Super Pearly White and ¼ teaspoon dispersed Activated Charcoal in the remaining 2-cup container. - Using a wire whisk or spoon, split the fragrance equally among the 3 containers.
- For the in-the-pot swirl, start by pouring the grey colored soap into the Titanium Dioxide colored soap in 4 places: 12:00 o’clock, 4:00 o’clock, 8:00 o’clock, and center. Repeat with the Merlot Sparkle Mica. Pour from a high point so that the soap penetrates the entire depth of the soap in the pot, which will create a swirl throughout the soap.
- Using a spatula, chopstick or dowel, swirl the soap by running the tool through each of the entry points once. Only once! You want to swirl but not mix the soap.
- After you’ve swirled the soap, slowly pour the batter into the mold. We started pouring in the upper left hand corner and moved diagonally to the bottom right hand corner.
- Now use the condiment bottle to “draw” holly leaf designs on the surface of the soap. We free-handed our designs, so have fun with this part!
- Once you’re satisfied with your leaves, pour the Cranberry Seeds as berries. In order to get little round berries that were relatively the same shape, we poured the seeds through an 8 oz. Funnel.
- We recommend keeping a chopstick or pair of tweezers on hand to clean up any stray seeds. That will help you keep your “berries” looking like berries and not scattered bunches of seeds!
What’s New for Fall
Santa came early this year to Bramble Berry, and he brought a whole host of new products with him! With winter quickly approaching, we want to highlight some of our new products before the busy soaping season starts. We’ve got a few exciting new tools, several fragrance and essential oils and a library’s worth of books and e-books. If you have any suggestions for products you’ d like to see Bramble Berry carry, be sure to let us know in the comments below.
In the past few months, we’ve been working hard on some new soaping tools that will change the way you swirl. Our Easy Swirl and Comb Swirl Tools (also available in our Swirl Tool Kit) are a cold process soaper’s dream. Instead of spending time painstakingly getting those peacock or frog foot swirls just perfect, these tools make the designs possible in a matter of minutes.
Our two newest essential oils — Cedarwood Atlas and Palmarosa, are fantastic for any all-natural recipe. Cedarwood Atlas Essential Oil is said to have aromatherapy benefits, and it’s it’s been said to be helpful for acne-prone skin. In cold process soap, this essential oil has a lovely woodsy scent. Palmarosa Essential Oil, on the other hand, has a soft floral aroma vaguely reminiscent of rose and blends well with citrus-y oils such as Bergamot or milder oils such as Chamomile. We used Palmarosa in the beautiful Fall Leaves soap we cut earlier this week.
To achieve a beautiful blue jean-blue, we’ve introduced a Natural Indigo Powder that can be dispersed in isopropyl alcohol and used in melt & pour or added to the lye water for cold process coloring. Indigo requires a super hot gel phase to go blue and we found that adding it directly to lye water gets you the most blue color. For the below video, we added it, pre-dispersed, at trace. We used Indigo Powder, Safflower Powder and Paprika Powder to color our Celine Swirl. Check out the cut below:
Easy Grip Silicone Ladle, Round Silicone Spoon, Silicone Spatula, & Square Silicone Spoon
These easy-grip silicone tools have been our go-to tools for our soaping sessions. They’re also easy to clean and sanitize. The rubber handles have a non-slip grip and can resist temperature up to almost 500 degrees Fahrenheit. You can purchase the tools individually or purchase the entire Silicone Tool Set.
Do you want to learn more about making your own lotions, cremes and emulsified scrubs? These three new e-books — Back to Basics, Formulating Lotions & Cremes, and Lotion Making 101 — will give you all the information you need to start formulating your own recipes. And at the very last moment (minutes before this post went up), we added this 194 page e-book on Hair Care Products. With this e-book, you’ll have a comprehensive overview of hair chemistry, how shampoo and conditioner work and most importantly, how to formulate great quality hair products for everyday use. They’re available for quick download and instant formulation gratification.
We added three new molds for your melt and pour & cold process soaping (or chocolate or plaster or wax crafting). We couldn’t help but add the Ornaments Mold, and the Guest Goat Milk Tray Mold and an art-deco inspired Filigree Bee Mold were too cute to pass up.
In Bubbles to Bucks, veteran soapmaker Elin Criswell explores what it takes to turn your soapmaking hobby into a business. She gives you useful advice on starting a small business so you’ll have the tools to succeed. This is a must-read for any soapmaker wanting to start or grow their business.
We also snuck a brand new fragrance oil into our line. Introducing the Amazon Lily & Rain, which smells like florally fresh line-dried linens. If you want a sneak-peek of how it works in cold process, check out our Rainbow Squirty Swirls (it performed beautifully!). Also, be sure to also check out the refill for the Guava Shave Ice Fragrance Oil, which is part of the SoapyLove Island Style Soap Colorants Kit. It’s a great way to keep this perennial summer favorite in-stock.
To achieve the perfect decorative finish for your bath bomb cupcakes, soap meringues, or even your fluffy soap filling, use this brand new Basket Weave Frosting Tip to take your designs to the next level.
Now you can get all your major soapmaking oils in one place. We’ve introduced Canola Oil to our fixed oils line for an affordable, inexpensive oil to use in your recipes. We like using Canola Oil as a partial substitute for Olive Oil when we’re trying to get precise colors in soap because it doesn’t discolor the way Olive Oil sometimes can.
Have you used any of these new products yet? If so, we’d love for you to leave a review on our website. Not sure how to do it? Learn how to leave a review on our website here.