Debbie Chialtas is also a guest blogger for the Soap Queen Blog. Check out some of her creative projects she’s designed exclusively for the Soap Queen Blog and don’t miss out on the Soapylove Product Line at Bramble Berry!
Tutorials on soapmaking, bath fizzies, lotions and more
Filed Under: Personal Ramblings
Debbie Chialtas is also a guest blogger for the Soap Queen Blog. Check out some of her creative projects she’s designed exclusively for the Soap Queen Blog and don’t miss out on the Soapylove Product Line at Bramble Berry!
Filed Under: Cold Process Soap
Father’s Day is next month (Sunday, June 20th). Now is the time to make your cold process soap so it has time to cure for Dad’s big day!
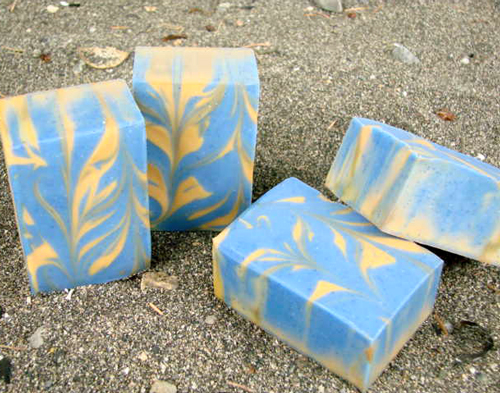
Never made cold process before? No problem! Check out our beginning series to cold process on Soap Queen TV. Be sure to check out all of the (free) videos before diving in. Don’t miss out on the safety precautions and basic instructions.
Video 1: Lye Safety and Ingredients
Video 2: Cold Process Basic Terms
Video 3: Cold Process Fragrances
Video 4 COMING SOON: Cold Process Colorants
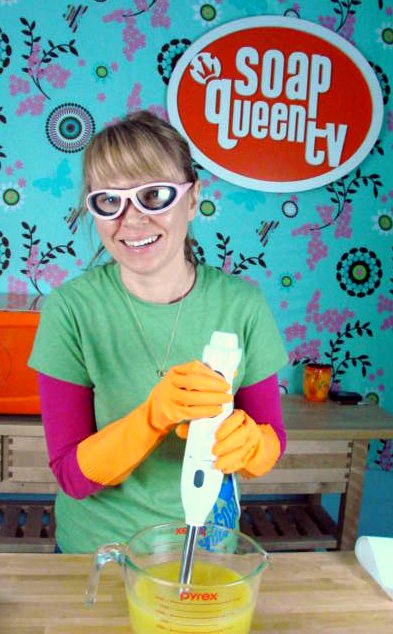
Safety First: Make sure that you have on your goggles, gloves and long sleeves. Read a lye safety blog post HERE or watch a short video on lye safety HERE.
Ingredients:
11 oz. Olive Oil
8.9 oz. Coconut Oil
7.9 oz. Palm Oil
2.1 oz. Jojoba Oil
.5 oz. Shea Butter
4.3 oz. Lye
10 oz. Distilled Water
(Yeild 45 oz.)
2.5 oz. Blue Man Fragrance Oil
¼ tsp of Ultramarine Blue
1 tsp of Ocean Blue Jojoba Beads
1/8 tsp of Super Pearly White
2 mini scoops of Titanium Dioxide
.5 oz. EXTRA Jojoba Oil
Tools:
2 Heat Safe Containers
Spoons
Mini Scoop
Small Bowl
Wax Paper
Mini Mixer for Colorants
Stick Blender
ONE: Put on your gloves and goggles and make your lye water. Measure out 10 ounces of distilled water and mix in 4.3 ounces of lye. Remember to always add the lye to the water and never the other way around. Stir the lye water until the mixture turns clear and set aside.
TWO: Measure out all of your oils. In a large heat safe container, heat and combine the olive oil, coconut oil, palm oil and jojoba oil. Give it a good mix.
THREE: Stir your shea butter into the oil mixture until is completely melts in. If shea butter gets too hot it tends to get grainy. I like to stir it in and have the heat from the other oils melt the butter.
FOUR: Let your oils and lye cool down. For this recipe, my oils and lye were both between 90°F and 100°F when I combined them (oils were 94°F and lye water was 98°F). While your oils are cooling, we have a couple of things to keep us busy, like lining your mold, measuring out your fragrance, and making a blue slurry for the swirl.
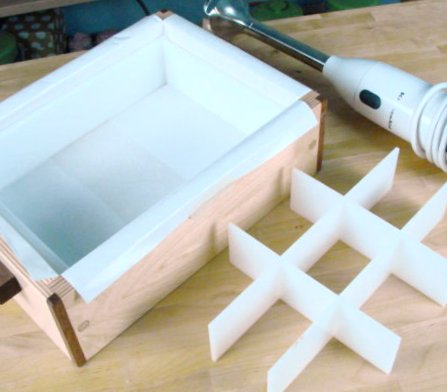
Line Your Mold: Use freezer paper to line your mold, shiny side up. Once your mold is lined add the side and end border pieces and put your inserts together so they’re ready for action.
Fragrance: In a small mug or bowl, measure out 2.8 ounces of Blue Man Fragrance Oil. I normally recommend .7 oz. to 1 ounce of fragrance per pound of cold process soap. I’m using a little more this time so it’s strongly scented (because I adore, love, love, love, strongly scented soap).
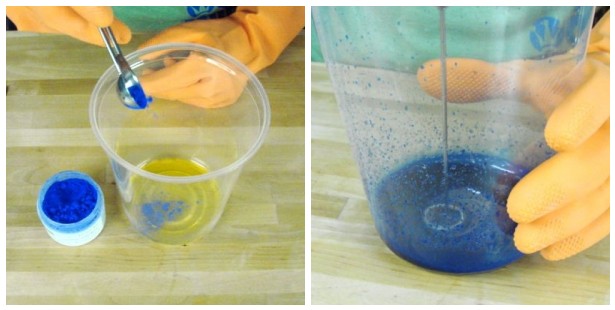
Blue Slurry: I learned this technique from Christy Rose of KBShimmer and love it. In a tall plastic container, combine ½ ounce of Jojoba Oil and ¼ tsp. of Ultramarine Blue Oxide. Mix together with a mini mixer or frother to break up all of the clumps. We’ll be adding some soap to this colorant later to swirl.
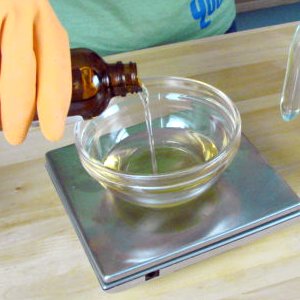
Fragrance: Measure out 2.5 ounces of Blue Man Fragrance Oil.
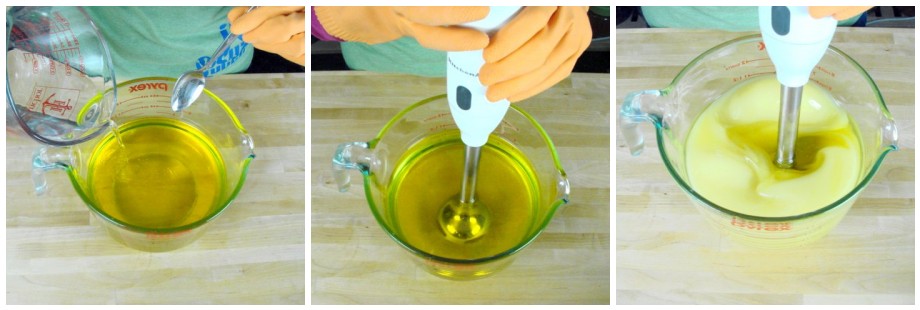
FIVE: Once your oils mixture and lye mixture has reached your desired temperature, it’s time to combine them. Slowly and carefully add your lye water to the oil mixture. Remember to “burp” your stick blender before turning it on.
What’s Burping? Burping gets rid of air bubbles. Give the stick blender a couple of taps on the bottom of the glass container while the head of the mixer is submerged in the liquid. The goal is to get the bubbles out of the head of the mixer before we start mixing.

SIX: Mix with your stick blender until you have a thin trace (like a thin pudding mixture). Then add 12 ounces of the soap batter to the blue slurry container and mix with your sick blender. Do not add any fragrance to this colored soap. Blue Man is a discoloring fragrance and we don’t want this part of the soap to discolor. Then hand stir in ½ tsp of Blue Jojoba Beads.
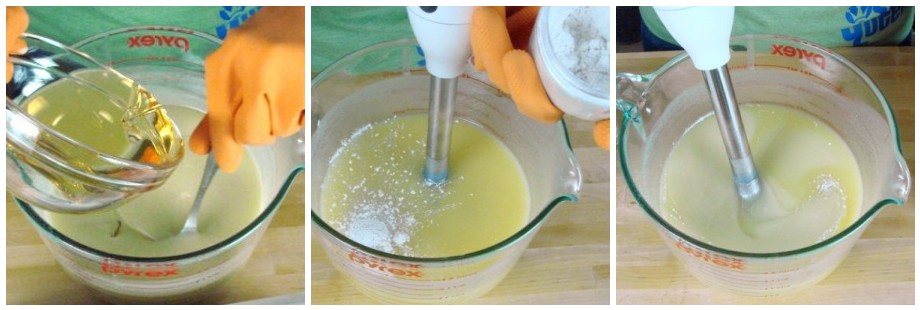
SEVEN: Add the Blue Man fragrance to the rest of the non-colored soap batter and hand mix with a spoon. Then add 2 mini scoops of Titanium Dioxide and 1/8 tsp of Super Pearly White Mica. Mix well with your stick blender. Don’t forget to “burp”!
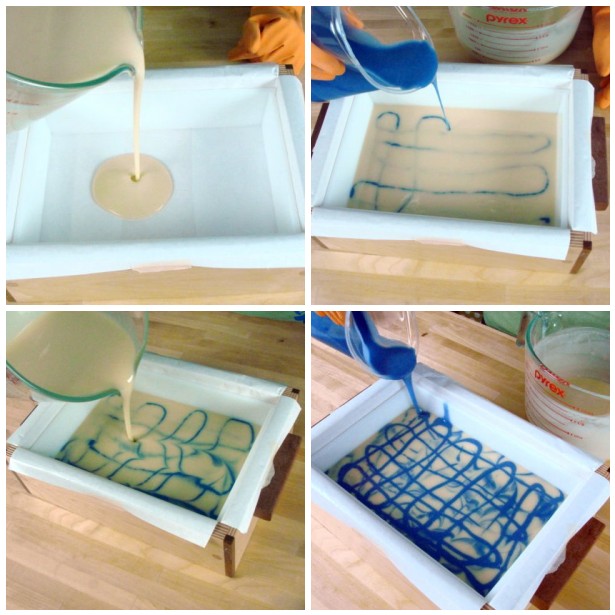
EIGHT: Both soap batters should be at a light trace at this point. Pour half of the non-colored base into the mold. Then drizzle half of your colored soap in an “S” like pattern horizontally then again, vertically. Repeat with the rest of your soap batter.

NINE: In bigger molds I usually use a spatula or a spoon to swirl. Because this mold is so small, I recommend something smaller like a skewer. I actually used a dropper and the swirls turned out great. Swirl your soap in an “S-like” shape horizontally then again vertically.
TEN: Drop in the assembled dividers and pop the lid on. Let it rest for 24-48 hours before unmolding. Then let it cure for 4-6 weeks. Click HERE for unmolding tips.
Filed Under: Bramble Berry News
Filed Under: Bramble Berry News
I want to give a soapy shout out to Erin Pikor, from Naiad Soap Arts, for winning Best Soap at the Handcrafted Soapmaker’s Guild Conference. Her Tea Room Soap took the cake and I couldn’t be more proud. I knew she was a great soap artist but the vote of all the soapers at the conference just proved it!
Erin is a guest blogger for the Soap Queen Blog and always comes up with the cutest projects like Solid Sugar Cubes and Cold Process Cupcakes.
Erin will also be a teacher at this years Soap Weekend Intensive making Strawberry Rhubarb Pie Soap and Ambrosia Salad Soap. Don’t miss out on this great opportunity to meet Erin! Sign up for Soap Weekend Intensive 2010 HERE And, congratulations Erin. We’re so excited for you and your award.
Filed Under: Home Crafts
Get back to the basics by using natural products like Bramble Berry’s new Naturewax. It is skin safe, 100% vegetable based and made from soy which is an environmentally friendly renewable resource. Reuse your old canning jars, mason jars or baby food containers for a variety of eco-friendly container candles.
ONE: Melt the Naturewax wax in the microwave in a heat safe container. Make sure to melt it in 1 minute bursts, stirring in between with a spoon. Normally we recommend a double boiler for wax melting but his particular wax has a melt point of 125°F so it melts nicely in the microwave. Also, for paraffin based waxes, I always recommend specialty candle containers. Again, because of the super low melt point, they are not needed for this Naturewax based project. For more tips on candle making, check out the Soap Queen TV Episode on Travel Candles.
TWO: Fill one jar with melted wax, leaving at least 1/2″ from the top of the jar. Mix in your essential oil blend (we used 5 ml Orange EO, 4 ml Grapefruit EO, 3 ml Lime EO). Blend well. Note: we used a 4 oz. baby food jar and found it held 3.2 oz. (by weight) of Soy Wax.
THREE: Dip the base of the wick into the melted wax and center on the bottom of the container.
TIP: If you’re having problems with leaning wicks, make sure that your wick can stand on “dry land” before putting it in your wax, bending the wick if necessary. Once the wick is centered in the candle, place 2 pencils horizontally on the jar on each side of the wick. This will give the wick a little support as you pour the wax and the candle cools.
Filed Under: Personal Ramblings
Once again I was distracted on Etsy (big shocker) looking for colorful soaps that scream SPRING! The weather has been absolutely gorgeous here (in Bellingham, WA) so I was on the hunt for bright colors and happy flowers everywhere, including nature. I even got to go on a beautiful hike to Clayton Beach with my parents this weekend so I definitely celebrated the happy weather this weekend. Back to Etsy, here’s what caught my eye this evening.
Filed Under: Bramble Berry News
Lisa Johnson, from Poppy Paperie, has done it again. She wows me with her creativity! Check out these Apple Pie Candles packaged to perfection. Lisa is a total rock star!
Filed Under: Cold Process Soap
Finally! I share a recipe in this, the 3rd episode in my ‘How to Make Cold Process Soap’ series. I really wanted to emphasize the need for safety and understanding the ingredients and process before showing a complete recipe in my video series. Thanks for being patient. (Can’t see the video because you’re using a blog reader or get SoapQueen delivered to your email? Click through to the blog to see the video).
How to Make Cold Process Soap: Using Fragrances, Episode 3 from Soap Queen on Vimeo.
Recipe:
7.9 oz distilled water
3.4 oz Sodium Hydroxide, Lye
8 oz Coconut Oil
8 oz Palm Oil
8 oz Olive Oil
2 oz Oatmeal, Milk, & Honey fragrance oil
I used our 2 pound wooden mold – so cute!
Be Safe! Watch the first video in this series “Lye Safety and Ingredients” Before attempting to make the soap demonstrated in this video.
While you’re at it – maybe you should watch the second video “Basic Terms” so you are fully prepared to make a successful batch of CP soap.
In this episode of Soap Queen TV learn what terms like Ricing, Seizing and Acceleration mean. This is the third episode in my How to Make Cold Process Soap series and it’s all about how to use fragrances and essential oils in your CP soap and what to watch out for.
Are you a blogger? Please feel free to embed this video on your blog. If you need any help, just let us know! [email protected]
Music: PsyWoofers’ “Dancing 4 Joy”
Filed Under: Tips & Tricks
Check the other Bramble Berry resources on soapmaking…
Filed Under: Business Musings
Bramble Berry customer service received super inspirational email the other day from Miranda Coggins, the owner of The Lano Company, where she sells the booming LED Lip Gloss Line. The coolest part is that she’s a Bramble Berry Customer. We’re so proud! Check out the press release below and thanks for letting us share this, Miranda!
Raymore, MO – The Lano Company experienced such an explosion of business after their Fall launch of the Pure Illumination LED lip gloss line, they had to get creative. Once a business that owner Miranda Coggins developed from her stovetop and ran from a home office, now has grown to exciting levels!
“This winter when gloss orders were pouring in, I had to figure out how to fill over 10,000 glosses by the end of the week!” Owner Miranda Coggins states. The days of filling 300 glosses in an afternoon with her girlfriends, had quickly come to an end. As exciting as the need to fill thousands of glosses, Miranda also found it quite daunting! Her team got creative and started recruiting stay-at-home Moms and both recently unemployed men and women from their local community.
The first day was trial and error, but by the end of the month, and 40,000 glosses later, the system was nearly perfected! Instead of three girlfriends around the small kitchen counter, the crew was now moved to the basement bar-top with a crew of close to 20! “Initially we thought finding that many people available to work in the middle of the day would be difficult!” said Miranda. She soon learned, there were many in her community that enjoyed the opportunity. They recruited a few close friends, and soon the news spread! People came together to not only work, but to support Miranda and their love of the product she had developed.
Raymore, Missouri is a small community where some might say, “everyone knows everyone!” In this instance that’s been a positive thing! Miranda and Layne, her husband and business partner, have lived in Raymore for over 20 years. When the success of The Lano product line spread, everyone knew of Miranda and she was soon affectionately coined, “The Lip Gloss Lady.”
“I think the combination of Miranda’s outgoing personality and devotion to her gloss definitely helped her recruit us to be a part of the excitement!” Carrie McGrew, family friend and lip gloss filler said . Curiosity of how lip gloss is made, poured and packaged intrigued many to give it a try as well.
“I worked the first day basically because I loved the product and wanted to help, but now it’s nice to feel like I’m a part of something exciting!” Said Ashley Lorenc, a repeat gloss filler. The community has a sense of ownership and pride when it comes to their Pure Illumination lip gloss. Walk into the local “pub” and ask about light up lip gloss and more than one person can tell you about Miranda and they probably have a Pure Illumination gloss in their purse!
The Lano Company has also become involved in community Fund Raising, working with the Missouri PTA, several salon distribution companies and of course their nationwide vendors.
To find out more about Miranda Coggins, The Lano Company and her Pure Illumination Line, contact her at (816) 809-9453 as well as by email MirandaCoggins(at)Comcast(dot)net. The website has extensive information and several other products at www.TheLanoCompany.com
Filed Under: Bramble Berry News
My number one amazing tip from the class though? Use a paintbrush, dipped in water, to get a smooth shiny finish on your cupcake frosting. Then I got to take all of the cupcakes to my birthday party where they were quickly gobbled up! It was such a festive way to make an entrance.
Filed Under: Cold Process Soap
Here is Stevie’s First Cold Process soap all popped out and looking absolutely fabulous. Yellow Oxide + Cappuccino Mica + Super Pearly White = Sophisticated Candy-looking Soap Bars.
Here is the recipe we used for the mini 9-bar-World’s-Best-Mold batch:
Filed Under: Bramble Berry News
Filed Under: Personal Ramblings
Have you seen Bramble Berry’s new Baltic Birch Molds? If not, check them out HERE. I love them SO much. They are stunningly gorgeous, so versatile and selling fast (we’re seriously having trouble keeping them on the shelves). And you can use them for more than just cold process. Here’s a colorful and fun melt and pour project!
Before you start: Line your mold with freezer paper making sure that you have a flat bottom with the shiny side up. Remember that the bottom will eventually become the top of your soap. Once your mold is lined, add the side and end border pieces and put your inserts together so they’re ready to go to.
ONE: In a large microwave safe container, melt about 32 ounces of clear soap base. Once the soap is completely melted, add 1 drop of liquid blue colorant to give the soap a “clear” effect (just one drop will do the trick). Do not add any fragrance at this point.
Note: You will only need a couple of ounces for the initial pour so if you don’t have a microwave safe container that big, it’s a-okay. Just melt 1-2 ounces. To save time, I like to melt my soap in larger quantities.
TWO: Pour a thin thin layer into the mold (about 1/8″ thick) and spritz the soap with alcohol while your pouring. This will help the soap spread out into the mold.
THREE: Before the soap cools, quickly place the inserts into the mold, squeezing the ends with your fingers to hold them together. Press the inserts firmly into the soap and let cool for 15-20 minutes, until the clear layer is totally hardened and the dividers are ‘sealed’ in the soap.
Embedding Tips: Spritz the first layer of clear soap with rubbing alcohol and pour another thin layer of clear soap (you might have to remelt your original clear soap). Liberally spritz the embedding object (whether it be soap scraps or toys) with rubbing alcohol and place it into the freshly poured clear soap.
FIVE: Once the embedded layer has cooled, add the final layer of soap with color* and fragrance. I used a combination of Energy Fragrance Oil, Grapefruit Essential Oil and Yuzu Fragrance Oil. I always recommend .25 -.5 ounces of fragrance per 16 ounces of soap base. When pouring your layers, remember to spritz the embedded layer before pouring your colored layer. Also make sure your colored soap is no hotter than 120 degrees; we don’t want to melt any of your other soap layers.
All of my soaps turned out different ranging from 3.2-5.6 ounces (using 89 ounces total) so have fun and make any size that you want!
Unmolding: Place a large cutting board over the top of your mold and gently flip the soap mold over onto a hard surface. Lift the mold off of the soap and slowly remove the freezer paper from the soap. I used the scraper tool from the Tool Kit (a non serrated knife or small spatula would work) to scrape the soap off the edges of the border pieces. Then slowly pull the sides of the mold away from the soap (Note: If you ever use this mold to make Cold Process soap, you cannot pull the sides from the soap as CP soap is softer and tends to tear). Pop out your soaps and marvel at your creativity.