
Moonstruckmagic has a great Rebatching Tutorial on her site here. If you’ve ever wondered about rebatching soap, she’s even got pictures of all the stages. Click here to be taken to the tutorial.
Tutorials on soapmaking, bath fizzies, lotions and more
Thanks Blissfully Domesticfor finding this little smile-inducing gem.

Thanksgiving is next week! (Public Service Announcement: Bramble Berry is closed from Thursday November 27 to Monday December 1. But, I’ll be working at Otion on the 28th so stop by if you’re in town.) You’re probably preparing to either go to your in-laws or for them to descend onto your house. If you are looking for a fun family project to do together, or perhaps something to entertain your long-lost-cousin who just wants to hide in the corner, this is the seasonal project for you. Plus! It’s an easy beginner’s project so even though the final product looks complex? It just requires you to follow directions.
Items needed:
Jelly Roll Pan
Festive Seasonal Cookie Cutter
Clear Melt and Pour
Soap Kit Syringe Injector
Micas in Fall Colors
Spritzer full of Rubbing Alcohol (Isopropyl Alcohol)
Fragrance (suggestions: Pumpkin Spice, Gingersnap, AppleJack Peel, Rum Nut Cake)
Step One
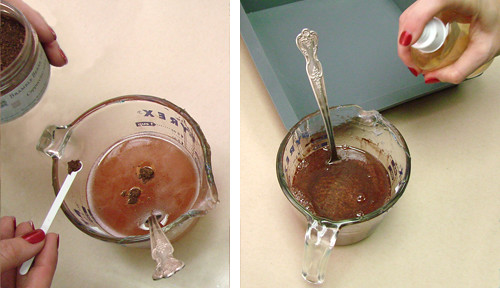
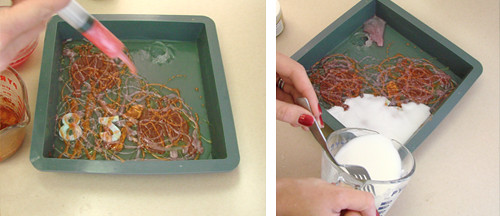
Prepare the Soap for the cookie cutter portion. We used Cappuccino Mica color in clear soap, scented it with Rum Nut Cake. The Jelly Roll pan uses about 8 ounces of melt and pour soap to make a thin layer (thin enough to push through, that is). To prepare your soap, melt it in the microwave on 30 second bursts. Color your soap to preference and add about .13 – .25 ounces of fragrance. Stir well.
Step Two
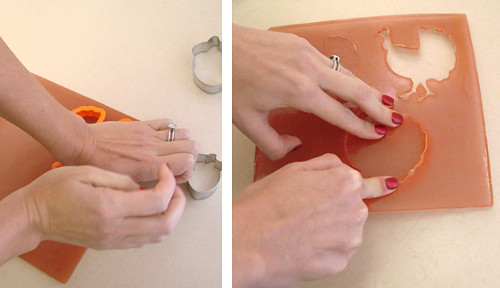
Pour your soap into the Jelly Roll silicone pan. Spritz with a finishing touch of alcohol. Allow to harden.

Step Three
Gently peel the soap out of the mold. Use your cookie cutter to press out Fall holiday shapes.
Step Four
Prepare your clear soap. Melt the soap in 30 second bursts. Once it’s melted, add fragrance. Be sure to choose a non-yellowing fragrance or at least a fragrance that stays clear.
Step Five
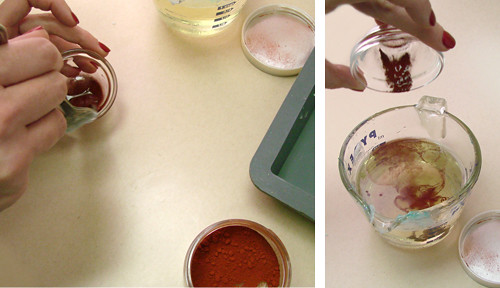
Pour off a little of your fragranced, clear soap into 3 little pots. You want .5 ounces to 1 ounce of soap per pots. Bonus points if your pots can be reheated in the microwave. Color each of these with a fall color. You want these to be bright vibrant colors so they really stand out.
Step Six
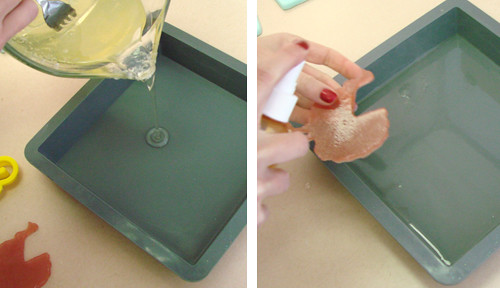
Pour a thin layer of clear soap into the bottom of the Jelly Roll Pan. Wait for soap to harden.
Step Seven
Spray the thin layer of clear soap liberally with alcohol. Spray your turkey (or other fall cut out soap) liberally with alcohol. Place the turkey down on the top of the clear soap.

Step Eight
Take your Soap Syringe/Injector and draw up a syringe full of colored soap (remember those little pots of colored soap? Now is the time to use them! If they’ve solidified, it’s okay, reheat and remelt). Pretend you’re Jackson Pollock and start drizzling. Alternate colors. Spray some more rubbing alcohol. Alternate more colors. Syringe, soap, syringe, soap, syringe. Let this masterpiece harden.
Step Nine
Prepare your background soap. It can be any color you want (we used green, gold, white and ivory – they all looked great!) so long as the drizzles stand out from the rest of the soap in a dramatic and impressive fashion. Spray your Pollock strings with alcohol. Make sure your overpour soap is around 120 to 130 degrees so it doesn’t melt your design. Pour the overpour soap gently over the entire pan, filling it 7/8th to the top or as thick as you want your soap to be.
Step Ten
Wait for the soap to harden. This will take at least an hour if not longer. It’s a thick slab of soap at this point. Gently peel out of the mold and cut into squares. I used the handy dandy scraper cutter but you could use a butcher knife.

Wrap in saran wrap, give away at Thanksgiving or use these for fun and easy place settings. Stick a skewer in them to make a sign.

Thanks CosmoGirl.com for including the Bramble Berry DIY Perfume kits in their Christmas Gift round up. We agree – the DIY Perfume Kit is ideal for your sister (or your best friend. Or your mother. Or, your teacher. Or the doorman. Or your dog walker. Or the nice checker at the grocery store. Or your barista at Starbucks). It’s probably ideal for a lot of people on your list. At just $24.95, it makes each perfume less than $3 each, including shipping! Get it hereand make everyone on your list a DIY convert.
 We have named our second free Mineral Makeup Eyeshadow recipe in our Holiday series Champagne Glimmer. It’s a shimmery pink blend with nice peachy undertones that seems to complement many skintones.
The recipe:
3 parts Sericite
2 parts Peach Shimmer mica
1 part Sparkle Violet mica (Sparkle Violet Mica will be discontinued when supplies run out. You can use Super Pearly White Mica instead).
1 part Rose Pearl mica
We used our mini pigment scoops for the parts – but you can use whatever measuring tool you have handy.
Blending directions: Place everything in your container (we like to use the classy black lip pots) and mix well. That’s it!
 Foiling Technique: Here’s how you can get a little extra shimmer and shine from your handmade eyeshadow blends.
Dip your makeup brush in water and then in the eyeshadow. The eyeshadow powder will stick to your brush. Then use a surface (like the lid of the container) to blend up the eyeshadow and water. You want a smooth flowing blend, not a paste.
 Step 1: Apply your favorite foundation to your eyelids and around your eyes – blend in well. If you have more mature eyes, a dab of moisturizer under the foundation will help the foundation go on more smooth and even.
Step 2: Paint the wet Champagne Glimmer onto the upper lid. Be sure to look down until it dries so you don’t get eyeshadow where you don’t want it!

Step 3: Apply liquid liner to the the upper lid (for the example real life photo, we used a blend of our brown oxide and black oxide and used the same foiling technique with water). Smudge a deep brown eyeshadow along the lower lash line and apply Mascara.
And that’s it! I have to admit, this isn’t a look I’ll be sporting this season. But maybe some of you more adventurous types will give it a shot and send us photos?
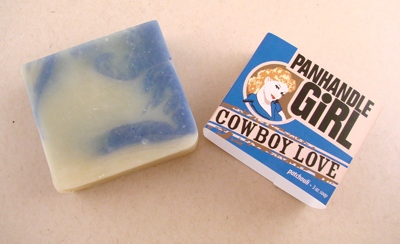
 My most recent soap purchase was from Panhandle Girl. I chose them based on their cheeky website and crafty product names. When the package got here, it did not disappoint. I can’t get over how put-together their packaging is. Of course, their products are pretty swell too! Given that they promise “fiercely fabulous products” on their site, I wasn’t surprised.
I purchased the Take-Out To Go-Go gift set with 3 bars of soap – my choices were Cowboy Love, Cowgirl Love and Hot Tamale along with a bar of the Mermaid Power Ginger-Lime soap and jar of the Bettie Spice Body Creme. And of course a Queen Bee lip balm (how can I pass up anything with Queen in the name?)
I love the creative use of the take out containers as well as the adorable logo! When Panhandle Girl confirmed by order via email, the email they sent was laid out perfectly, with matching branding and colors. It put the Bramble Berry shopping confirmation email to shame (hanging head. I vow to change this in the new year. Thanks for the kick in the patootie, Panhandle Girl).
I’m using the Cowboy Love Patchouli soap in my shower right now. It smells very strong and cleans with large bubbles. Every Cowboy and Cowgirl, even if you’re not home, home on the range, should check out Panhandle Girl. You’ll love their well made, unique, retro-glamtasticly hot products.
 Do you Twitter? If you don’t, you should. If you don’t know what Twitter is and don’t know why you care, check out the post that Michael Hyatt from Thomas Nelson Publishers wrote wrote about it and then go set yourself up. Our Twitter name is “Brambleberry.” We’d be delighted if you joined our merry group of Soapy Twitter Friends.
If there was any doubt about the validity of Twitter as a the next form of crowd consensus and movement, the #MotrinMom debacle from today pretty much crushed it. Don’t know about the MotrinMom debacle? It’s okay. As of a few hours ago, Motrin didn’t either.
The details aren’t all that important (but if you really care, there’s a round up here or here). The outrage will be lost in the shuffle and the next headline will replace the indignation that slingwearin’ happy mammas are feeling right now. And eventually, everyone will go back to buying Motrin.
But for now, there’s a lesson in this debacle for anyone running a business: Brand Management Matters. Do you know what people are saying about you online? Are you monitoring MySpace, Facebook and Twitter for mentions of your name?
![]() If you don’t have an official (and ominous sounding) Brand Management Strategy, take these simple steps right now and start being proactive about protecting your reputation:
If you don’t have an official (and ominous sounding) Brand Management Strategy, take these simple steps right now and start being proactive about protecting your reputation:
1. Start a Twitter account. It’s painless. It’s free. And, it can be a great connector, should you choose to use it.
2. Monitor your brand on Twitter here. Don’t get all uppity and defensive if someone has an issue. Take care of it openly, honestly and with an attitude of humble servitude. If you’re not willing to check your ego at the door, forget I said anything about brand management and go back to your comfy hiding space under your big rock.
3. Monitor your brand with Google. Set up a Google Alert. Better yet, set it up for your name, your business name and any major competitors you’d like to track.
That’s it. You just started an official Brand Management Strategy. It’s painless. It’s easy. And, it’s done. When you are graciously given an opportunity to improve on your customer service, think of it as a gift and a blessing. After all, before tonight, you wouldn’t have even known anyone was saying anything about you. And now, you have a chance to correct it before it becomes the next #MotrinMom debacle.
(You did do everything I just suggested, right?)
 I recently received a new boxful of soapy inspirational goodness! Have you every seriously contemplated taking a little nibble out of some soap because it smelled that good? .
If edible, soapy sensations are your thing, look no further; introducing Cinnamon Toast Soap from French Hill Country. I love love love this fragrance. The little fortune cookie shaped soaps came in the cutest “to go” container. And no, I didn’t take a bite despite the urge.
 This Lily of the Valley soap from Rain Barrel Soaps smells heavenly too. I don’t want to eat it but the scent gives me a calm and fresh feeling every time I use it. It has a great fluffy lather too. The calming fragrance combined with the copious bubbles makes for a luxurious shower. The packaging is also unique and adds to the natural, handmade message Rain Barrel Soaps promotes.
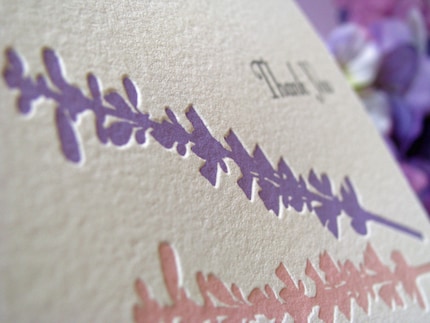
 This Lavender Mint from Dandy caught my eye because of their simple yet effective packaging. They did a marvelous job with their labels. It looks very professional and classy. The Lavender buds are a nice addition. They add texture and feel without overburdening the bar with too much scritch and scratch.
Today was a busy day at the office. With Christmas-Gift-Giving season in full swing, Bramble Berry is very blessed with an abundance of orders (thanks everyone!). I’m very excited about some of the projects that we’re working on for Christmas; (shhhh, there’s a possibility that some may appear first on the Martha Stewart Radio Show … I’ll keep you posted)and I can’t wait to share them with you.


I’m excited to announce the launch of our new Bramble Berry DIY Foundation Kit. If you are currently buying mineral make up foundation, you’ll be pleasantly surprised at how much product this $39 kit makes. It will make enough powder to last you for a year (or even two). You can even use your customized color to create a tinted moisturizer, foundation or a concealer.
UPDATE: This kit has been discontinued. Click here to browse more kits.
If you missed the first part of this Christmas Soap Gift Series Tutorial, click here.
I am going to show you how to make those lovely loopy swirls in cold process soap. There are other ways to do it, but these are good starter instructions that will help get you started down the path of creativity and adding colorful designs to your soap.
 Step 5 Pour your soap mixtures alternating colors with each layer. I do about three to six layers depending on the depth of the mold. Ideally, you’d like to get two layers of each color, minimum.
 Step 6 Using a kitchen knife, putty knife or a chopstick, snake through the soap in an up and down ‘S’ shape making short, squat ‘S’ shapes in the mold. Once that is done, drag your implement through the soap in two or three long, straight lines to make the finishing beautiful top design.
 Step 7 Wrap up your soap to insulate it – we use wax paper and then wrap in old towels. Let your soap set-up in the mold for a couple of days until it’s hard enough to take out. You can either allow it to cure in a loaf shape or you can slice your soap and cure them in bars. Cure time will be about 4 to 6 weeks. Make sure that there is good air flow to the entire soap (whether in a loaf form or bar form), turning the soap at least once a week. Store in a dry, room temperature or slightly cooler, place.

Step 9 – After four to six weeks of cure time, package and give fabulous handmade soap to all of your favorite people!
Want a label like the the one in the picture above? We have free PDF’s for you to download and print. Click here for Christmas Forest labels, Fresh Snow labels, Cranberry Fig labels, or Cinnamon Sugar labels.
Looking for other easy and inexpensive Christmas Gift Ideas? Click here for this year’s Christmas Gift Ideatutorials.

Thank you to editor Amanda Flores from Family Circle for not only using our Mineral Makeup Eye Shadow Kit but making shades for her co-workers! That’s our kit and the shades Ms. Flores made up on the right hand side of page 74 in their November 29 issue. She says,
“I could spend hours trying every eye shadow in our beauty closet, but when I discovered the Bramble Berry Mineral Makeup Eye Shadow Kit, $45, I undercovered a whole new passion: making my own! It stocks everything you need to create any shade. Just mix the pigments with the color adjusters to control the consistency and shimmer until you reach the hue you want – say, a blue-gray that’s not too matte, not too shiny.”

I’m getting back to my roots with this project, an unofficial “Gift Series” addition. My first true love will always be Cold Process Soapmaking despite my propensity to do melt and pour and all manner of other fun toiletries. For this unofficial Gift Series project, I created a soap recipe that will fit in our 5 pound wooden mold.
 Step 1 Weigh out all of your oils and make your lye solution (remember, always add the lye to the water). Stir the lye into the water taking precautions to not breathe in the fumes. Always use stainless steel or high temperature plastic for your stirring implement. Set the mixture to the side. You can put the lye water mixture outside if you are not in a well ventilated area. Make sure that small children and pets are not underfoot during this process. If you missed Konnor’s story about lye burns, click here to read it. Lye solution is caustic and can easily burn skin and damage eyes (you are wearing your eye proection, right?). Prepare your mold (this is a good time to line it if it requires lining). You want to have all of your tools ready and everything within reach.
 Step 2 Melt your oils and mix them all together. Add your lye solution and blend. Many soapmakers like to have their temperatures within 15 degrees of eachother for the lye water and the oil. If you’re a newbie, stick with a 105 to 115 range for your lye water and oils. I strongly recommend using a stick blender to help speed up the process. You’ll be blending for between two and five minutes before the next step. It will vary a bit based on your temperatures, blender and size of bowl.
 Step 4 Mix in the color with your stick blender until all the clumps are gone and you’ve achieved the color you want. Next, quickly hand stir in your fragrance to each container. Mix again and get ready to pour!