Are you ready to get creative with a new cold process technique? Then this is the project for you. I got a little crazy and experimented with a third divider in the vertical mold. And to get even more creative I added powdered goat milk to the recipe. Powdered Goat milk is easier to use and store than fresh goat milk and is very quick to mix-up when using our little mini-mixer tool. You’ll also notice in the instructions that I added the goat milk at trace, which is an easy way to add the goat milk without turning the soap brown. Oh…and if you’ve never used Apple Jack Peel, you’re in for a real treat! Enjoy!
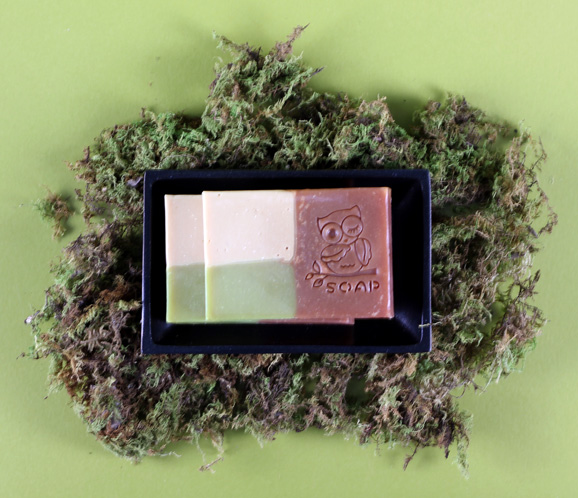
Tub Time: Goatsmilk Bath Tea
This simple, four ingredient recipe only has 4 steps, making it easy to whip together a luxurious bath after a hard day on your feet. What’s so great about goatsmilk?
Goatmilk is particularly moisturizing and nourishing to the skin because of capric-caprylic triglyceride. Capric-caprylic triglyceride is an effective skin moisturizer that helps to contribute to skin softness by forming a barrier on the skin to help inhibit the loss of moisture. It is the only milk that contains naturally occurring capric-caprylic triglycerides. The protein strands of goat milk are shorter than other types of milk and are more readily absorbed by skin.
Goatmilk also has naturally occurring lactic acid that helps keep skin smooth by encouraging skin turnover (it acts similar to a gentle peel). It also contains many vitamins, specifically A, D and B6, as well as the anti-oxidant Selenium.
Soap Queen TV Makes Soap for a Gardener
Learn to make a soap that is perfect for scrubbing those green thumbs clean! In this episode of Soap Queen TV, Anne-Marie shows how to make a beautifully layered soap using 2 kinds of natural exfoliants – Walnut Shells and Shredded Loofah. This project is perfect for that gardener in your life or just someone who needs a little extra help getting those little piggies clean! And if you’ve ever wondered about our tray molds, this episode shows just how easy it is to make 8 bars of soap at once.
Make Gardener’s Soap from Soap Queen on Vimeo.
We’ve created a kit with all of the ingredients you need to make the soap in this video. You can make at least 8 bars of soap with our kit. Buy it NOW!
In this episode, Anne-Marie uses:
- Shea Melt & Pour Soap Base
- Goat Milk Melt & Pour Soap Base
- Clear Melt & Pour Soap Base
- Walnut Shells
- Liquid Green Oxide
- Shredded Loofah
- Grass Stain Fragrance
- Sweet Grass Fragrance
- Fresh Zucchini Flower Fragrance
- Handmade Tray Mold
Peppermint Bark Soap for the Holidays
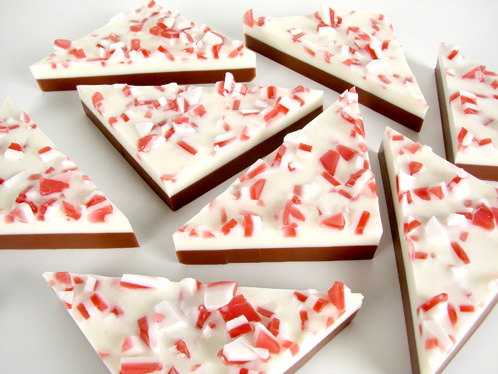
It’s time to officially kick off the holiday season with our first Christmas tutorial of the year! Keep it clean this holiday with delicious smelling and realistic looking Peppermint Bark Soap.
- White Melt and Pour
- Clear Melt and Pour
- Goat Milk Melt and Pour
- Dark Rich Chocolate Fragrance Oil
- Peppermint 2nd Distillation Essential Oil
- Perfect Red Color Block
- Brick Red Oxide
- Liquid Brown Oxide
- Liquid Black Oxide
- Melt 5 ounces of white soap base and pour it into the silicone tray mold and let cool. Then melt 5 ounces of clear soap base and mix in Perfect Red Color Block and Brick Red Oxide (2 parts Perfect Red and 1 part Brick Red Oxide makes a perfect candy cane red). Pour the red soap on top of the white soap and let cool. Make a slurry with your red oxide by mixing it with a little rubbing alcohol before adding it to your soap. This will eliminate speckles.
- Unmold the soap and cut into small, irregular pieces. These are going to be the peppermint crumbles on top so uneven cuts make them look super realistic.
- Melt 16 ounces of clear soap and mix in ½ ounce of (delicious) Dark Rich Chocolate Fragrance Oil. To make the realistic chocolaty color, combine Liquid Brown Oxide with a skosh of Liquid Black Oxide. Let cool.
- Melt 16 ounces of white Goat Milk soap base and mix in ½ ounce of Peppermint 2nd Distillation Essential Oil. Let cool to 130 degrees, spritz the “chocolate” layer with rubbing alcohol and pour about 12-13 ounces of the goat milk soap, saving 3-4 ounces (you can totally eyeball the amount, just make sure to save a little bit).
- Once the soap has cooled, remelt the remaining 3-4 ounces of goat milk soap base to 130 degrees. Start spritzing your “peppermint” pieces with rubbing alcohol and get ready to sprinkle them on top of the final layer of soap. Spritz the top layer of soap and pour the remaining 3-4 ounces of goat milk soap then sprinkle on your “crushed candy cane” garnish.
- Once the soap has cooled, cut the soap into triangles and trick your friends into taking a bite of delicious Chocolate Peppermint Bark.
Goaterific!
Happy Monday! Even though today was a super duper busy day, I managed to squeeze in a little Etsy shopping from Kristy’s Lovely Lathers. Now I just have to patiently wait for my “Luxurious Artisan Goat’s Milk Soap” to arrive. In the mean time, check out the incredibly amazing (and artistic) soap that is in route!
Greetings from Goat-Land!
Hello from sunny California where Marie Gale (President of The Handcrafted Soap Makers Guild) and I are judging the *best* Goatsmilk Soap in America. That’s Marie Gale on the left with just a fraction of the soap that we’ll be evaluating for color, creativity, hardness, lather and more. We evaluated about 60 bars this morning just on subjective things like fragrance and looks.
This afternoon, we’ll be starting to lather up with all of them after we tongue test every single one of the for excess lye. That’s sure to be a hoot! Expect a full write up this evening or tomorrow morning of our fun and soapy day.
On Thursday, I’ll be teaching Cold Process I & II, Lotion Making 101 and Marketing for Small Business. If you’re near Rohnert Park, California and would like to come, check out the American Dairy Goats Association Website for more information.
We’re off to go lick 80 bars of soap now … yummy!
Goatsmilk Soap Judging!
For that test, we tested each bar of soap for weight in grams. Then strung the bars up with grommets and BBQ skewers. Those bars soaked for a full 2 hours before draining for 15 minutes. Then, every bar was reweighed and a mathematical calculation was done to see the % of water each bar absorbed. If the soap absorbed too much water, it was deemed a soft bar of soap that would disappear in the shower. The Soap Guild suggests an absorption rate of 5-15% is average. Some of the bars absorbed up to 45% and still others totally disintegrated.
This process looks easy. It wasn’t. Cutting and weighing and screwing the bars took hours. Hand screwing the hooks in caused some feelings of numbness and carpal tunnel onset.
We had to tongue test every bar for lye bite. It was horrific. Eighty bars of soap tasted terrible. I almost threw up multiple times. We did this in a public restroom with the manager coming in every 25 minutes telling us to leave immediately. It was the ultimate negotiation trying to get her to let us stay in the bathroom. “Please, just another 30 minutes? Under what circumstances could we stay another 30 minutes?”
It is amazing how badly we rated some of the bars for lather and residue. Those same bars scored poorly on the water absorption test as well, absorbing much more than the suggested 5-15% rate. The fact that, scientifically from a water-absorption rate, these bars were poor coincided impressively with our subjective ratings on lather, residue and feeling when using. It showed us that science matched gut instincts, at least with goatsmilk soap.
The winners will be announced tonight. We’re excited. Harriet and I don’t know who wins. We just know what the random # is. After 12 hours of testing, we can’t wait to see who the winner is!
Using 3-D Molds – Set Up
This week’s blog postings will be a daily series on using Heavy Duty 3-D Molds ($6.50 – 8.00 each) and soap ropes along with the normal random musings about business and soapy self-employment.Using the Heavy Duty molds is convenient because they withstand very hot 165 °F sustained oven temps and 180 °F degrees poured-soap temperatures (sorry, you in-the-oven-hot-process soapers – not that hot!). They are made out of a food grade 60 ml plastic. You can make really large chocolate or marzipan goodies in them as well!
The 3-D molds come with two sides. Snap both sides together, making sure to match up the pouring spout on the top. If you accidentally put one side of the pouring spout on the bottom, your mold will not seal and soap will come rushing out the bottom, all over your table. Once the molds are snapped into place, simply slip the large rubber bands (included with the mold) around the mold to ensure a tight fit.
Because of their large open pour spout, 3-D molds are perfect for using soap ropes! Soap Ropes are a fun throwback to the past and handy for hanging soap up in the shower (no goop on your soap dish!). Using a hanging soap ensures that your soap will dry out faster and thus, last longer. Bramble Berry’s soap ropes are made from a braided nylon rope, measure 9 inches tall and sell for $1.15 each. The ropes are sealed with a plastic tab at the bottom, making them easy to insert into the open pour spout.
I used extra nourishing Goat Milk Melt and Pour for this project. Notice the soap has a slightly ivory or off white look. This coloring happens because of the goat milk. It’s easy to color over the yellow tint, as long as you remember that you are starting with a slightly yellow palette and not a pure white. Colors like purple are difficult to achieve when starting with a yellow base.
Here is the entire set up: Soap Ropes, Fragrance, Labcolors (water soluble and easy to mix in), the assembled soap mold, a sharp knife, a cutting block and my chopped up goat milk soap. Check back tomorrow for tips on melting, pouring, and fill line tricks as well as a contest (with prizes!).