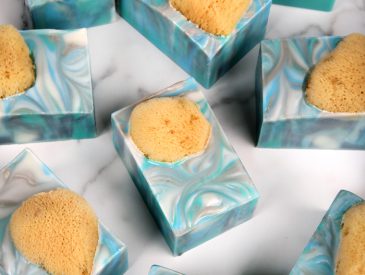
Sea Sponge Cold Process Soap Tutorial
New silk sponges give this cold process recipe a beachy look and creamy lather.
Ingredients
- 9 Bar Birchwood Mold
- Silicone Liner for 9 Bar Mold
- 9 Silk Sea Sponges
- 9.5 oz. Coconut Oil 27%
- 2.5 oz. Cucumber Seed Oil 7.1%
- 2.5 oz. Mango Butter 7.1%
- 11.2 oz. Olive Oil 31.8%
- 9.5 oz. Palm Oil 27%
- 5 oz. Sodium Hydroxide Lye
- 10.4 oz. Distilled Water 10% water discount
- 2.2 oz. Sea Salt Fragrance Oil
- Hydrated Chrome Green Pigment
- Caribbean Blue Mica
- Jagua Blue Extract
Instructions
FRAGRANCE PREP: Measure 2.2 ounces of Sea Salt Fragrance Oil into a small glass container and set aside.
COLORANT PREP: In separate containers, disperse 1 teaspoon Caribbean Blue Mica and 1 teaspoon Hydrated Chrome Green Pigment into 1 tablespoon of lightweight liquid oil such as sweet almond oil or sunflower oil. Use a mini mixer to get rid of clumps. Then, mix together 1/2 teaspoon of jagua blue extract with 1/2 tablespoon of distilled water. Be very careful with this mixture – it’s highly concentrated and will stain skin and other surfaces. Use a small spoon to mix together the jagua blue extract and water. If necessary, you can use a mini mixer to help get rid of clumps. We recommend covering the container with your hands if you use the mixer, it can cause the water to spray.
SAFETY FIRST: Suit up for safe handling practices. That means goggles, gloves, and long sleeves. Make sure kids, pets, other distractions, and tripping hazards are out of the house or don’t have access to your soaping space. Always soap in a well-ventilated area.
- Slowly and carefully add 5 ounces of lye to 10.4 ounces of distilled water. Gently stir until the lye has fully dissolved. Set it aside to cool. If you’d like a harder bar of soap that releases faster from the mold, you can add sodium lactate to the cooled lye water. Use 1 teaspoon of sodium lactate per pound of oils in the recipe. For this recipe, you’d add 2 teaspoons sodium lactate.
- Melt and combine 9.5 ounces of coconut oil, 2.5 ounces of cucumber seed oil, 2.5 ounces of mango butter, 11.2 ounces of olive oil, and 9.5 ounces of palm oil into a large container (remember to fully melt then mix your entire container of palm oil before portioning). Once the lye water and the oils have cooled to 130 degrees F or below (and are ideally within 10 degrees of each other), add the lye water to the oils and stick blend the mixture to a very thin trace.
- Split the soap into four containers of the following amounts. Then add the following amounts of dispersed colorants and use a whisk to fully mix them in.Container A (300 mL): UncoloredContainer B (300 mL): 2 tsp. dispersed jagua blue extractContainer C (400 mL): 2 tsp. dispersed Caribbean Blue MicaContainer D (400 mL): 2 tsp. dispersed Hydrated Chrome Green Pigment
- Pour the 2.2 ounces of Sea Salt Fragrance Oil equally into all the containers (it’s okay to eyeball it). Use a whisk to fully mix in the fragrance oil.
- Pour some of the first color (it doesn’t matter which) into the mold in long S-curves lengthwise. Pour some of a different color in the mold, still going lengthwise. Continue pouring alternate colors lengthwise into the mold. If the soap starts to thicken, mix with a whisk to loosen it up.
- For the first few passes of color, the order doesn’t really matter. Once the mold is about halfway full, take more care to differentiate the colors to make a more distinct pattern when you swirl them. Once you get to the top of the soap, pour so that each color is showing.
- Once all the soap is in the mold, tap the mold firmly on the counter to get rid of bubbles. Insert a chopstick or dowel into the very top of the soap and drag the tool so that it crosses the lines created by the soap. Continue this S-curve pattern down the length of the mold until the entire soap has been swirled.
- Insert the chopstick again, and move it up and down the mold in small wavy-lines.
- Insert the dividers into the soap so that the dividers reach the bottom of the mold in every section. This drags the design down the sides of the bars. If you prefer to cut your bars, you can skip this step.
- Insert a dry silk sea sponge into each bar. We placed most of them towards one side of the bar, to allow the swirl to be seen.
- Spritz the top of the soap with 99% isopropyl alcohol to prevent soda ash. Cover the mold to insulate and promote gel phase. Gel phase helps the colors of this soap pop and it helps the bars release from the dividers faster and more easily. If you live in a very cold climate, place the mold on a heating pad set to medium for about 30-60 minutes to help raise the temperature and promote gel phase.
- Allow the soap to stay in the mold for 2-3 days. To remove, pull the silicone mold out from the wood mold. Then pull away the sides of the silicone mold to break the airlock. Push the soap from the bottom to release. If the bottom of the soap is still quite soft, allow the soap to harden upside down in the dividers for one day. Once firm enough to handle, gently remove the soap from the dividers. To prevent tearing, do not pull the dividers. Push the soap down, or slide the dividers up or down to remove the soap without tearing. This video shows that process in more detail. Allow the soap to cure for 4-6 weeks, and enjoy
Tried this recipe?Let us know how it was!